What could possibly be better than a hardcore gaming computer housed in a custom-made Lego case? Well, I’m sure there are a few things, but for a lot of gamers, the fusing of computer gaming with Lego is probably pretty high on the list of things to geek out about. Just what does the Lego Gaming Computer do differently than every other computer?
Here’s a brief list of just some of the features the Lego Gaming Computer has to offer…
-Entirely new form factor built around cooling performance
-Custom graphics card cooling that achieves the performance of water cooling – using just air
-Enhanced processor cooling beyond what any conventional air cooled case can offer
-Increased overclocking potential from better cooling performance
-More stability, durability, and performance through custom power supply modifications
-Complete cord control, hidden away inside of the system
-Better total system cooling with every component being actively cooled through individual fresh-air inlets
-Oh, and in case I forgot to mention, it’s made from over 2200 pieces of real Lego!
So if any of those features pique your interest, then continue reading to find out just how the Lego Gaming Computer makes it all possible.
Gaming Origins
For a certain subset of people there exists a second reality that coexists with our own. It is one that mirrors ours in many ways, but it is also a world that diverges from the one we know dramatically, to travel down the most spectacular and amazing paths you could ever imagine. Vast galaxies and universes unfold, where mystical beings come to life; armies march against each other and forgotten kings lay claim to lands of treasure and beauty; heroes and villains battle it out until only one survives. And in this fantastic reality, you get to be in control of the how the story plays out. This is the world of a gamer. It’s a place to lose yourself into completely. And if you’re not careful, sometimes you go so deep down the rabbit hole that the game world and reality start to blur.
As I kid I used to spend hours playing games – Atari, Nintendo, Sega, and so on and so forth. The extended gaming sessions started to bleed over into real life. No longer did you simply eat a meal – no, instead you filled your health bar. No longer did you just enter a room – you now wondered what hidden artifacts or clues existed in that space to get you into a secret area. Sounds became linked in your head with levels and special moves. Hours – days even – were spent mastering a certain element of the game, and you’d be so engrossed in your work that you would sit in school playing it over and over again in your head, just waiting for your next gaming session.
Over the years of playing games I started to learn all the peculiarities of a system – the way the cartridges like to fit into the NES tray, the way the CDs stutter at first on Sega CD before loading. It wasn’t until my family finally owned a computer in the 90s that I was introduced to an entirely new way to game: the PC. My first forays into PC gaming involved Wolfenstein, Doom, Duke Nukem, Warcraft, Sim City, Star Wars X-Wing, Mech Warrior, Baldurs Gate, and so many more. At some point during my immersion in computer gaming, I discovered Myst at Best Buy (I know, forever ago). Studying the box, I was intrigued by the fact that I couldn’t exactly figure out what the game was about, or how it really worked. I think it was around this time that I had finally gotten a set of speakers for the family computer, and I was excited to try them out. I arrived home, fired up the system and popped the game in. I waited patiently through all the installs and setups and everything, and finally, the game got going. I stepped onto the island and started to wander, with the new stereo speakers and the realistic graphics, I felt like I was there. The room I was in vanished, and I was on the island. The combination of the gameplay, mindboggling puzzles, perpetual wandering coupled with fantastic sound quality really made me feel like I was there. I had moved beyond playing a game; I was immersed in a different world.
That experience shaped my path into computer gaming, and from there I played everything I could get my hands on – Starcraft, Tomb Raider, Quake, Unreal, Half-Life, Descent, Age of Empires, GTA and on and on. It was also during this time that I became fascinated by computer hardware and building computers to improve my gaming experience. Initial upgrades were simple, like a 3D soundcard and then a graphics card. But from there I became interested in pushing the hardware to operate faster, so I started tinkering with overclocking my various systems. Once I opened that can of worms, there was no going back – every system became custom built, overclocked, modded and pushed to the limits in order to play the newest games.
Lego Computers
When I built my first Lego-based computer 5 years ago and put it online, I never expected to get such a huge response. It was amazing to see that so many other geeks shared my same passions for computers and Lego, and the fusion of the two together was really a hit. For years I built people custom Lego computers, and with each new system I slowly moved closer to deciding to design and build a standardized Lego Computer system that combined the typical requested system requirements into one computer. This system became the Mini Lego Computer, a small form-factor system that packed the power of a full desktop computer – including Intel i7 processor, multiple SSD drives, and 16GB of memory – into a customizable Lego case. Upon its release, it was shared all over the internet, and I was absolutely overwhelmed with the response and positive feedback. From the deluge of people who contacted me, I was able to hone in on additional Lego-based computers that people were interested in. The Mini Lego Computer offered a powerful option in a small form factor, but for some that power was outside of their budget. This pushed me to create a more entry level system for those individuals that didn’t need all that computing power but still wanted a very capable, Lego-based computer. Thus the Micro Lego Computer was born! Following it’s release, I once again received a lot of great feedback and found that there were still two types of computer systems that were missing from the Lego Computer line-up, Lego Servers and a Lego Gaming Computer. I first turned my attention to the Lego Servers. I had a series of builds going on for customers as well as a series of recently finished systems. I wanted to take all that data and development time and turn it into something, so I developed a line of Lego Servers with various models for various different server-based applications.
This finally brings me to today and the Lego Gaming Computer. With decades of computer gaming and gaming computer builds behind me, I would say that this system is the one closest to my geek-heart. While I’ve built a lot of custom Lego Gaming Computers for people over the years, some very high powered with dual and triple GPU combos, I had not really had the time to clean slate develop a system. Most customer builds tend to steer towards familiar form factors and build completion deadlines. So the idea of starting from scratch and spending months and months developing a completely new Lego Gaming Computer was quite exciting.
Custom Gaming Computers
If you’re interested in custom gaming computers, or custom builds in general, than you’re probably quite familiar with the myriad of amazing systems that exist today. Without a doubt there are some truly awe-inspiring builds out there by incredibly talented builders. One could easily spend hours just looking through the 1000s of systems and still not see them all. However, the downfall of true custom builds like these – with full loop water cooling systems, and custom paint, fiberglass, carbon fiber, etc – is that they tend to be one-off builds, meaning that you usually can’t buy the same build for yourself. This is a totally understandable because the labor required for some of these custom builds can be very high, and the cost to replicate them would be even higher. So as I looked more and more at custom systems, I decided that one of the design goals of the Lego Gaming Computer was to build something that could be replicated, so that it wasn’t just a one-off.
Design
When reviewing custom gaming computers and builds, I noticed that in a lot of cases they followed a trend. Most designs seemed to gravitate towards a more aggressive styling, with fins, hard angles, and often LED lighting. The more aggressive case designs looked like military explosives boxes, while others looked like Transformers. Don’t get me wrong, a lot of the designs are very cool, and depending on what aesthetic you’re into those looks might be right up your alley. But I had many requests for hardcore gaming systems with a more toned down look to them. Customers still wanted the system to look cool, but they wanted something with a more high-end electronic look to it.
In terms of case design and form factor, the vast majority of the systems I reviewed were either standard mid-tower or full tower ATX systems. They were basically some type of rectangular box, just in different sizes. While a lot of these systems have their own look in the details, the rectangular form factor seems to have become the standard even in custom builds. I decided then that I wanted to do something different.
One thing I had to consider was the overall functionality of the generic box design. It definitely has some pros, mostly in offering space to expand the system but also in the standardization of the form factor which fits existing hardware. For the most part, however, the rest of the rectangular box design is nothing more than adequate. It’s fine. It gets the job done, but there’s a lot of room for improvement.
My thinking therefore took a turn to the “what if…” What if the design of the case was built to try to match the hardware better, to be more efficient in its packaging and system cooling? So I started looking into where improvements could be made. The thing that really stood out to me the most at this point was the inherent design drawbacks in system cooling. Here the standard box cases are, again, adequate. They rely on convection and usually an intake and exhaust fan (or more) cycling air through the system, exchanging fresh air for heated air. The downside of this system is that it doesn’t really control where the air is directed, and in most cases you end up with a lot of localized hot spots within the case because they do not have direct airflow. This allows for certain components to run hotter and, as a result, be less stable in a highly stressed system and more prone to failure.
Furthermore, it’s also a problem that all the components share the same space. This allows for different components to “cross-talk”, which means that heat from one component raises the temperature of a nearby component. The total thermal output inside of the case is consequently the sum of the heat produced by the processor, processor power circuitry, graphics core, graphics VRMs, power supply, memory, SSD drives, and hard drives and not the result of any one component. The big box system was therefore in need of an overhaul, so I went to work.
My first project was to create a few designs that were geared towards moving the heat generated by each component into its own compartment. This in itself is not a new concept, and some high-end cases offer compartmentalized sections for different components. However, these types of cases tend to be very expensive and are often times also fairly large. My goal was to create a compartmentalized system in a medium form factor that was comparable in price to to the average gaming computer.
Hardware Choices
Processor
When I started the development of the Lego Gaming Computer I used a Intel Z97 platform and a Haswell 4790k as the testbed to test various graphics cards. During that time Intel released Skylake CPUs. I wanted this new system to use the latest available, but also be as future-capable as possible. Skylake offers improvements with the Z170 chipset, so it made sense to utilize these components.
After doing a fair amount of testing, I began focusing in on a series of processor options – all Skylake based. The first was the i5-6600k and the second the i7-6700k, but others were soon to follow. These are the latest and greatest releases from Intel and offer the best overall performance of any Intel processor in the 1151 socket. Additionally, they have pretty solid overclocking potential, which makes them a perfect fit.
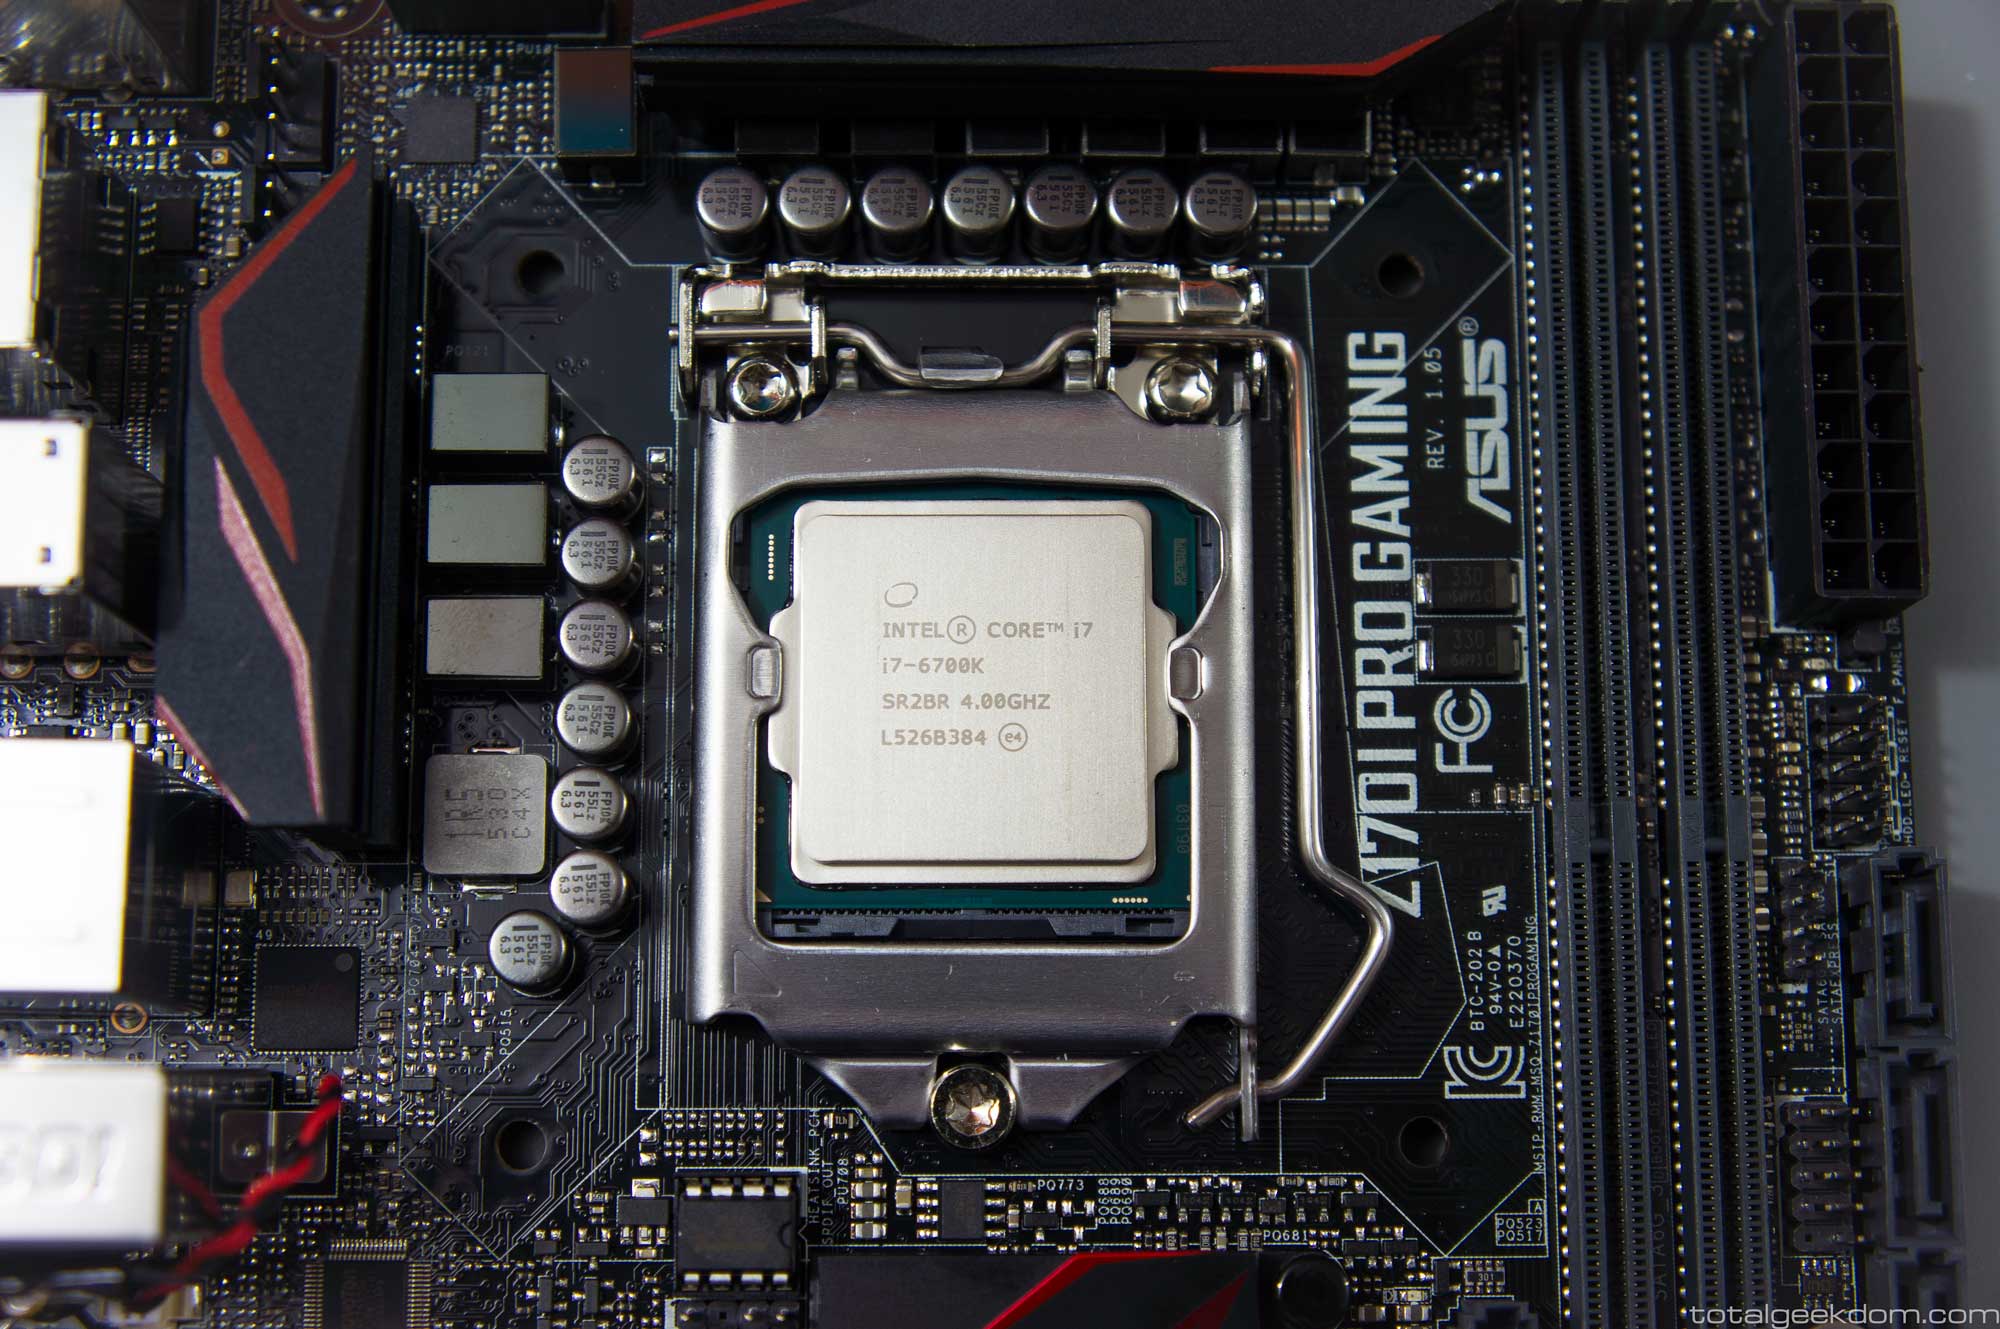
Lego Gaming Computer Intel i7-6700k Processor Installed in Asus Z170I Pro Gaming Motherboard
Motherboard
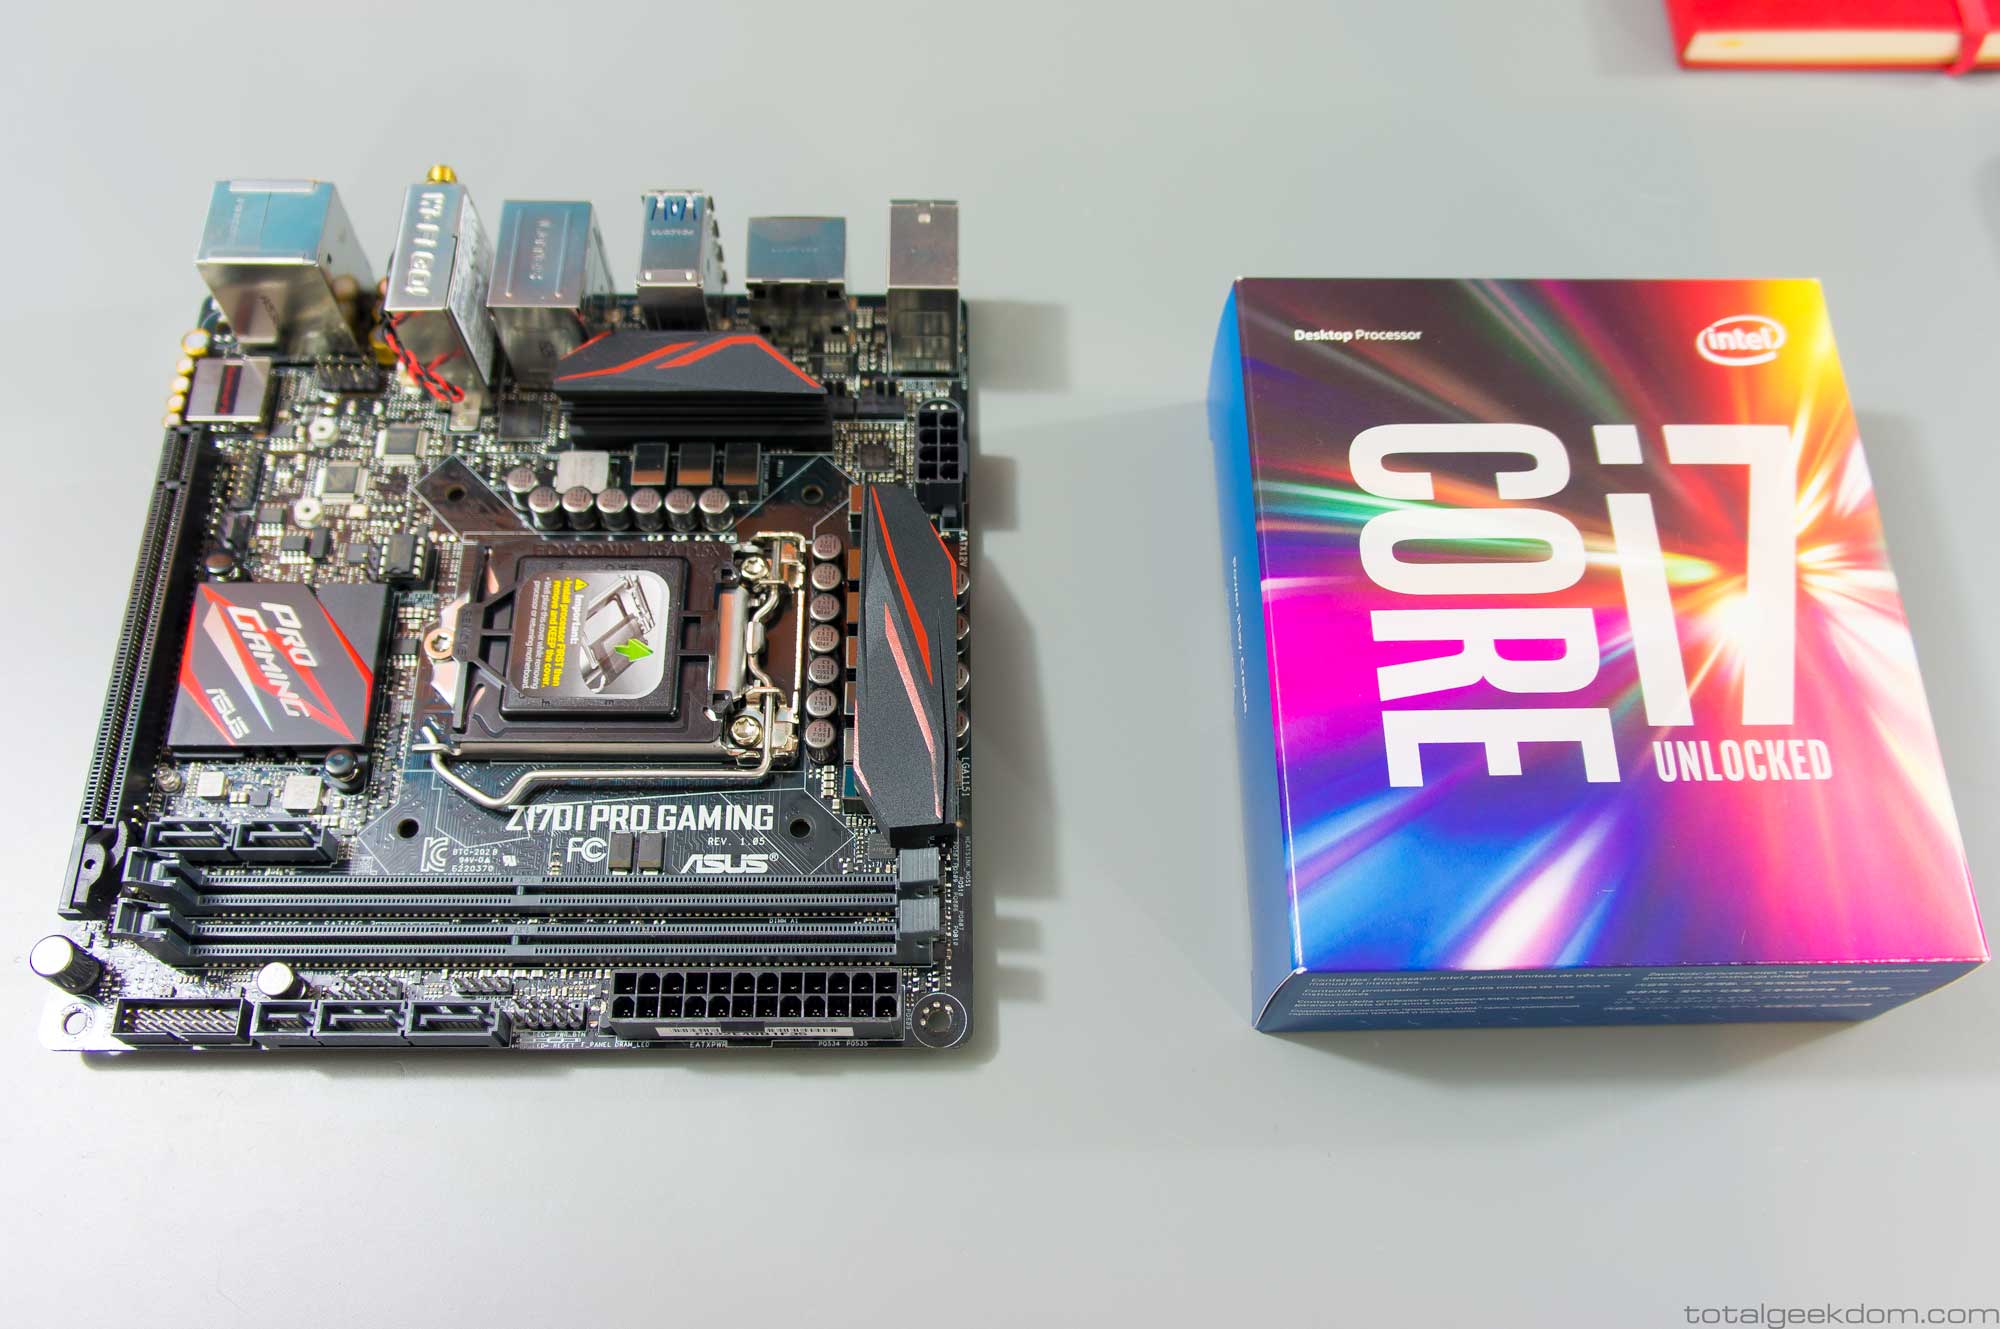
The next important step was the motherboard, as it was very important to find one that offered a lot of the key features I wanted for the Lego Gaming Computer. After doing a lot of testing with various motherboards (EVGA, Gigabyte, MSi, etc.), I found that the Asus Z170 Pro Gaming mini-itx offered excellent performance and had all the features I wanted. This board offers great power regulation, which is ideal for overclocking and stability, and it’s feature packed. I intended to use a PCIe X4 M.2 SSD drive in the system, and the Asus board provides that slot. The board also has USB 3.1 ports as well as a slew of USB 3.0 ports, enhanced audio circuitry and Intel LAN.
Memory
Wanting top-tier performance, I turned to a trusted source for high quality memory and used HyperX DDR4. I’ve often used HyperX memory in the past and have always been very pleased with its performance, both in terms of stability and overclockability.
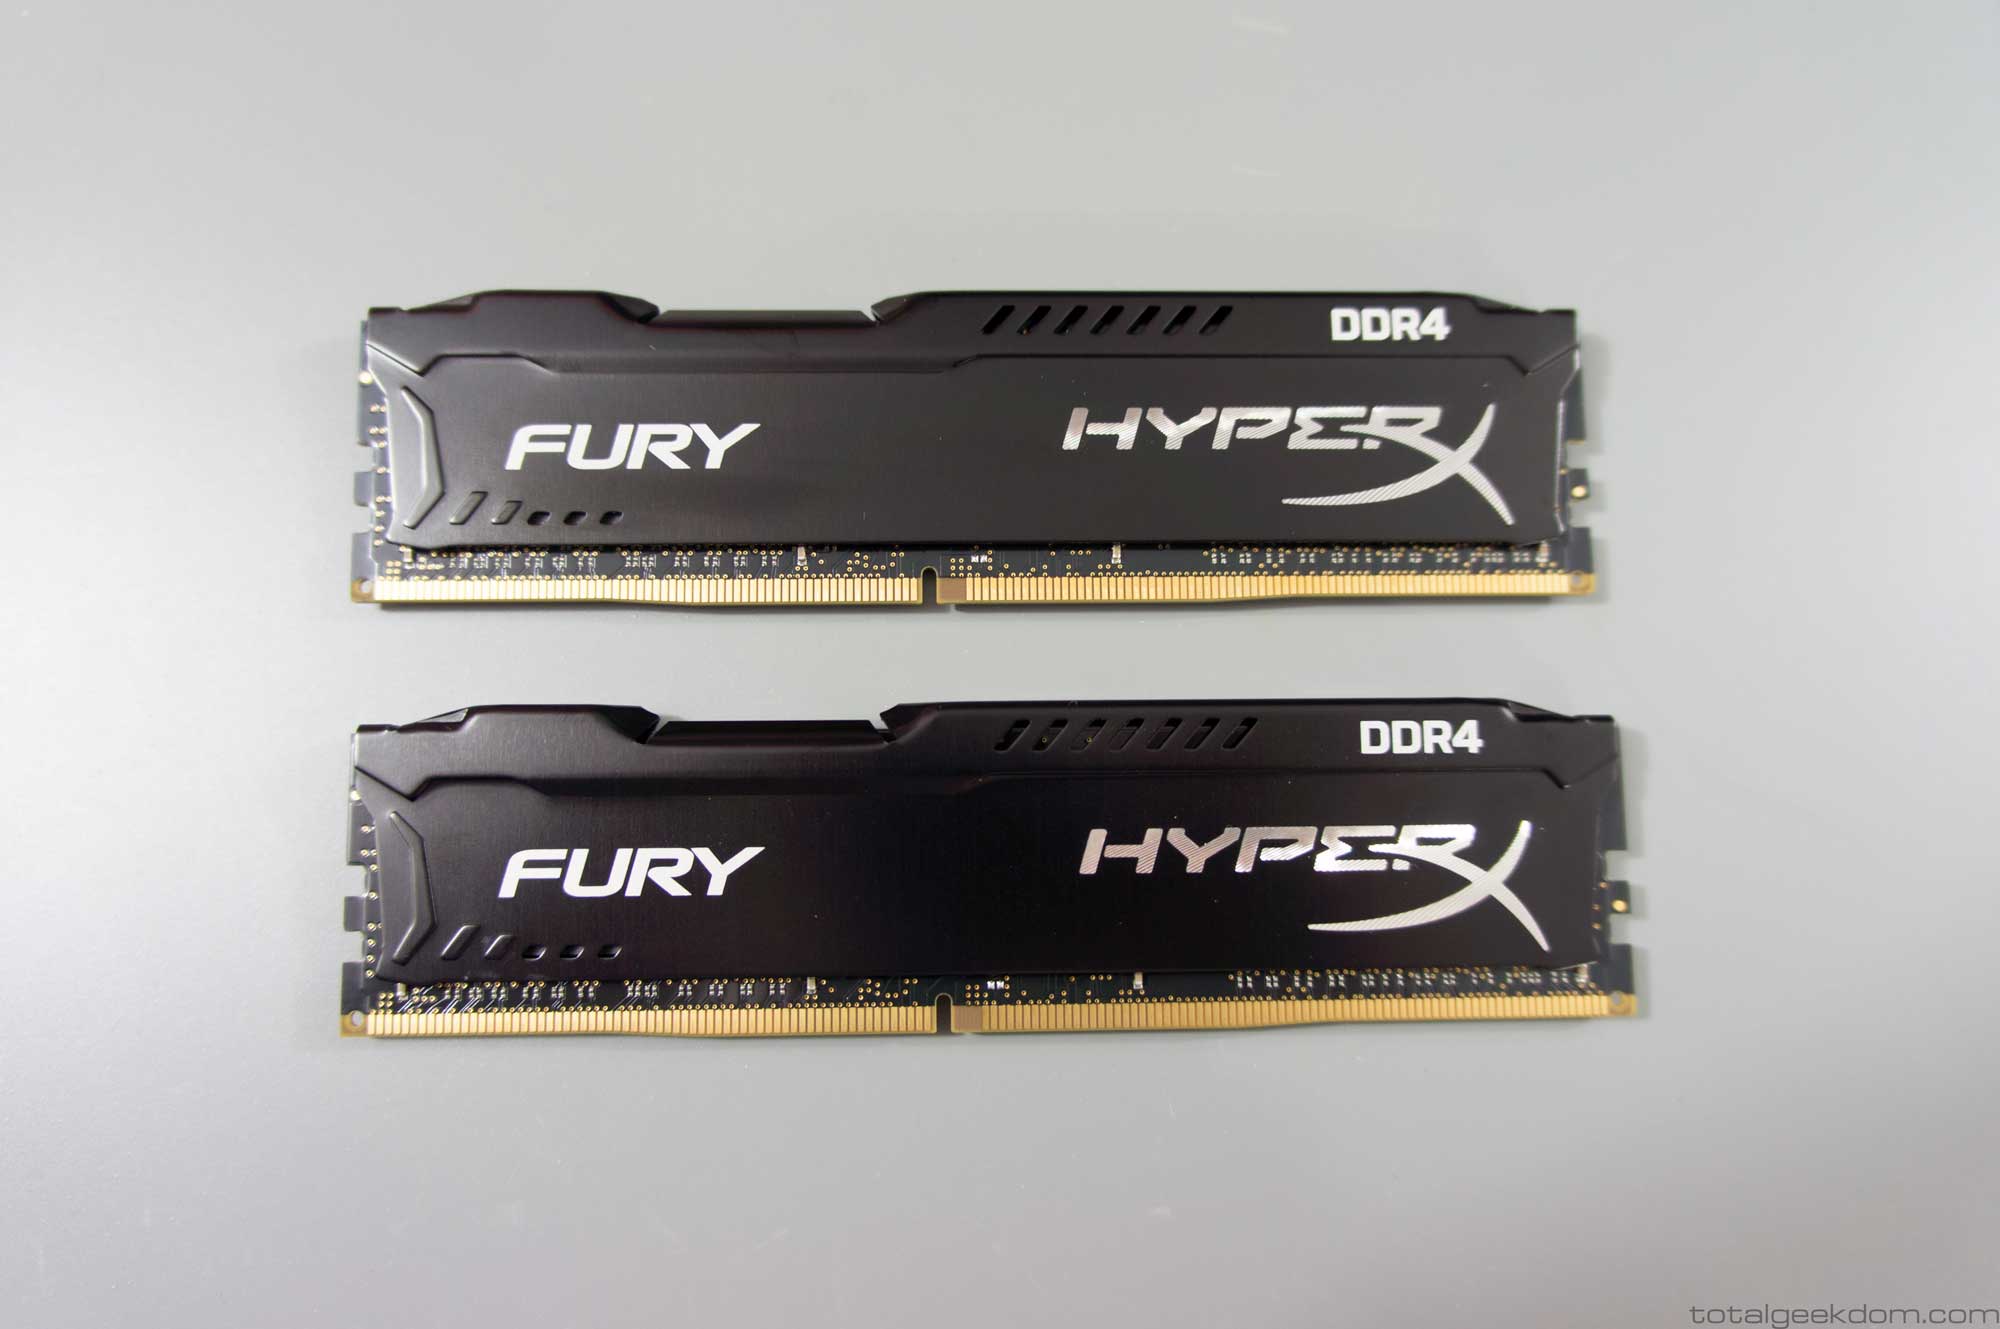
Lego Gaming Computer Fury HyperX DDR4 16GB Memory
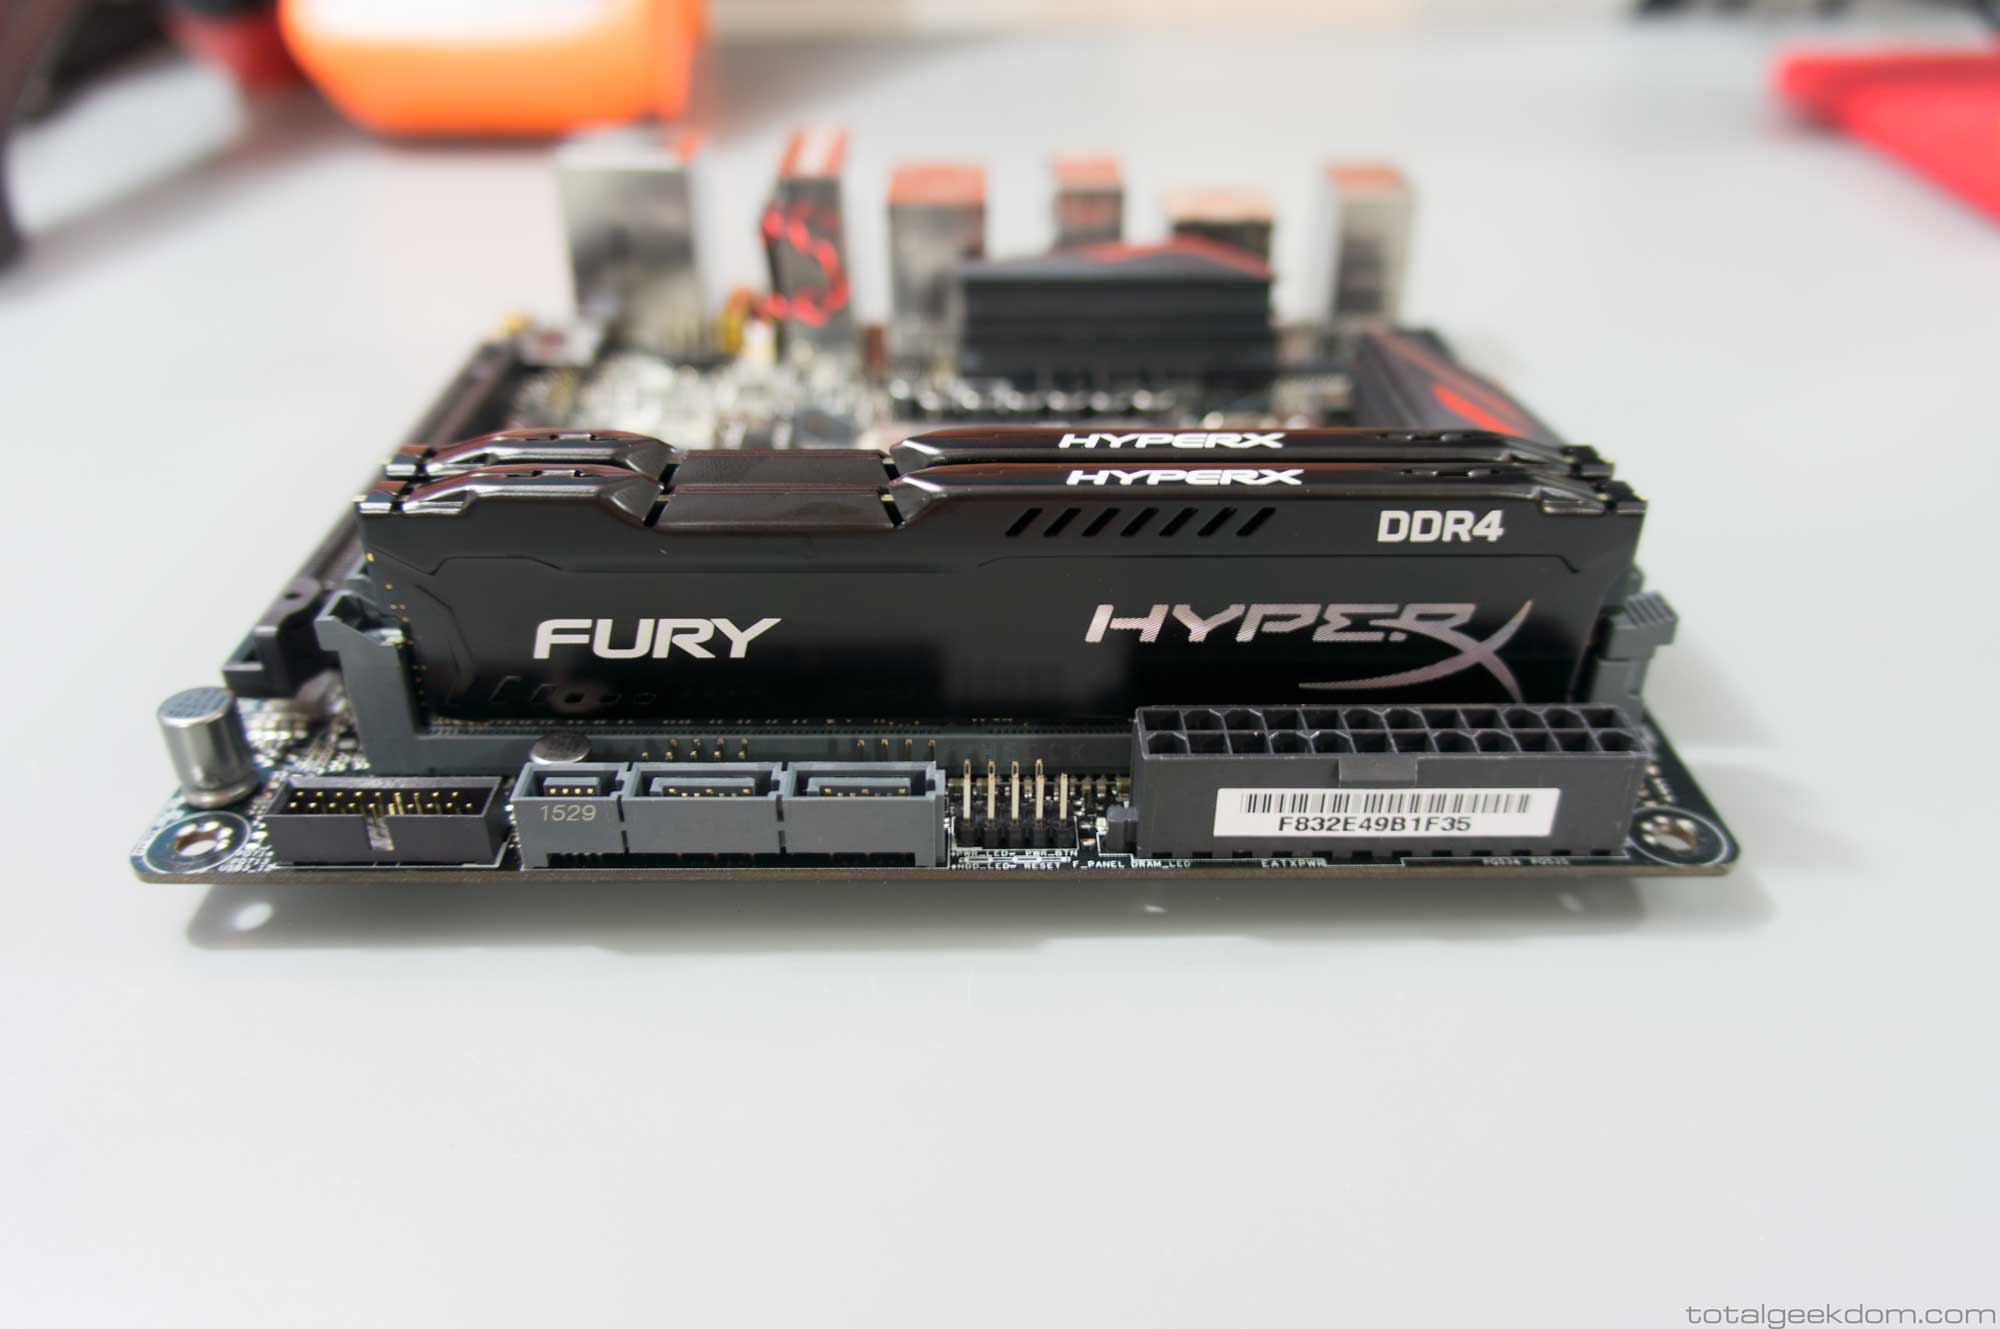
Lego Gaming Computer Fury HpyerX Memory Installed in Motherboard
Disk Drives
For the drives I wanted the system to be able to incorporate a mix in order to allow for flexibility in configuring systems. The primary drive is a Samsung 950 Pro M.2 PCIe drive, which offers incredible speeds of up to 2,500 Mbps read and 1,500 Mbps write as well as amazing IOPS numbers. This is the drive that the OS, applications and games will primarily reside on. For secondary storage options, the system is capable of housing four additional SATA based, 2.5″ drives, which can be a mix of HDD and SSD. This allows for onboard local storage of up to 8TB (but this figure will grow as bigger drives become available).
Graphics Card
The core of any good gaming machine comes down to its graphics card. The amount of time I spent testing graphics cards was substantial, but that was a prerequisite to ensure that I had the best possible options available for the system. This particular system is using a GTX 980 Ti, which as of today (1/1/2016) is considered to be the fastest single processor graphics card available for gaming. While AMD’s Fury X is neck-and-neck in many cases, the packaging, power consumption and overclockability of the GTX 980 Ti give it more flexibility.
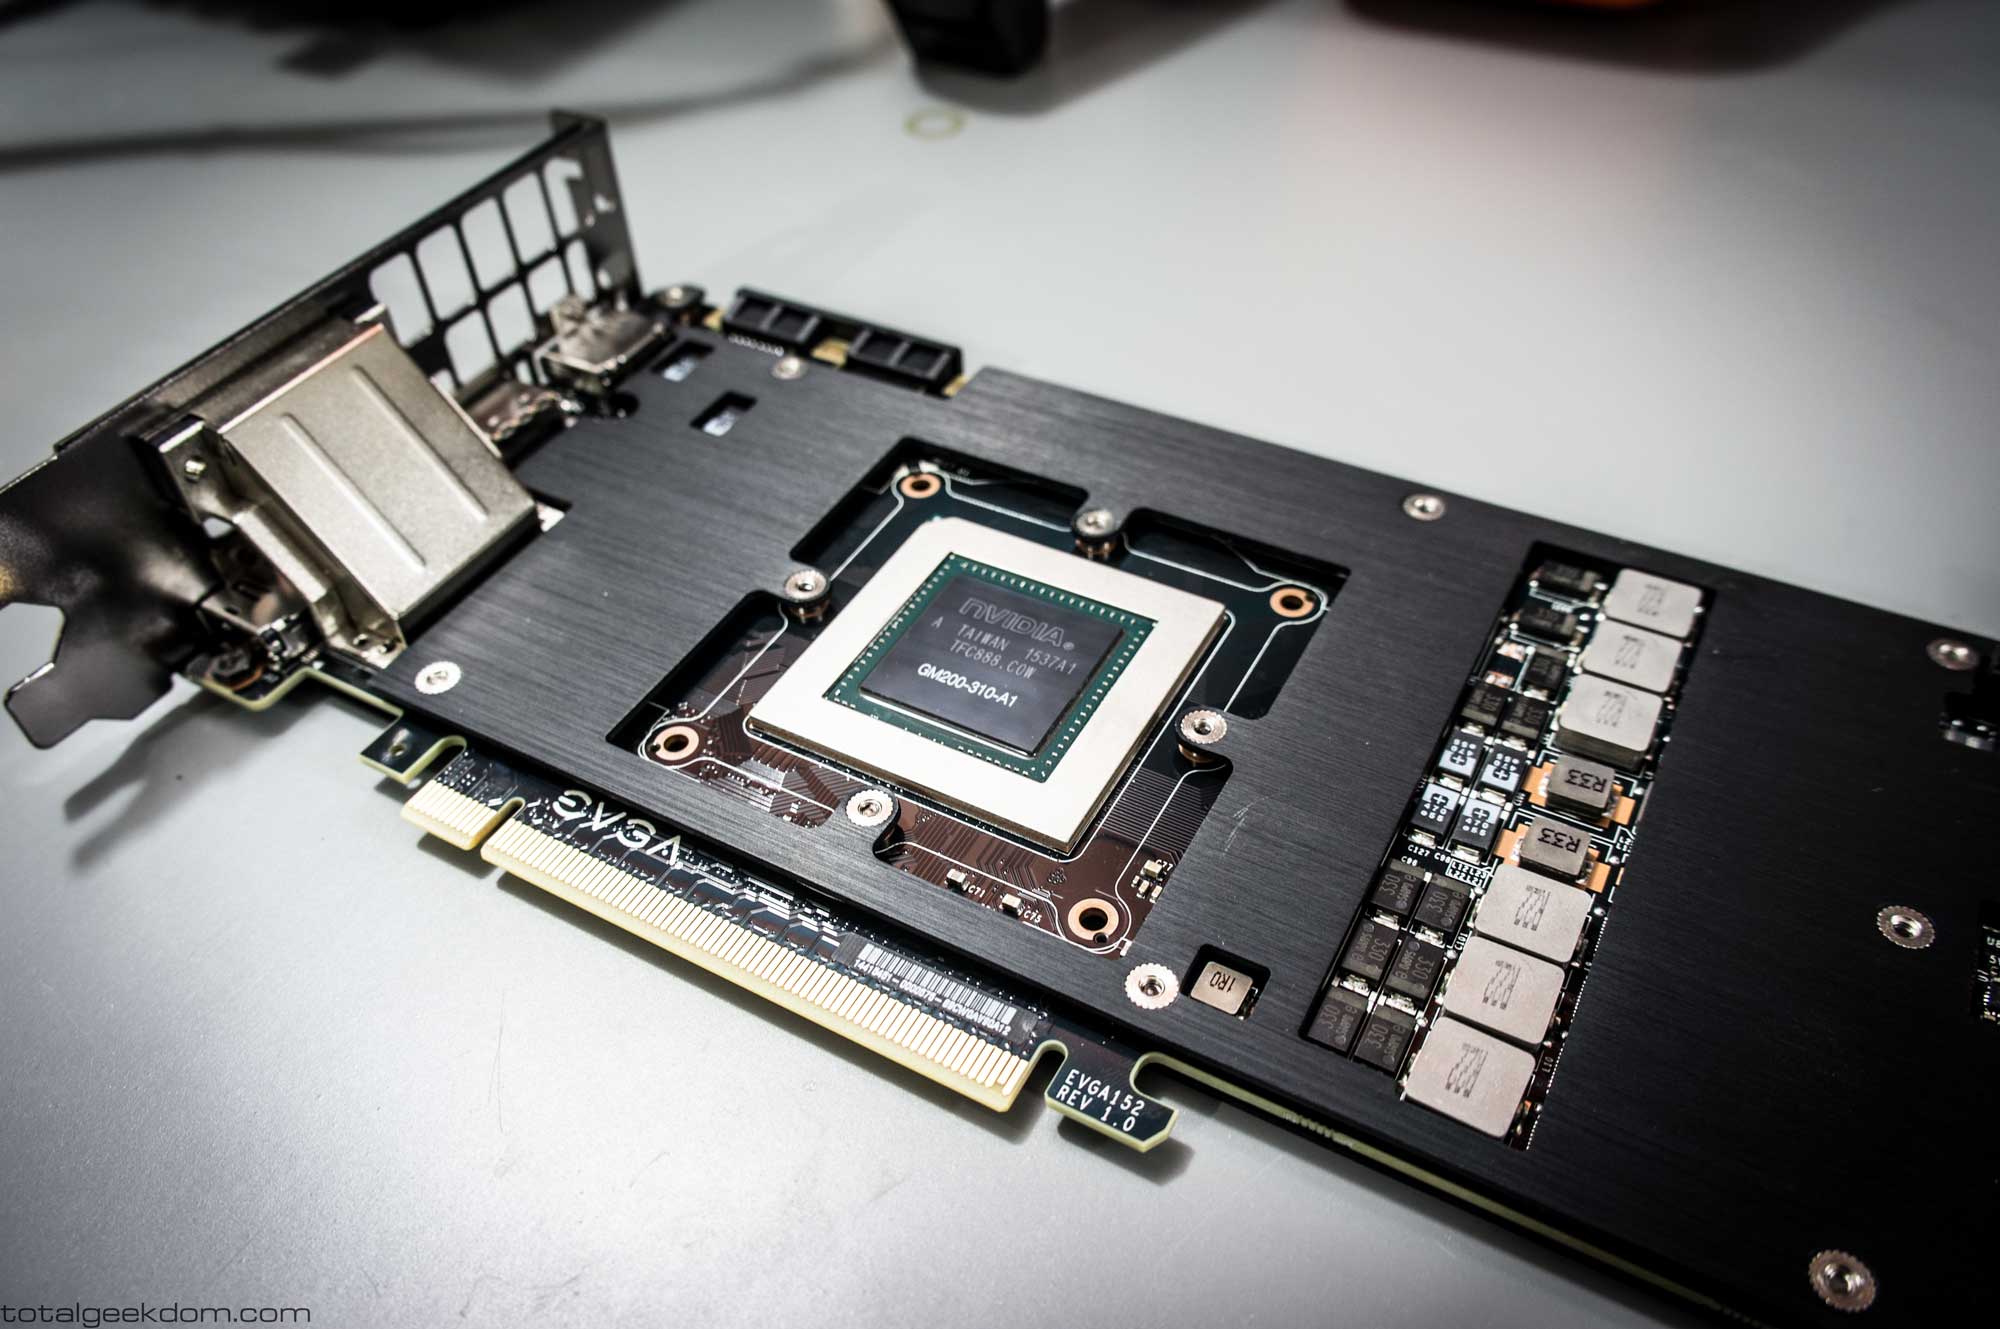
Lego Gaming Computer Bare GTX 980 Ti Maxwell Core
Knowing that different users have different system requirements based on game resolutions and the kinds of games they play, I wanted to make sure that I offered a wide variety of graphics cards so that users could tailor the system to fit their needs. The following list provides an overview of the graphics cards that will be offered with the Lego Gaming Computer:
Nvidia
Titan X
GTX 1080
GTX 1070
GTX 1060
GTX 1050
GTX 980 Ti
GTX 980
GTX 970
GTX 960
GTX 950
AMD
RX 480
RX 470
RX 460
R9 Fury
R9 Nano
390X
380
285
System Fans
When it comes to system fans, I almost exclusively use Noctua fans, as they have proven to be of the highest quality, offer the best possible performance and have excellent noise characteristics and durability. I’ve used a series of different Noctua fans in the Lego Gaming Computer, from their Industrial fan to their smaller fans. I also used some of Noctua’s newer Chromax urethane components to match the color scheme of the exterior of the system. I only used fans from other manufacturers when Noctua did not offer the specific size of fan I required. In this case I went with Sunon, as they are another maker of high-end server and industrial fans that possess excellent durability.
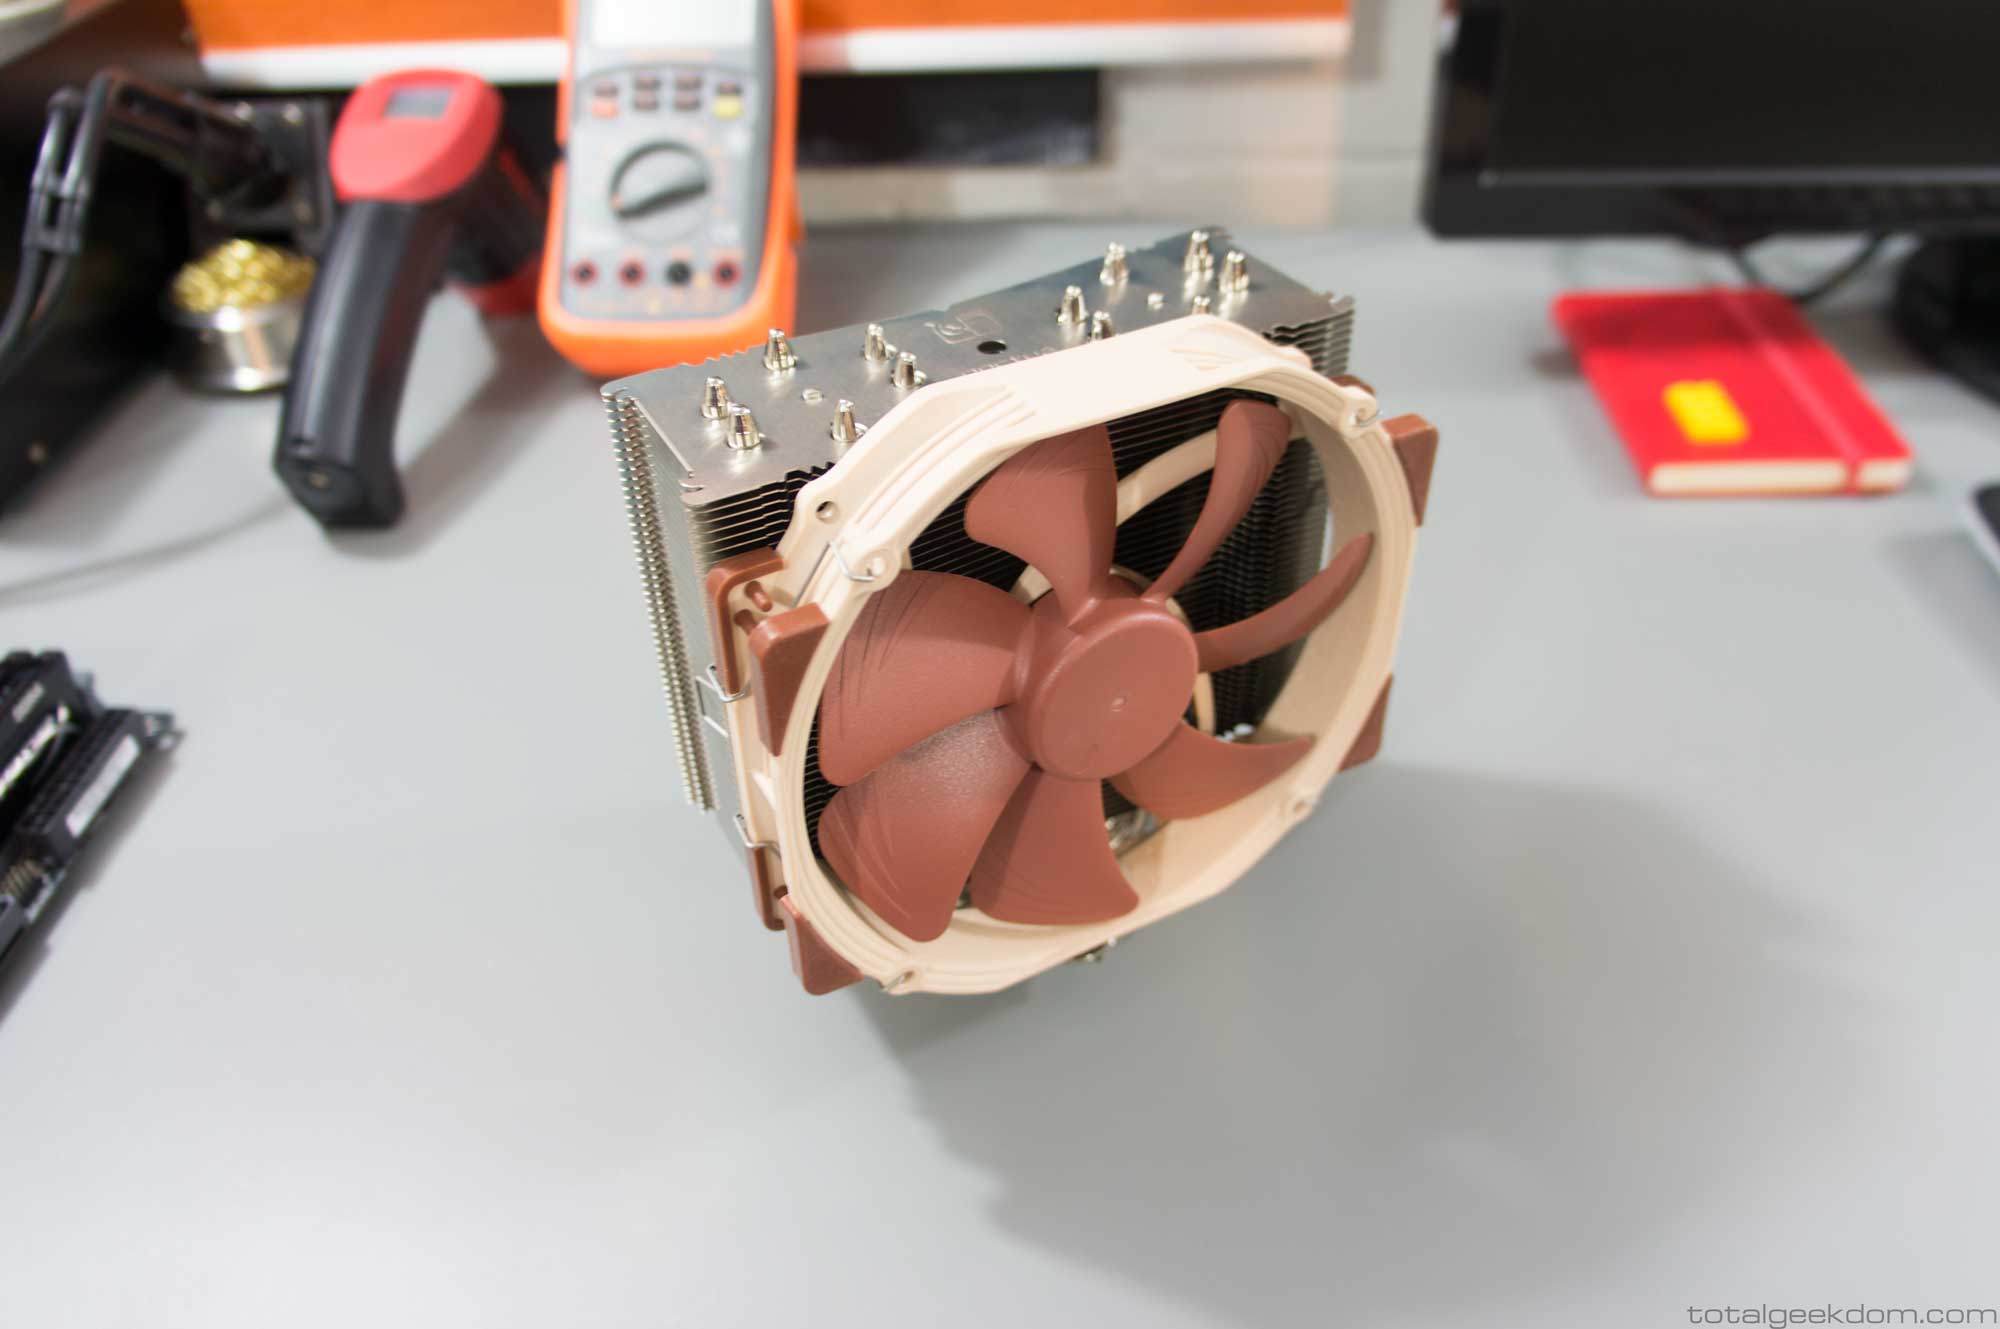
Lego Gaming Computer Noctua NH-U14S Processor Cooler
System Summary (for this build – other configurations available)
Motherboard- Asus Z170 Gaming
Processor- Intel i7-6700k
Graphics- Nvidia GTX 980 Ti
Memory- HyperX Fury 16GB DDR4
Coolers- Noctua NH-U14S 140mm and NH-U12S 120mm
Power Supply- Silverstone SFX 600w Gold
SSD (Primary)- Samsung 950 Pro
HDD/SSD (Secondary) Seagate 2TB HDDs & Samsung 1TB SSD
In terms of connectivity, the system offers a wide array of options.
3 Displayport Ports
1 HDMI Port
1 DVI-D Port
4 Rear USB 3.0 Ports
2 Rear USB 2.0 Ports
1 Intel LAN Port
1 Intel AC Wifi and Bluetooth
2 Front Mounted USB 3.1 Ports
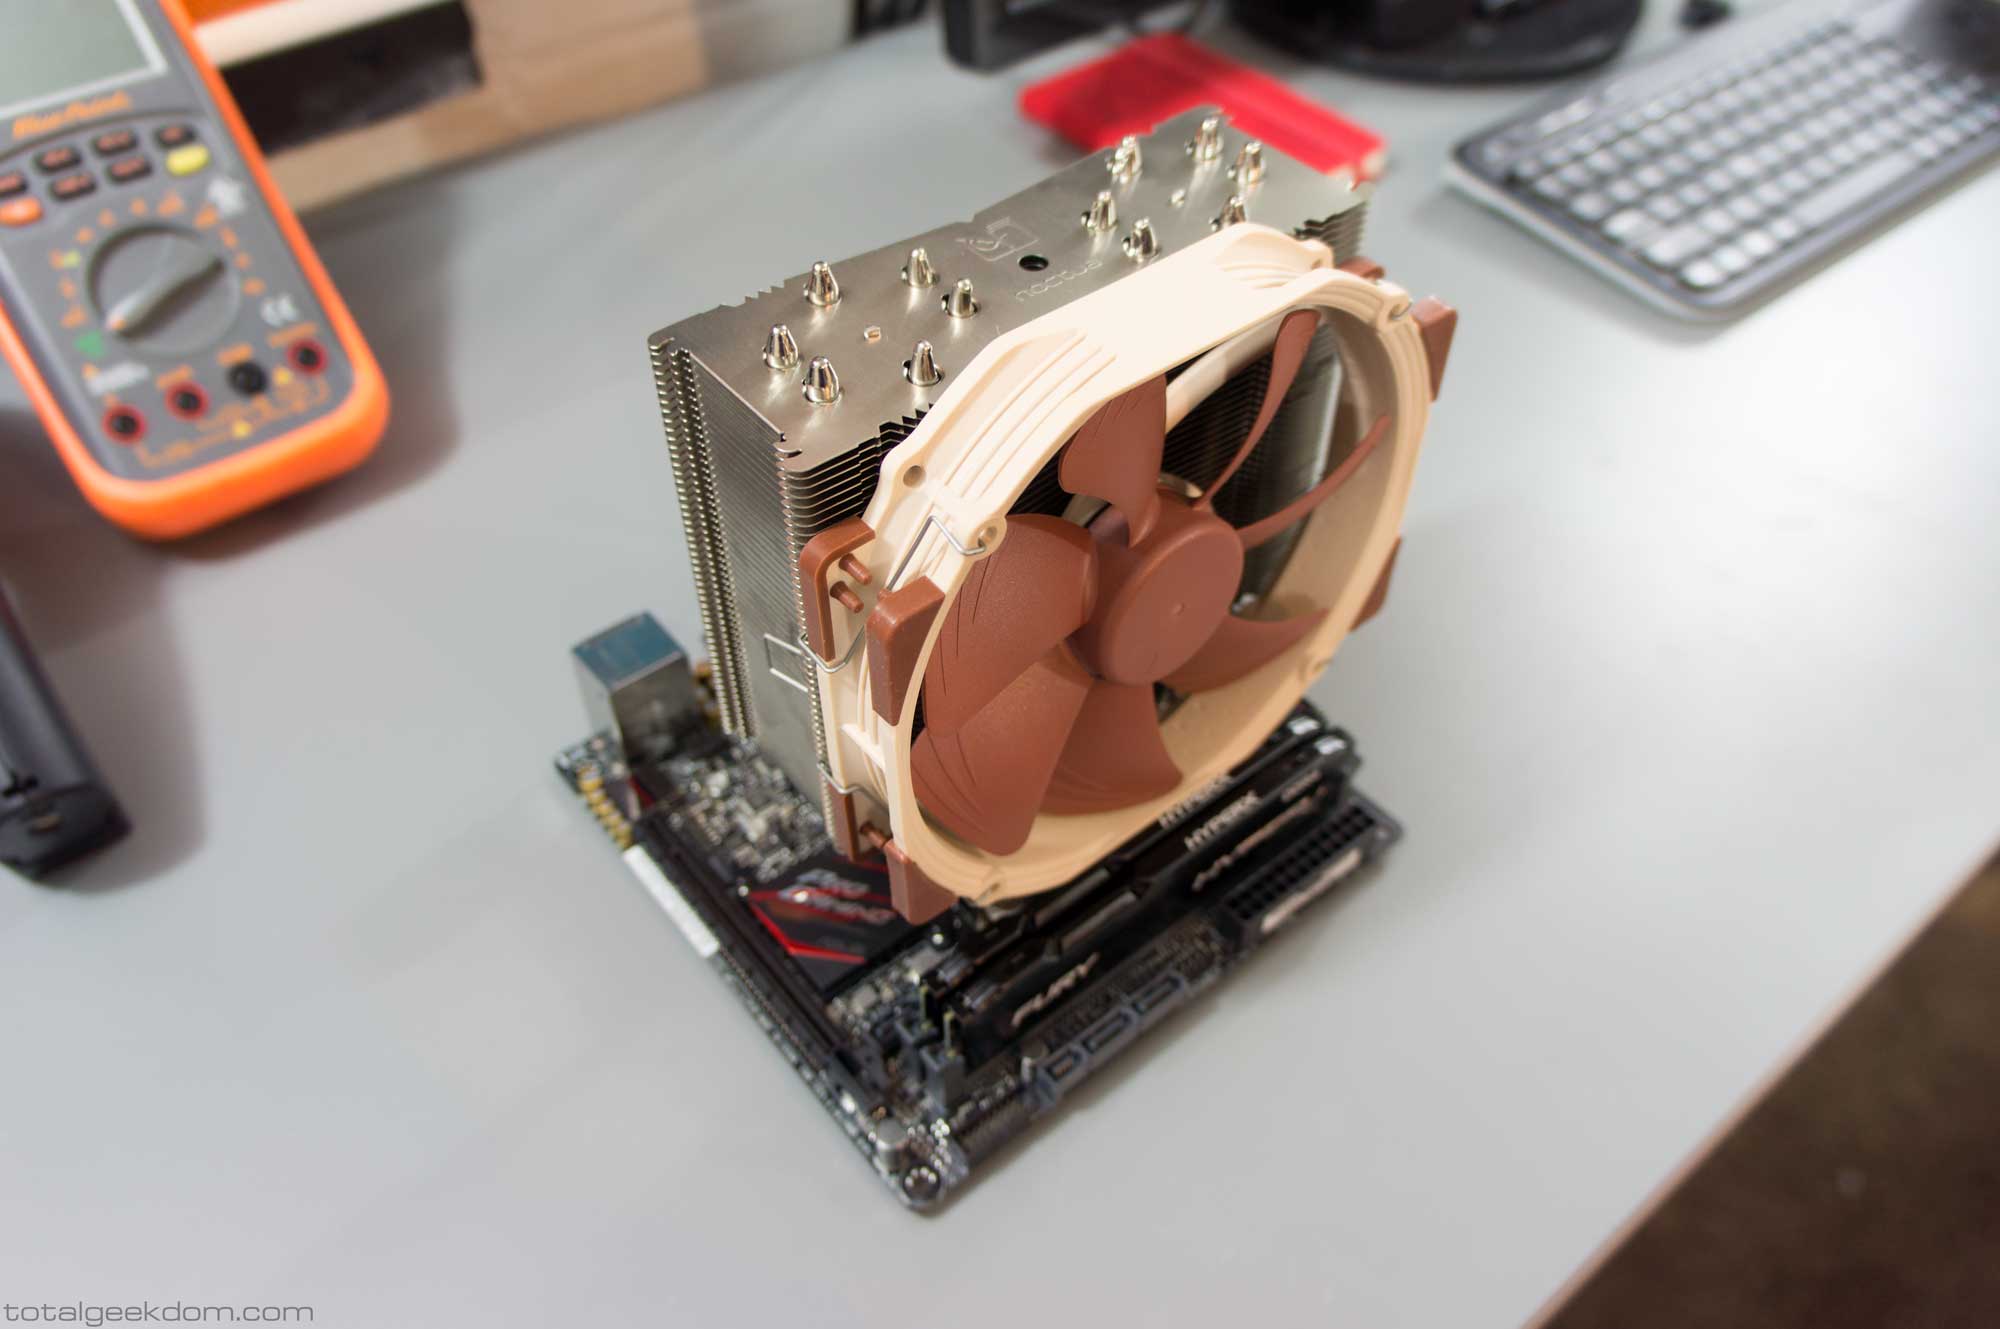
Lego Gaming Computer Noctua NH-U14s Processor Cooler Installed on Motherboard
Case Design & Cooling
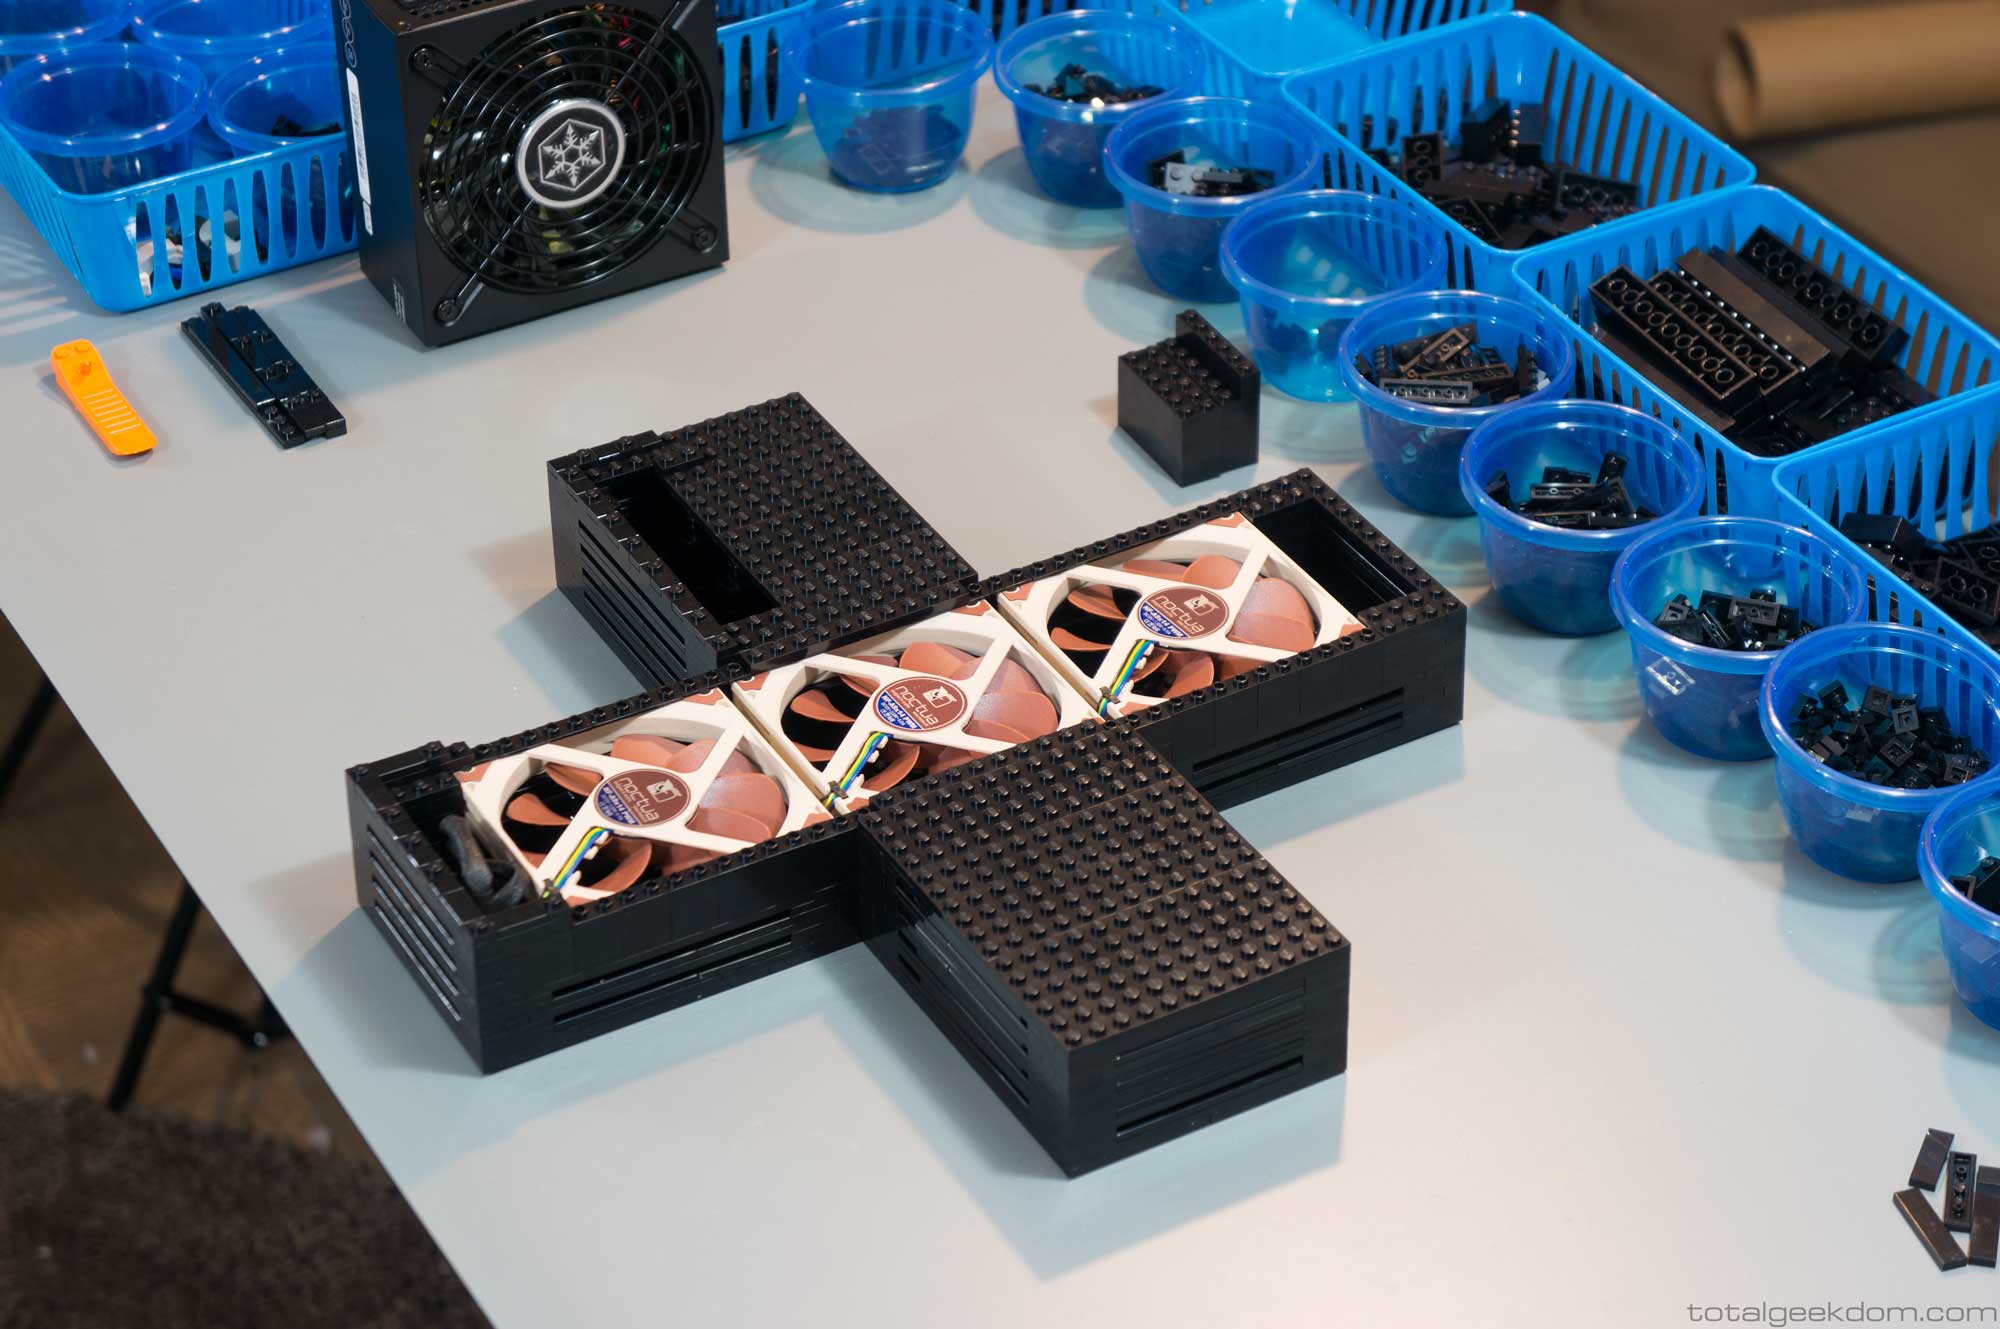
My development for the Lego Gaming Computer began with numerous different designs for the case. The great part about Lego is the infinite flexibility it affords – nothing is impossible. During the initial design phase, I considered a couple different case designs that I thought looked very unique while still offering different approaches to cooling and form factor. This phase involved a lot of testing of mockups to see how well they performed. Slowly the best aspects of the different candidates started to merge together to create a new system that was comprised of all the best concepts and features from the other designs.
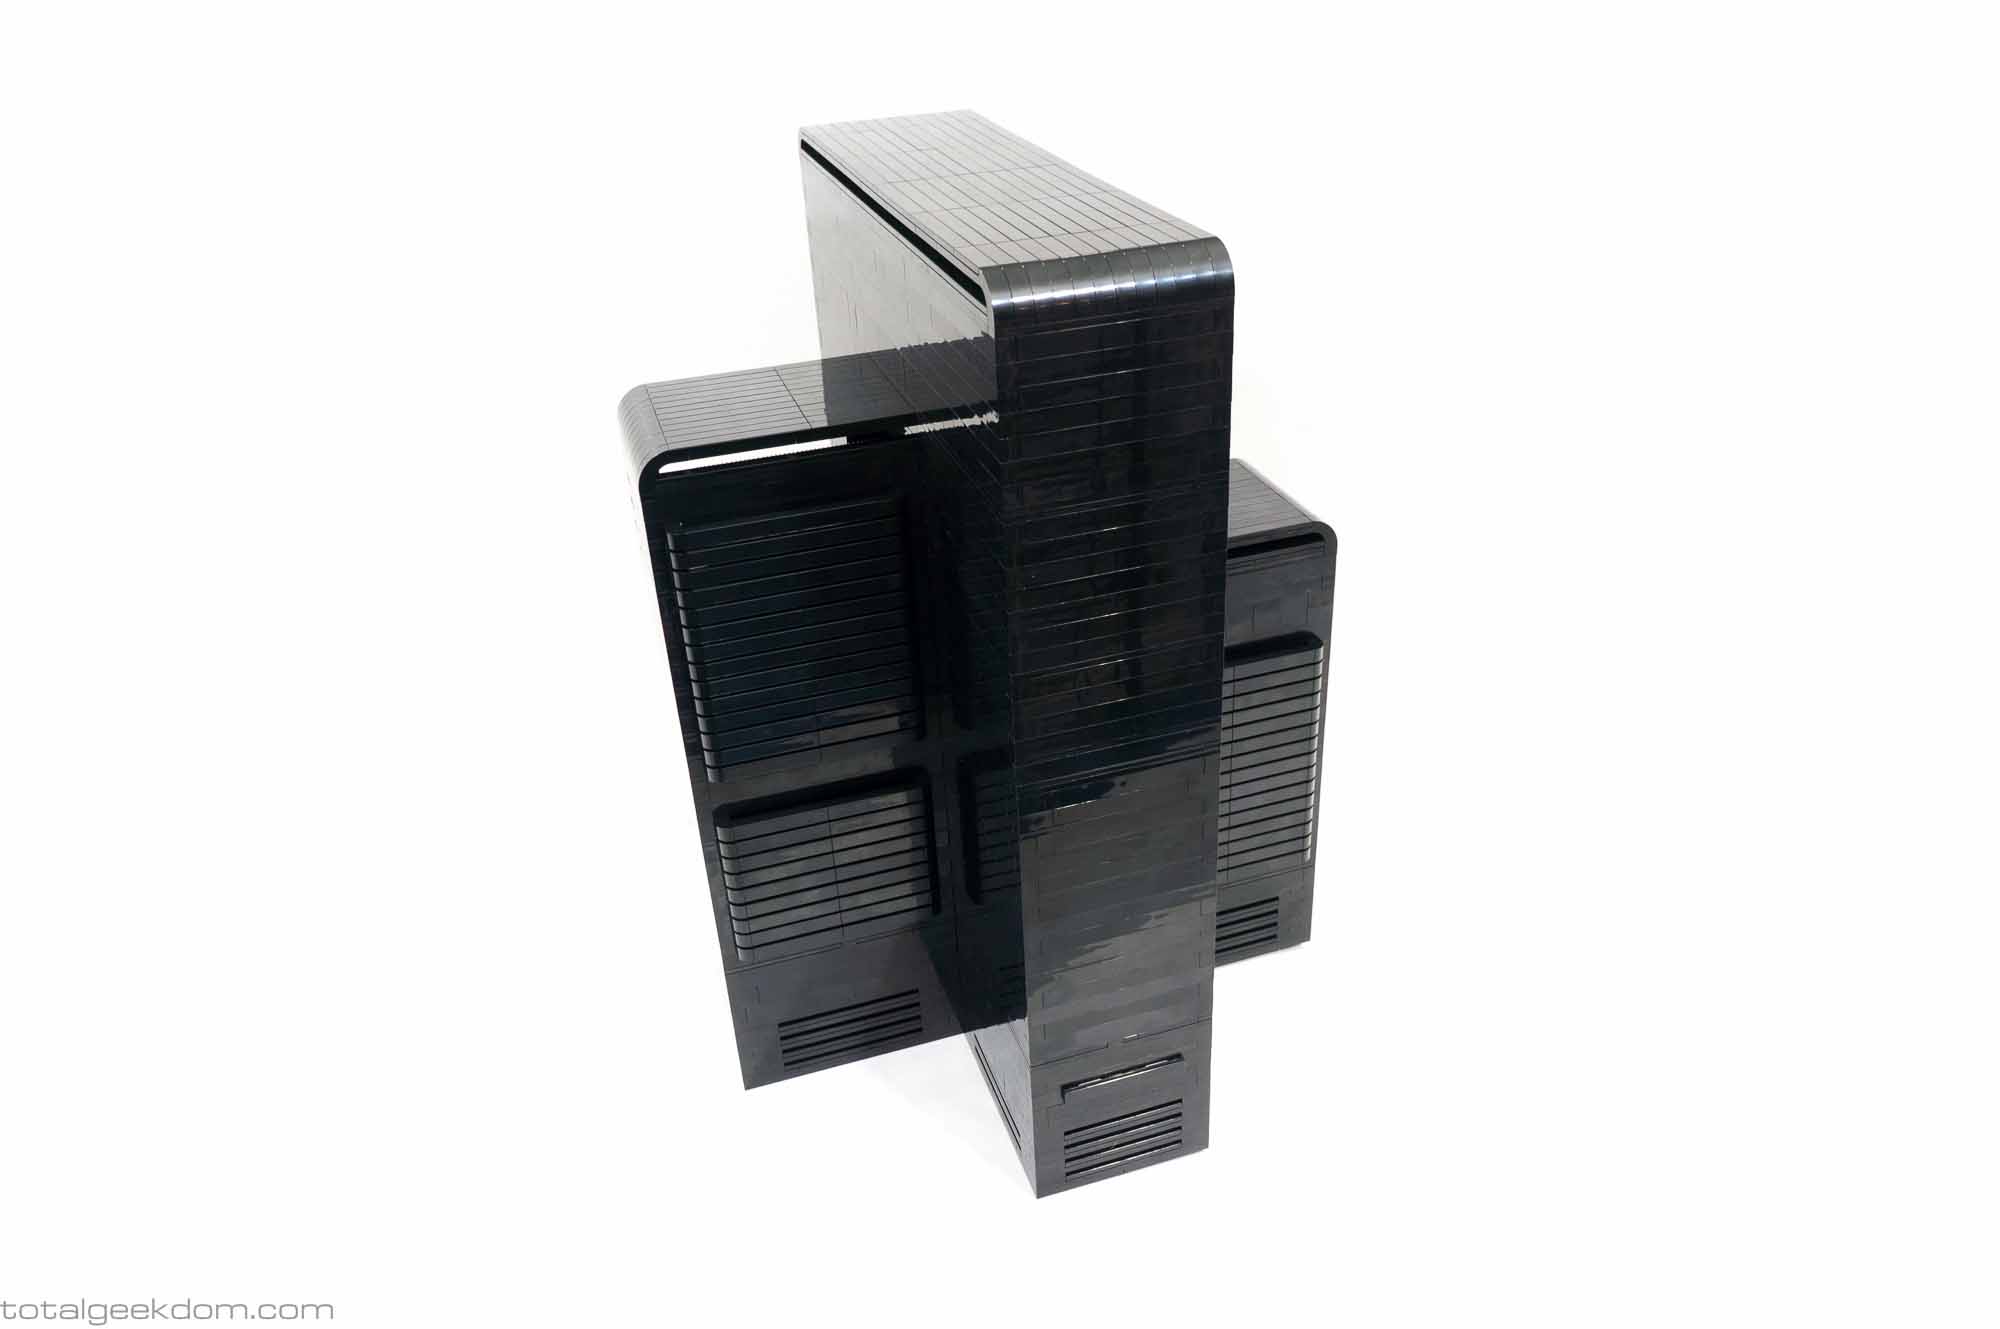
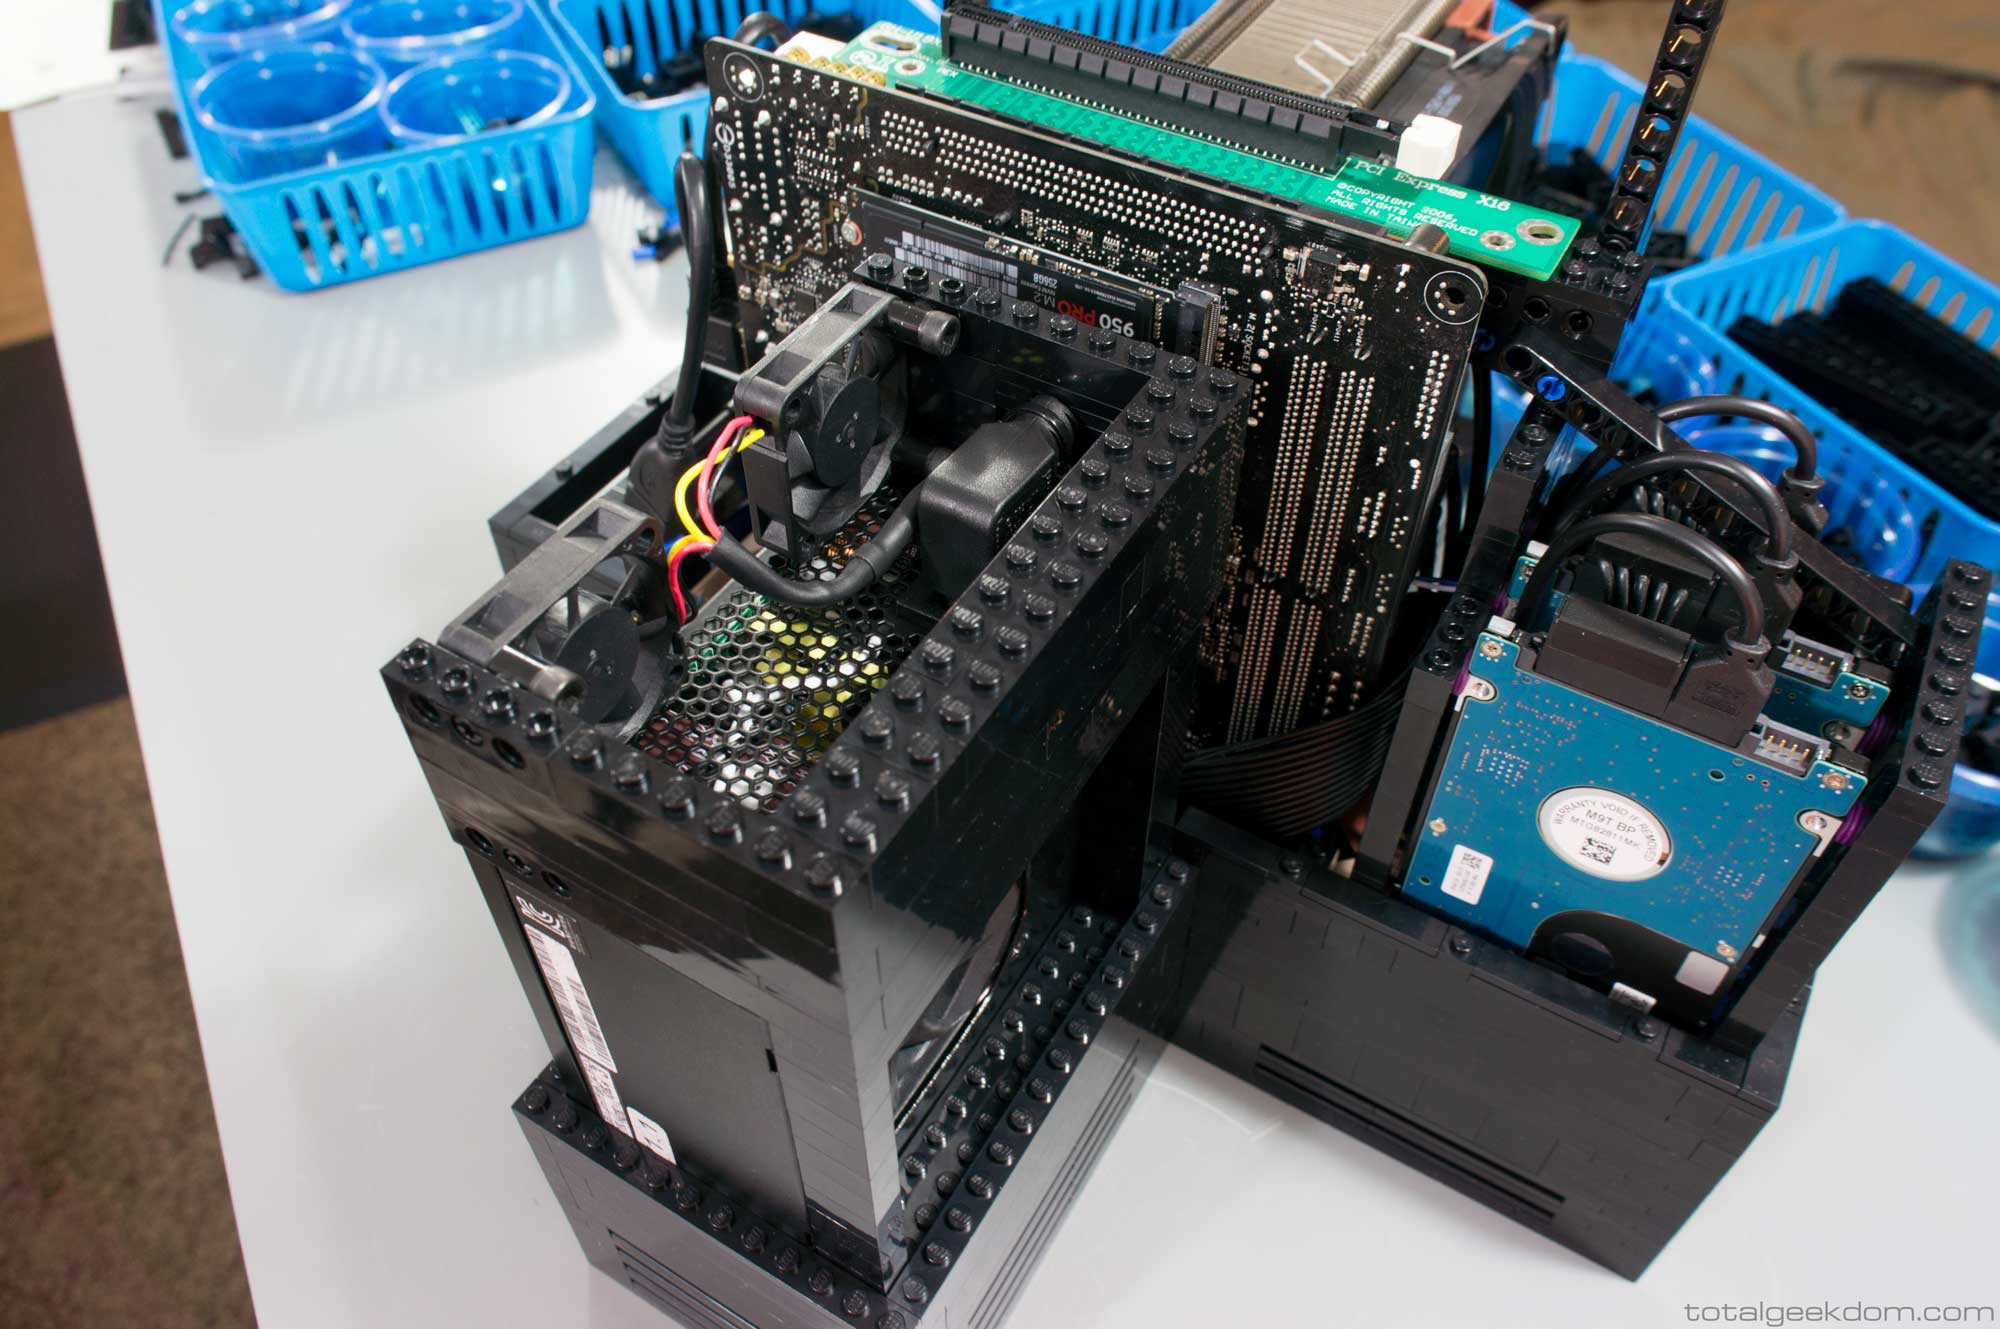
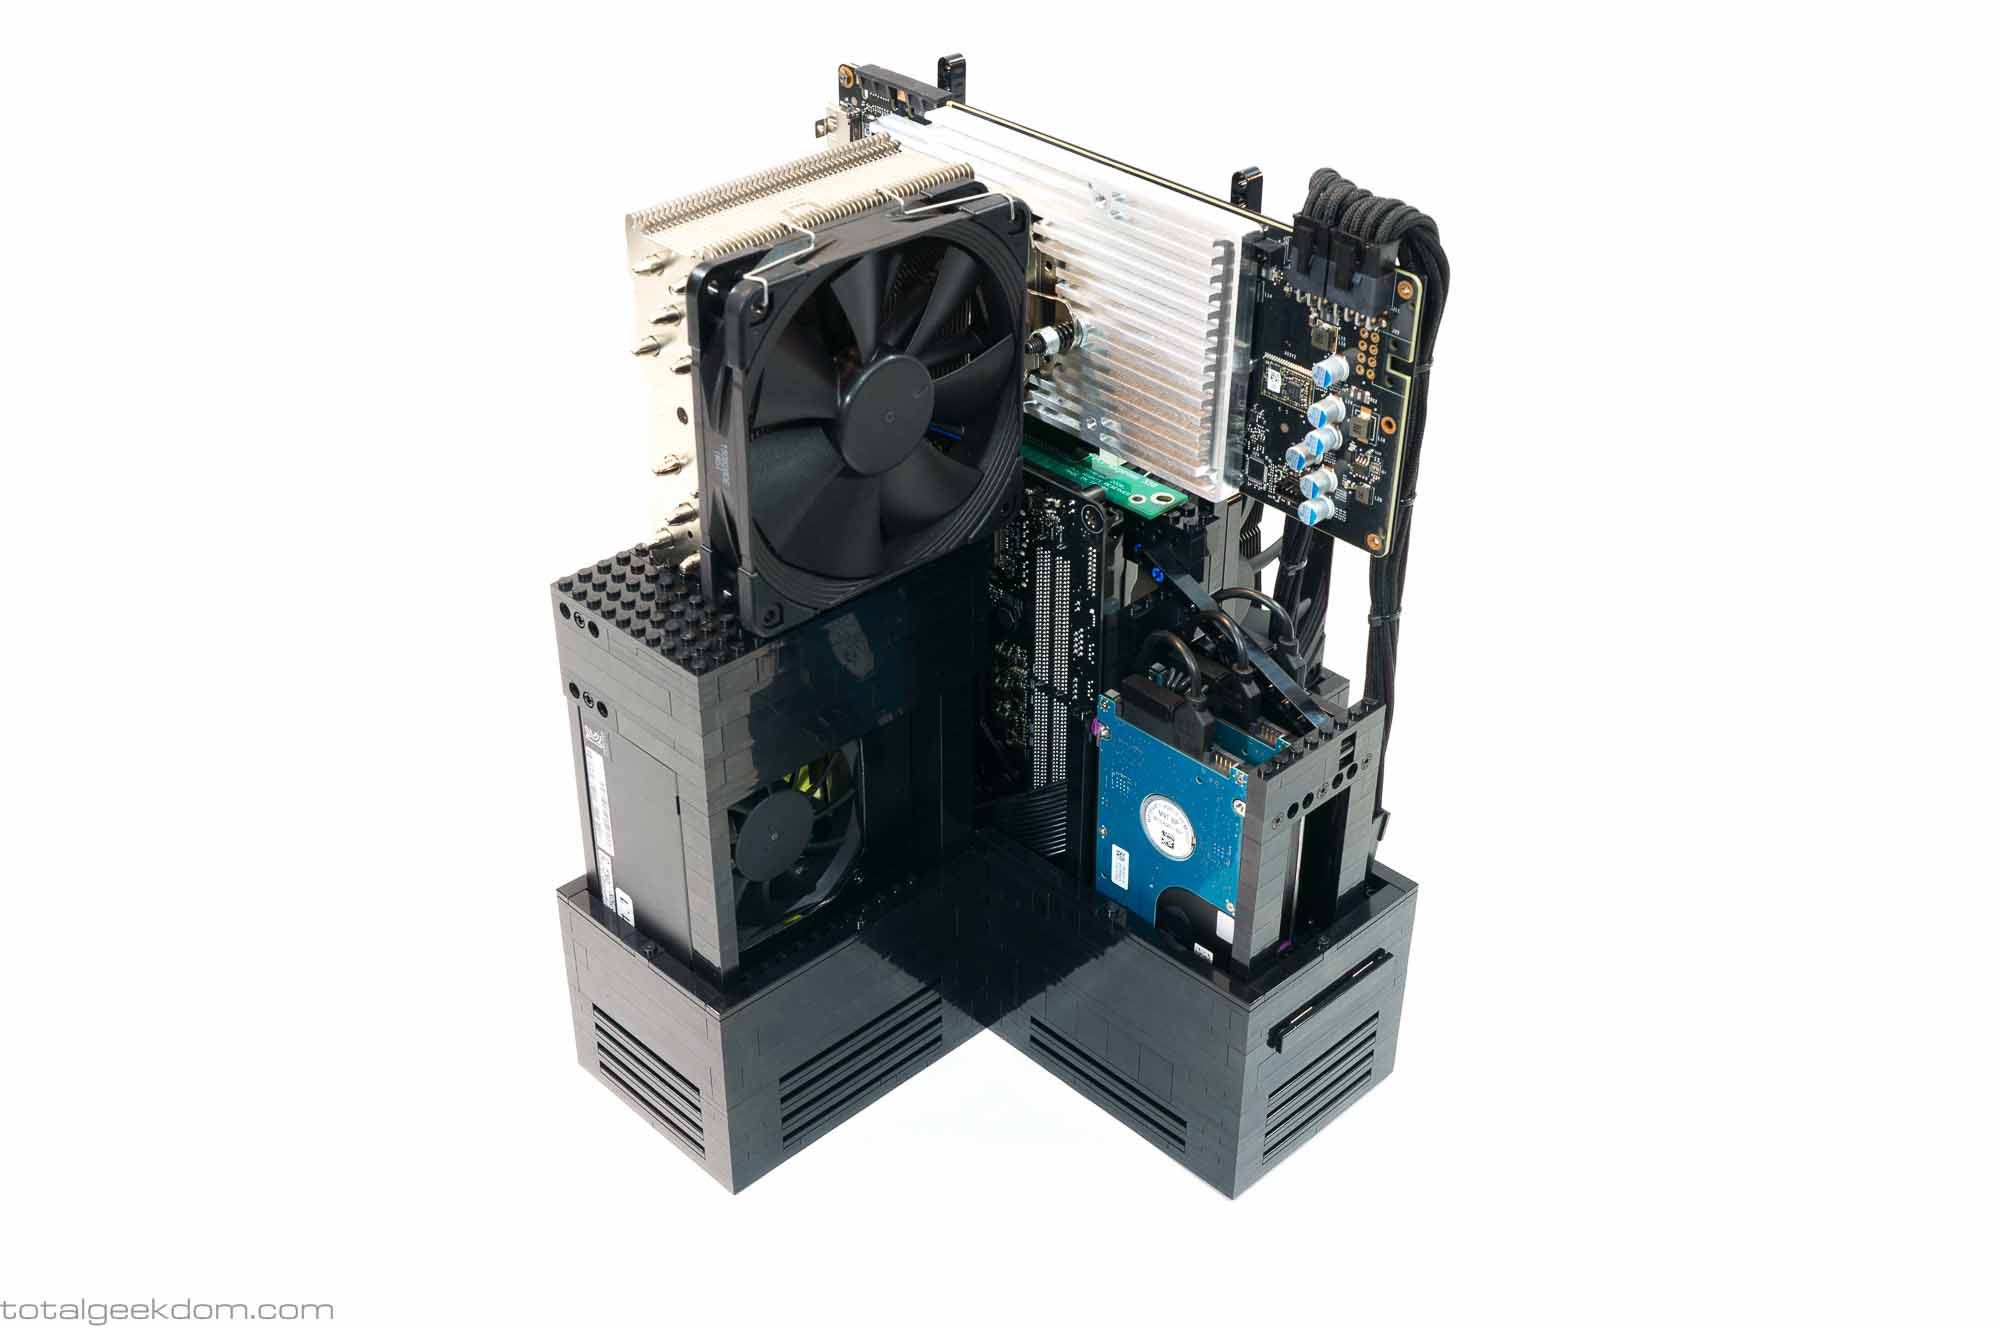
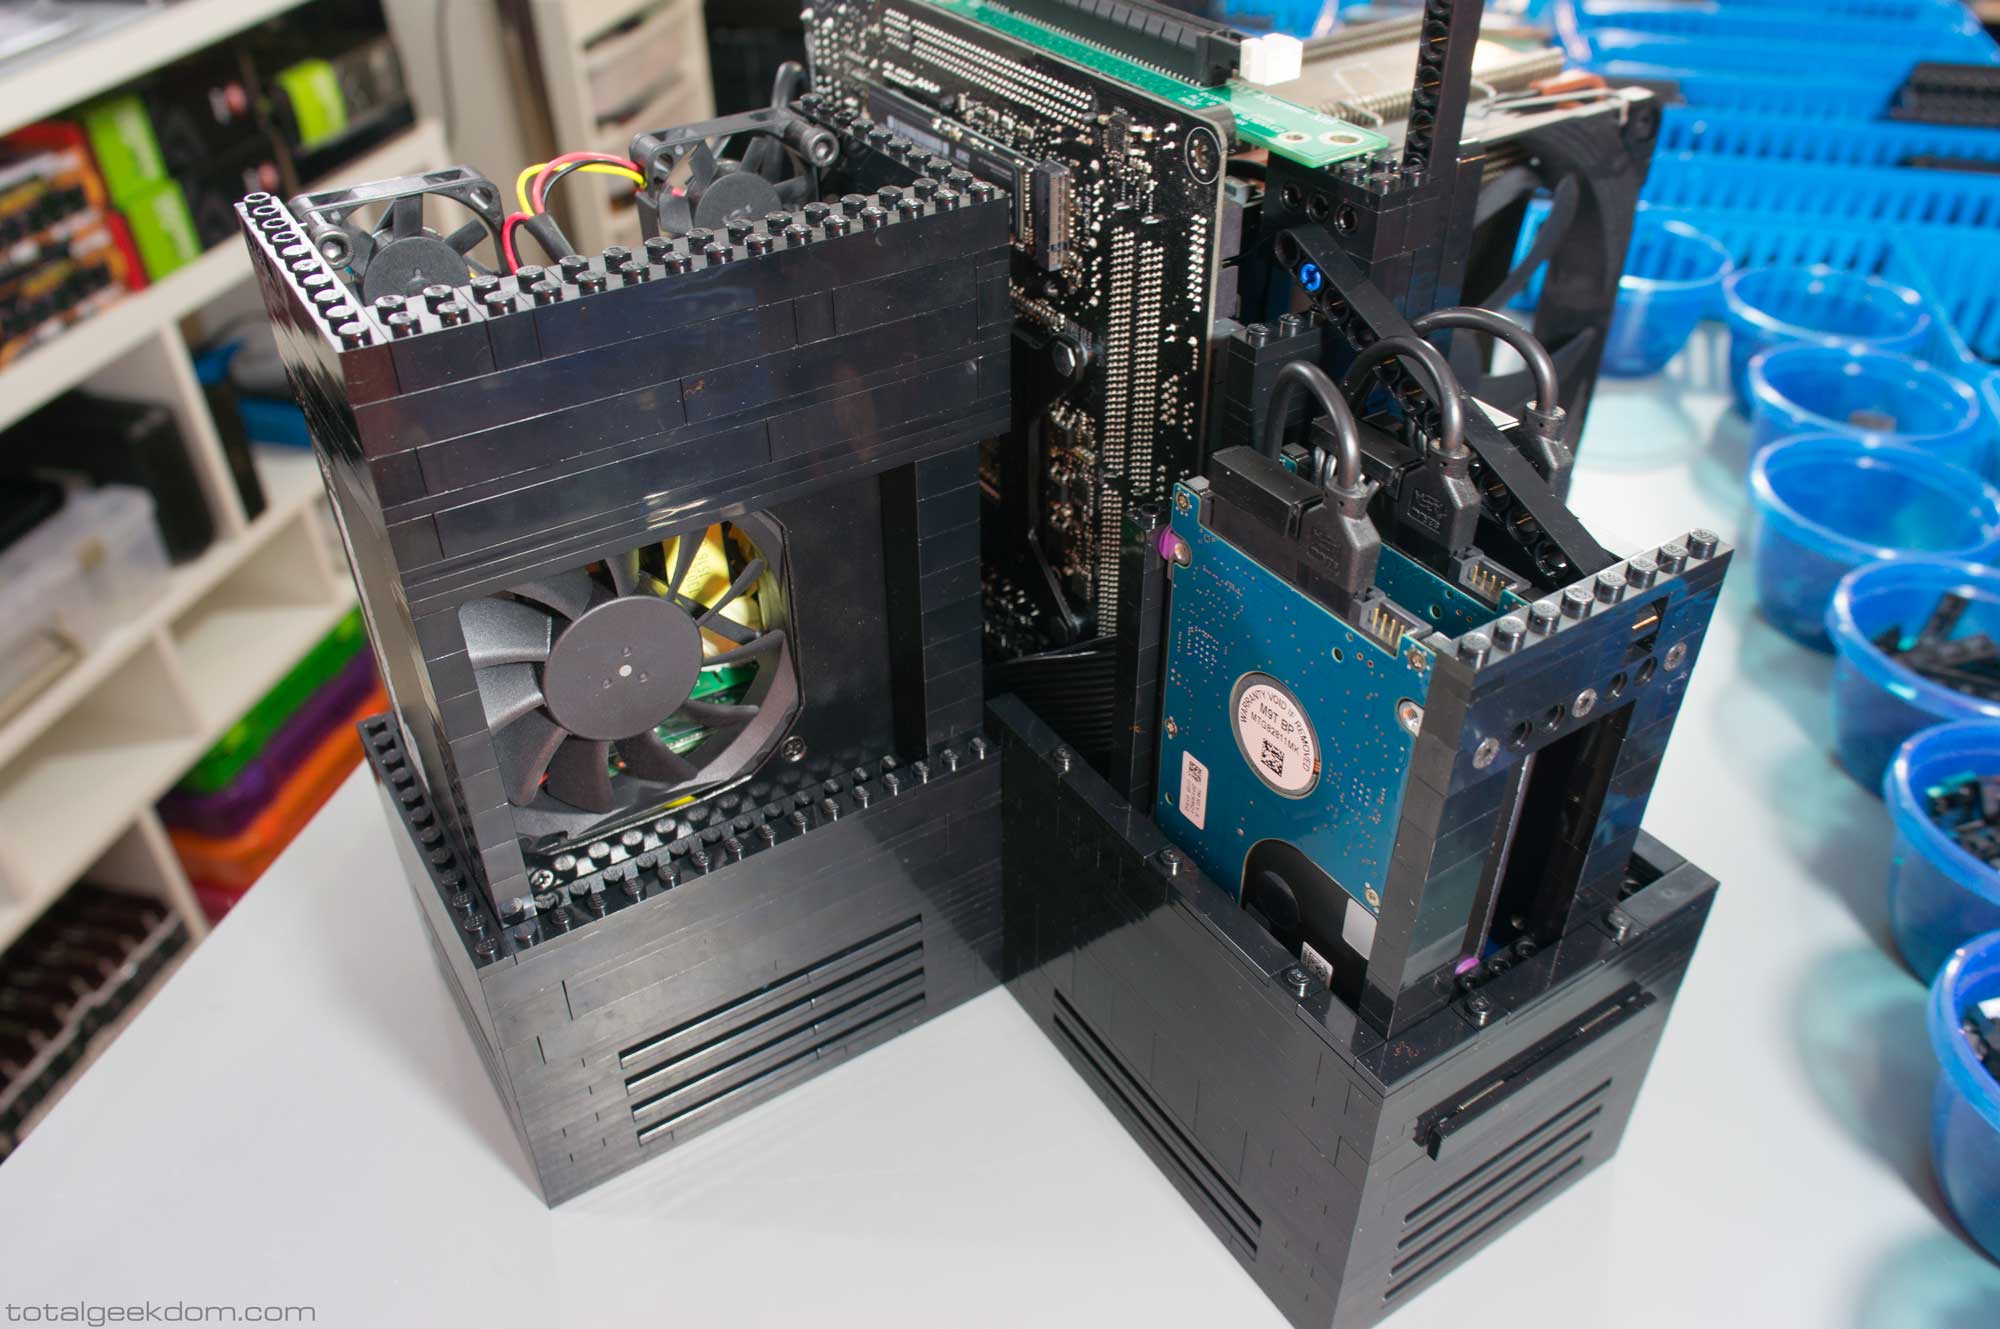
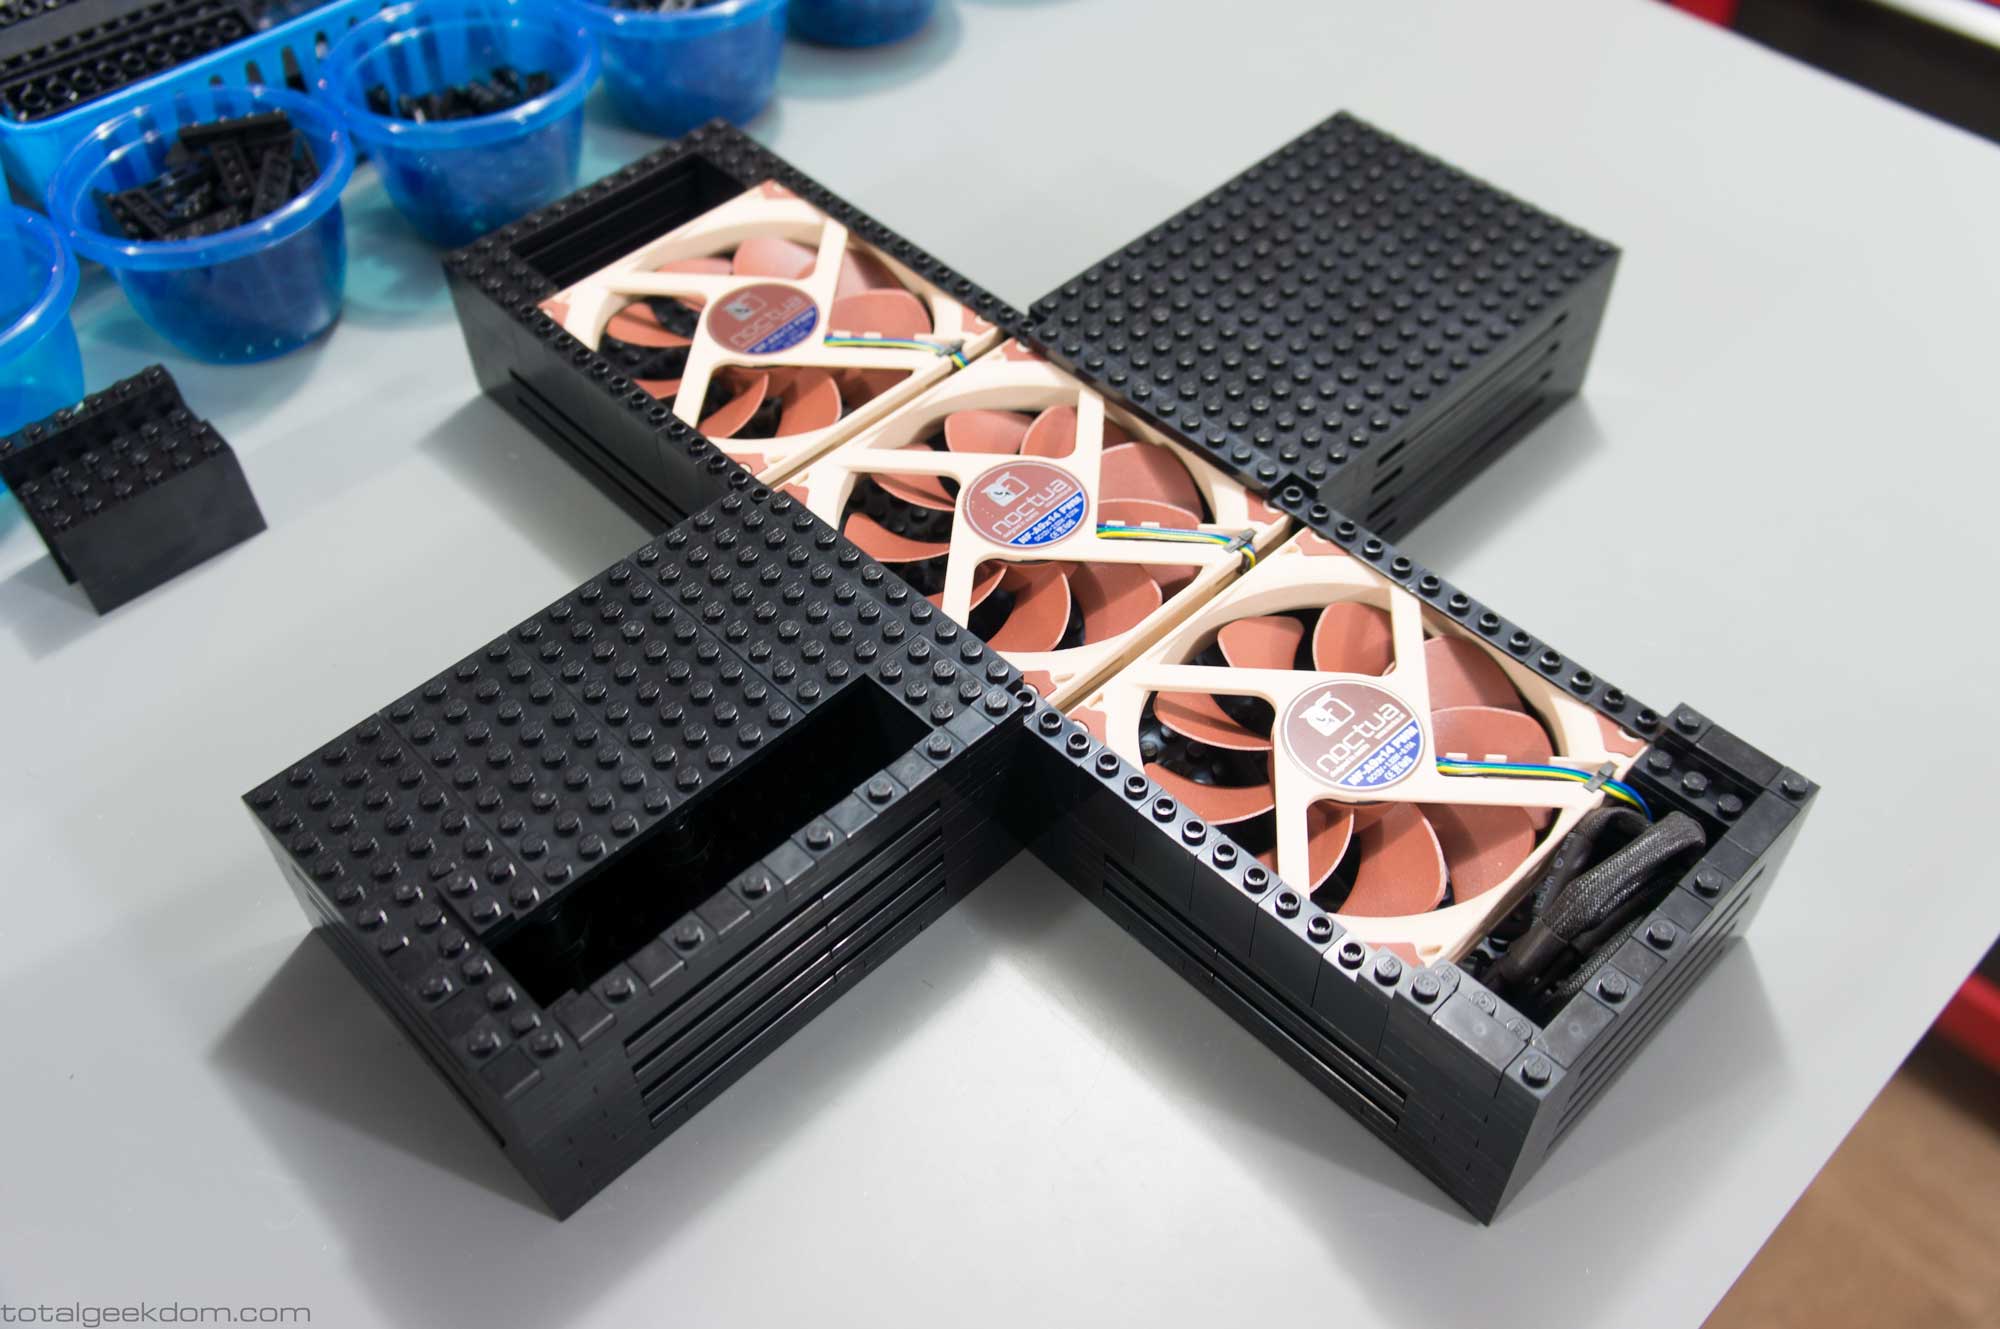
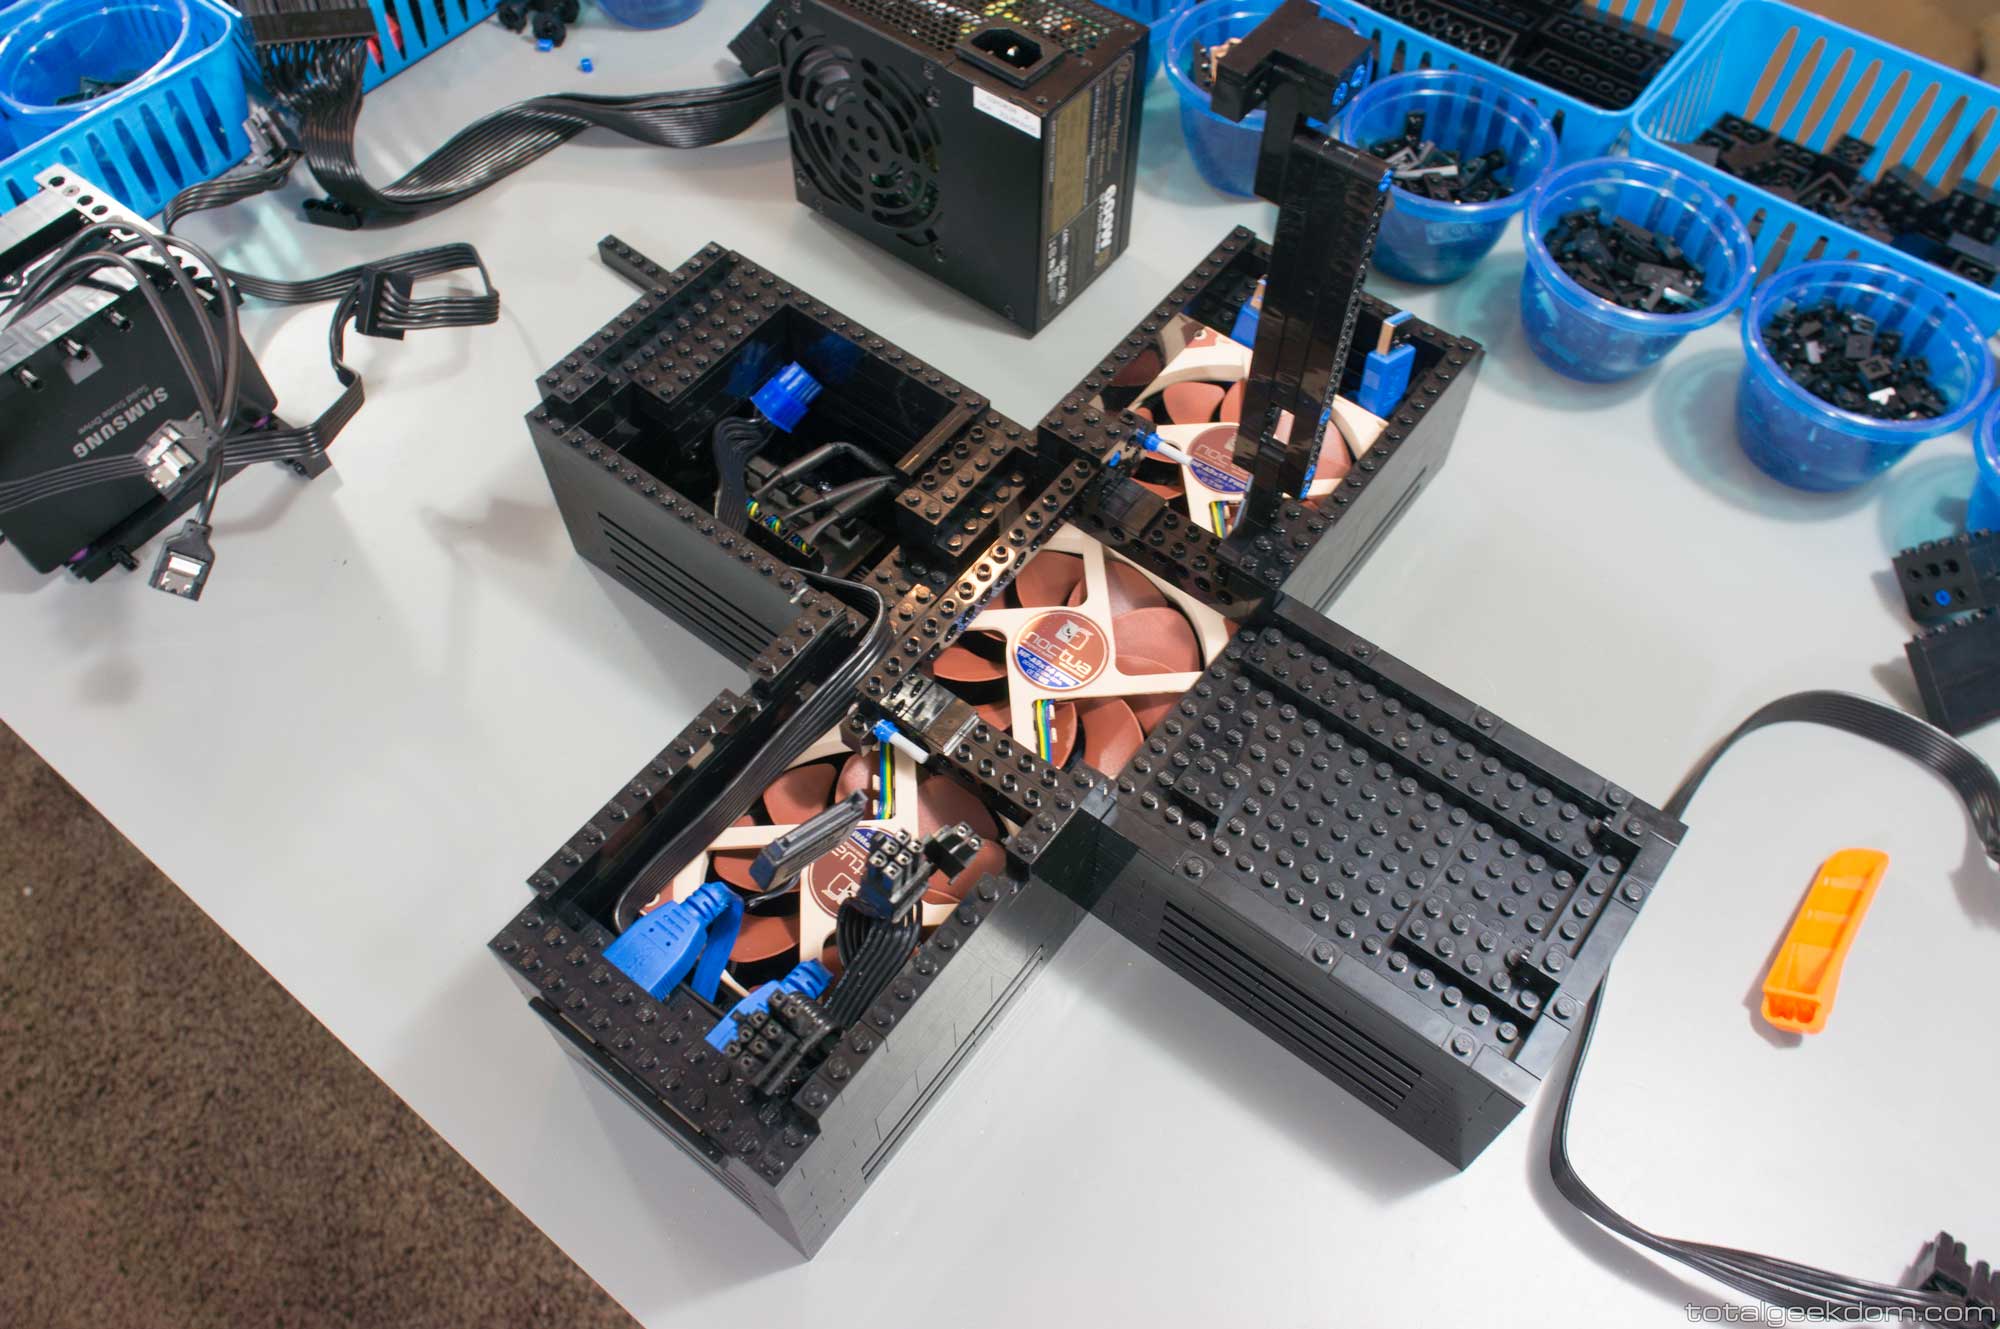
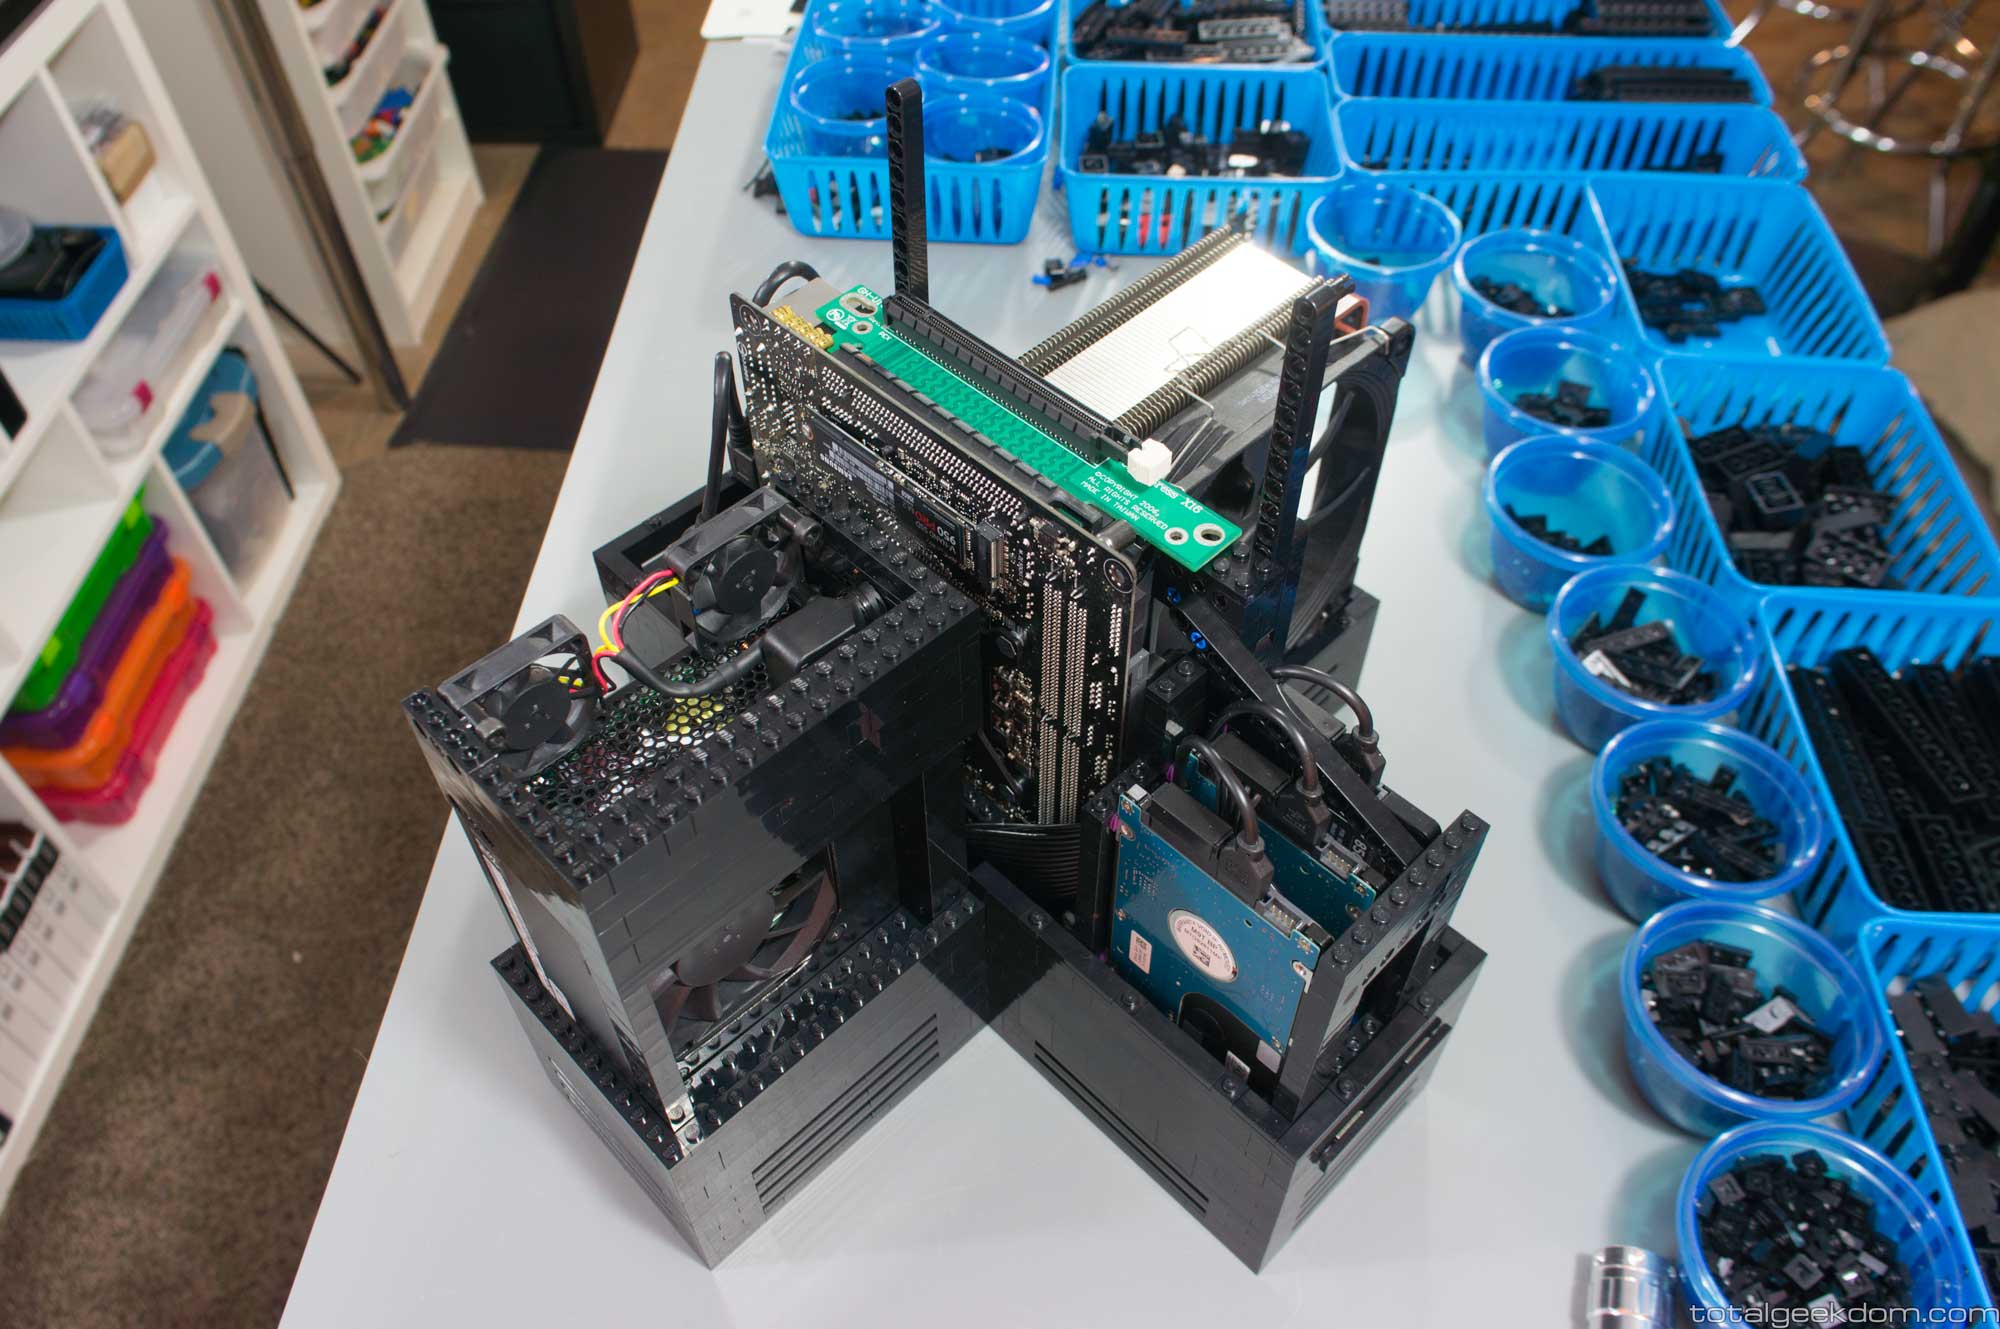
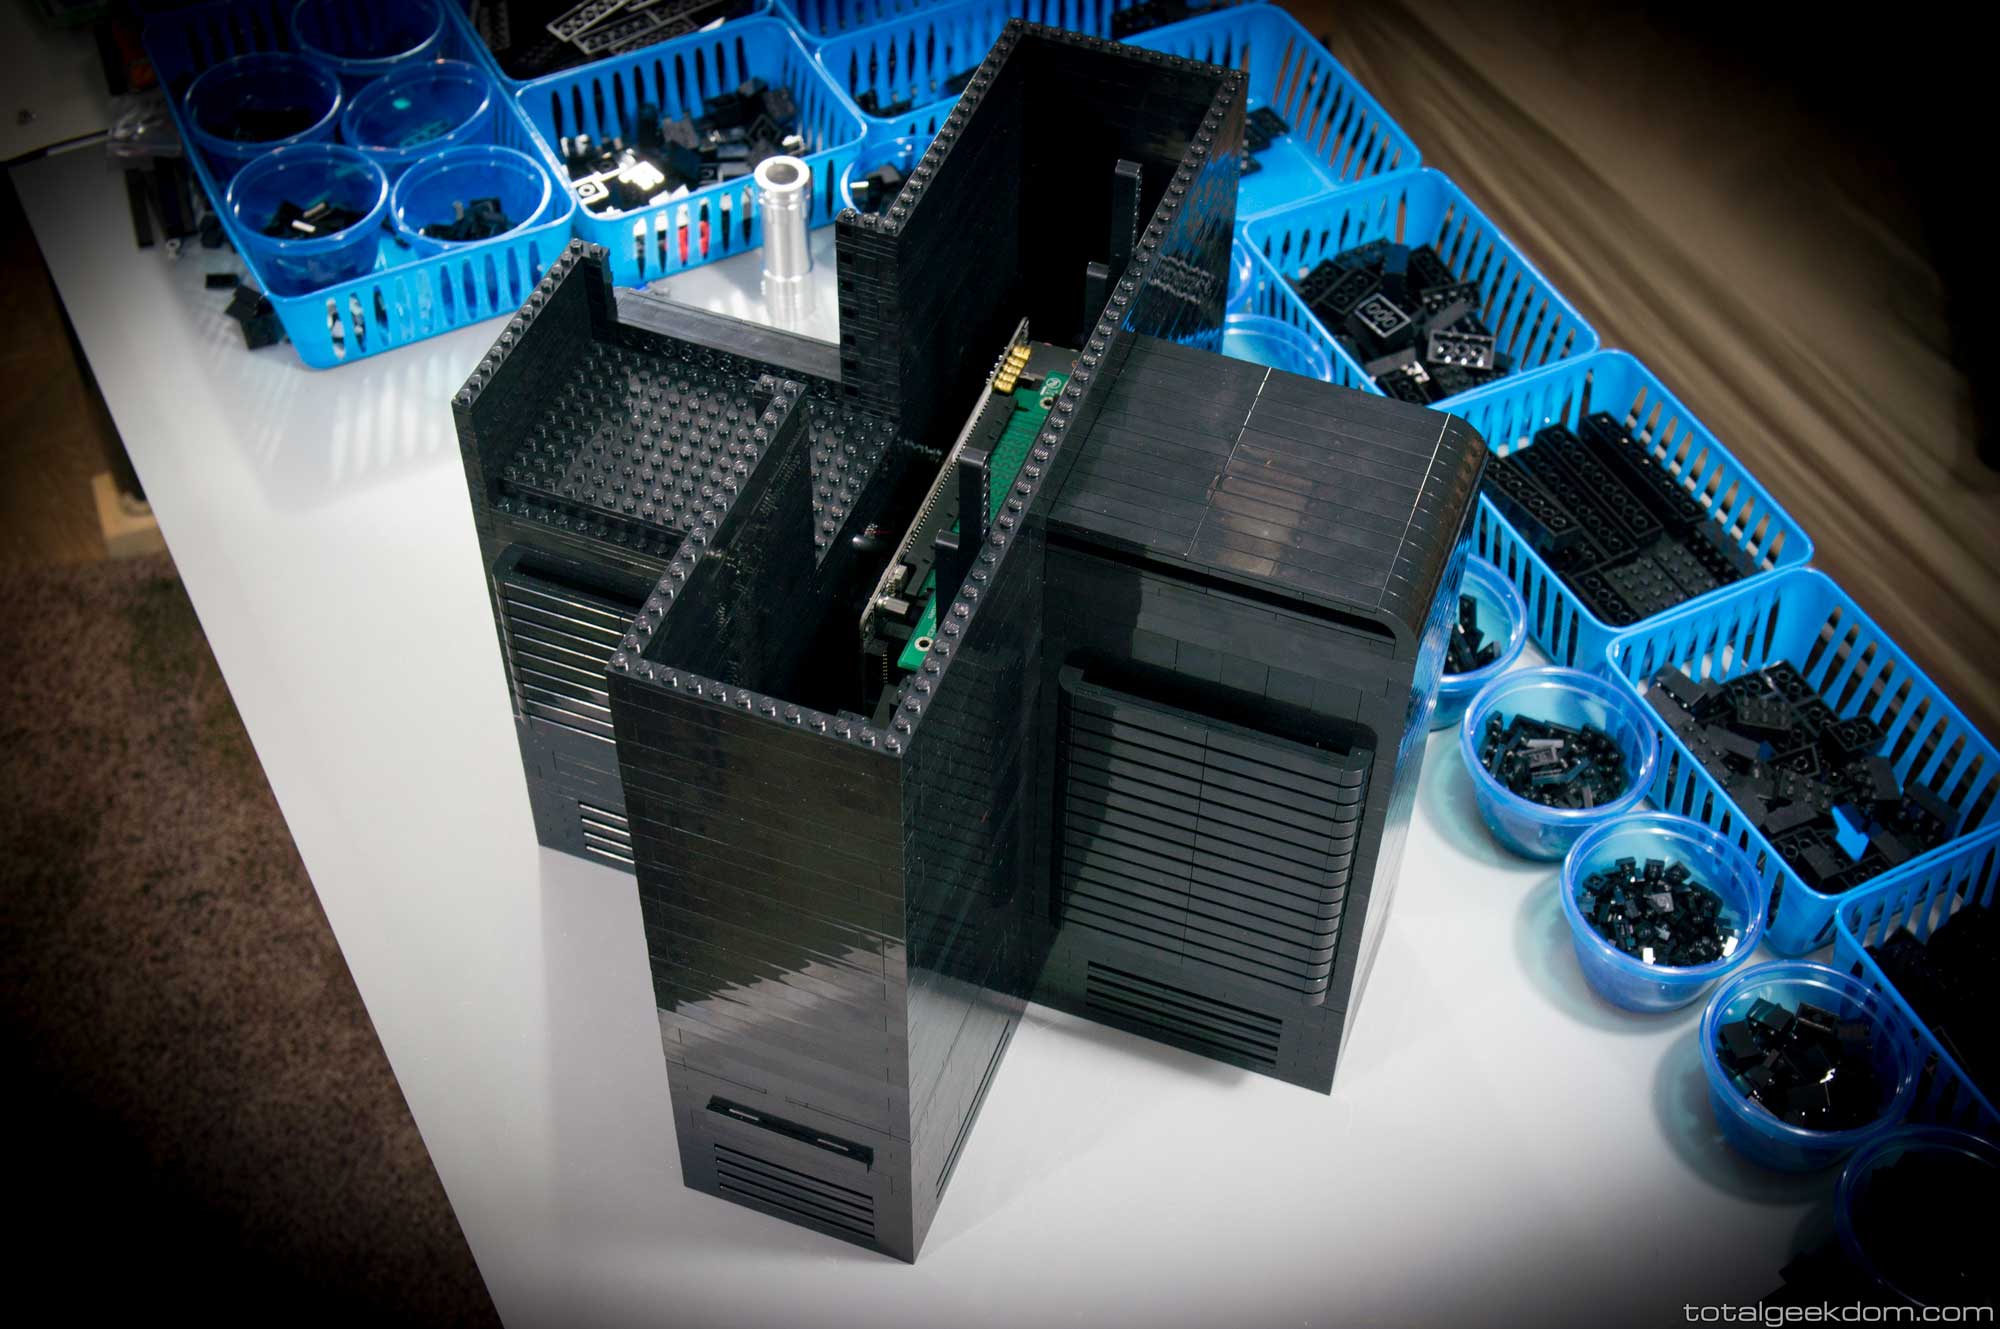
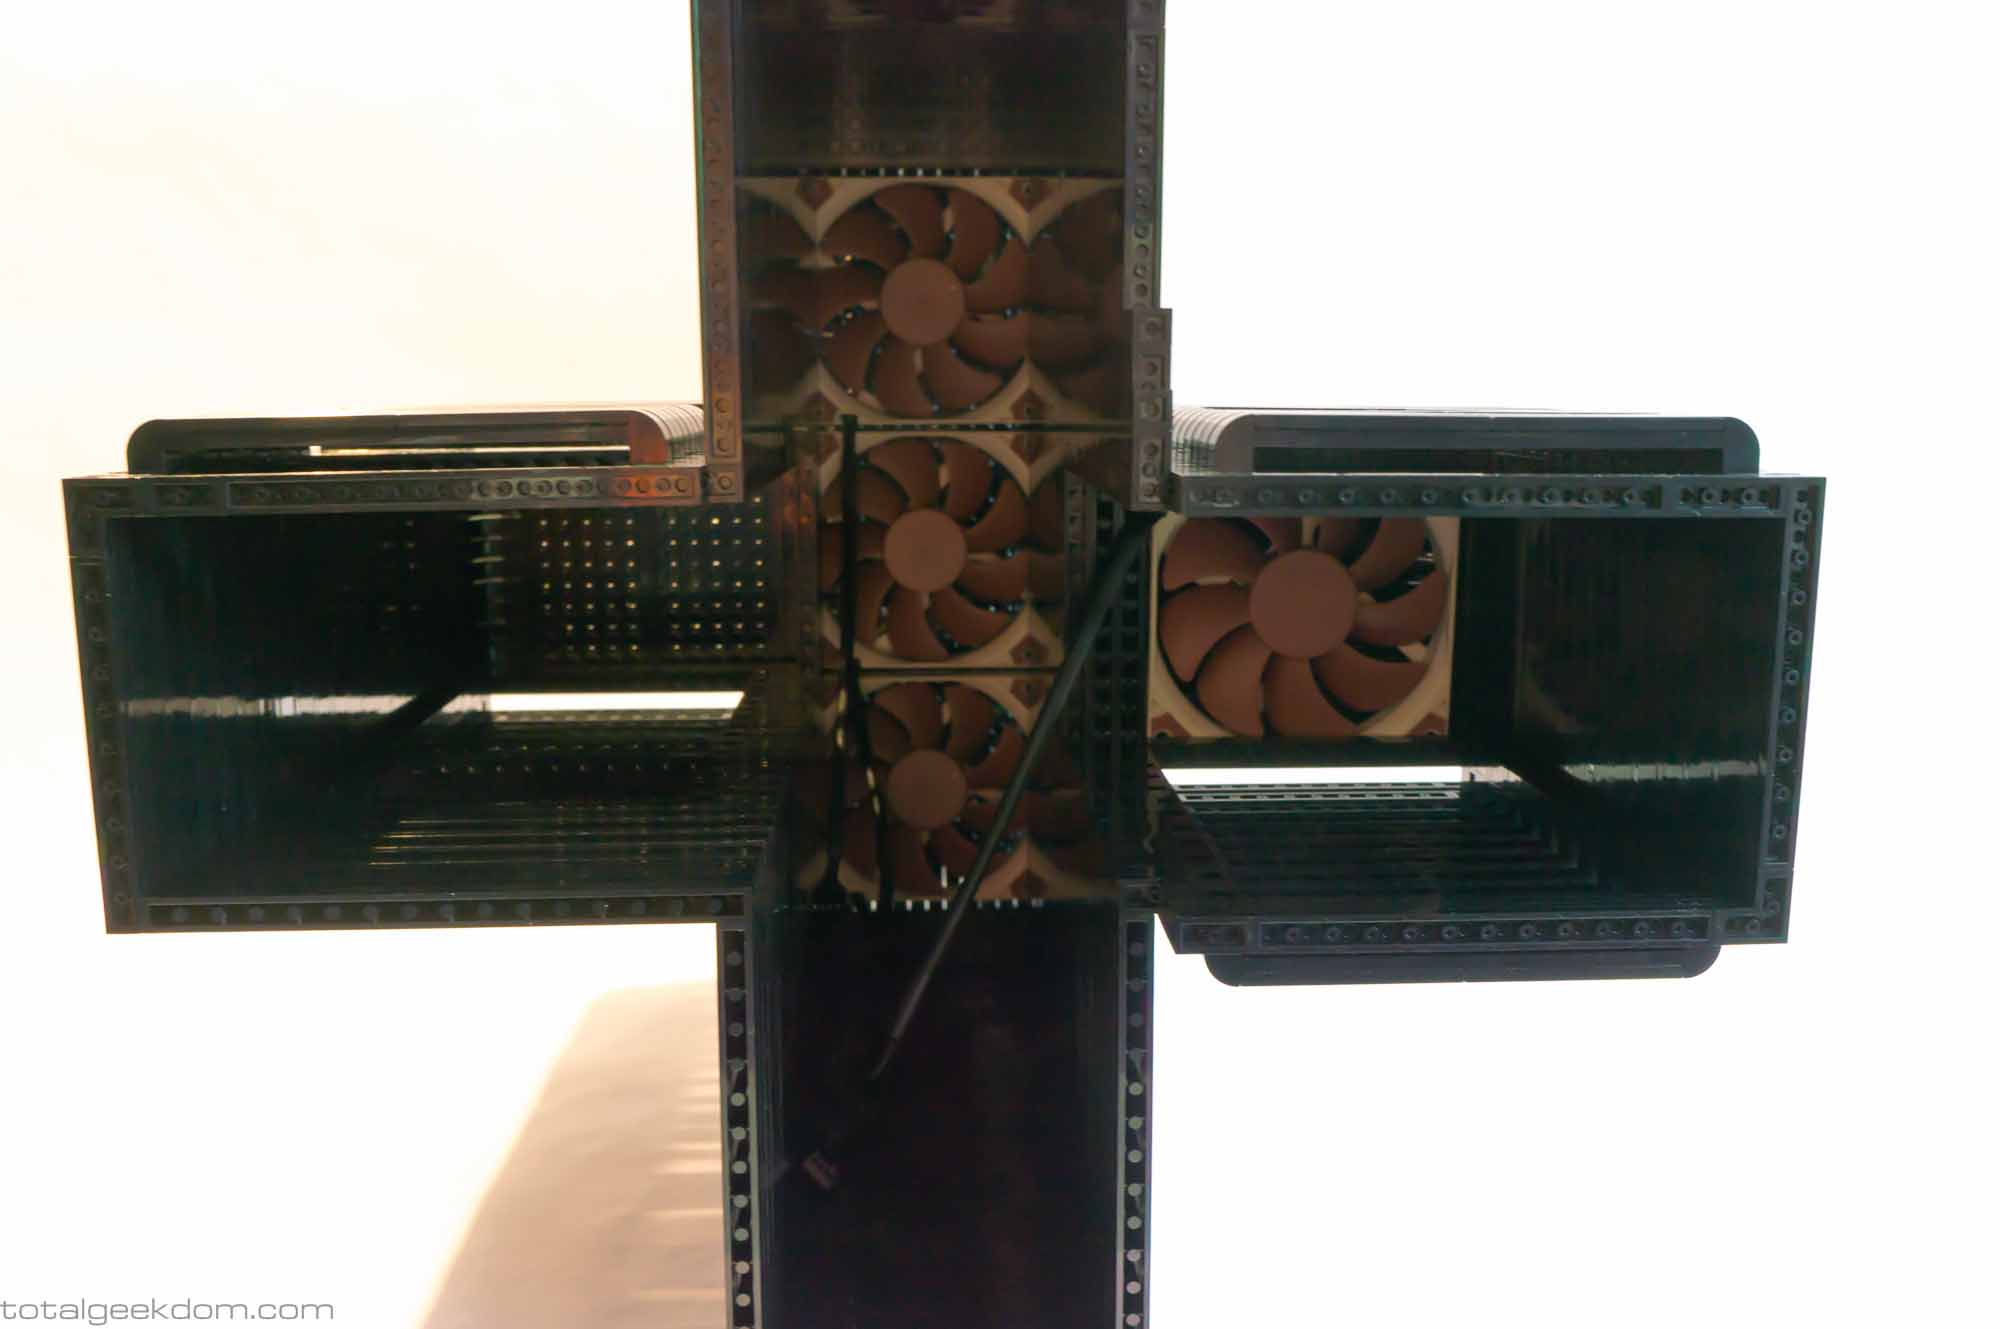
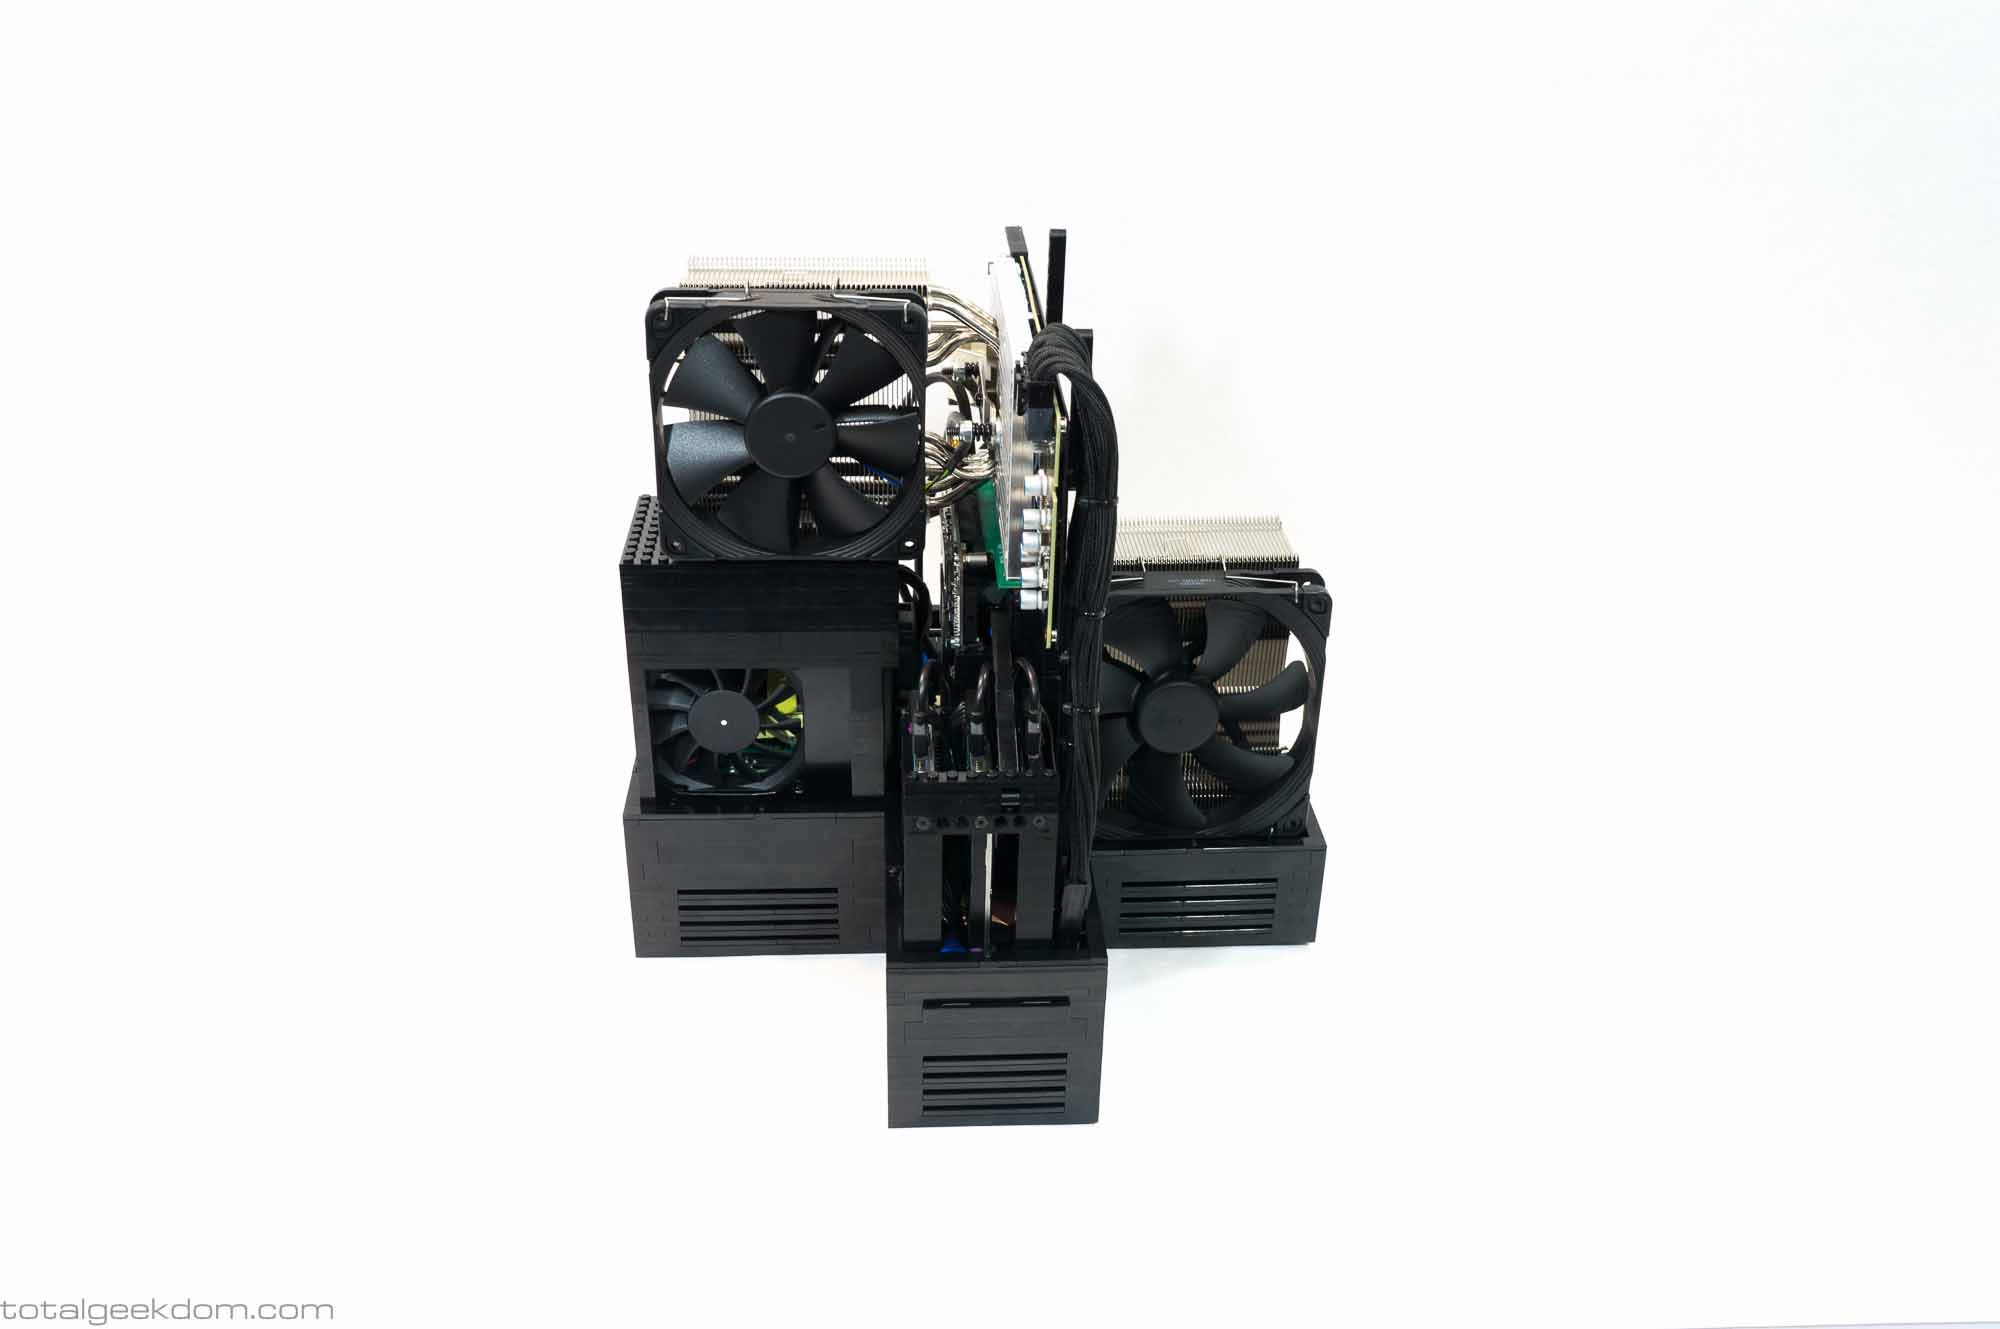
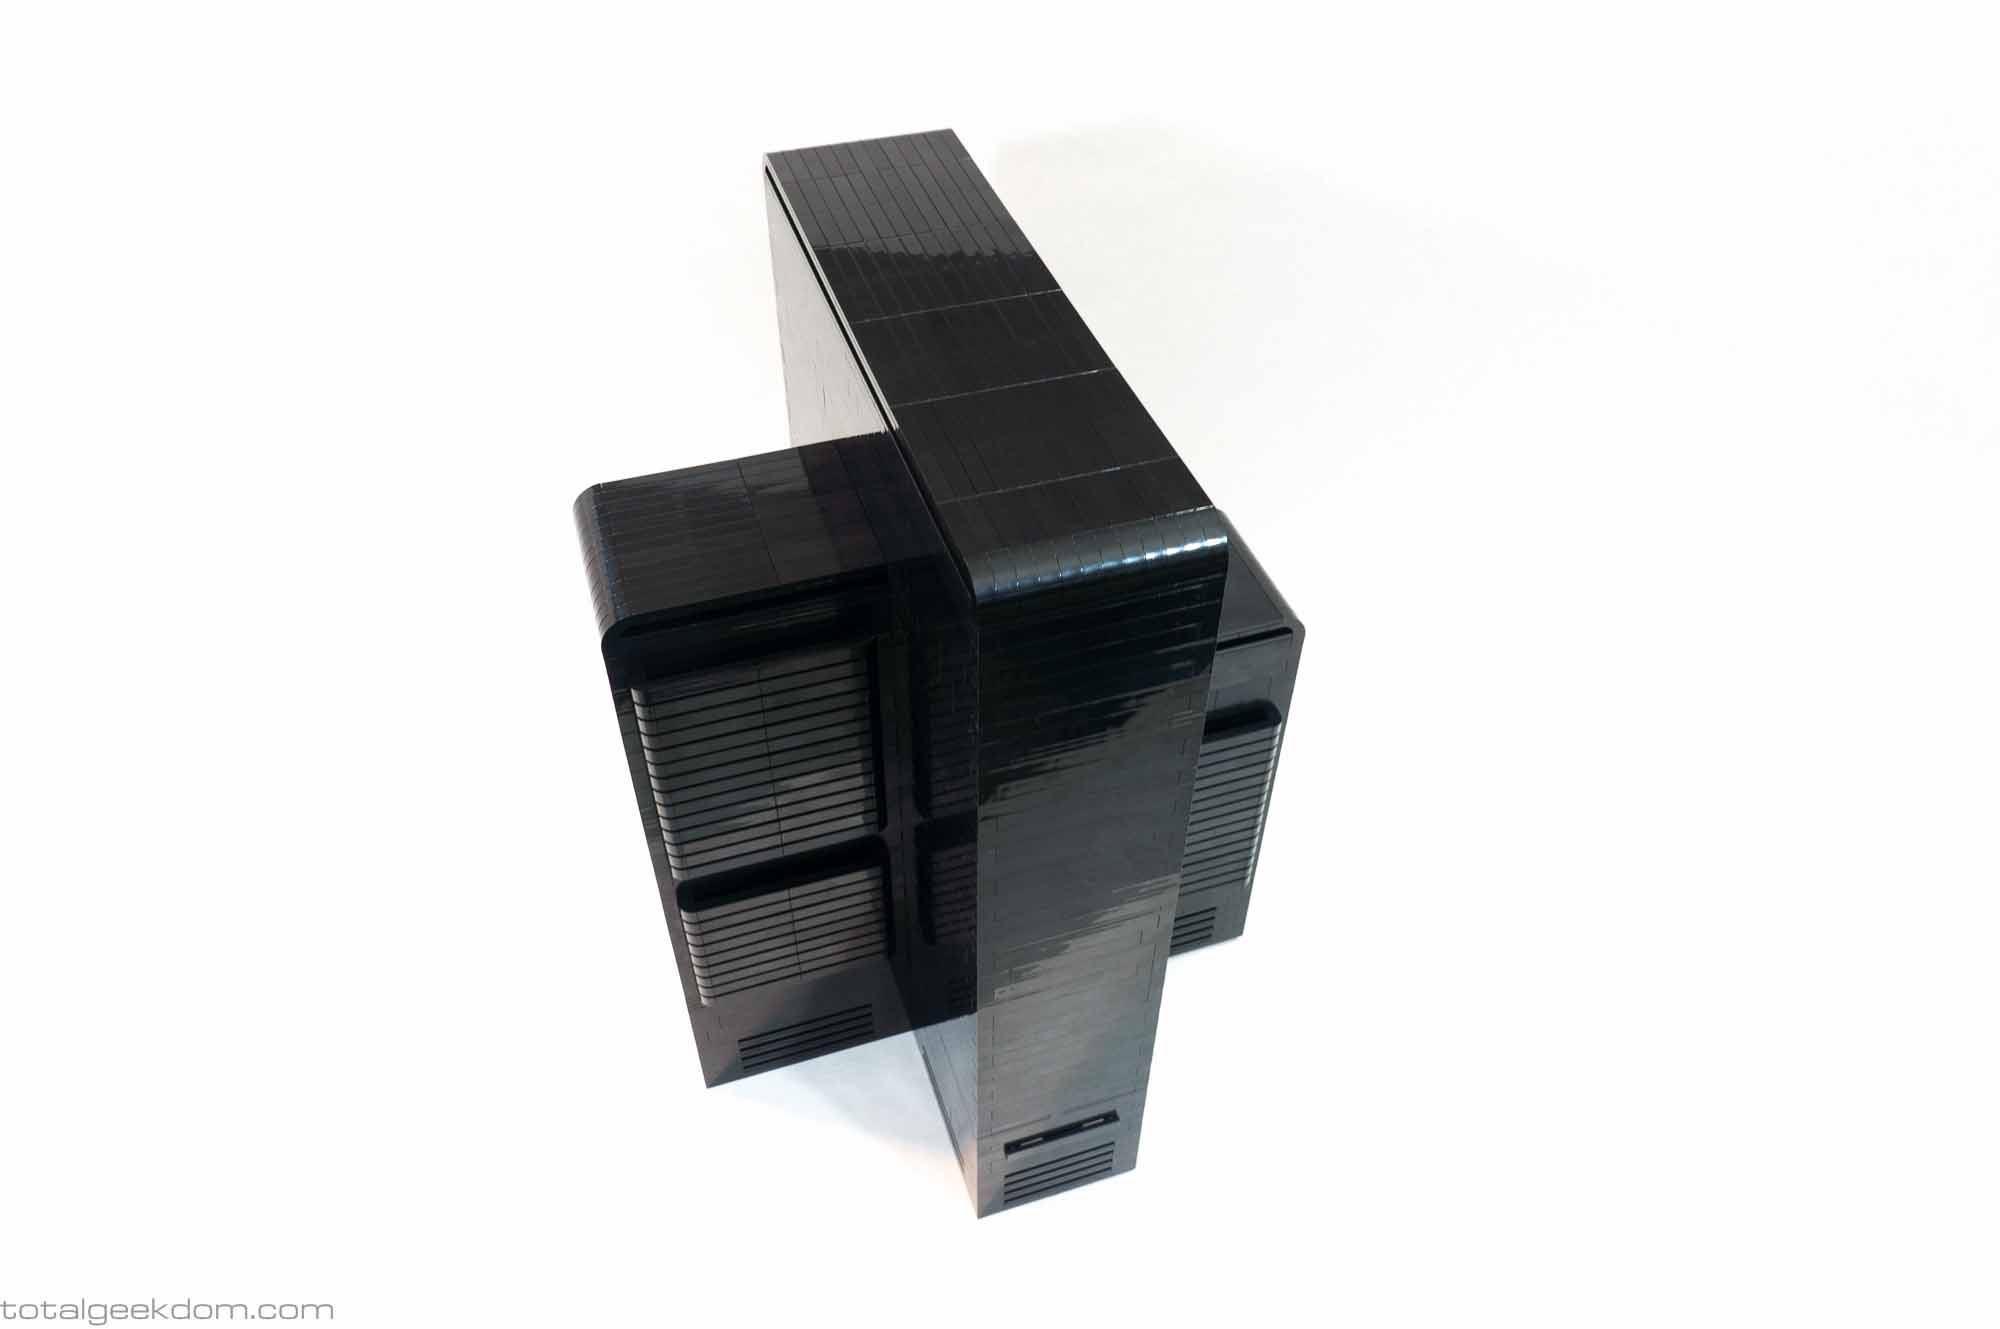
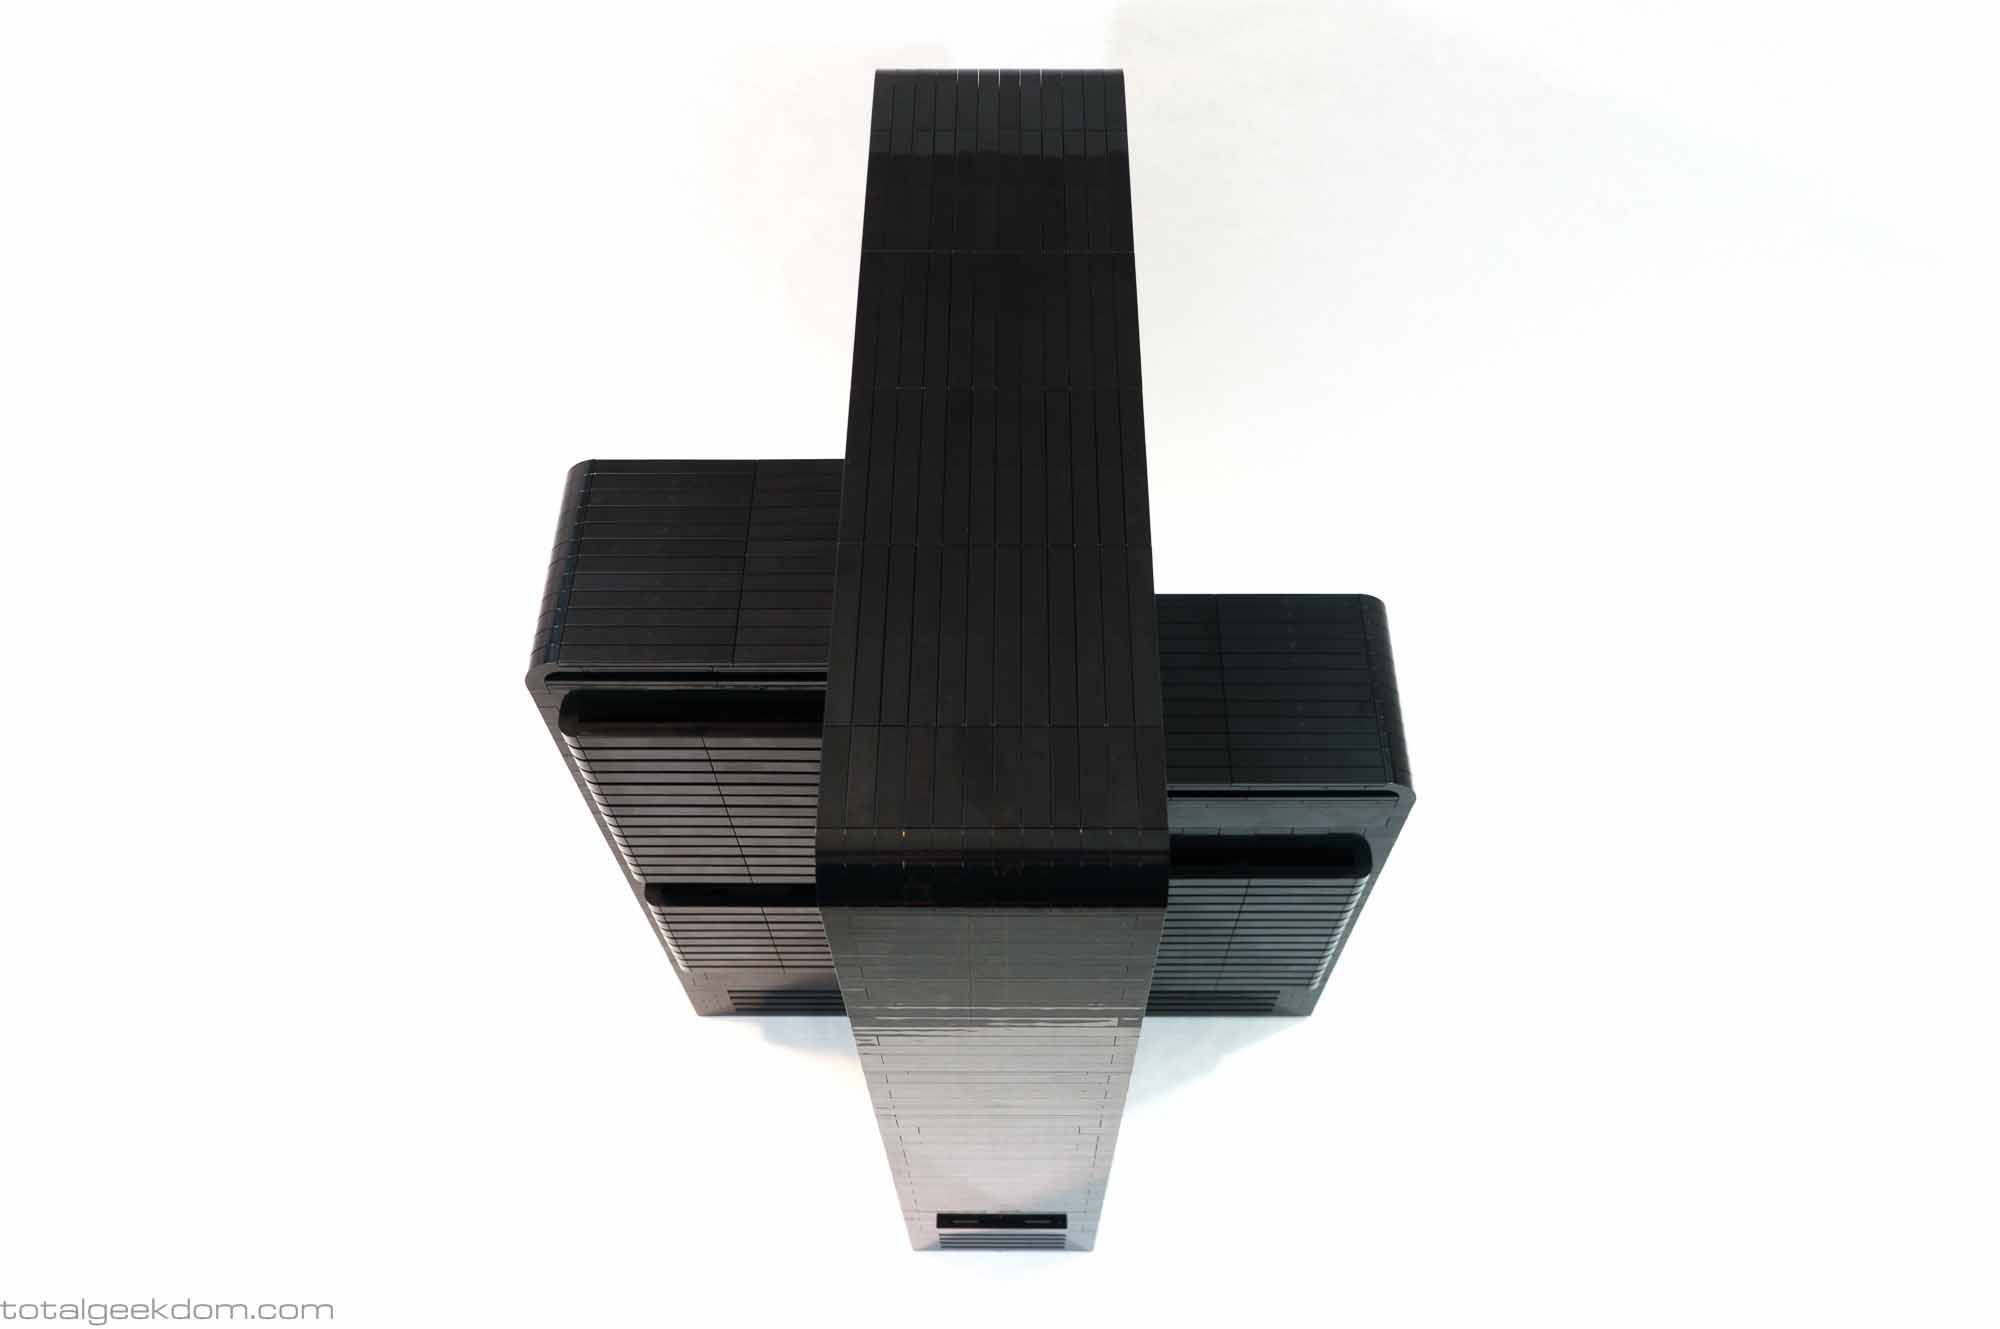
Going back to my original intention — to design a Lego Gaming Computer from scratch and make the case itself an integral part of the cooling system — led me to design the case in the shape of an X. In order to compartmentalize the components and give them their own fresh air inlets and exhausts, I needed the case to closely mirror the components. This meant flipping the motherboard around from its normal position (which is usually facing outward to the left) to allow for the graphics card to face the opposite direction, separating the airflow paths.
With the motherboard on its side, the very large Noctua NH-U14S CPU cooler is able to jut out sideways from the case. By building a separate section for the CPU cooler there is now an immediate fresh air source and exhaust path that is separated from the rest of the case. This allows the heat generated by the CPU to pass outside of the case instead of remaining within the compartment and increasing the internal temperature of the case.
The lower section of my case design features the wiring and air inlets. Air slots placed around the perimeter of the lower 4 sections allow for fresh cool air to be drawn into the system. The sections under the power supply and CPU cooler are sealed and feed the middle section of the case, where three 92mm Noctua fans blow cool, fresh air directly onto the motherboard, disk drives and graphics card. This system greatly improves upon typical strategies in the control of air flow. In a regular computer case you don’t get direct air blown over the motherboard, which allows for localized hot spots to occur. This system, with the fans placed directly below the motherboard, allows for a stream of air to flow over the entire motherboard surface on both the front and the back, cooling the MOSFETs, VRMs, Capacitors, chips, and motherboard PCB itself. Furthermore, this technique enables the cooling of the PCIe drive, which is located on the back of the motherboard and is quite sensitive to heat. Once again, my compartmentalized design is superior to the rectangular computer box which neither blows fresh air directly onto the motherboard nor provides the additional airflow to the back of the motherboard to cool the SSD drive.
Opposite the CPU, the power supply is housed in its own dedicated case section. This allows the power supply to have its own fresh air inlet and dedicated exhaust path. Once again, I have improved upon the design of the conventional computer case, in which the power supply typically resides inside of the case, sharing airflow with other components and consequently being heated by them.
Lego Gaming Computer Power Supply Cooling Section
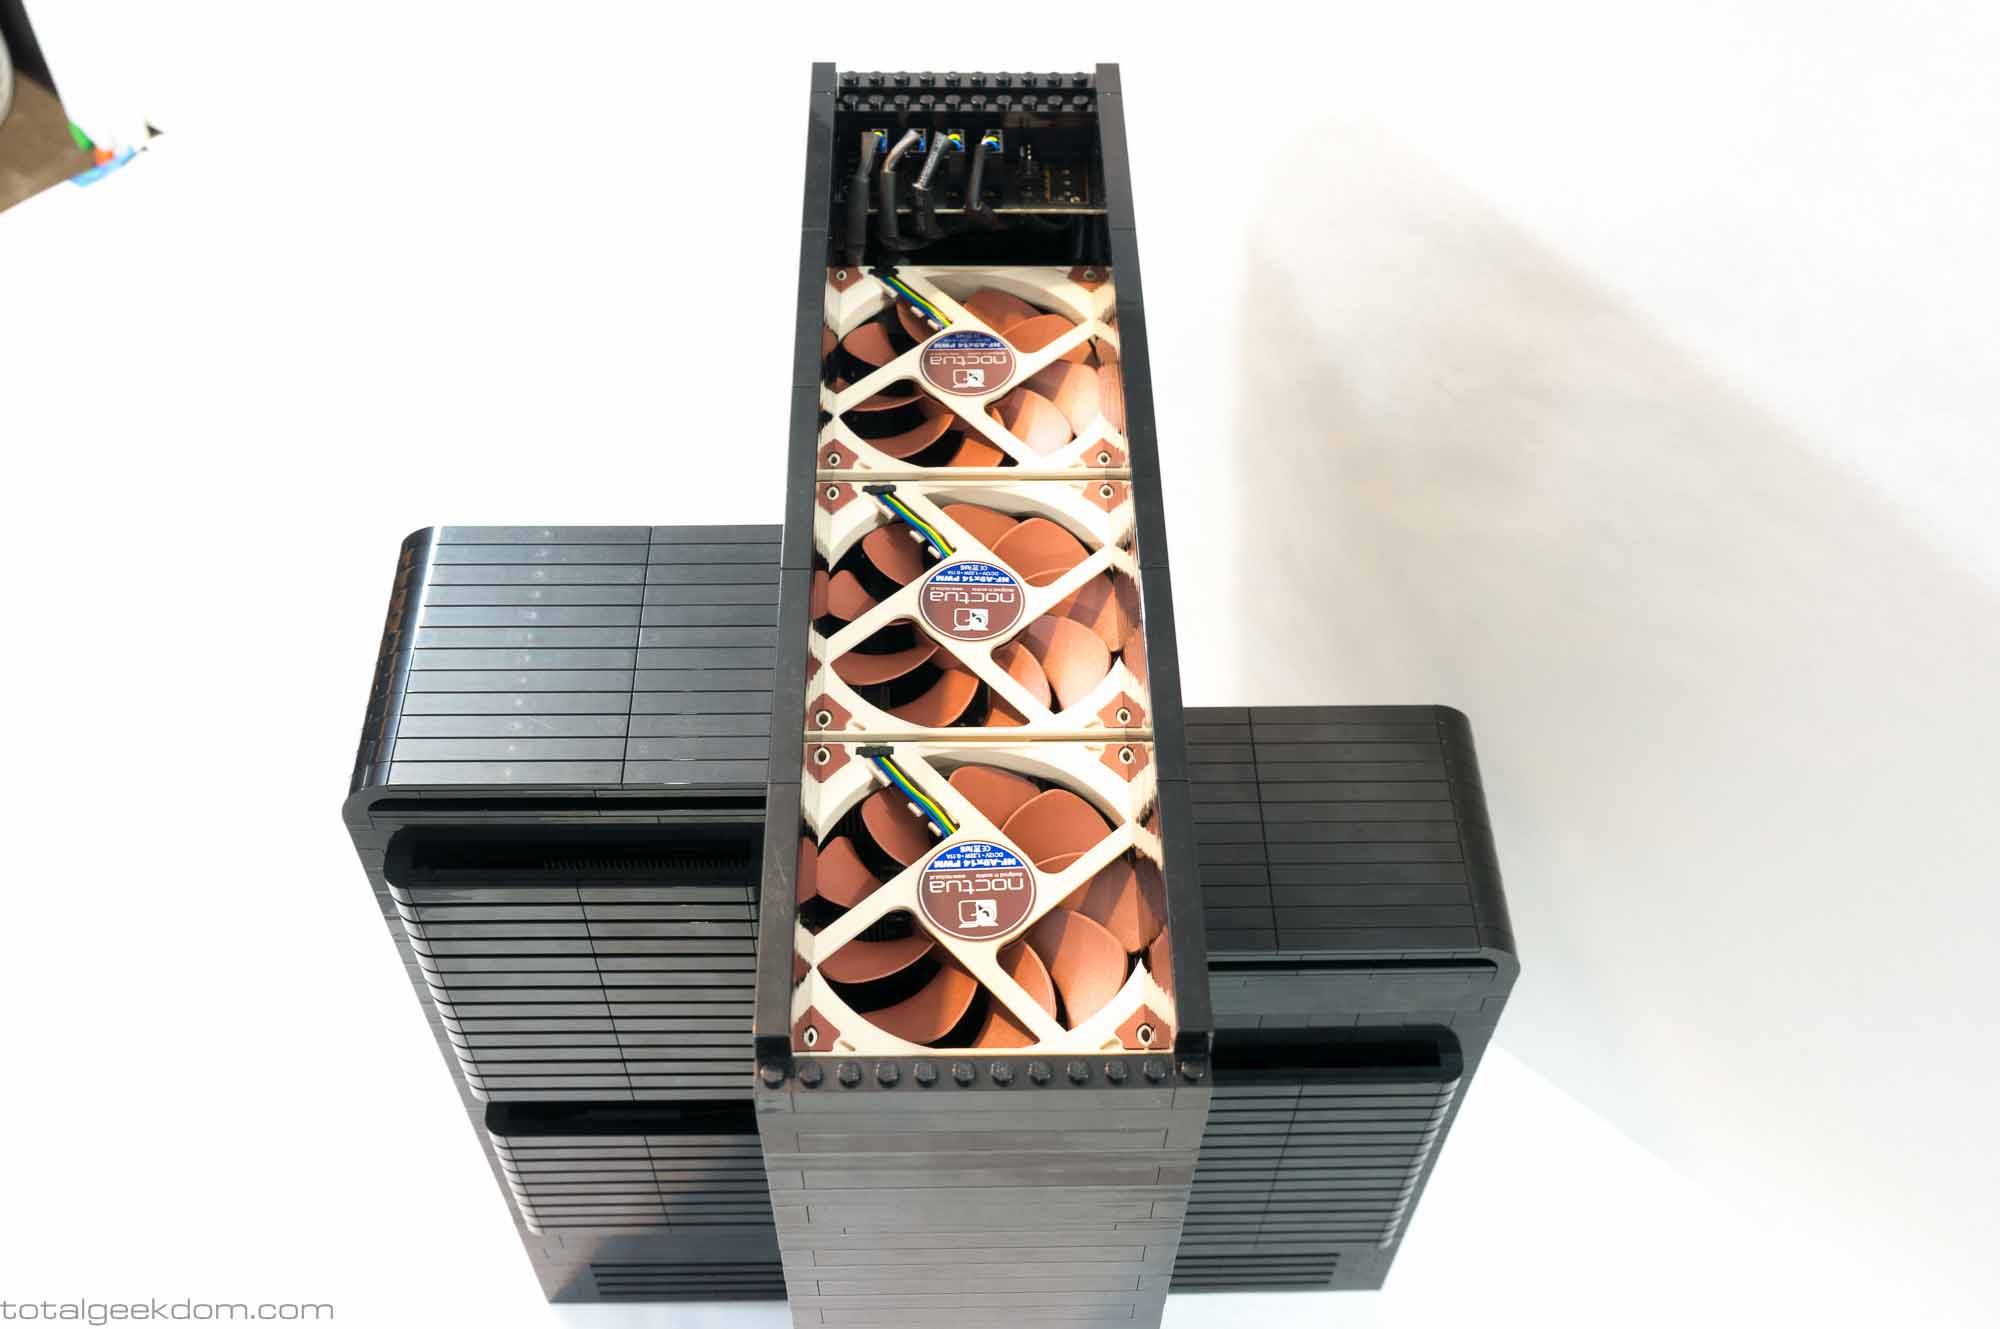
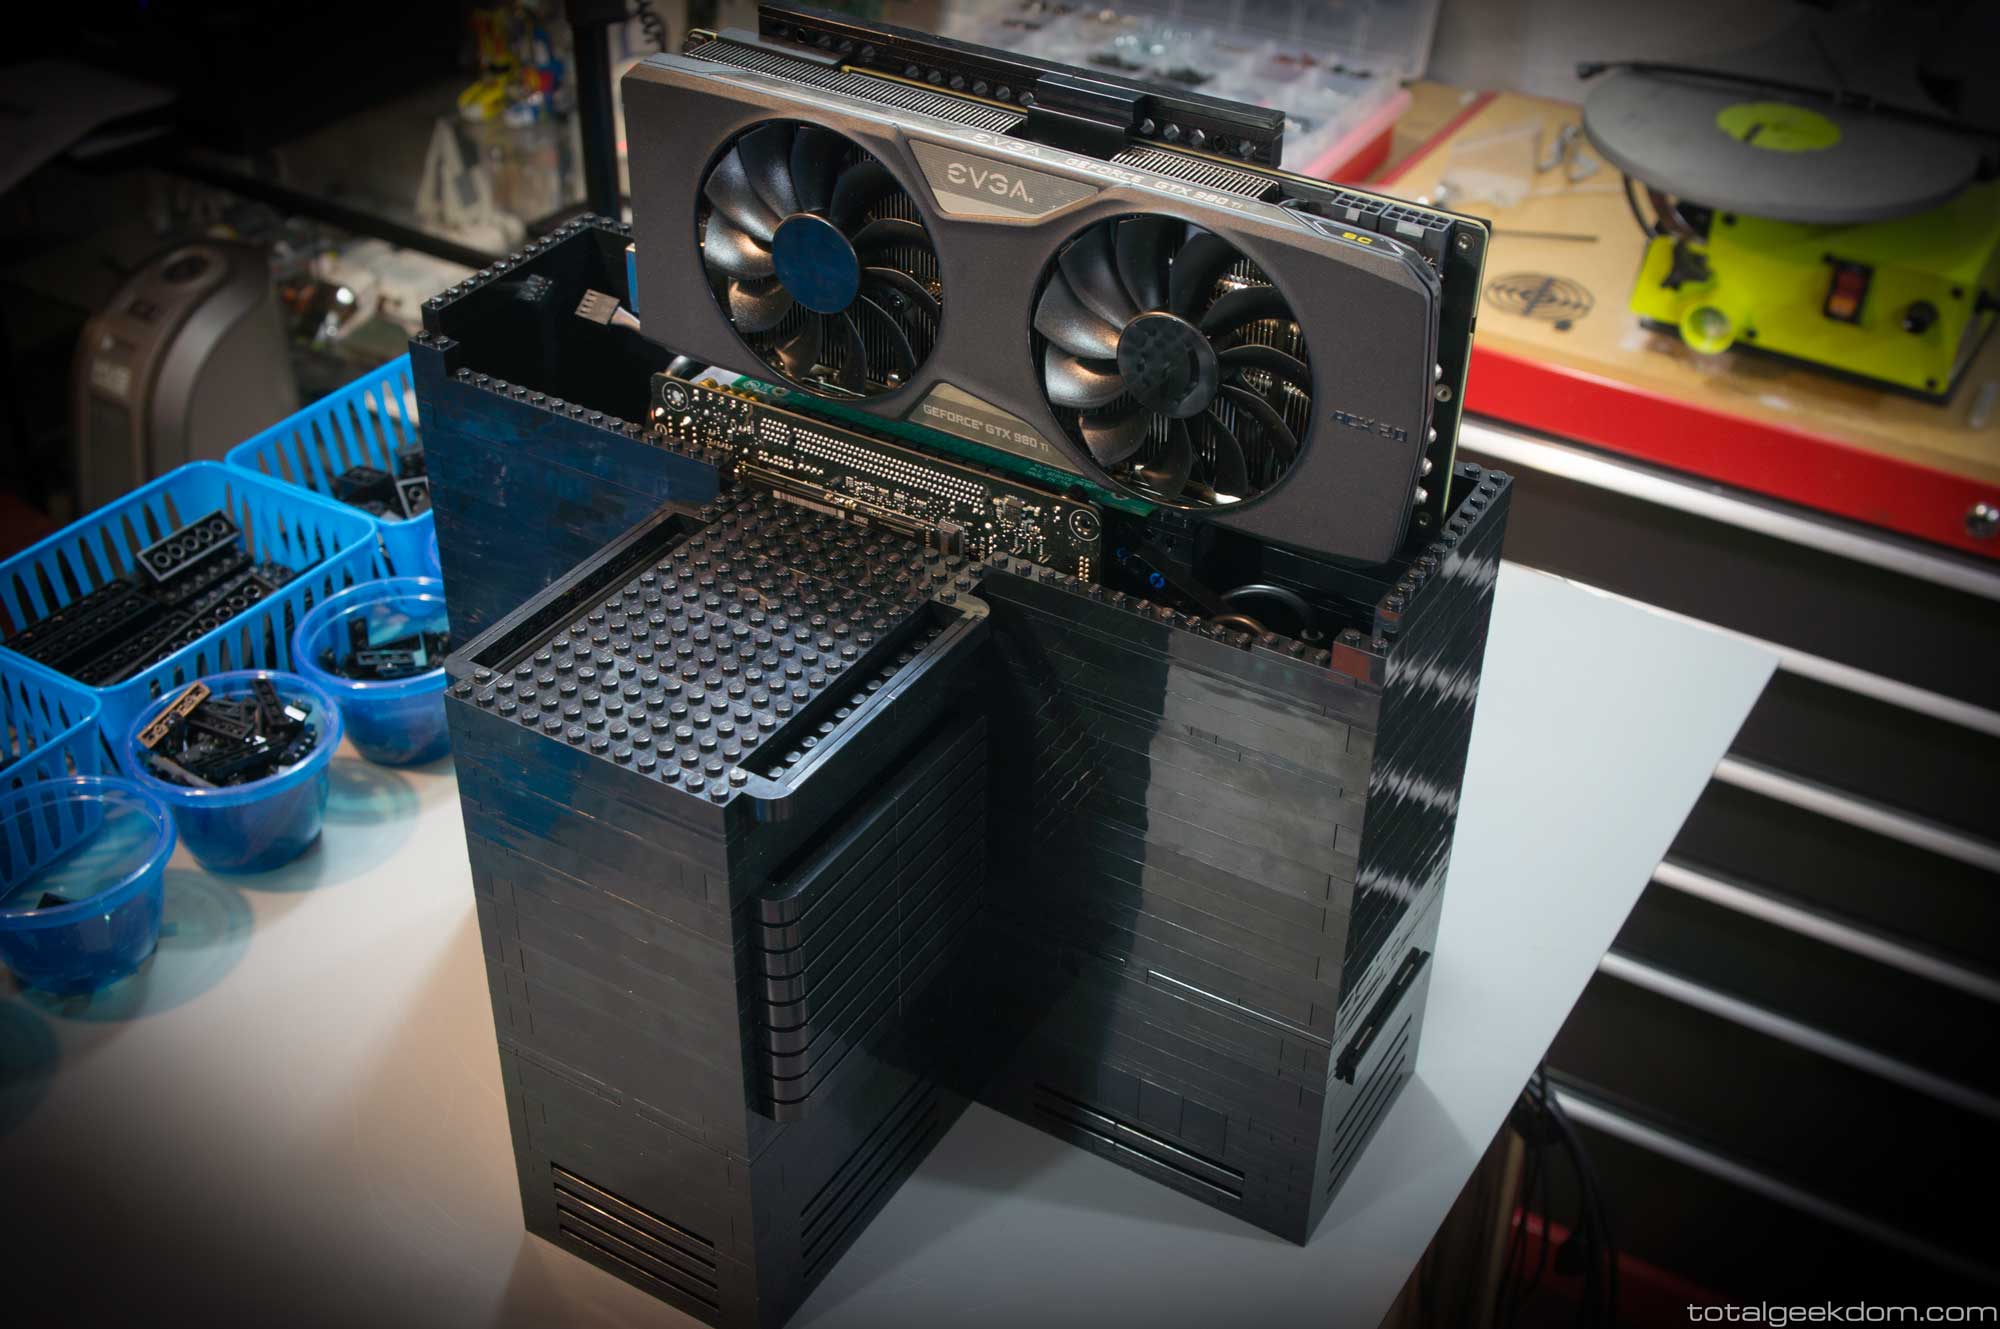
The top section of the case, where the graphics card resides, has 3 exhaust fans positioned directly above it that draw fresh air that flows over the entire card surface. This approach is an improvement over a conventional case design, by directing cool, fresh air over the graphics card to facilitate in cooling the PCB, VRMs and memory.
Lego Gaming Computer Upper Noctua Case Fans
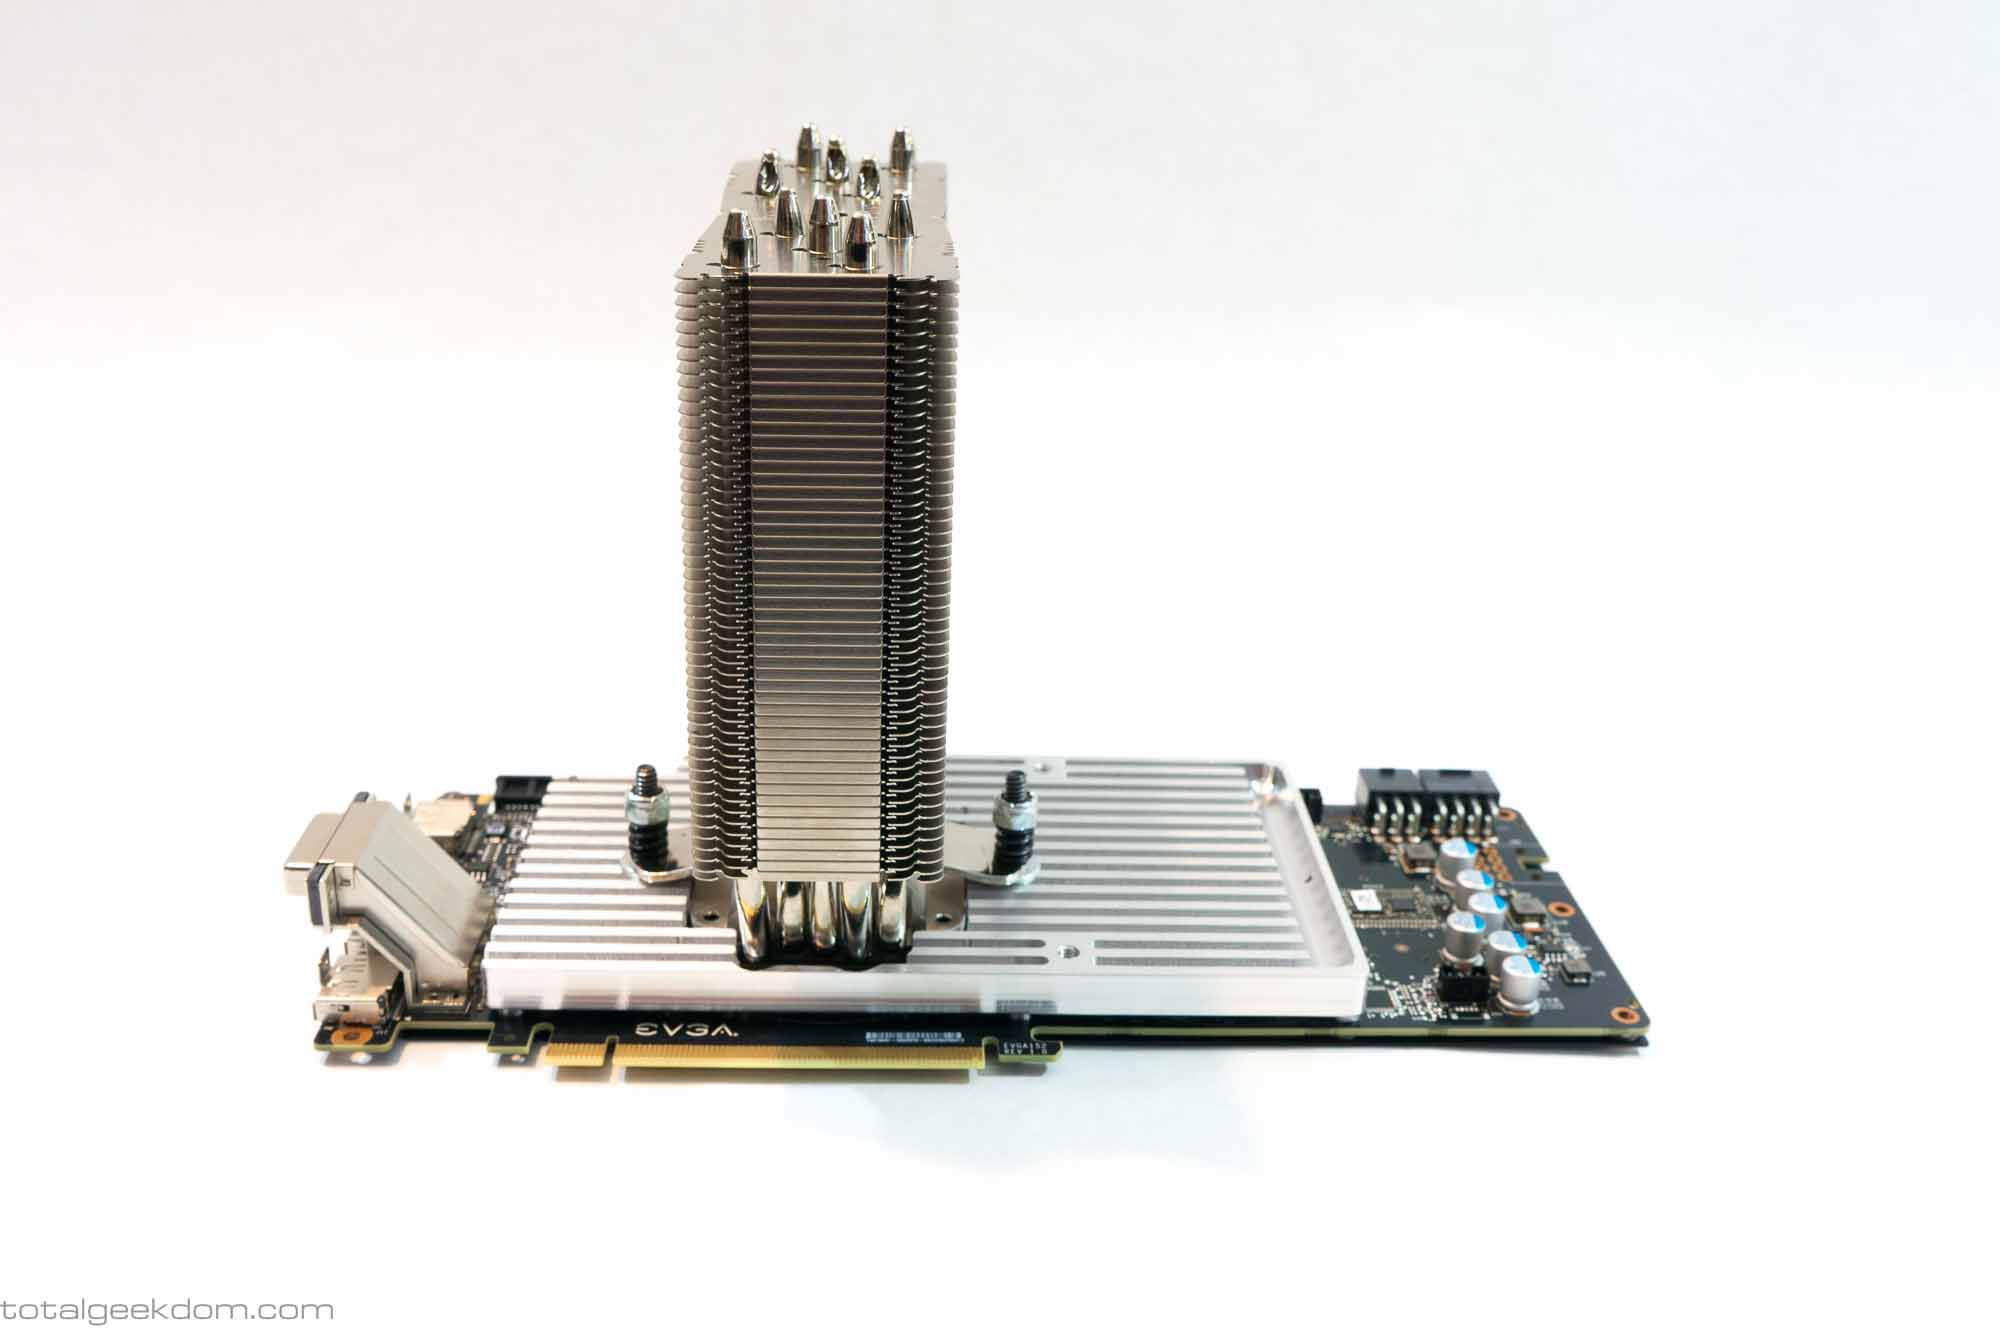
Additionally, I added a CPU tower-style heatsink to transfer the heat produced by the graphics card core outside of the case more effectively. Typically, graphics cards are designed with their cooling system held close to the PCB because in order to fit them in conventional cases (possibly with other cards right next to them), they can’t be more than 2 slots wide. This imposes an important limitation on cooling the graphics card. The core of the graphics card requires the majority of the cooling, but with the heatpipe coolers sitting flat on the card with only slim fans positioned directly in front of them, the air blown to cool the core is the same air that is heated by the core. Blown back onto the card itself, it does not help to cool of the PCB, VRMs and memory whatsoever. It’s a necessary trade-off because of the form factor, but the graphics card’s stability, overclockability and durability suffer.
This is where the Lego Gaming Computer offers something very different than conventional systems to enable the graphics card to operate at its full potential. With a large CPU tower-style cooler attached directly to the core, the Lego Gaming Computer greatly increases the cooling of the graphics card. Furthermore, the graphics card core heatsink has its own fresh air inlet and exhaust paths. This cools the graphics card more effectively and ensures that the heat produced remains outside of the central section of the case, greatly improving the cooling of the entire computer. Sealing the graphics card’s core heat off from the motherboard and other hardware, does not increase the temperature of the other components, while the individual fresh air inlet and exhaust keeps the graphics card itself cooler.
Lego Gaming Computer Custom Graphics Card Tower Cooler and Heatsink
The tower-style heatsink graphics card cooler will be available as an option of the Lego Gaming Computer that would allow you to fully reach the maximum potential of the case design. However, even without it, the Lego Gaming Computer case is still more effective at cooling graphics cards with standard factory coolers than the conventional computer case, so the option is not essential.
Total Case Cooling
With fresh air brought in at the bottom of the case and exhaust fans placed at the top of the case, the cooling system of the Lego Gaming Computer already works well through the natural convection effect that takes place. But this design focuses on controlled airflow paths, which means instead of having large open spaces (like a conventional computer case), the slim profile of the case, which wraps around the components, forces the air path to flow directly over the components, maximizing the cooling effect. Furthermore, the individual sections for the CPU, graphics card, and power supply separate each of these heat producing components, lowering each of their temperatures by not allowing them to add to the total system heat output. Lastly, the top section of the case has vents for each stack, which permits the raising hot air to flow out and upward. By tightly controlling the airflow paths and ensuring airflow directly over all of the components, my design uses the available airflow to maximize cooling.
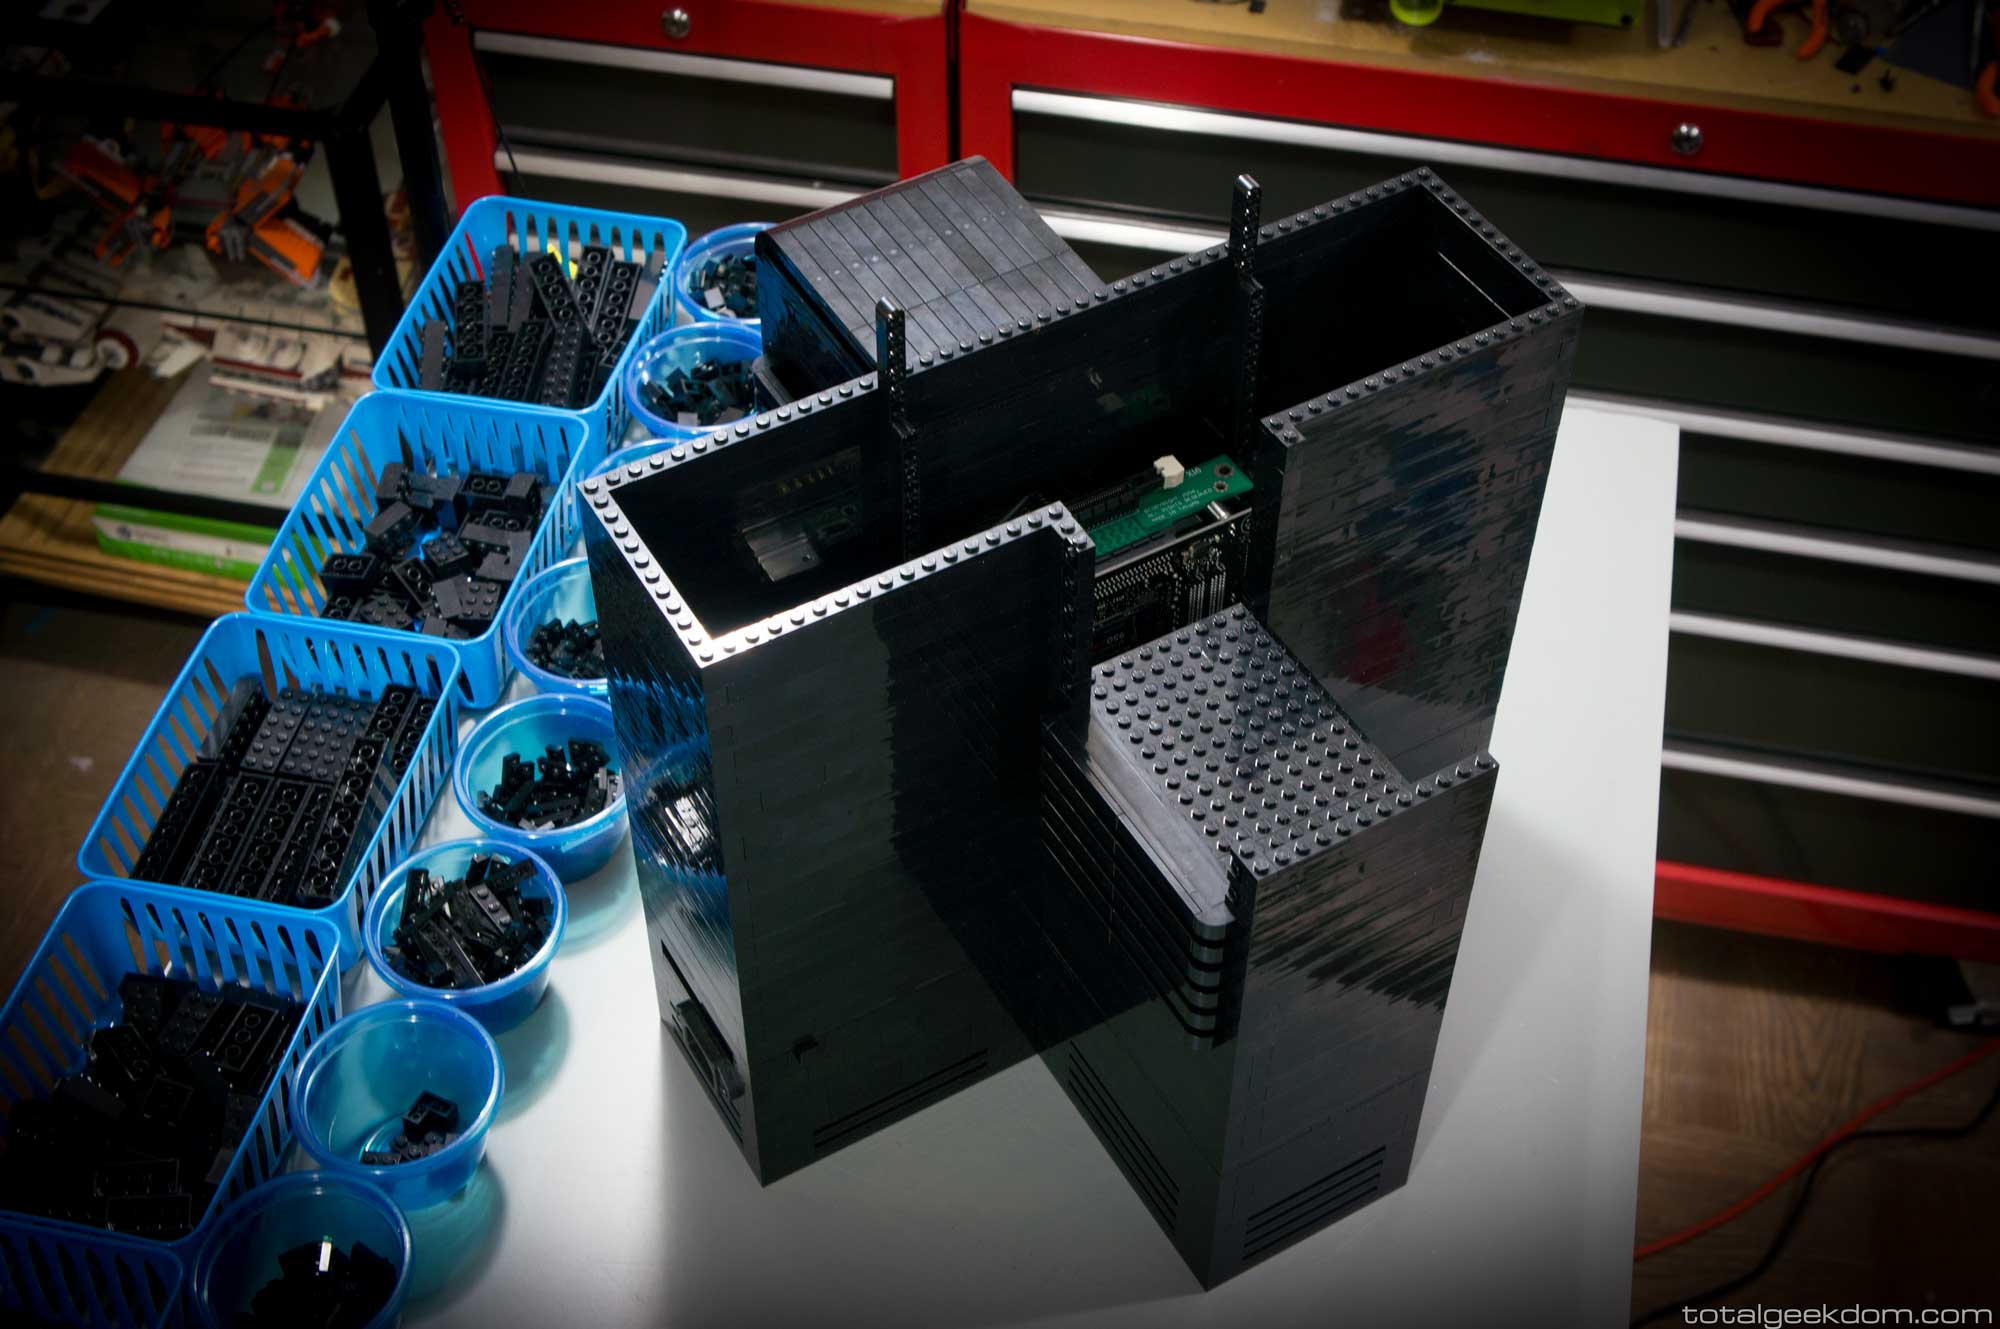
Case Separation
Given that upgrading is an important element of successful gaming, I’ve designed the case itself to be as easy as possible for users to take apart. And for individuals that want to build their own Lego Gaming Computer, I sell just the case, so it was important to make the design as user-friendly as possible. The lower section has routing built in for the front USB cables, fan wiring, power wiring and mounting for the fans. The motherboard is installed using Lego Technic pins. You can pretty much just set your motherboard into the lower section, push the pins through and snap them on the other side – and you’re done! The lower case perimeter has a mix of flat Lego tiles and Lego plates. I designed it with more Lego tiles than plates, so that the upper case would easily just pop into place on the lower. There are no screws required – just a little push and it’s set!
Beyond user-friendliness and the possibility of building your own computer, it is important that the case is easy to take apart for cleaning purposes. As anyone familiar with computers knows, dust is a system’s nemesis. I’ve built a ton of computers over the years and have tested out various methods of keeping dust out of systems, the most common being dust filters. While they do okay, you have to clean the filters regularly, and they still allow dust into the system. True, it’s a lot less dust, but it’s still dust. The only foolproof way to keep dust out of a system is to use a sealed enclosure with fans and a filter system – basically a big clear case that goes over your case. Seeing as how that is just not an option, I decided that the next best thing would be to make the case as easy as possible to clean.
Cords and Cables
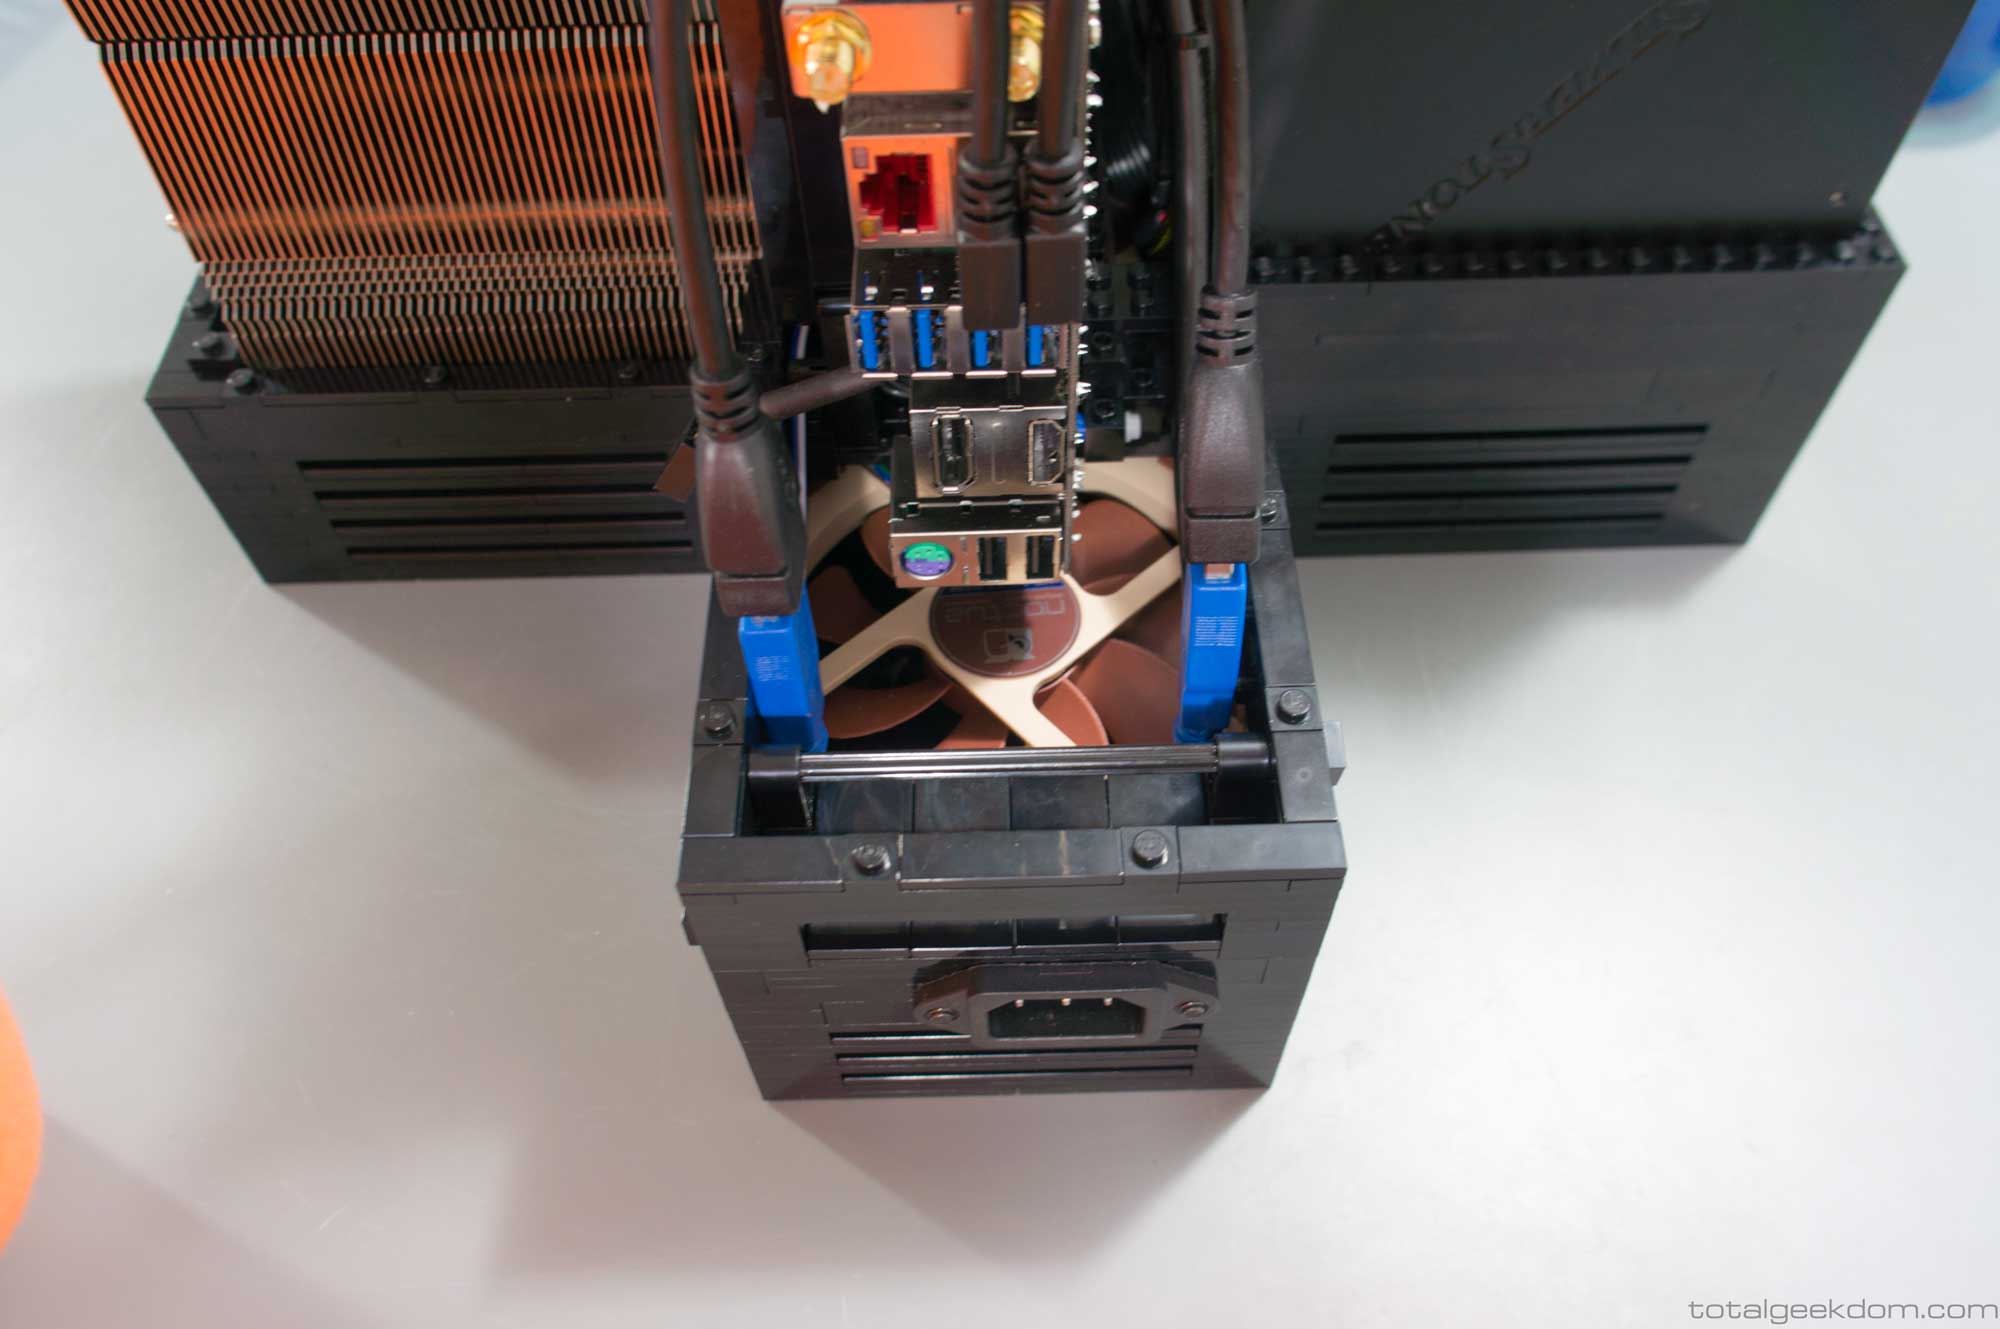
Cable clutter is something that I hate. If there is one area of a computer that has always vexed me, it is the cables jutting out of the back of the case. The vast majority of computer cases place the ports at the back of the system. This makes sense and works well enough to get the job done. But the thing that has always perplexed me are those custom built computers that still end up with a bunch of cables sticking out of the back of it! It’s just not very elegant and takes away from the aesthetic of some really attractive looking systems. So with the Lego Gaming Computer I decided I wanted to change how cords worked.
In order to make the cables coming out of the back of the computer a little less obtrusive, I designed the case so that the motherboard sits in the middle and not up against the back like in standard cases. This allows for the cables to be connected internally and then routed down inside the case to the lower section, where there is a slot positioned near the rear only about 2″ from the surface. The cables can easily be connected just by lifting the upper case section off the lower – no screws, no screwdrivers, just lift and it pops off. Plug the cables in, route them under the beam near the exit slot, and then put the upper section back on. This allows the cables to come out neatly in a line, immediately meeting the surface the Lego Gaming Computer is sitting on. And there are no ugly cables jutting out of the back.
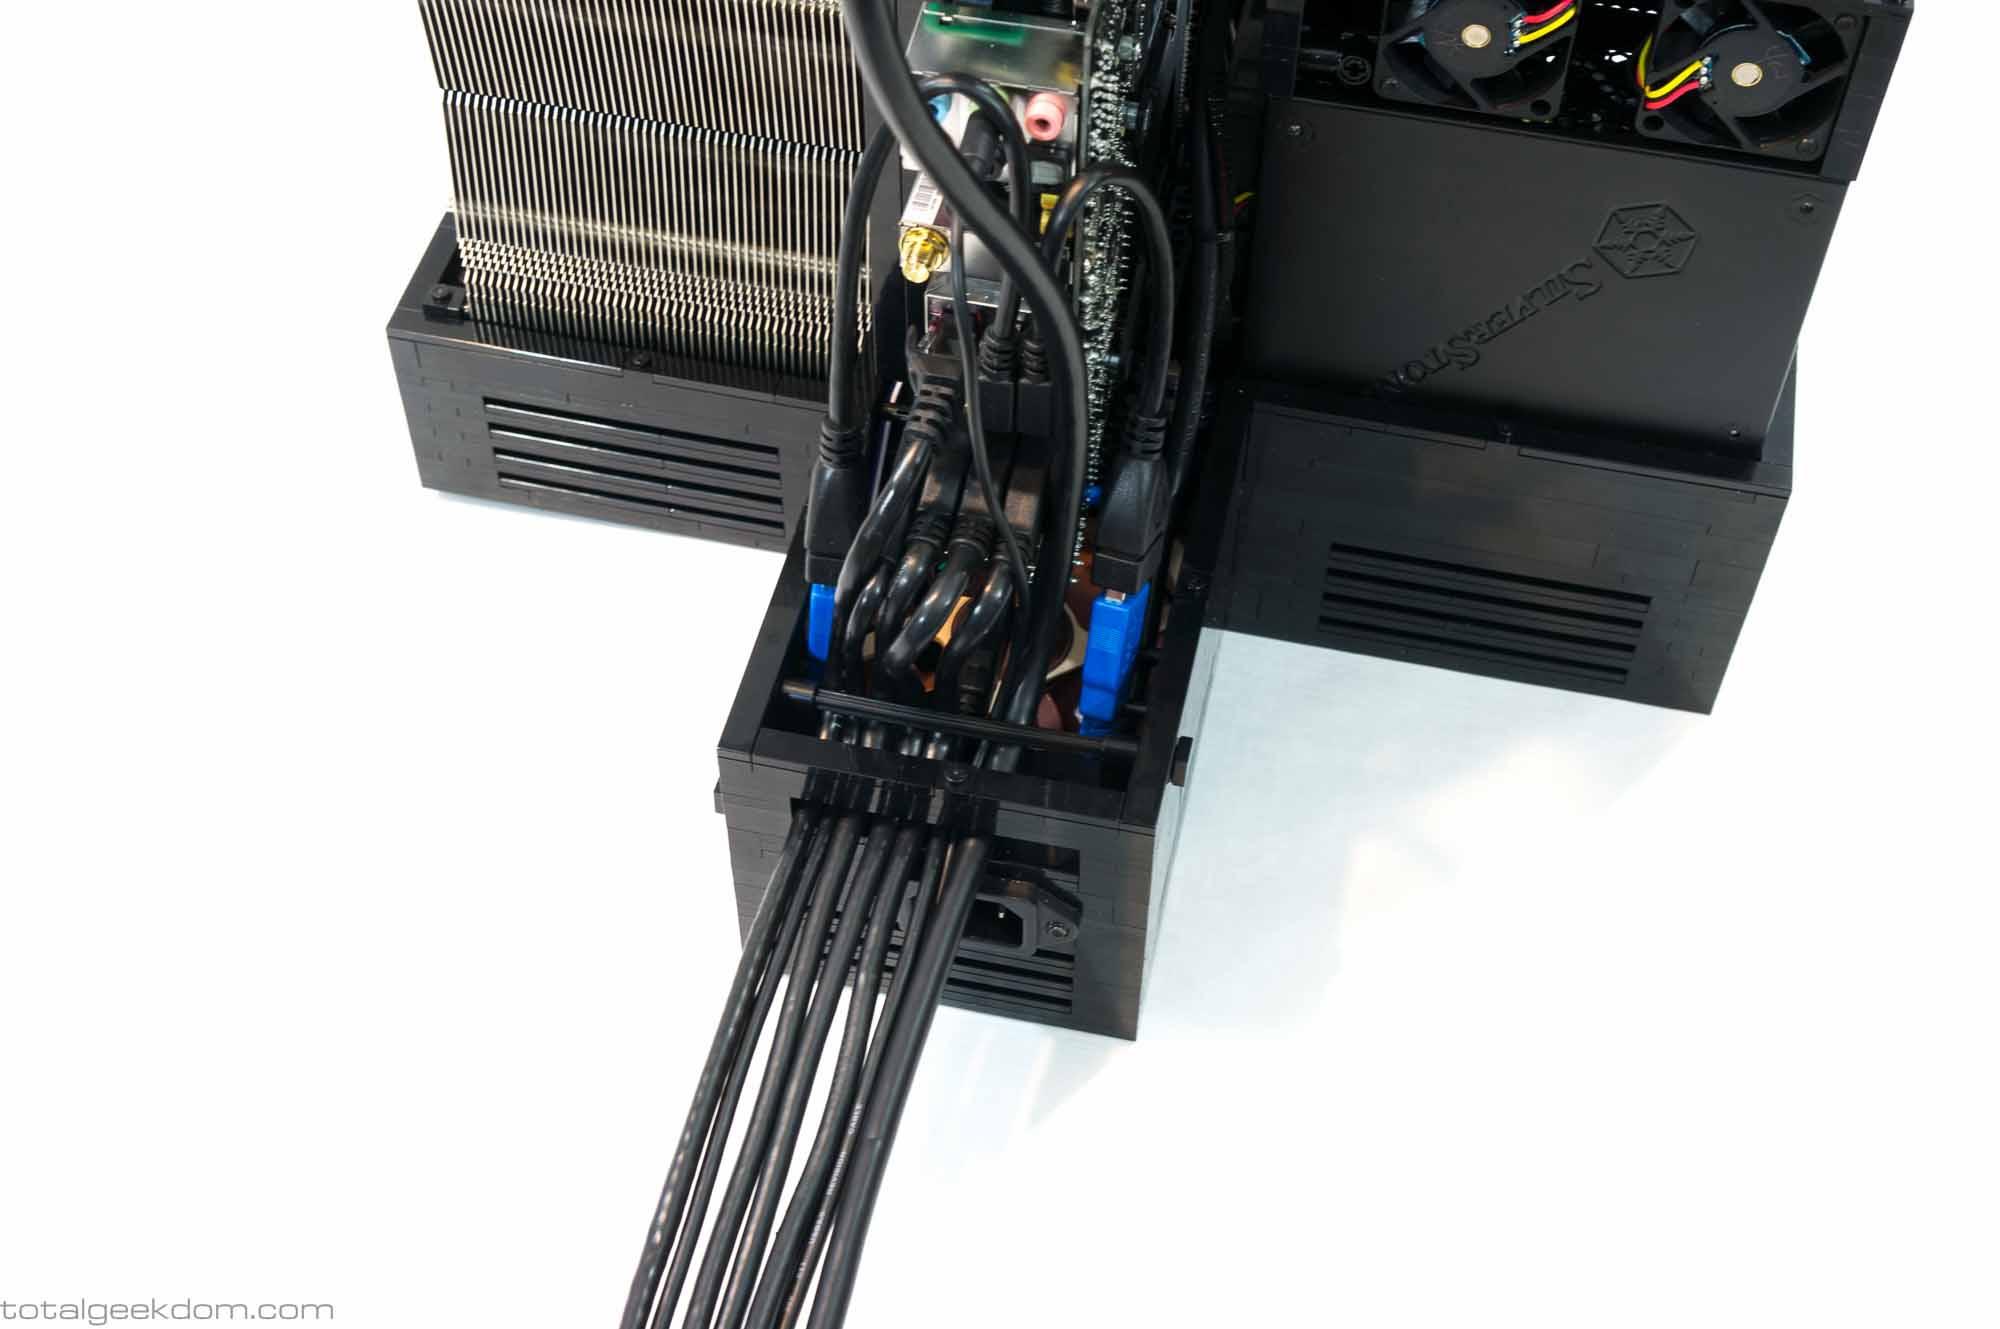
Lego Gaming Computer Rear Cable Control System

Lego Gaming Computer Rear Cable Management
Power Supply Challenges
The power supply proved to be a bit more challenging than I had originally thought due to the form factor of the Lego Gaming Computer. Trying to keep the system size as small as possible, I had to go with an SFX form factor power supply. Currently, there are only a handful of companies that produce these power supplies, and of those, the only high-power, gold-rated power supplies available are made by Silverstone. Efficiency is very important when it comes to power supplies. The inefficient conversion of AC to DC results in heat production, which is the exact opposite of what we want. Luckily, Silverstone makes a very nice* high-power (600 watt), gold-rated SFX unit.
*While the power supply is indeed high quality, I take issue with some of the choices Silverstone made in its production, which I’ll discuss in more detail below.
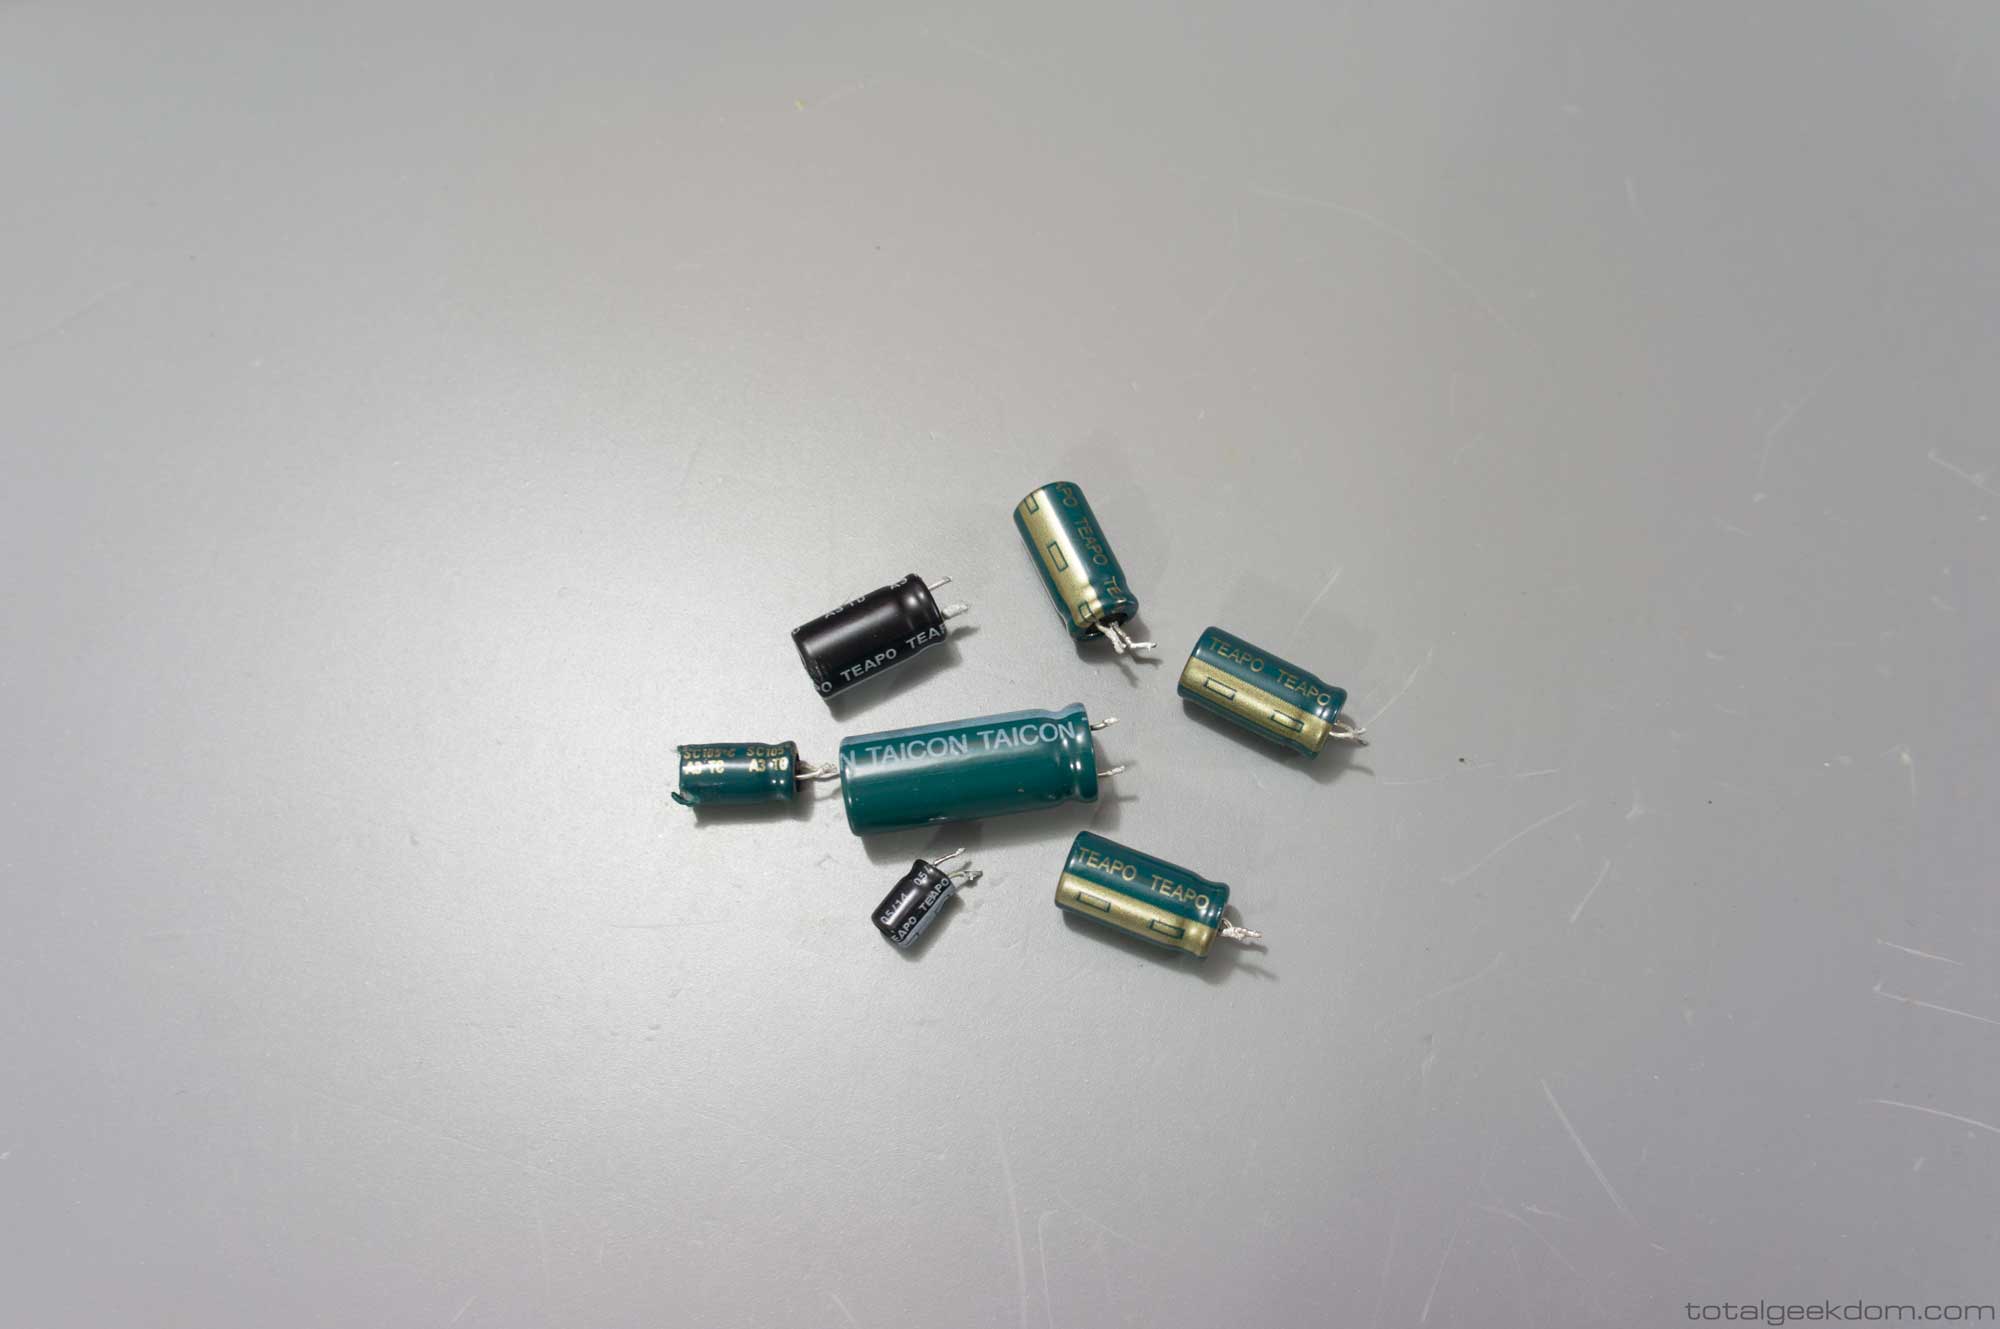
Reading through the numerous reviews on the Silverstone SFX 600w unit, it would seem to be a pretty solid premium power supply. The overall design is good, and packing that much power – efficiently – into a little SFX power supply is definitely no small feat. Silverstone is the current leader in SFX power supplies because of this. The problems with the power supply are more in the quality of component choices and how they affect the overall power supply durability. The biggest single issue with the power supply is the capacitors. Instead of using high-end, Japanese capacitors, Silverstone has mixed in a bunch of cheaper 2nd and 3rd tier Taiwanese and Chinese capacitors. This isn’t going to cause any immediate failures by any means. But in a power supply that is contained in a very small housing, where the capacitors are subjected to higher heat, it just doesn’t make sense to cheap out on capacitors that cost less cents – not dollars. High-end Japanese capacitors from brands like Rubycon, Chemi-con, Nichicon and others have built a reputation on being the best available, so I bought a bunch of these and switched out the lower quality capacitors.
The other aspect of the design has to do with the fan and fan controller. While it’s a not a bad fan (an ADDA ball-bearing unit), it’s somewhat of an interesting choice given the way the controller works. I know that this is probably a result of pressure from Silverstone’s marketing team, who probably really wants to be able to advertise a semi-fanless design, but it comes at the expense of essential cooling. Basically the system doesn’t turn the fan on until the temperature of the power supply reaches a certain level. It’s okay in theory, but on this specific product, it doesn’t make sense. Given the small form factor and higher power output, there is already a need for above average cooling, so restricting the fan seems counter-intuitive. The fan should always be on, but it could function at lower speeds at lower temps and higher speeds at higher temps. Furthermore, the fan is placed so that its airflow covers about 80% of the unit, which is great for cooling most of the power supply, but that remaining 20% sees a pretty limited airflow.
While I’m sure that these issues will probably be resolved by Silverstone as time goes on and better models are released by Silverstone and other companies, as of right now there is only one gold-rated, SFX power supply capable of delivering enough power for top-tier (GTX 980 Ti, Fury X) overclocked graphics cards, and it’s this one. So I made a few adjustments.
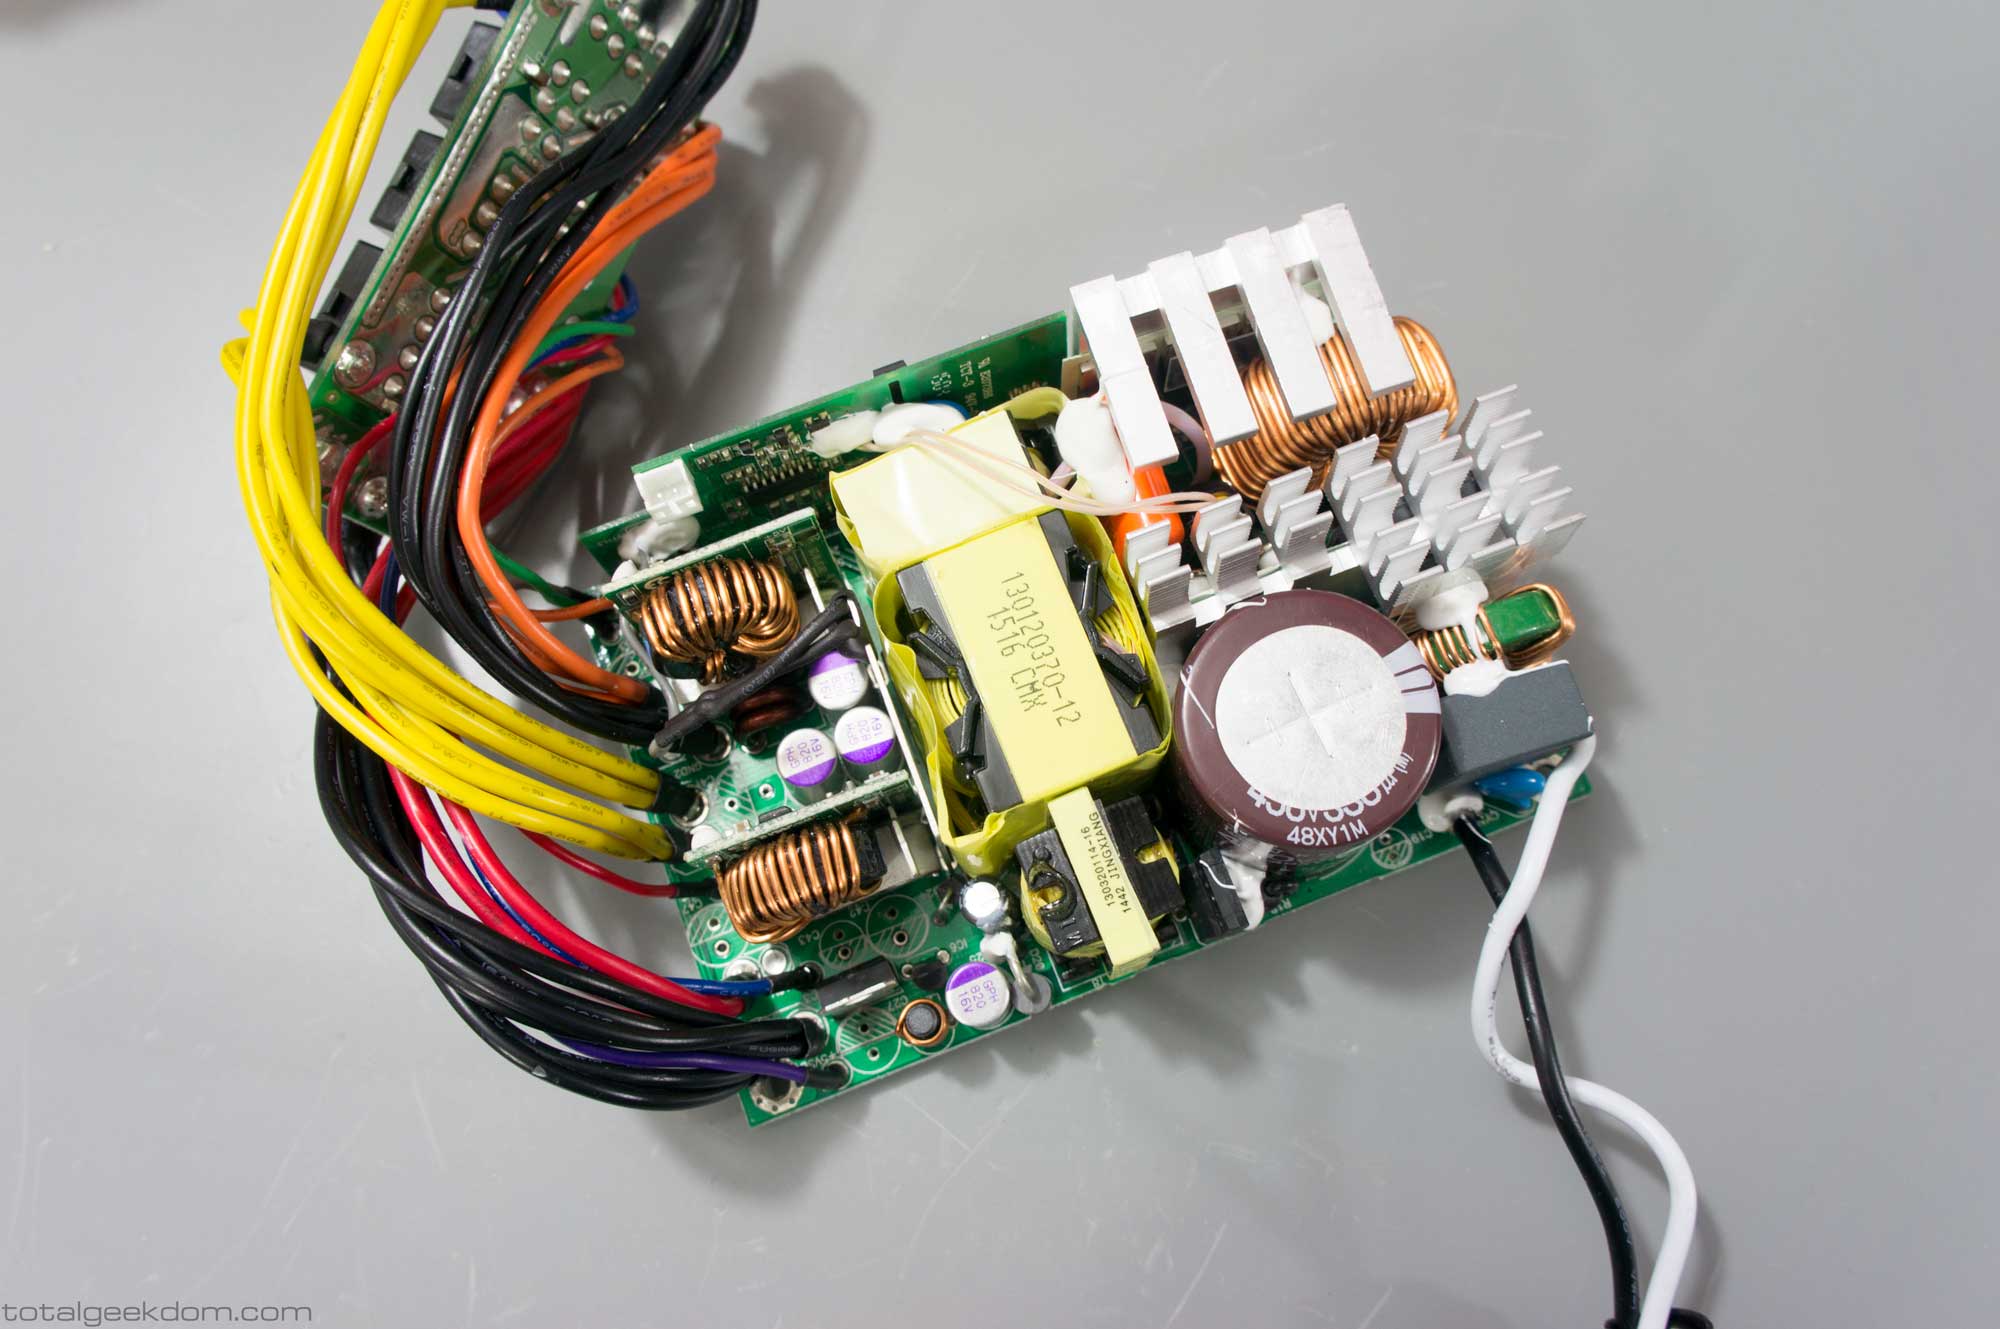
In order to bring the power supply up to a level of efficiency, cooling, stability and durability I was happy with, I decided to go back to my roots in computer building and mod the power supply. This meant a fair amount of work needed to go into researching all the different capacitors in the system, finding the best available Japanese replacements, de-soldering all of subpar capacitors and replacing them one by one. I wasn’t overenthusiastic about this proposition, but at the same time, I really do enjoy a good modding project, so I dove in head first. The first step in doing this correctly was copious amount of research, and the most reliable site for information was BadCaps.net. The experts and electrical engineers on the site’s forums are amazingly knowledgeable about anything capacitor-related. After spending a considerable amount of time reading, reading, and reading, I spent some more time reading before talking with members the capacitors I intended on replacing, and I narrowed down the choices for replacement caps. I decided to go with Chemi-con capacitors, as some of the newer series (KZN) are specifically designed with power supply filtering in mind and offer low ESR, ripple, and extended life. Luckily I’ve been soldering and de-soldering for a very long time and am pretty comfortable with that portion of the work, so I used my trusty solder re-work station and removed all the cheap capacitors.
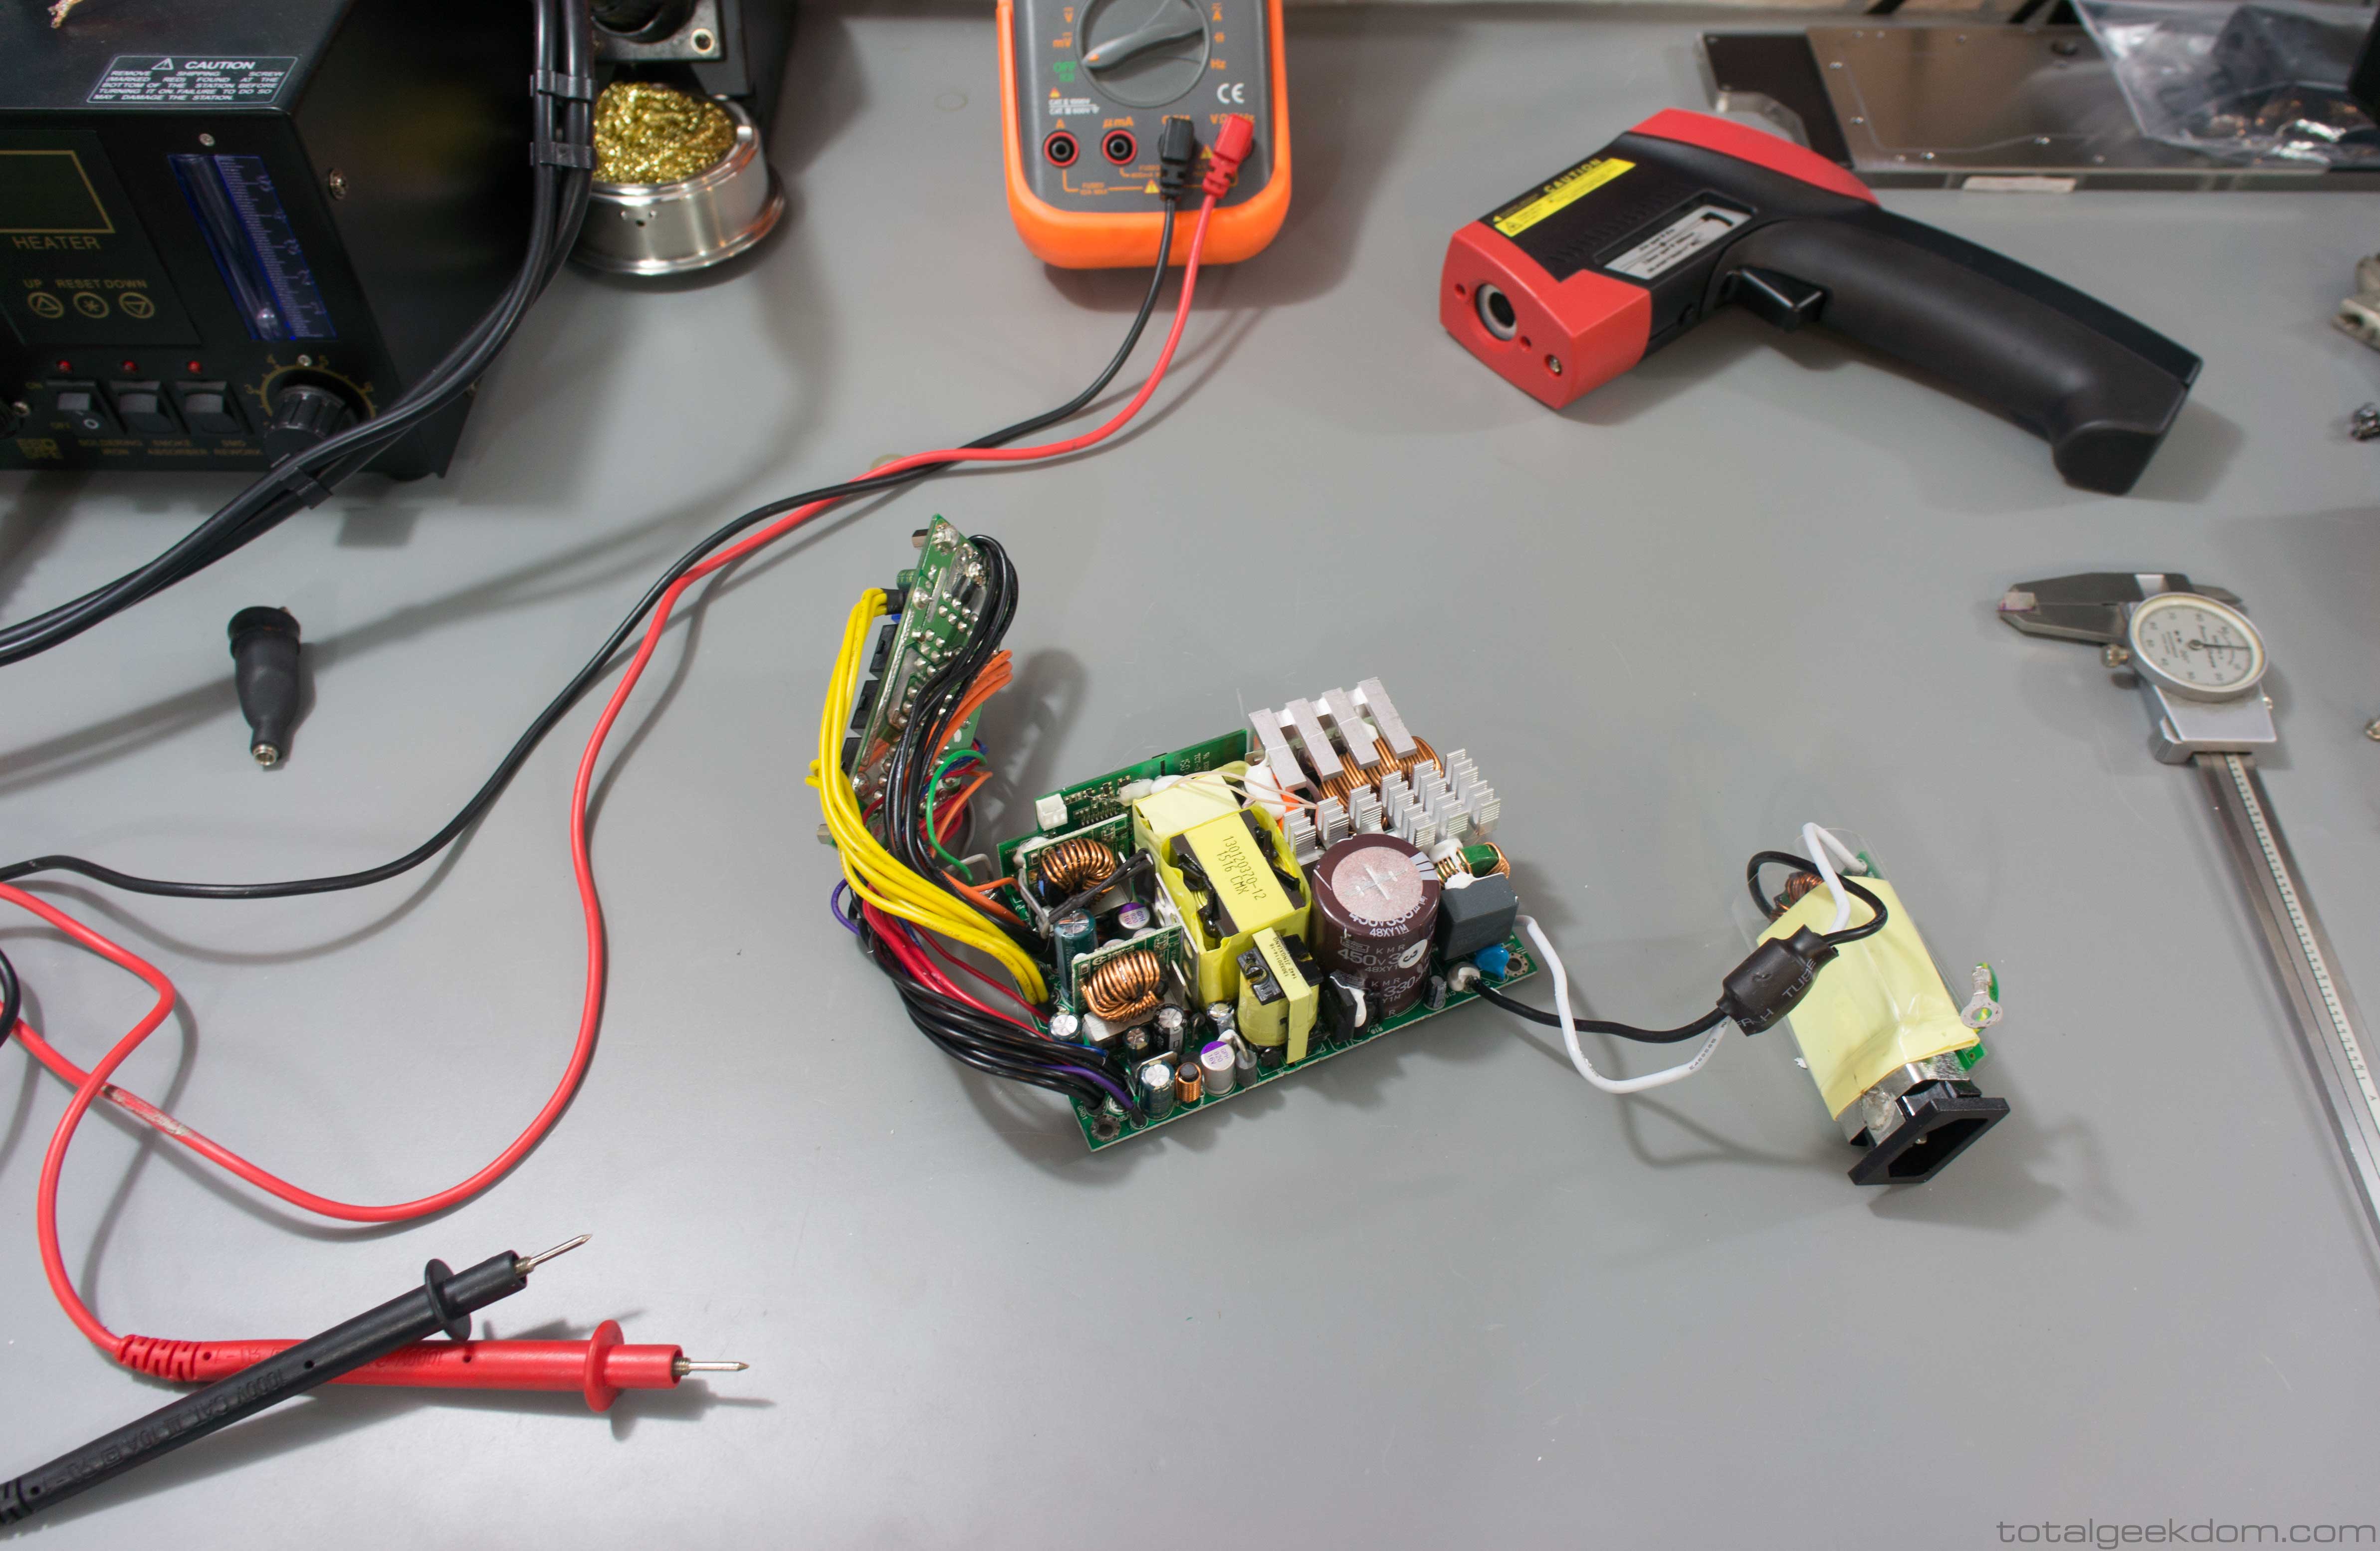
Lego Gaming Computer Silverstone Power Supply Teardown
Silverstone Power Supply Cheap Capacitors
Lego Gaming Computer Silverstone Power Supply Capacitors Removed

Lego Gaming Computer Power Supply Chemi-con Premium Japanese Capacitors
From that point on it was as straightforward as replacing the capacitors and soldering them back into place one by one.

Lego Gaming Computer Power Supply Chemi Con Replacement Capacitors Installed
My next step in upgrading the power supply was fixing the issues with the fan and airflow. This required drilling and cutting up the power supply case to allow for the addition of fans and the replacement of the inlet fan. The challenge with the system fan was that the control board limits the voltage of the fan to control the speed, so the fan never gets much over 5-6 volts, which is not enough to run a larger aftermarket fan. After testing several brands, I decided to go with a Sunon fan, which offered the best combination of speed for cooling and noise. The Sunon fan flows more air and is quieter at the same RPM points as the ADDA fan. It is also a much higher-quality fan with better durability. The only downside was that I couldn’t use the fan controller built into the power supply.
Ideally there would have been a control circuit that allowed for ramping the speed up and down, but because I wanted maximum power supply cooling at all times and because I had little alternative, this was the system I decided to go with.
Lego Gaming Computer Power Supply Intake
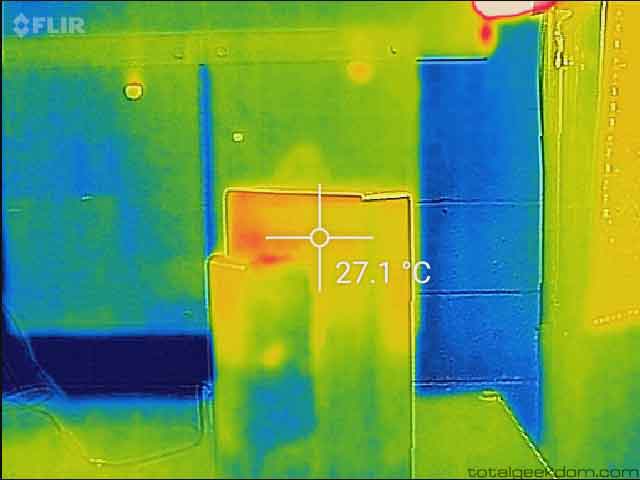
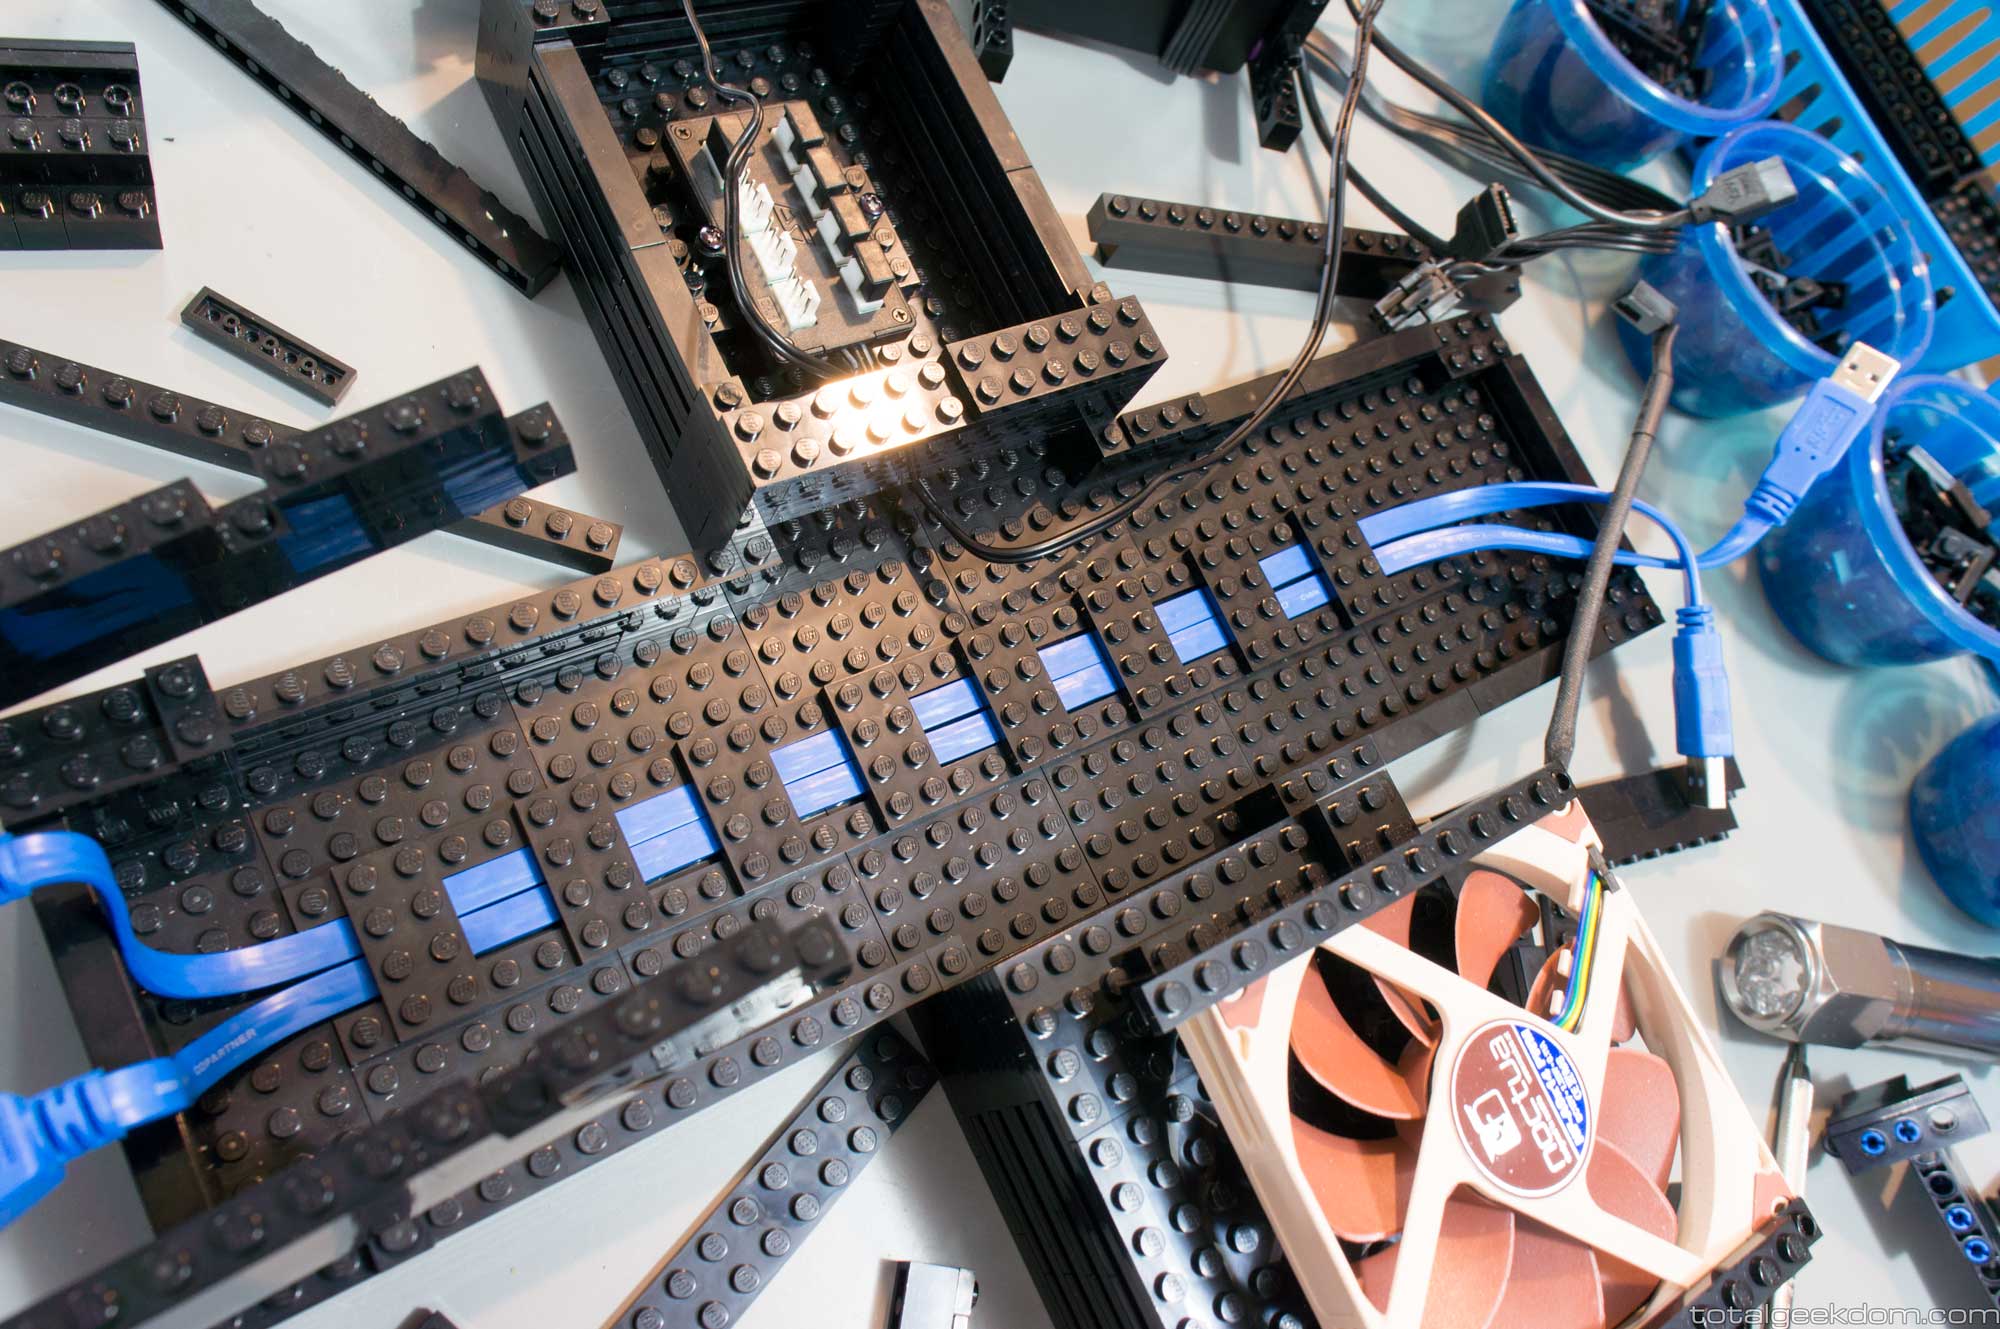
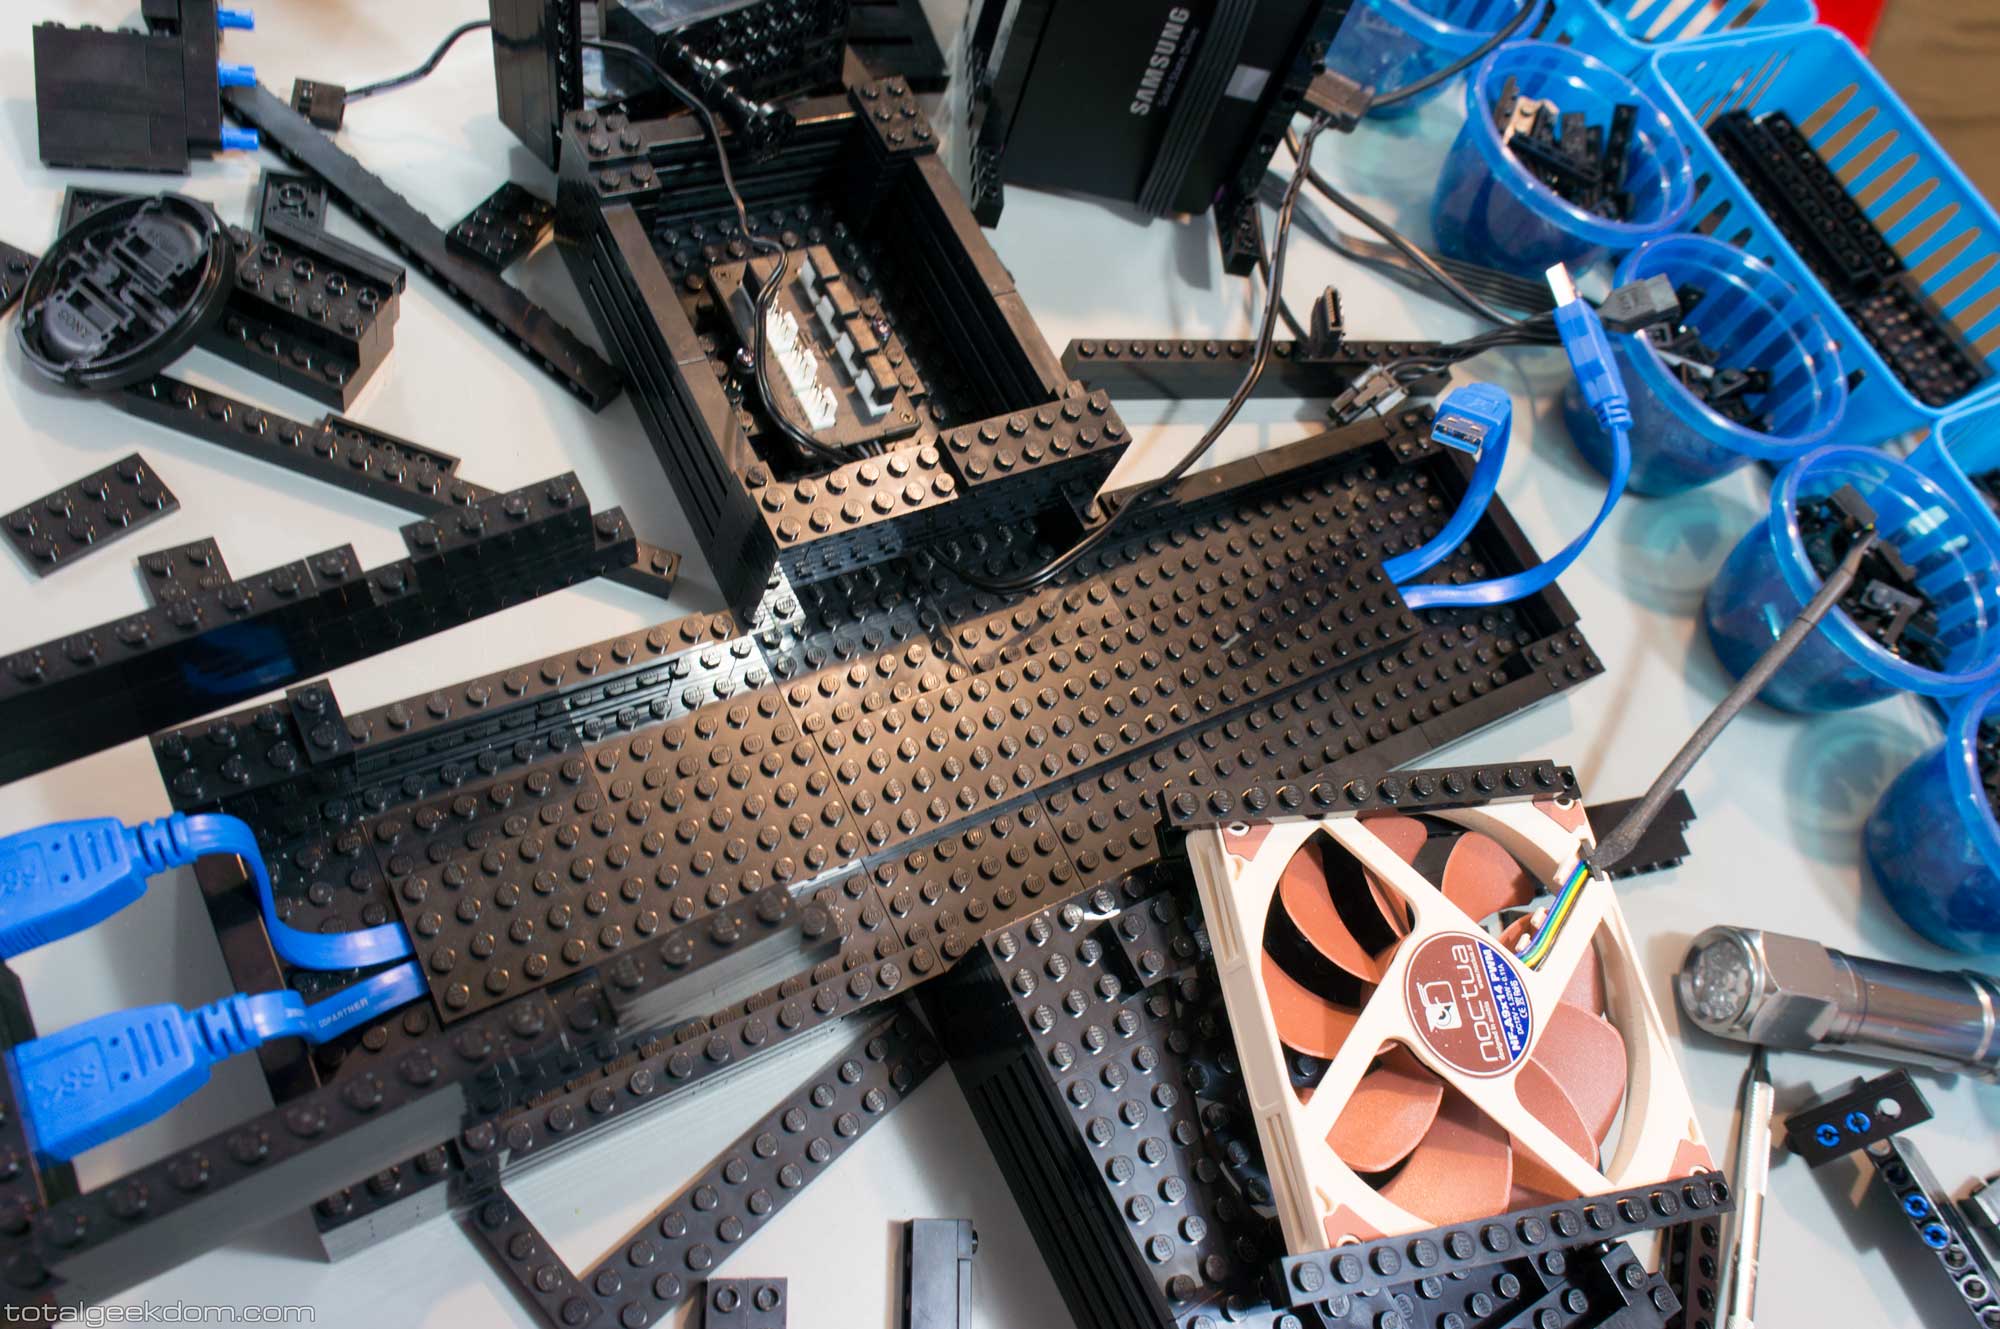
Beyond adding the better Sunon fan to the housing, I also decided to open up the side of the case and add two smaller 40mm fans to allow for airflow over the secondary side of the power supply, which was the section that wasn’t getting airflow in stock form. The placement of these smaller fans is perfect as it allows direct airflow over the capacitors in the secondary circuit and the other components concealed by the plug.
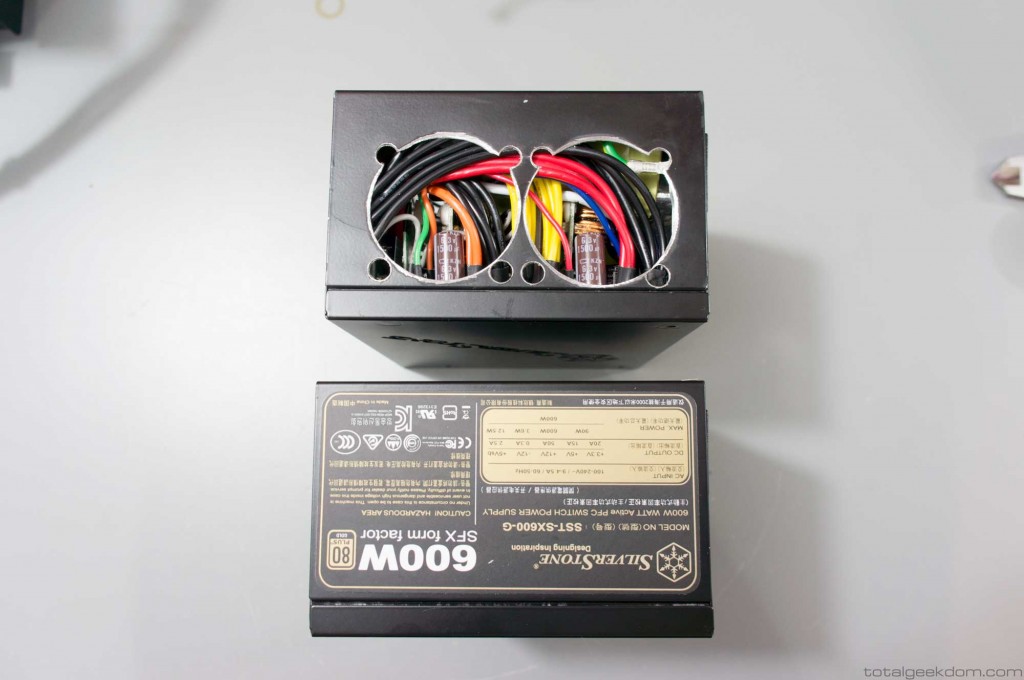
Lego Gaming Computer Power Supply Comparison (Modified Upper Case for Fans vs. Stock Lower Case with No Fans)
The Chemi-Con Japanese capacitors I used will now outlast the power supply, while also offering better and cleaner power delivery. Moreover, adding the higher quality case fan as well as the fans on the side of the power supply will greatly improve the airflow and cooling. In conjunction with the power supply having its own fresh air inlet and exhaust paths, these modifications* will ensure that the power supply will be able to easily handle powering the system for years to come.
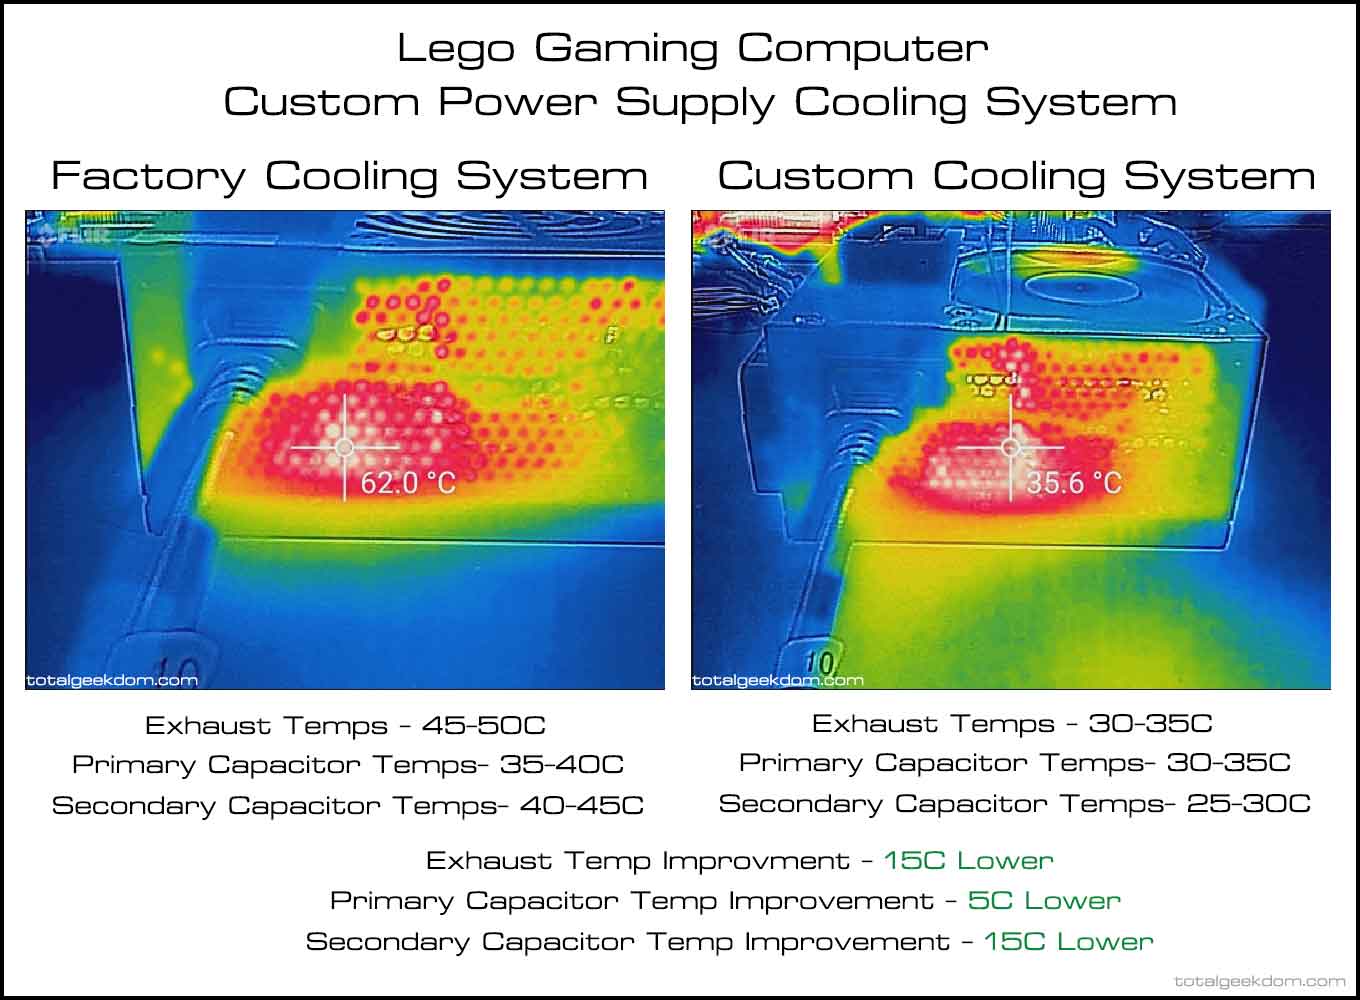
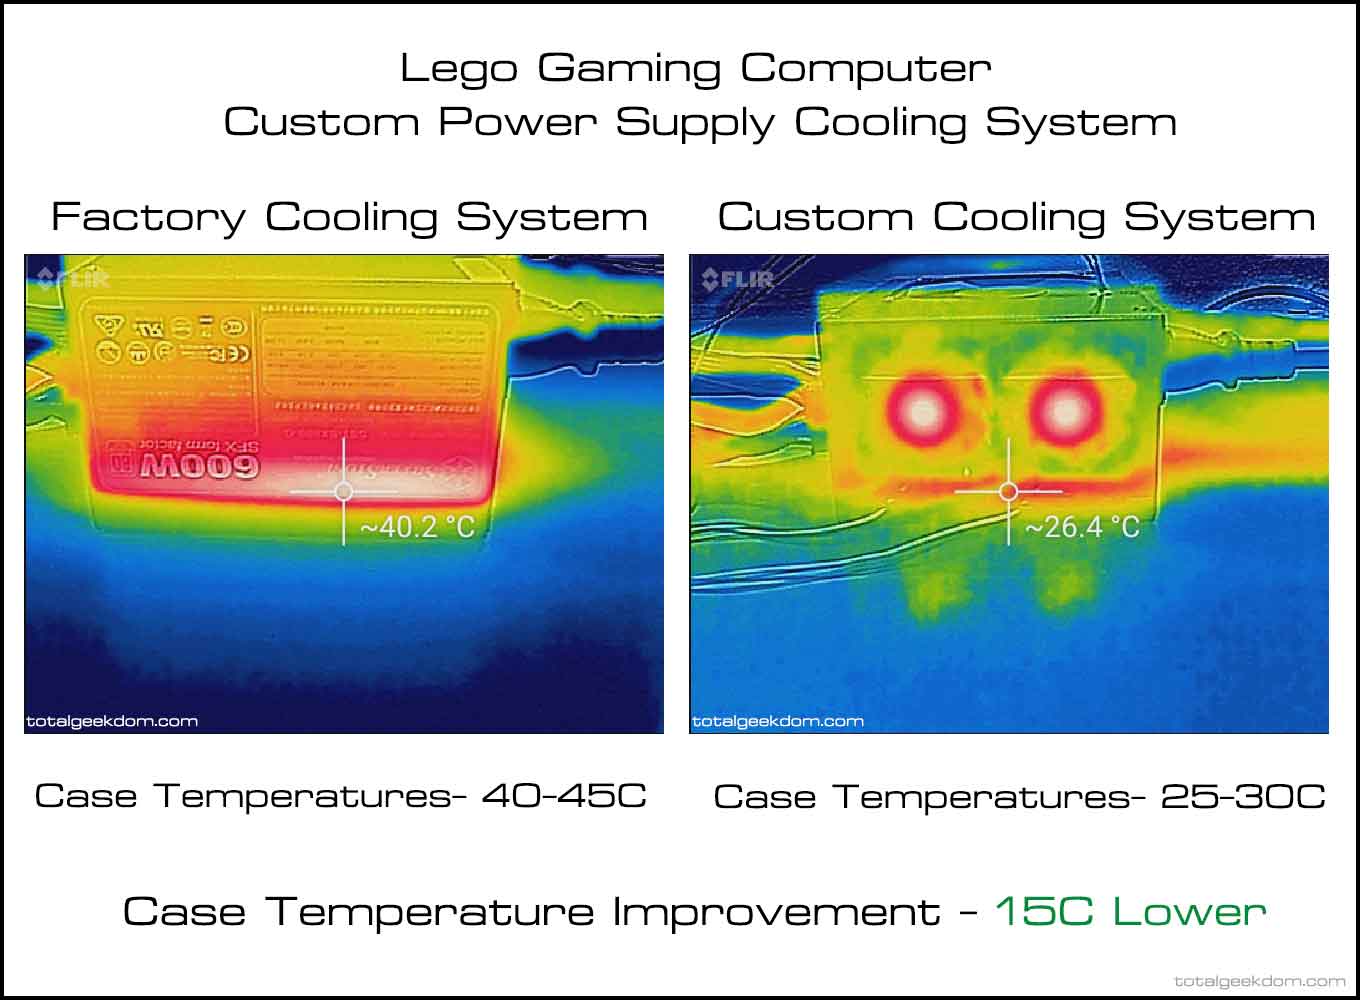
*Disclaimer: If you don’t know what you’re doing, please do not take apart your power supply to modify it, as there is the possibility of lethal voltages.
Air vs. Water Cooling
One of the areas that I spent a lot of time on during development of the Lego Gaming Computer was in testing water vs air cooling. I tested a wide variety of All-in-one (AIO) closed-loop CPU and GPU coolers against a series of air coolers. For the most part, I found that the performance of most of the mid-size AIO coolers was only slightly better than a single large air cooler, and the temperature difference was really inconsequential. From a noise standpoint, I actually found that the Noctua NH-U14S cooler was quieter than most of the AIO liquid cooler options.
For the graphics card cooling, I tested a series of AIO coolers with various graphics cards and found that they were definitely better than the cooling systems already integrated into the graphics cards. However, in terms of noise, it was usually more of a toss-up.
While AIO water cooling has definitely shown that it is very capable and powerful, the noise levels tend to be in the same ballpark – or sometimes higher – than air coolers. However, water cooling using a custom loop with a large radiator and reservoir and a high-end pump is definitely the best cooling system available, and it has the high maintenance and price tag to match.
My main concern with AIO coolers is that while they’ve come a long way, they have had to take some shortcuts in order to meet their competitive price point, and the compromise on quality has generally been made in their pumps. The pumps that I typically use in custom-loop builds are usually something like a EK D5, which is a very good, durable and long-lasting pump. A premium pump like this will outlast your build if maintained properly. But this pump costs more than the vast majority of AIO cooler kits on its own. So like I said, while AIO cooler kits have their place, I’ve seen too many pump failures (dying, leaking, etc.) over the years to want to send out a system with a pump I don’t trust.
Given how well a single high-end cooler, like the Noctua NH-U14S I’m using, performs in terms of cooling and noise, it’s definitely my preferred option. The only moving part is the fan itself, and I’ve yet to see a Noctua fan fail.
Single GPU vs. Multi GPU
In the world of gaming computers, having a system with multiple graphics cards has always been considered higher end for those looking to squeeze as much performance as they possibly can out of their system. That is still somewhat true today, but we’re getting closer and closer to the era of the single GPU. While systems based around a single high-end graphics card have always offered pretty high-end performance, they have never quite met the performance of a dual or triple GPU setup. With ever improving games, putting higher and higher demand on the hardware with their higher and higher resolution, the need for as much graphics power as possible is just as true as ever. The difference now is we’re finally starting to get core architectural improvements in the latest processor revisions from Nvidia and AMD, which are based on Nvidia’s Maxwell core and AMDs Fiji XT core. Additionally, with the recent implementation of HBM (High Bandwidth Memory), we’re seeing improvements in the memory system as well. In 2016 we’ll see the release of the first 14/16nm graphics processors, which will bring improved performance to both Nvidia Pascal and AMD Greenland.
So what does all of this mean?
Well, it means that high-end single GPU configurations can now keep up with all but the most demanding titles in the very highest settings and at the highest resolutions. In its highest configuration, the Lego Gaming Computer offers an overclocked GTX 980 Ti, which is capable of playing basically every game on the market with maxed out settings at the most common resolutions (1920×1080 and 2560×1440). Even at the highest resolution currently available, 3840×2160 (4K), the system is still capable of playing basically every game on the market at high or ultra settings.
While there will still continue to be dual and triple GPU configurations, the era of high-performance single GPU configurations is upon us, and it’s only going to keep getting better.
Build
With all that information behind us, let’s get to the good stuff – the build!
Part of the design intent was to create a case that was as compatible with mass-market components as possible. This way the case could be made available for those customers that wanted a DIY version.
The base of the case is designed to accept all the components as well as all of the wiring.
The lower-most portion of the case is built with each section having its own perimeter air inlets. These all lead to the central section of the system, where the 3 Noctua case fans reside, blowing on the motherboard. Under the case fans are channels for some of the wiring, such as the fan and USB 3.1 wiring.
Lego Gaming Computer USB 3.1 Front Port Wiring
Lego Gaming Computer USB 3.1 Front Port Wiring Concealed
Lego Gaming Computer Lower System Fans
Lego Gaming Computer Lower System Fans Section
In the power supply section, the area directly beneath the power supply houses all of the power supply wiring as well as the fan headers that the lower case fans connect to and the fan header for the power supply fans.
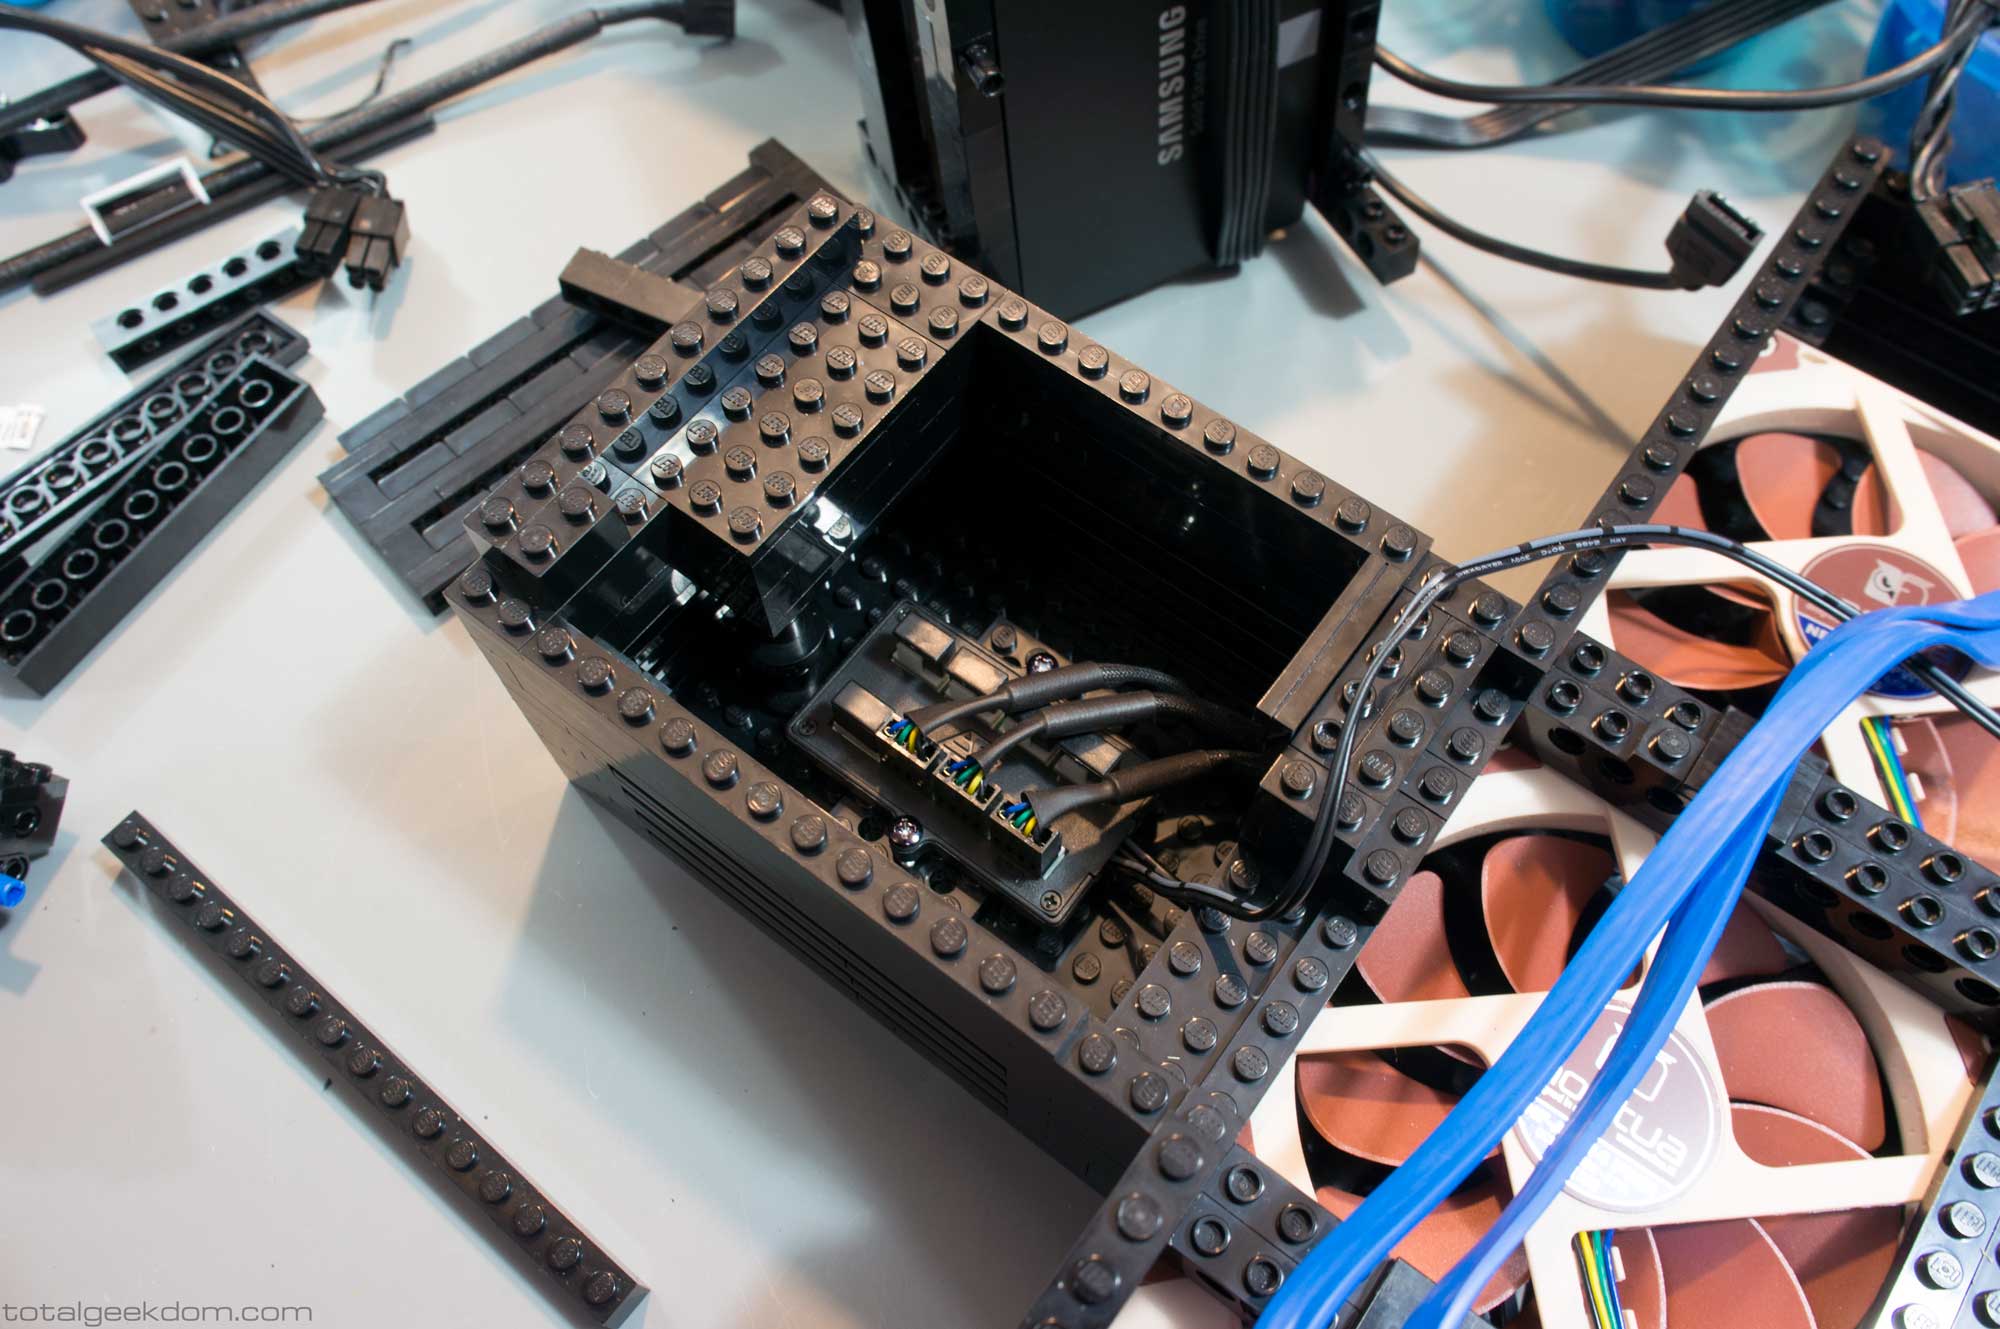
Lego Gaming Computer Fan Header
The rear of the lower case houses the system-cables guide and slot. This is directly above the air inlets in the rearmost section of the case. Also in the rear section, the system power button is built into the side of the case. This is the only button on the entire case, as I’ve stopped adding reset buttons to cases since they are almost never used. During normal operation, the power button turns the system on and off through the OS with a single push. In the event of the system freezing, the reset button usually is powerless to do anything, but by holding the power button down for 3-5 seconds, the system is forced to shut down. I therefore decided that the power button was really the only button worth having.
Lego Gaming Computer Rear Cable Control Section
The motherboard is supported by Lego Technic beams and pins, which are used to attach the motherboard to the case. Held in place with these Lego Technic pins, the motherboard is prevented from moving in any direction. They also position the motherboard so its weight is carried directly on the Lego Technic beams. By holding it directly above the system cooling fans, this mounting provides for excellent cooling of the motherboard and its power circuitry.
Lego Gaming Computer Lower System Section
This system of mounting the motherboard allows for the processor cooler to rest directly on the processor cooler section. There has been some concern with Skylake systems that certain processor coolers will damage the processor due its load. But with this design, the entire weight of the cooler as well as the weight of the motherboard is carried by the Lego, so all components are supported and nothing is free-hanging like in a conventional system.
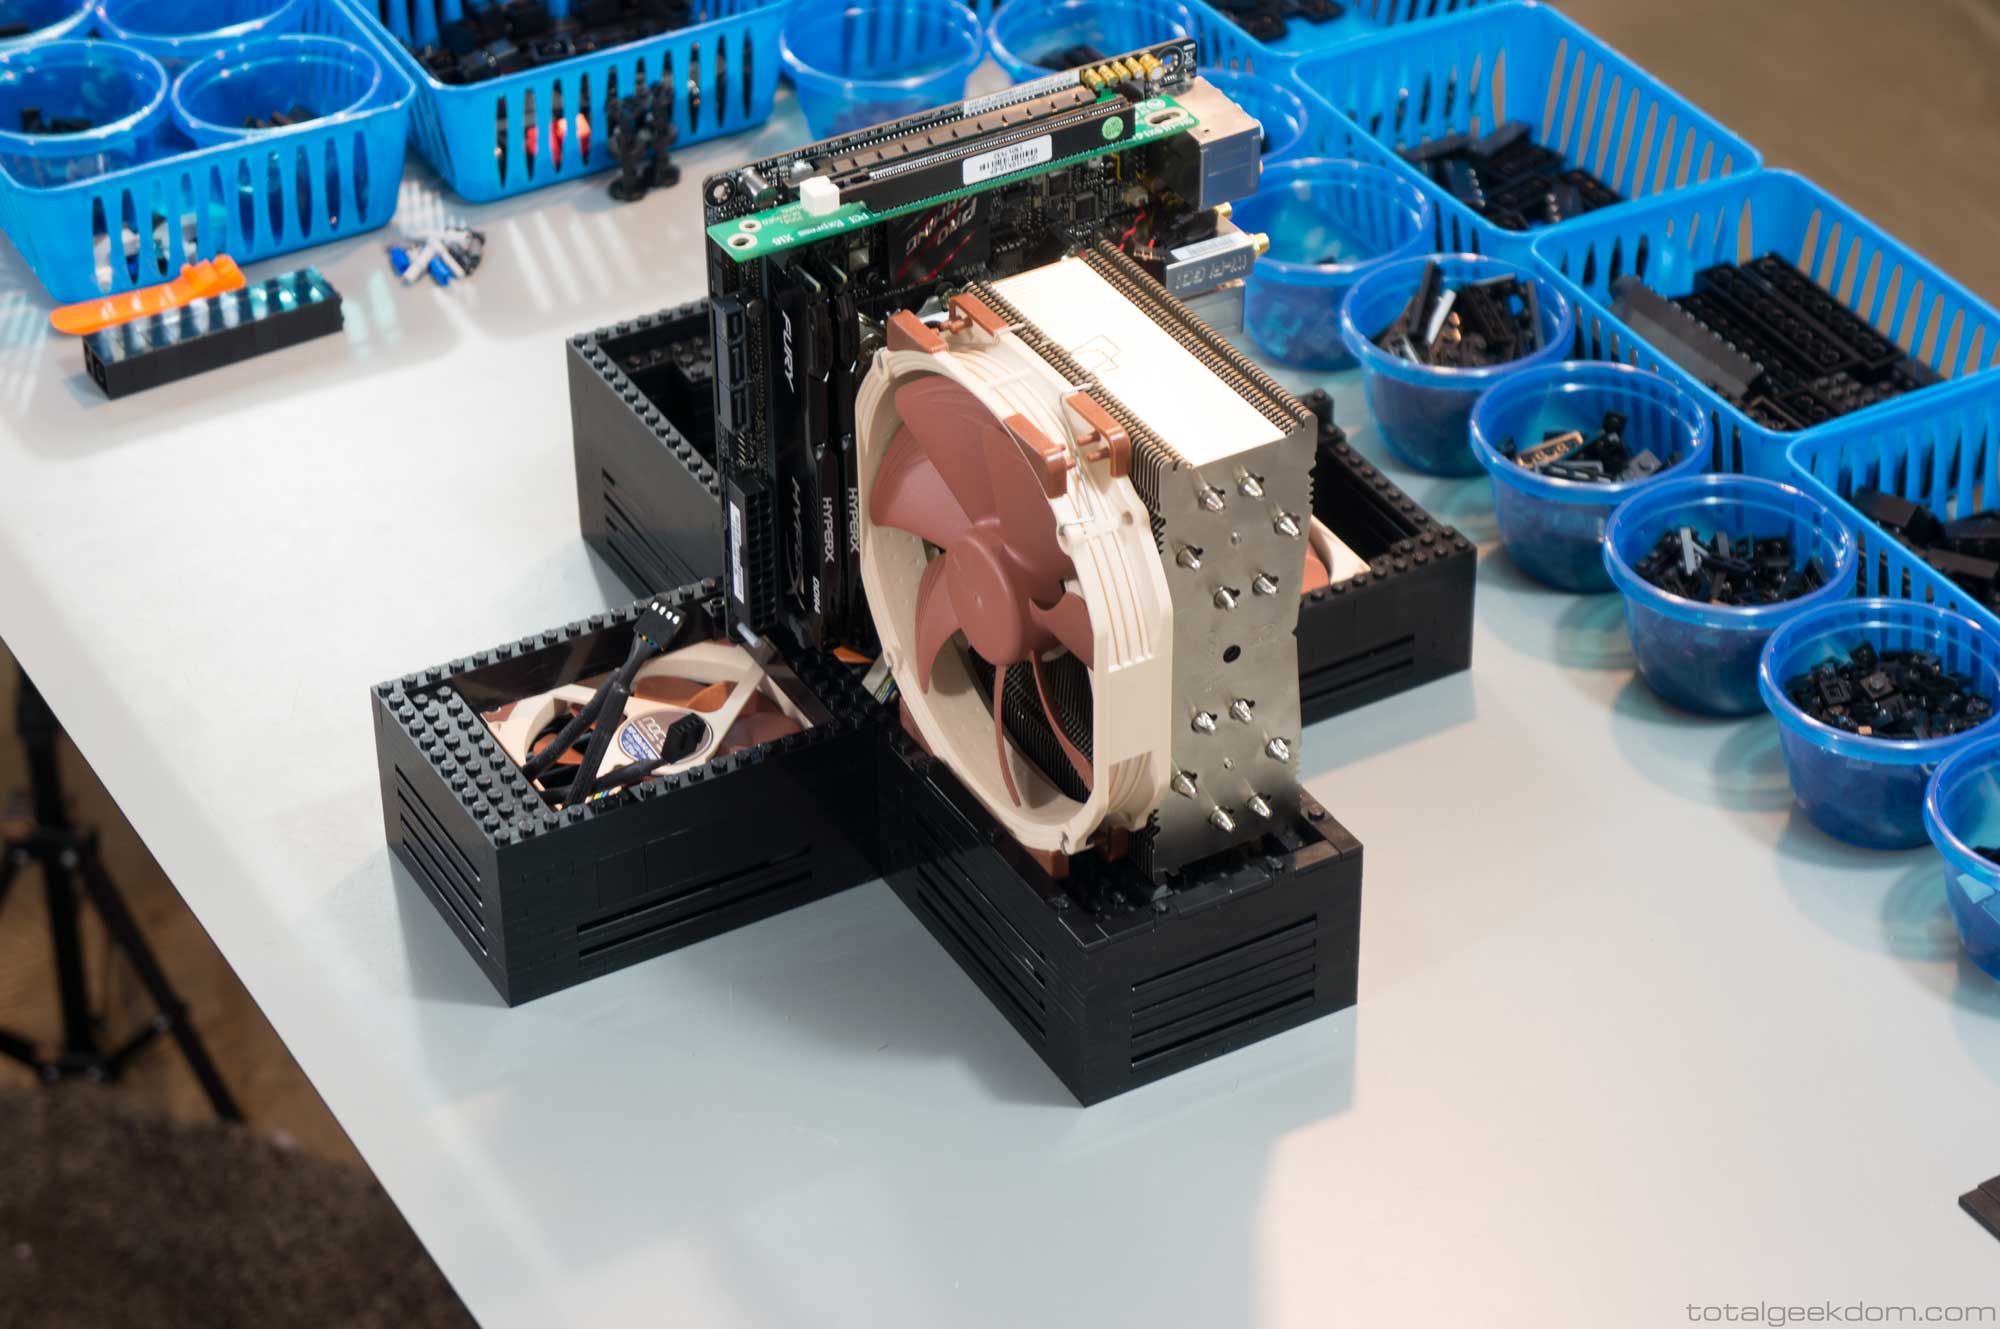
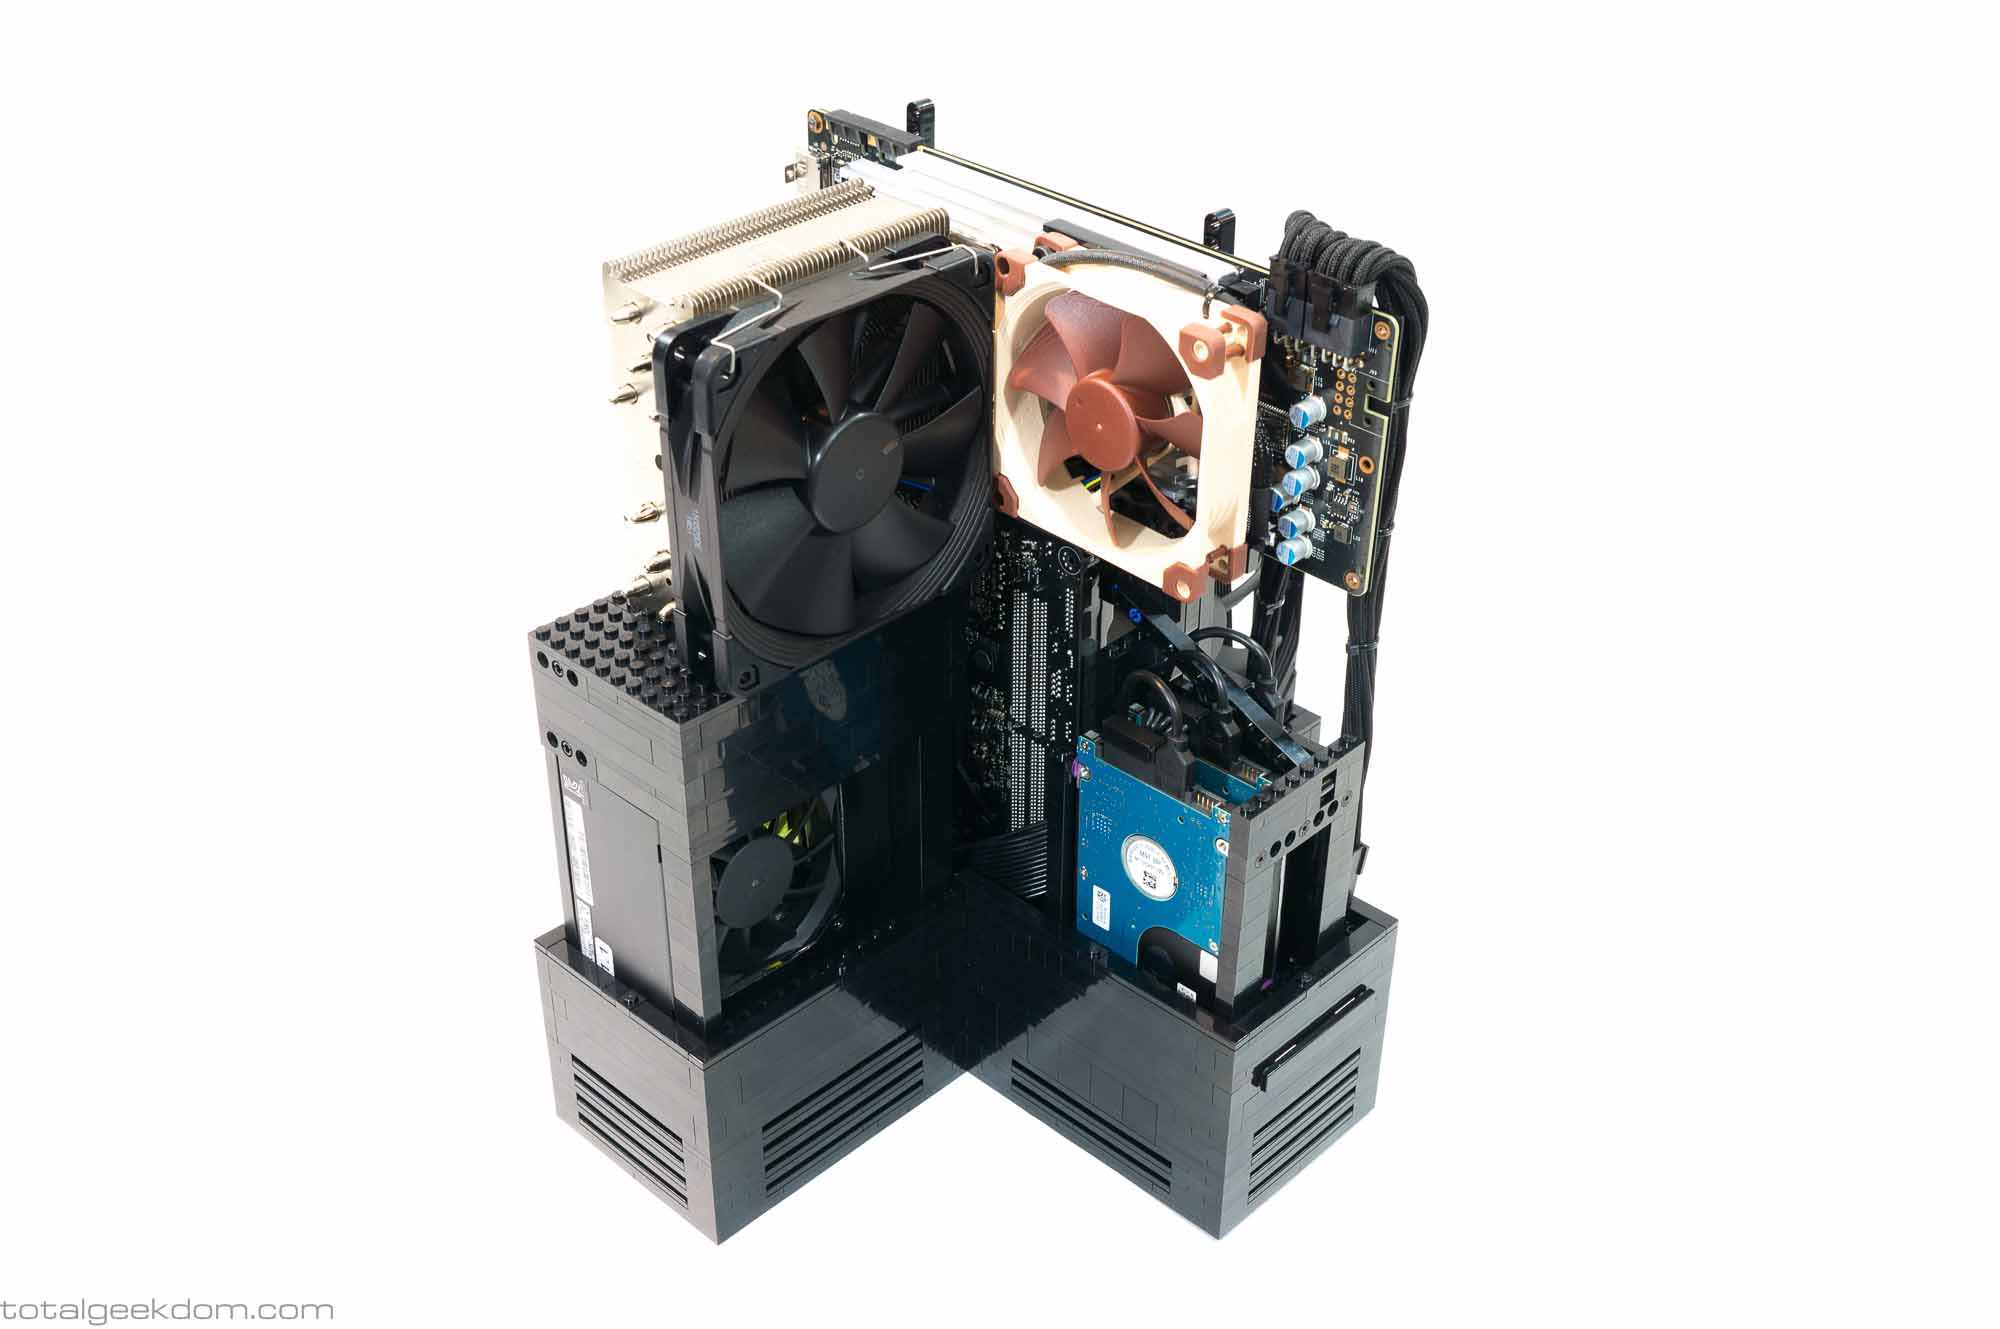
Lego Gaming Computer Asus Motherboard and Noctua NH-U14S Installed
Moving forward to the front SSD & HDD section, more Lego Technic pieces are used to create a frame system for the 2.5″ drives. In this system I’ve used dual 2TB HDD storage drives and a single Samsung SSD, but this section is designed to accommodate up to 4 total drives. Each drive has space between it and the other drives in order to take advantage of its position over the case fans, which blow a stream of fresh air over each of the drives.
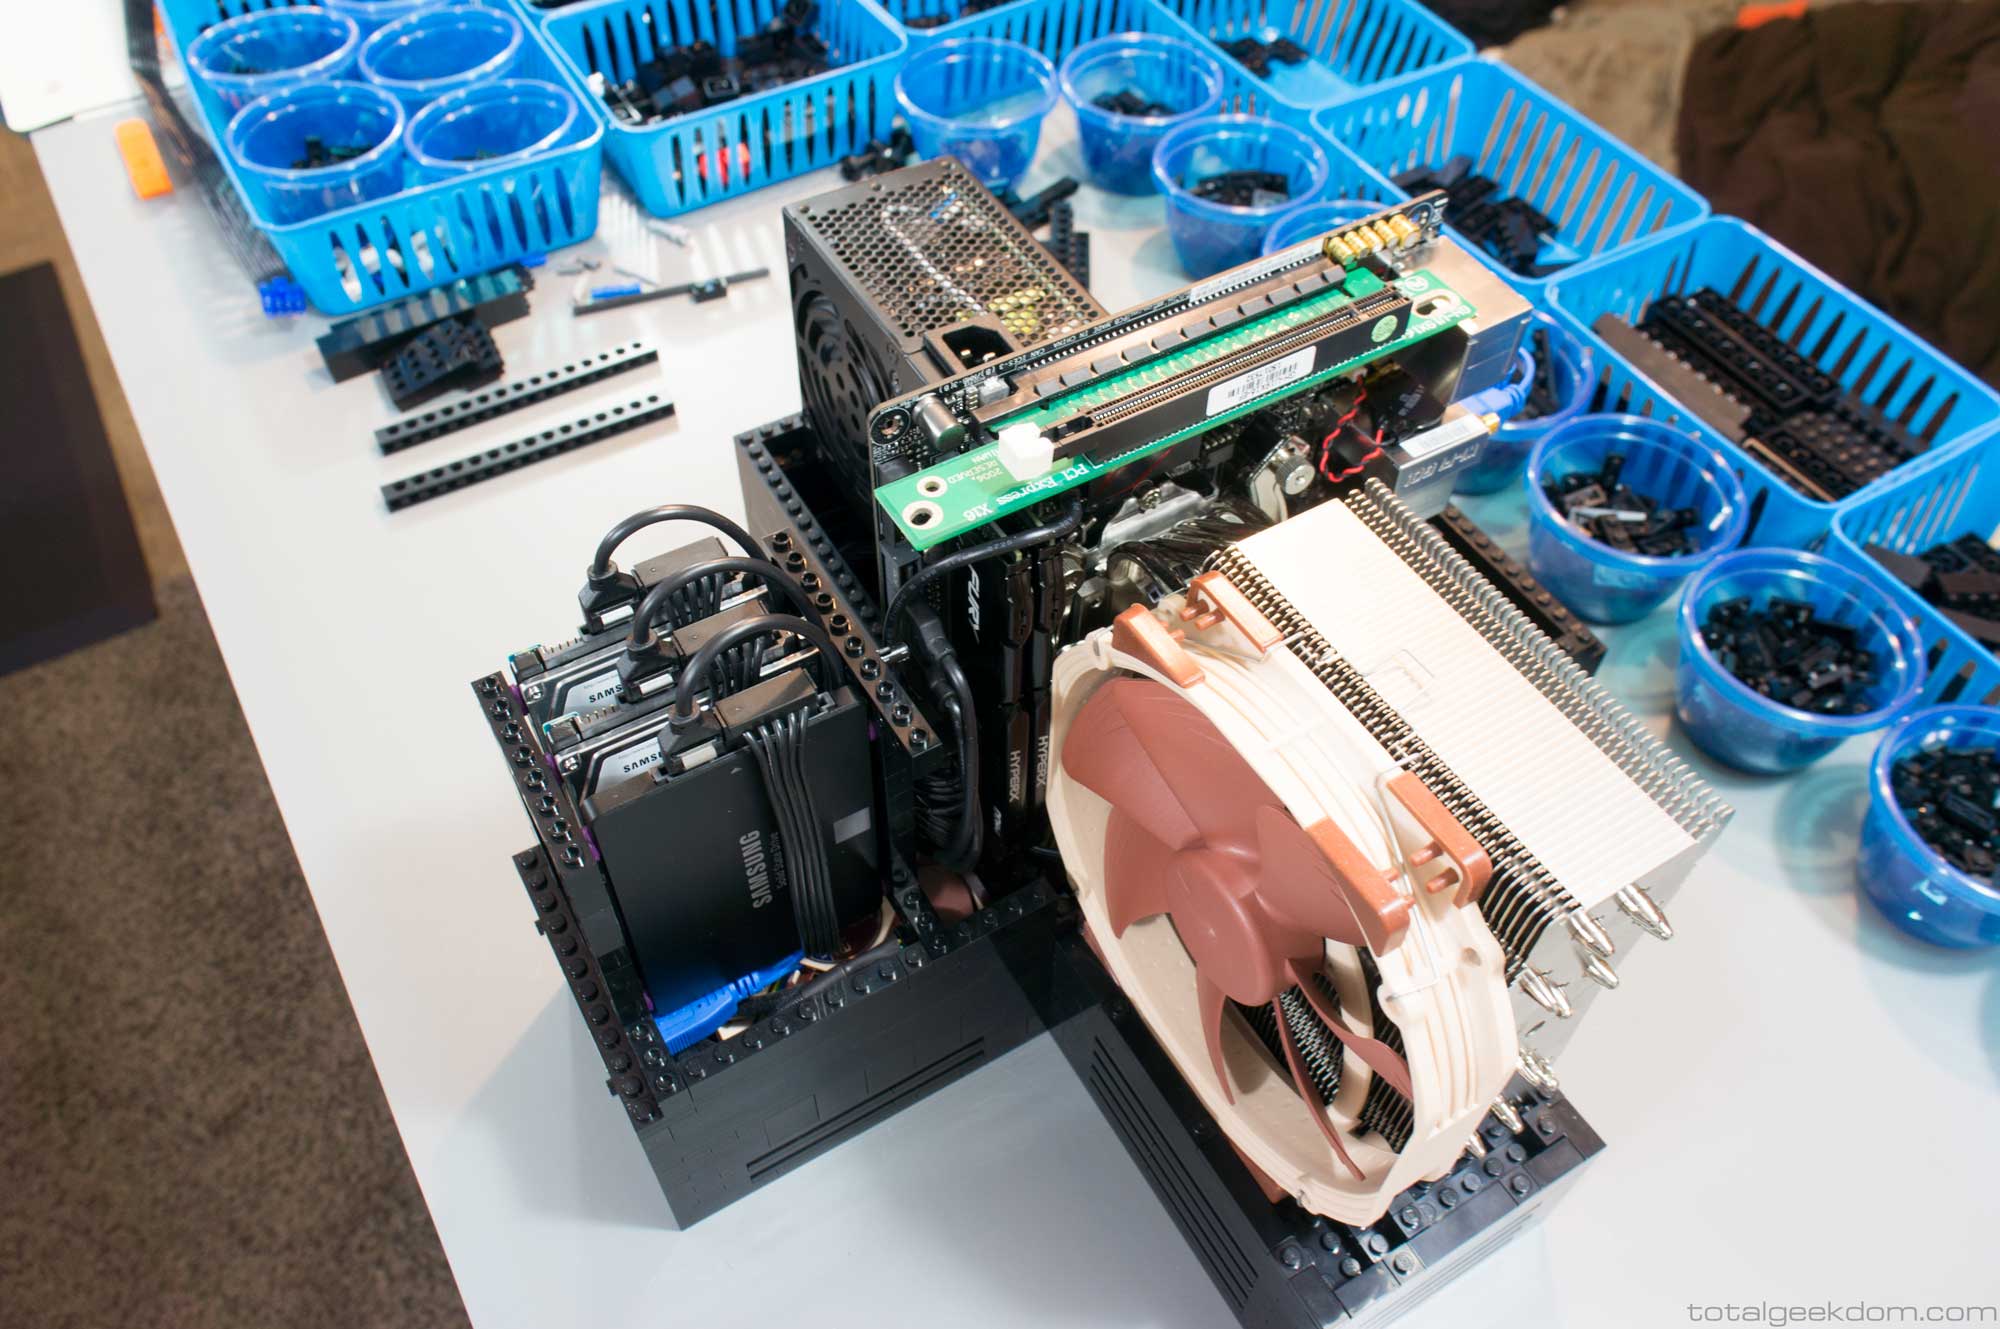
Lego Gaming Computer Hard Drives and Power Supply Installed
For the graphics card, I used more Lego Technic pieces to create two supports directly under the graphics card 90 degree slot adapter. The adapter rests directly on top of these supports, and the weight of the graphics card is carried directly on them. This is another area where my design is an improvement on conventional cases, which require the cards to lay on their side with their only support in the rear. Heavy cards and coolers can cause sag at the front of the card, which causes the cards to warp over time and could lead to failure. The front support structure of my design is built into the top of the HDD/SSD frame, while the rear is attached to the case lower.
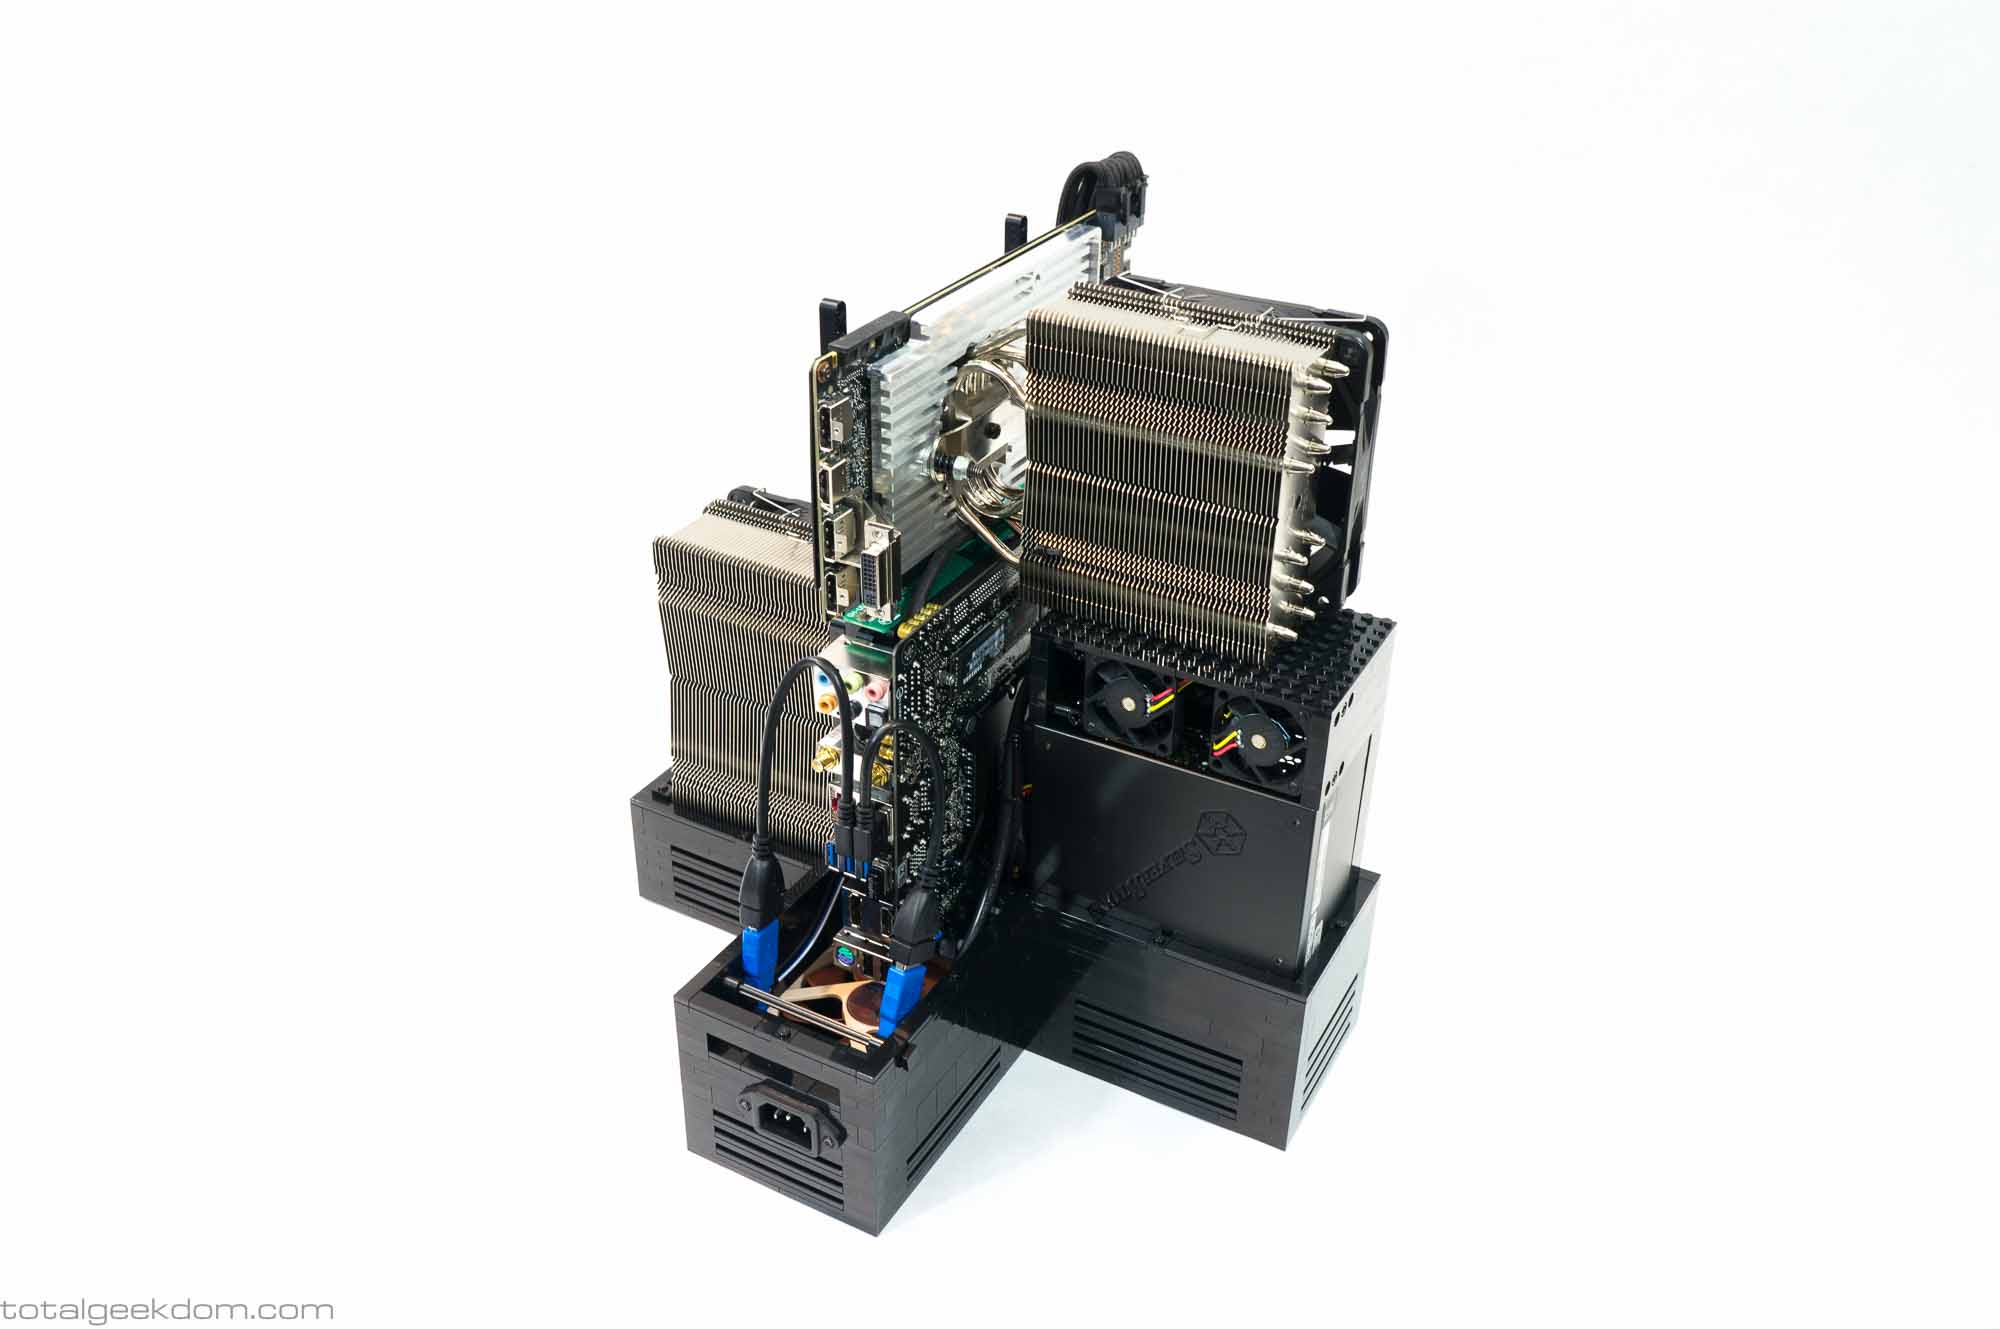
The power supply section has it’s own inlet and exhaust that are separated from the rest of the system. The inlet section is sealed and pulls fresh air from directly in front of the power supply. The exhaust section can be configured in two different ways, each designed to match the corresponding graphics card. In a system configured with the tower-style custom graphics cooling system, the exhaust section of the power supply is sectioned off a couple of inches above the unit, so that two additional 40mm fans can be installed facing rearward to assist in directing exhaust out of the back of the power supply section. In a system configured with a factory OEM graphics card and stock cooler, the exhaust section of the power supply continues its path directly upward and exhausts out of the top of the case.
Lego Gaming Computer Power Supply Section
Lego Gaming Computer Power Supply Intake
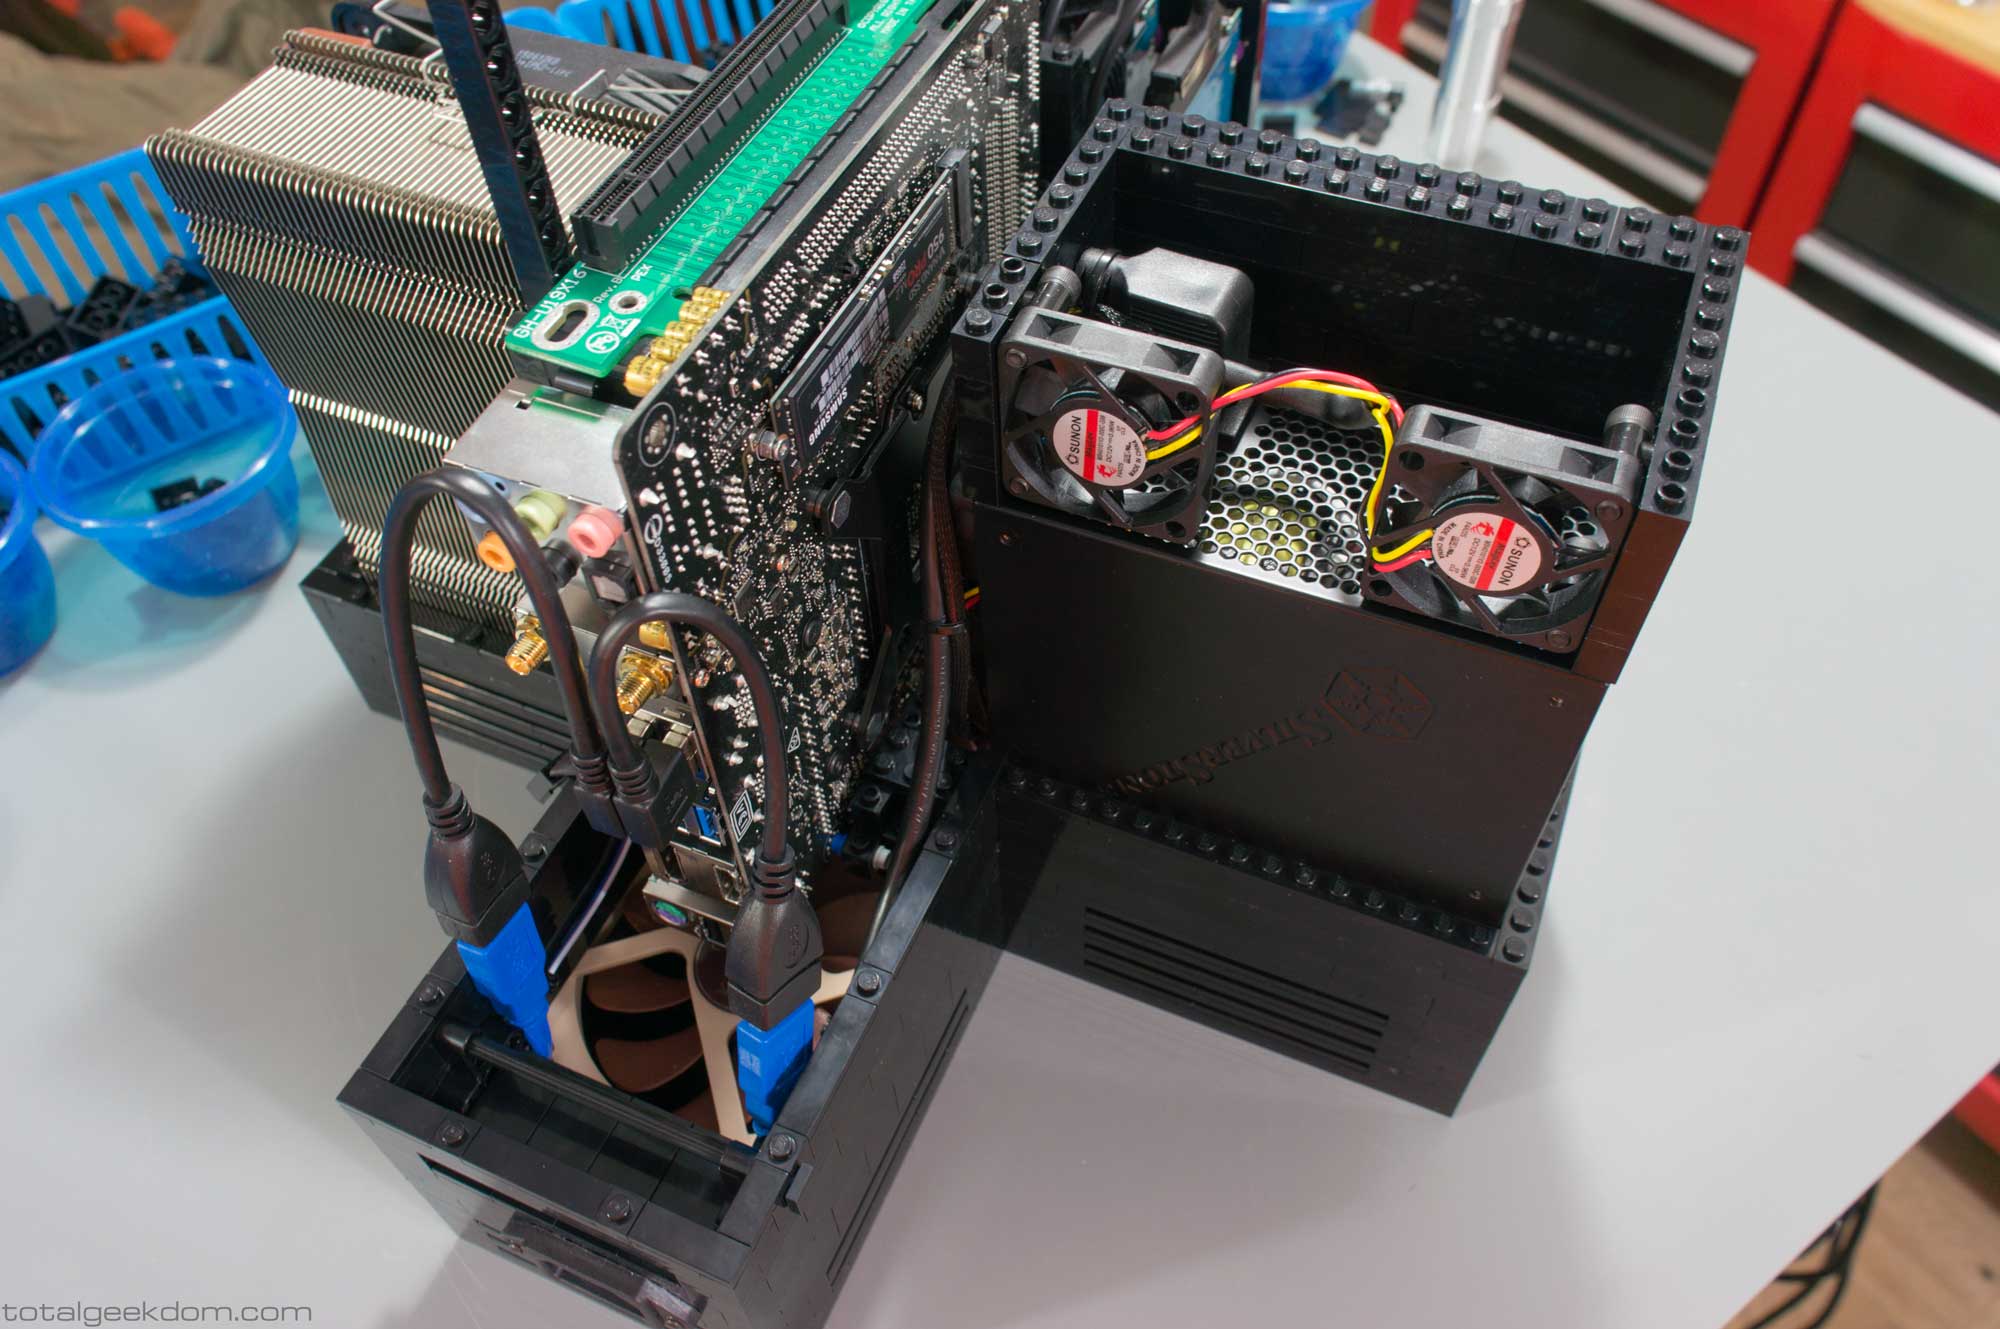
Lego Gaming Computer Power Supply Exhaust Section
As you can see in the image above, the graphics card is installed into the PCIe adapter and locked in place. With a conventional graphics card with a factory cooler the mounting of the card is pretty much plug-and-play. The system is designed with dual 6/8 pin graphics cards power leads that snap in place.
Lego Gaming Computer
Lego Gaming Computer Standard Graphics Card Mounted
The custom tower-style graphics card cooler has a custom billet 6061 aluminum heatsink that allows for mounting the tower-style Noctua NH-U12S cooler and the addition of supplemental cooling to the board. Keeping the core of the graphics card cool is only one aspect of cooling the graphics card, as the VRMs, Mosfet and memory also need cooling. I decided to take my modification of the graphics card cooling system a couple of steps further than anything I could find on the market and custom-build a billet alumimum heatsink that doubled as a mount for the Noctua tower cooler. This heatsink is modeled after of a waterblock, and the pads on its back perfectly mirror the layout of the VRMs, Mosfet and Memory locations. The front side is finned and offers mounts for the addition of supplemental fans. This greatly improves the cooling of the graphics card and offers better cooling performance than anything on the market. Nothing like it exists.
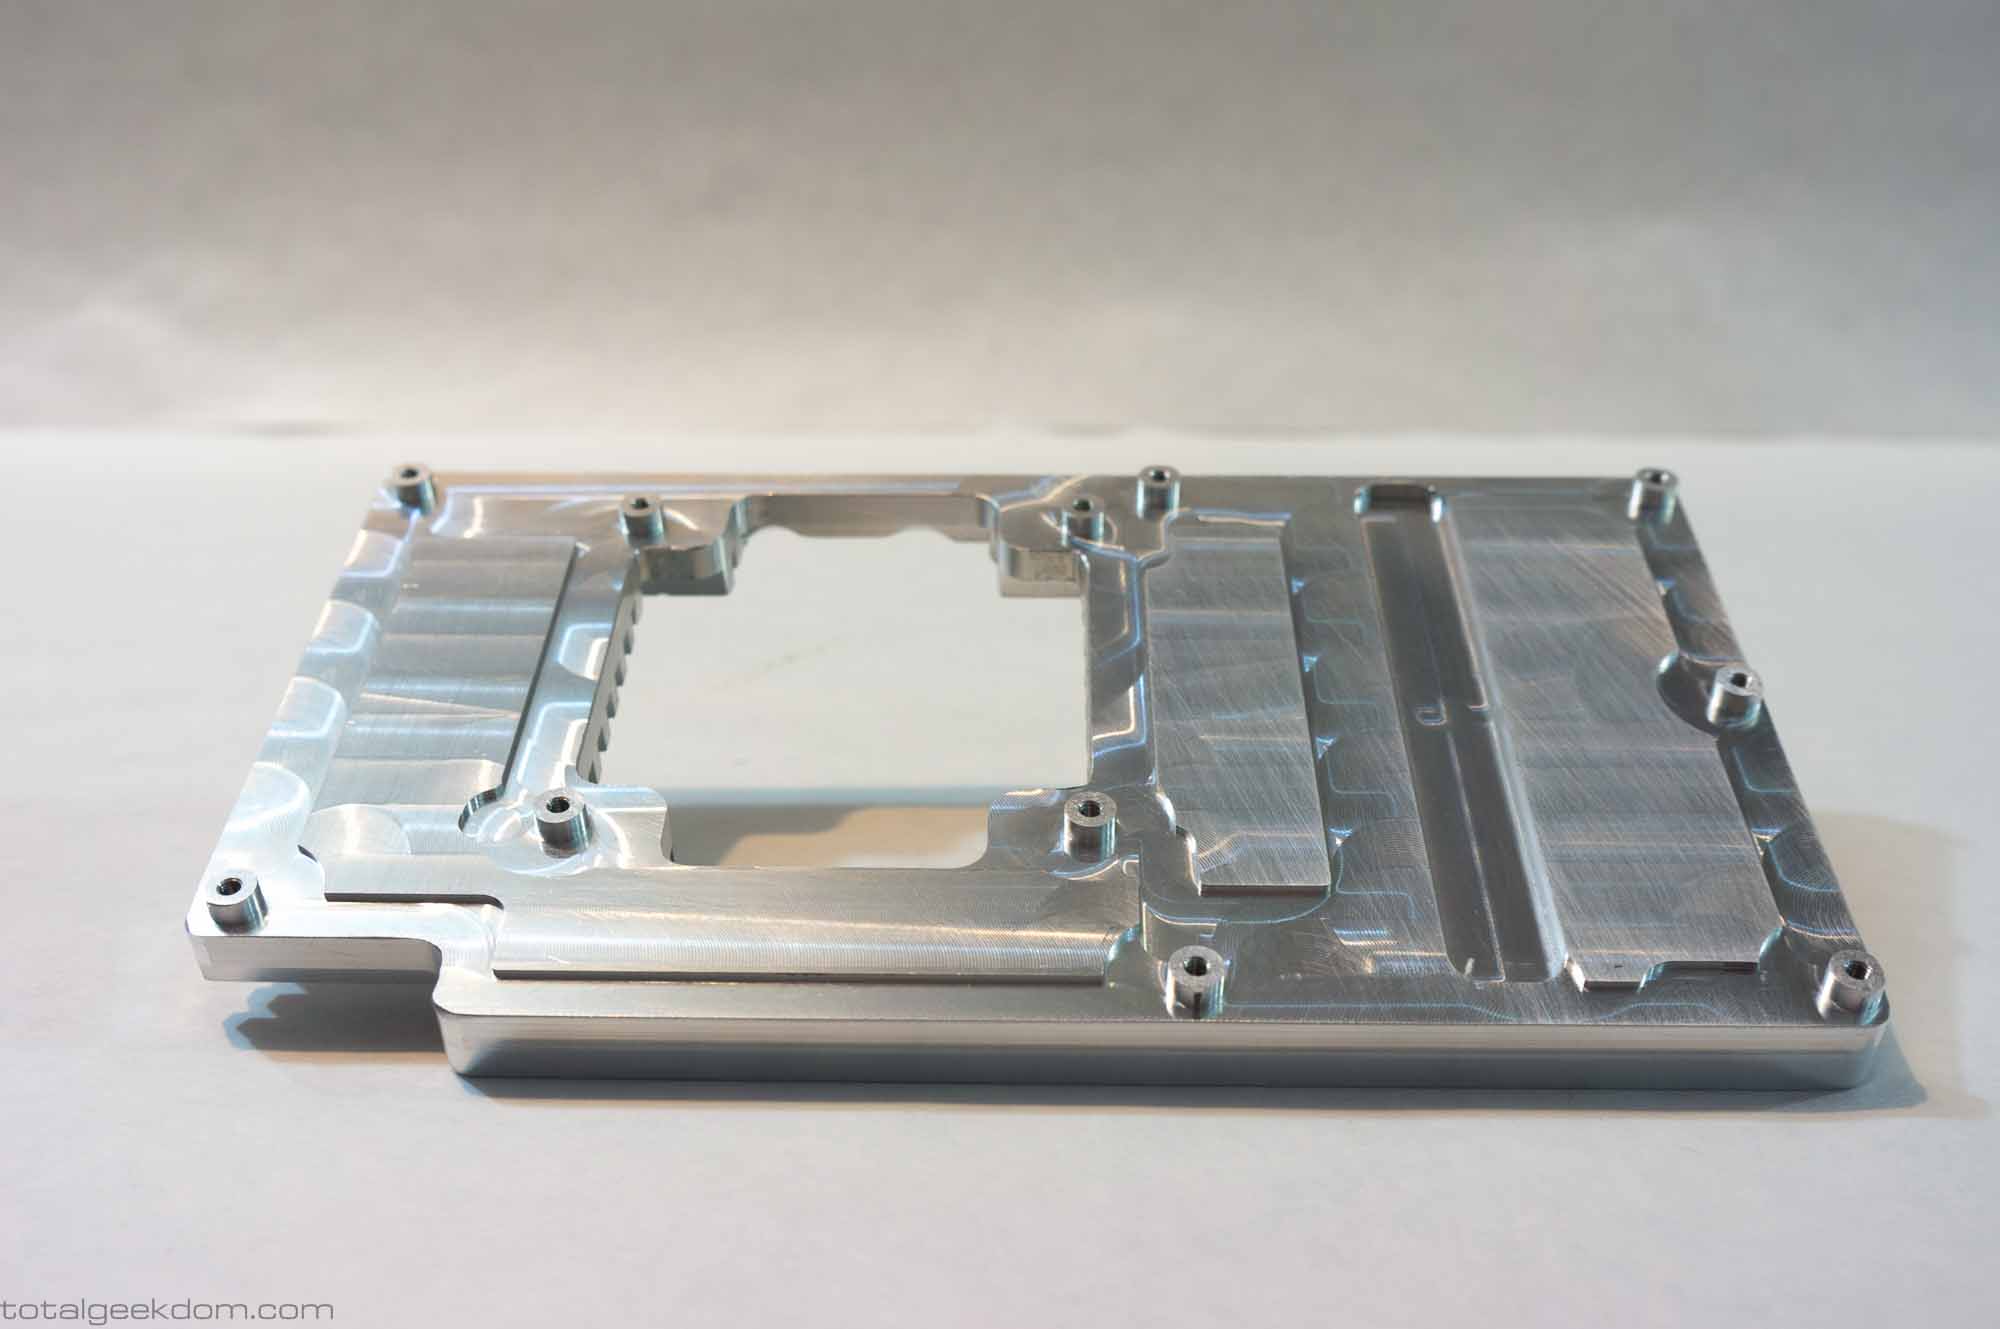
Lego Gaming Computer Custom Graphic Card Heatsink
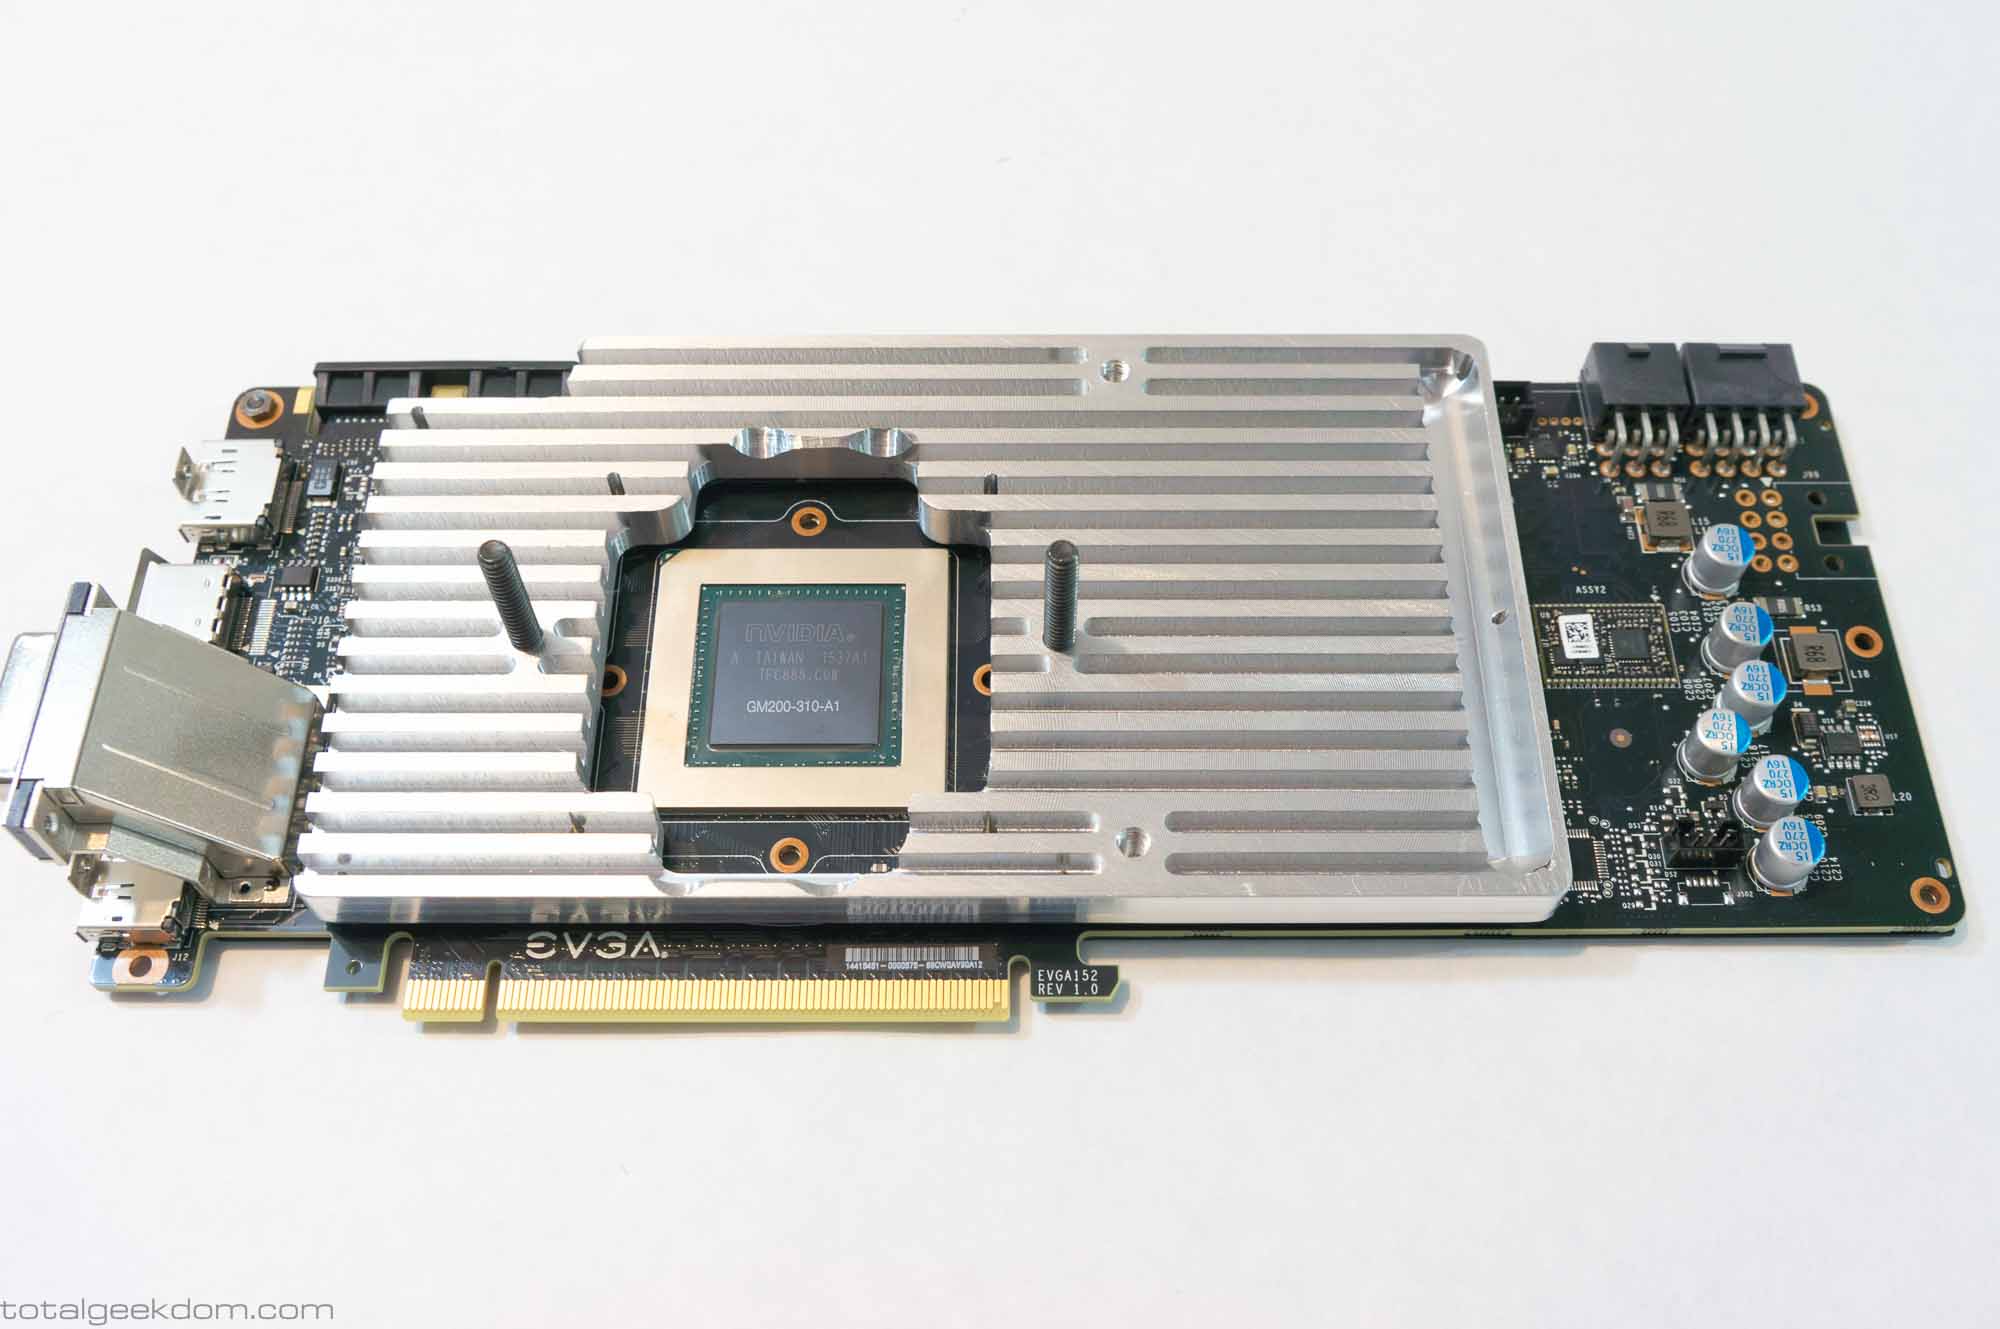
Lego Gaming Computer Custom Graphics Card Heatsink GTX 980 Ti
Lego Gaming Computer Custom Graphics Card Tower Cooler

Lego Gaming Computer Custom Graphics Card Tower Cooler and Heatsink
Case Outer
The final section of the case is the outer shell. It was designed to offer quick and easy access to all the components inside of the system. The upper portion simply snaps in place on the row of Lego studs that is left exposed on the lower case section. There are 3 more Noctua fans held in the center section which assist the airflow throughout the system. The top of each compartment is capped off with a slot design that allows for exhaust air to exit. This system takes full advantage of the effects of convection.
Lego Gaming Computer Upper Section
Lego Gaming Computer Upper
Lego Gaming Computer Outer Shell Upper System Fans
Lego Gaming Computer Upper System Fans
Lego Gaming Computer Custom Graphics Card Tower Cooler and Heatsink
Lego Gaming Computer Graphics and Processor Cooling Systems
Lego Gaming Computer Custom Graphics Card Cooler and Heatsink with Fan
Lego Gaming Computer Rear System
Lego Gaming Computer Upper Profile
Overall Performance
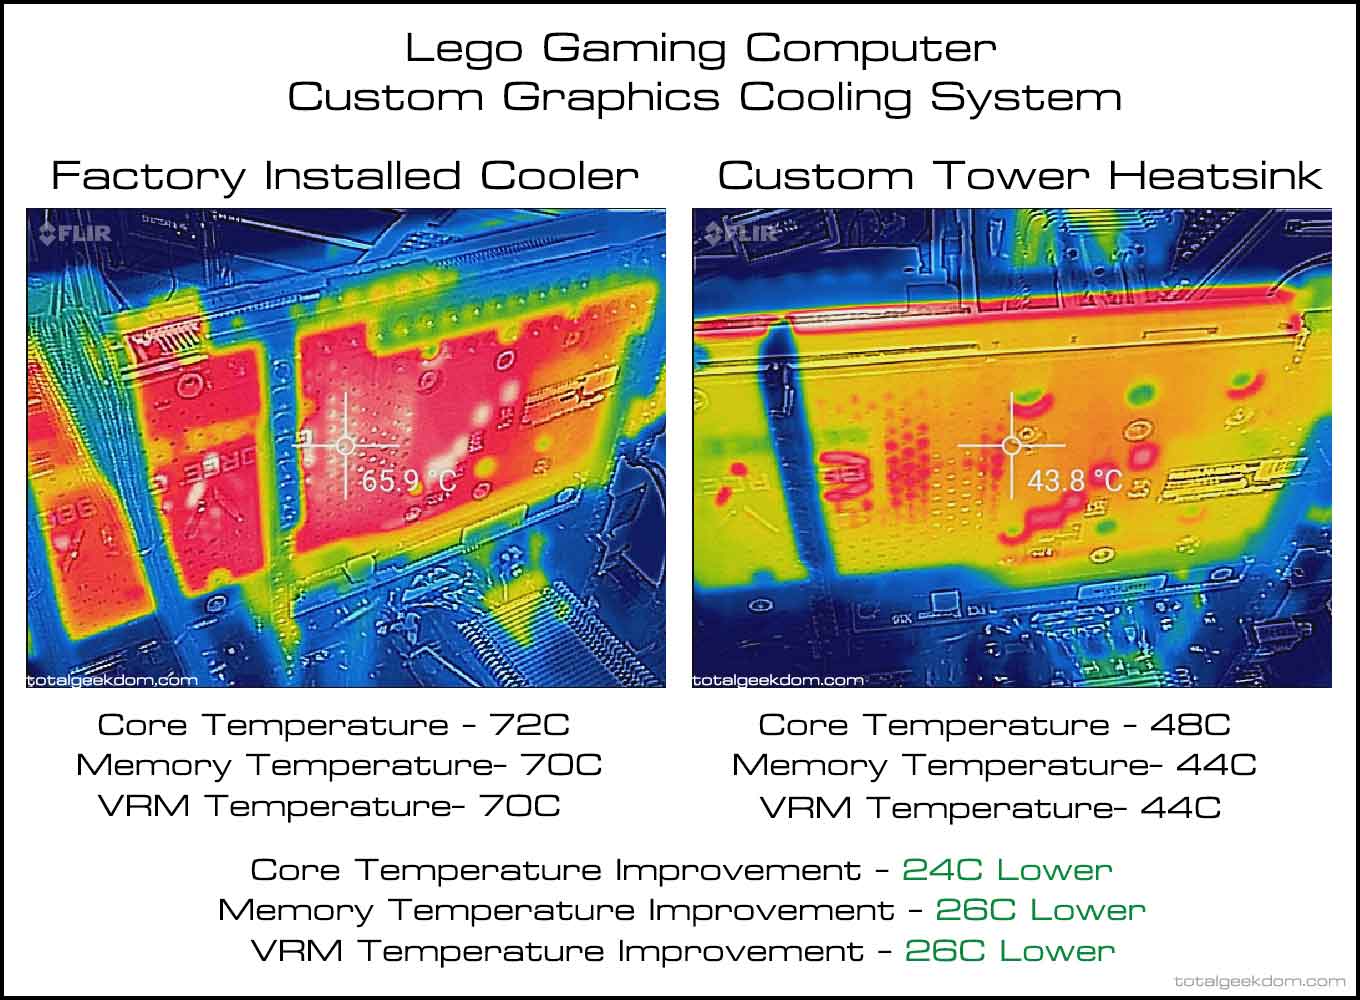
In testing the Lego Gaming Computer has performed amazingly well. Every component in the system runs cooler thanks to the cooling methods employed in this new case design. Here are the results of my testing between the stock EVGA cooler on the GTX 980 Ti and my modified tower cooler and custom heatsink.
Benchmark- Unigine Heaven
These test results show just how effective the tower style cooler and custom card heatsink. Temperature reductions like this would normally not be possible without using a full water block and water cooling system. This offers an excellent alternative to water cooling, with performance nearly on par or better in some cases, and without any of the maintenance or possible complications that come with a full water loop.
Overall I’m very happy with the Lego Gaming Computer and how it performs. I’ve done extensive testing on the system, both through synthetic stability testing as well as real-world usage, and it has performed amazingly well. Furthermore, additional cooling performance makes the system extremely stable. With the ability to easily overclock the Intel 6700K and GTX 980 Ti, the Lego Gaming Computer has proved more than a match for every game I’ve thrown at it.
For more information, pricing, and options, visit the Lego Gaming Computer page.
Lego Computer Updates
If you're interested in following along with new updates, pics, designs, models, and info related to the Lego Computer, then click the button below to check out the Total Geekdom Facebook page. There you can Like and follow Total Geekdom to see updates on the Lego Computer.
Total Geekdom