I’m an avid Lego geek; I love sitting down for a build session whenever I can fit one in. This often means pulling out the bins of Lego bricks and clearing a spot on the floor or a table and having at it. With bricks flying and hands madly building it’s only a short time before robots, dinosaurs and all kinds of fun Lego creations are scurrying about. The downside to this fun is at the end of a build session you have to clean up and put away the bin of Lego bricks and even….gasp… disassemble your new creations! The horror.

Lego Plates on Wall and Ceiling

Lego Stairs
The solution to this problem seemed simple enough; just build a dedicated area for Lego play and building. Only one small hitch, my house isn’t big enough to devote an area for just Lego play. So I started thinking, I needed an area that I could use as a Lego build area and never take it down, but I didn’t have any more space. This got me thinking further, what about my walls? Why couldn’t I just get some Lego plates and stick them to the wall and build on the wall, seems like that could be pretty cool way to do it. I toyed around with this idea in my head a little bit and eventually decided that if I was going to build a permanent Lego area on the wall I wanted it to be both functional and aesthetically pleasing.
Besides utilizing unused space, I also wanted to implement the design in a way that would allow for a little more creativity during building. Don’t get me wrong, there is nothing wrong with a big flat space of Lego plates but I wanted something a little more than that. Since I was going to be building on a vertical surface now I thought why not take it one step further and add some Lego plates to the ceiling as well. Inverted Lego building area! I thought that by having both a vertical and inverted surface to build on it would change things up a bit and offer the chance to do things I had not done before, plus it was just more space that was sitting there going unused, so why not.
The two most important aspects to me for this project were the overall layout of the Lego plates/design and the location of where I would build this. My basement was the ideal place in my house since it was already my principle domain and a favorite spot for all kinds of Lego, computer and general geekery projects. I evaluated a couple of the walls and corners and ended up choosing one that I felt offered the best design possibilities. While a standard corner would suit this project just fine I had a small area in one corner that jutted out and offered a couple of extra surfaces to work from. Plus, I liked the angularity and look. I spent some time tinkering around in my head what I wanted the layout to look like before I finally came to a decision.

Before Lego
When it comes to the Lego plates you have 3 options for the plates themselves. There are two colors of the 10″ x 10″ plates, either blue or green. There is also a larger “15 x 15″ plate that is grey. The 10” plates are $5 and the “15 plates are $15 dollars. Since I was trying to get maximum bang for my buck I went with the 10″ plates. I ended up choosing the blue plates since I thought they offered a nice contrast to my wall color, though the green probably would have been just fine too. I had saved up a birthdays and Christmases worth of Lego gift cards and took off to my local Lego store to buy the plates. For the design that I intended I would need about 26 plates.
Unfortunately, the area I intended on putting these plates was not an even surface because when the previous owner refinished the basement they used 1/4″ thick strip moldings everywhere. I needed to get the surface flat before I could mount anything. In order to do this I went to the hardware store and bought a couple of small sheets of 1/4″ MDF board. Then I went through and based on my design laid out exactly the lengths I would need in order to build a patchwork of MDF board that seamlessly blended in with the existing 1/4” mold work to create a flat surface. I also wanted this project to be removable in the future without damaging the walls. Just in case I ever sell the house and some crazy non-Lego loving person moves in; they can always take it down.
The actual attachment of the MDF board uses short drywall screws to fasten all the pieces in the exact locations needed. The Lego plates themselves are attached using Liquid Nails. The key to making the system removable in the future is to not apply Liquid Nails around the areas where the screws are, this way if you want to remove the system you can break the Lego plates off the MDF support boards and then just unscrew the MDF boards from the wall.

Installed MDF Boards

MDF Board Layout
After getting all the MDF boards in place and making some final double checks on the placement I moved forward with gluing the Lego plates onto the MDF support boards. Using a very thin amount of Liquid Nails and spreading it with an old plastic card across the surface, I put each board in place one by one. Once each section was done I used 2×4 Lego bricks to align each plate and make sure they were the exact distance apart, so you could seamlessly build from one plate to another. This is an important step, because if you didn’t align the plates before the Liquid Nails dried you would not have the correct alignment to build across plates.

Aligned Lego Plates

Lego Plates Installed
With all the plates installed, and the Lego bricks at all the edges lining them up, I let everything dry overnight. The next day I removed the bricks and took a look and was very happy with the result. I lasted all of about 37 seconds before I had my bins of Lego in front of me and was building away exploring the different surfaces and things I could do. I spent a couple of hours, 2-3 days in row, playing each night. It was nice to be able to build without having to deconstruct anything. After about 5-6 hours of play over a couple of days this is what my Lego corner looked like…

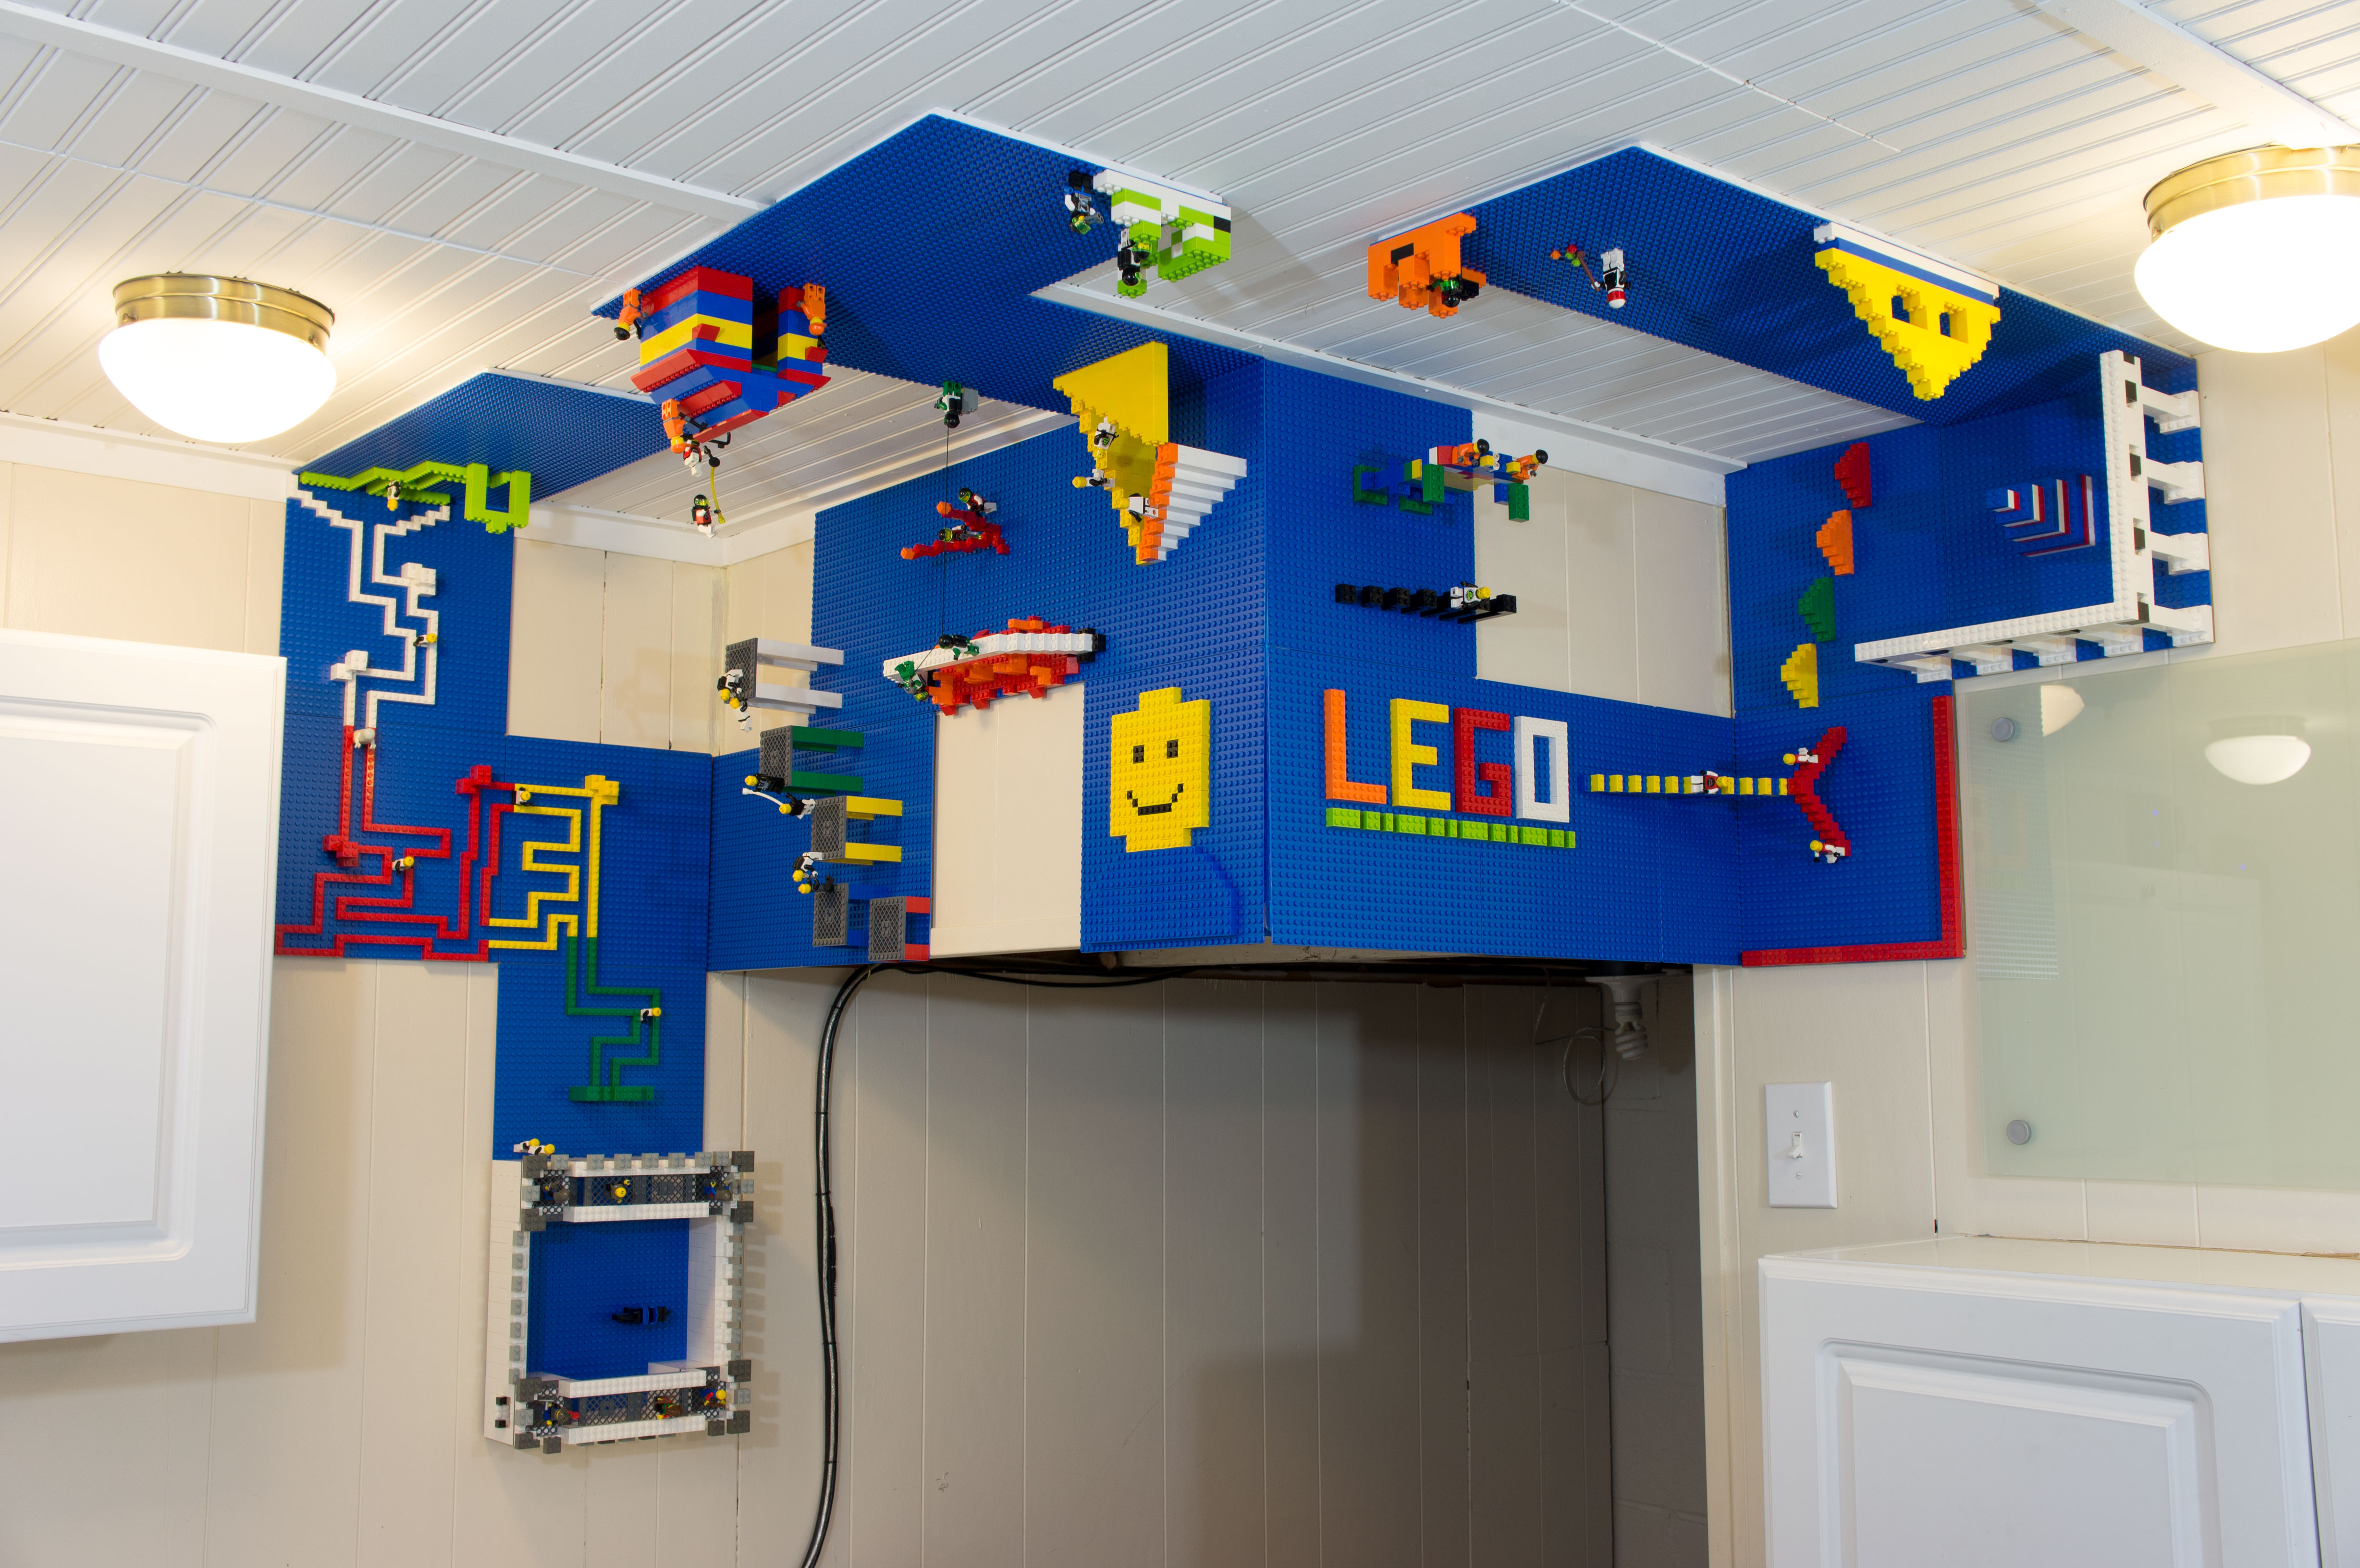
Lego Builds
In order to facilitate easier builds and to get all the bins of Lego spread throughout my house into one place I bought an Ikea Trofast organizer with bins and put it up right under the build area, this allowed for easy and quick access to all my Lego bricks and makes building an ease.

Lego Builds

Lego Builds

Lego Builds In Corner

Lego Builds from Below

Battle Stations

Lego Escher Stairs

Lego Robot

Lego Wall Maze

Lego House

Lego Man Falling

Lego Fire Bridge Rescue

Lego Lava Drillers

Lego Castle

Lego Platforms
The biggest problem I ran into during this whole project is that there were a couple of spots where the wall geometry is not perfect and square, so I just kind of had to make due and roll with it. In a perfect world all of your walls will be even and square. My house was unfortunately built over 60 years ago, so I’ll cut it some slack for being off an eighth inch here and there.
In the end, I’m very happy with how this project turned out, I didn’t spend too much money (thanks to gift cards) and I now have a permanent Lego build area using space that was unused before. I really enjoy the new things I can do with the vertical and inverted building that I had not played with before. Plus I think it looks kind of cool, but as a Lego-maniac I might be biased.
Materials
Lego Plates- Qty 26 ($130)
MDF Board- Qty 3 ($15)
Liquid Nails- Qty 2 ($5)
Total after using Lego gift cards- $20
Comments 46
If you’re looking for games, try gamesx66. It’s got a nice selection. The graphics are pretty good and load times are fast! gamesx66
Pingback: How To Put Drywall On A Ceiling | Stunning Ceiling Design Ideas - Best Ceiling Decor & Painting
Pingback: Build Server Computer | Breaking News Stories from US and Around the World
Pingback: Dedicated Server Gaming | ---------------------
Pingback: How To Put Drywall On Ceiling | Stunning Ceiling Design Ideas - Best Ceiling Decor & Painting
Pingback: Drywall Ceiling Designs | Stunning Ceiling Design Ideas - Best Ceiling Decor & Painting
Pingback: Drywall Ceiling Design | Stunning Ceiling Design Ideas - Best Ceiling Decor & Painting
Pingback: How To Make A Removable, Non-Permanent Lego Wall – Rosemarie
Pingback: Lego Decor For Wall – Pakar Me
Pingback: Plate Hangers - Home and Kitchen Ideas
Pingback: Plate Hangers - Home and Kitchen Ideas
Pingback: Liquid Drywall - Home and Kitchen Ideas
Pingback: Plate Hangers For Wall - Cool Home Remodeling
Pingback: Teenage Bedroom Designs For Small Rooms - Bedroomfurniture.me
Pingback: Teenage Bedroom Wall Designs – Bedroomfurniture.me
Pingback: Boys Lego Bedroom Ideas – Bedroomfurniture.me
Pingback: Teenage Bedroom Wall Ideas – bedroomfurniture.me
Pingback: Lego Decorating Ideas For Bedroom | | Bedroom Design Ideas
Pingback: Lego Bedroom Decorating Ideas | | Bedroom Design Ideas
Pingback: Lego Themed Bedroom Pictures – Biggest Online Picture Finder
Pingback: A few cool, simple & original LEGO ideas you can build with your kids - GeekyDad
Pingback: How To Organize 250,000 LEGO Pieces | School Library Journal
Pingback: Cheap NFL Jerseys Shop
Pingback: URL
Pingback: Build Lego House | sapcrmarchitecture.com
Pingback: 7 amazing decorating ideas for kids' bedrooms - Real Estate News
Where did you buy the actual wall panels?
I recently bought a 14ft catavan for my son and i to live in, it doesnt lrave much room for play space so i thought up covering the ceiling, wall and maybe the top of a shelf with lego for a truely 3d build zone! Thanks for putting this out there, im glad to hear that the fantasy can be made into a reality!
My son is 8 and wants a ‘LEGO Wall.’ I have no idea where he got the idea, or saw anything like this, but in a google search I came up with your page. Thank you so much for helping me turn my kiddo’s dream into a reality 🙂 He wants to be a LEGO Engineer someday. LOL.. he loves them!
Awesome! I’m glad I was able to help!
Good luck to your little LEGO engineer in training! 🙂
Pingback: Geek Turns House Corner Into a Mini LEGO Land - Bloggedd : Bloggedd
This is very creative. Great job!
Thanks! 🙂
Pingback: Home design idea for LEGO lovers [NEWS] - Lego Picutres, HD Wallpapers and News Blog
Pingback: Lego Wall and Ceiling Build Area
Pingback: Lego Wall and Ceiling Build Area | Indoor Digital Billboards
Pingback: Lego Wall and Ceiling Build Area | House of Mods
Nice! Your good!
Thank you! 🙂
Where do you get the time to make all of these awesome things?
Thanks!
I wish I had more time to tinker and experiment, I’ve got a lot of ideas in the queue waiting to get worked on, but there is only so much time in the day.
Hahaha. Now your sounding like me LOL.
Pingback: Habitación decorada con LegosNerdgasmo
Pingback: Arredare casa con le Lego | Vaxgelli Blog
merzbau
Thank you!
It’s flattering to have a Lego work of mine compared to something so important and cool. 🙂