What has 8 cores of Xeon power, along with up to 128GB of ECC memory, and offers terabytes of super fast SSD storage? Why a Lego Server, of course!
Over the years of building Lego Computers I’ve received requests for many different types of systems, and after building numerous variations of custom systems, I decided to design and add some standard Lego Computer based systems. This was how the Micro Lego Computer and Mini Lego Computer came into existence as well as soon-to-come Gaming Lego Computer, which is currently under development.
One request that has become increasingly common, however, is for a small form-factor, Lego-based server system. These requests have ranged from simple home server systems used as file servers and centralized backup to more advanced systems targeted at virtual machines. After building a couple different variations to fit different users needs, I decided to design a standard system and form factor that would work for multiple system configurations.
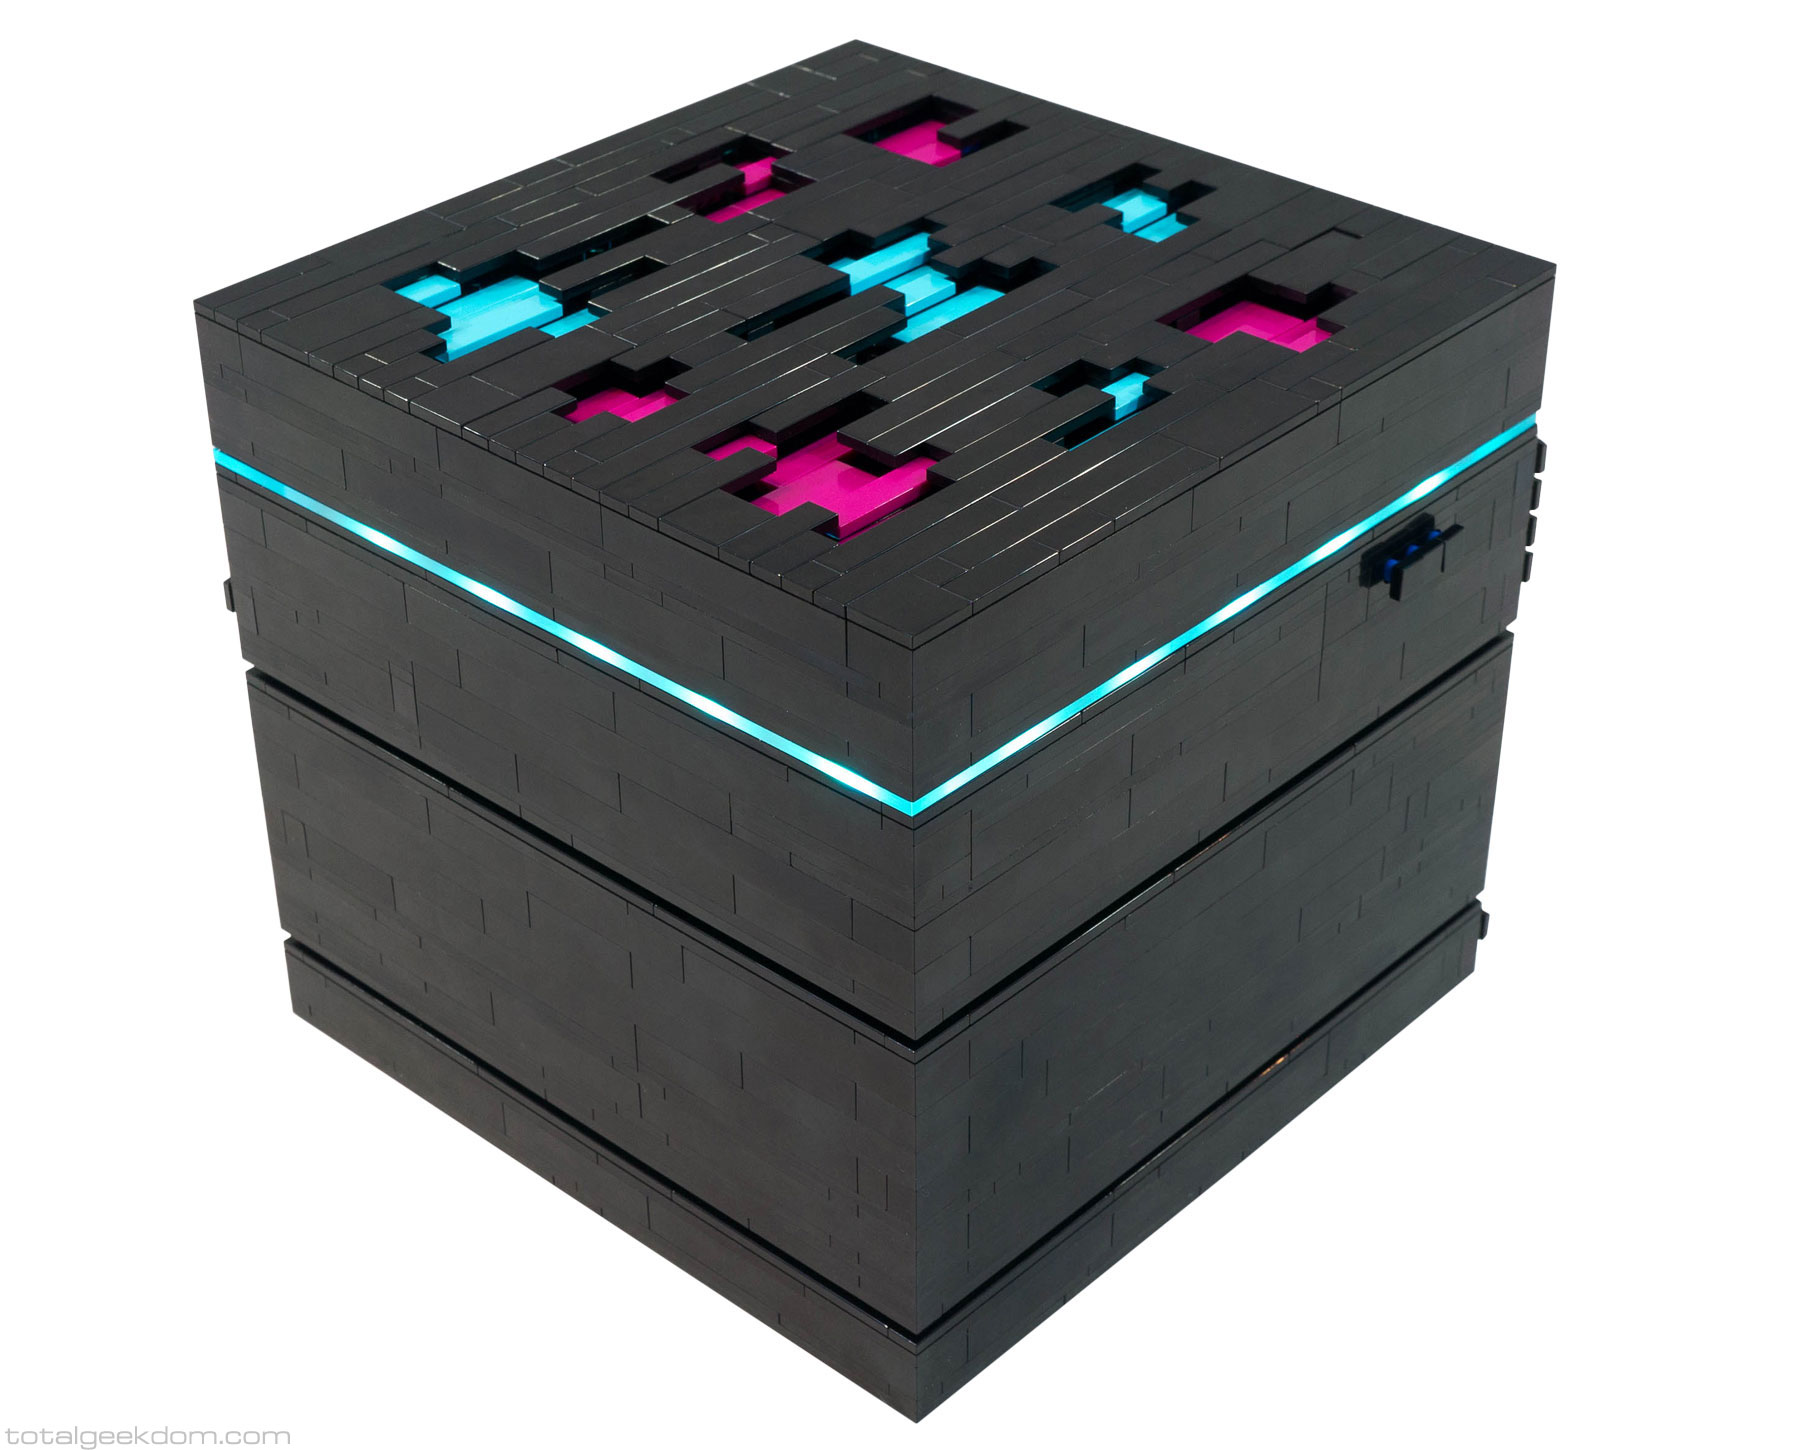
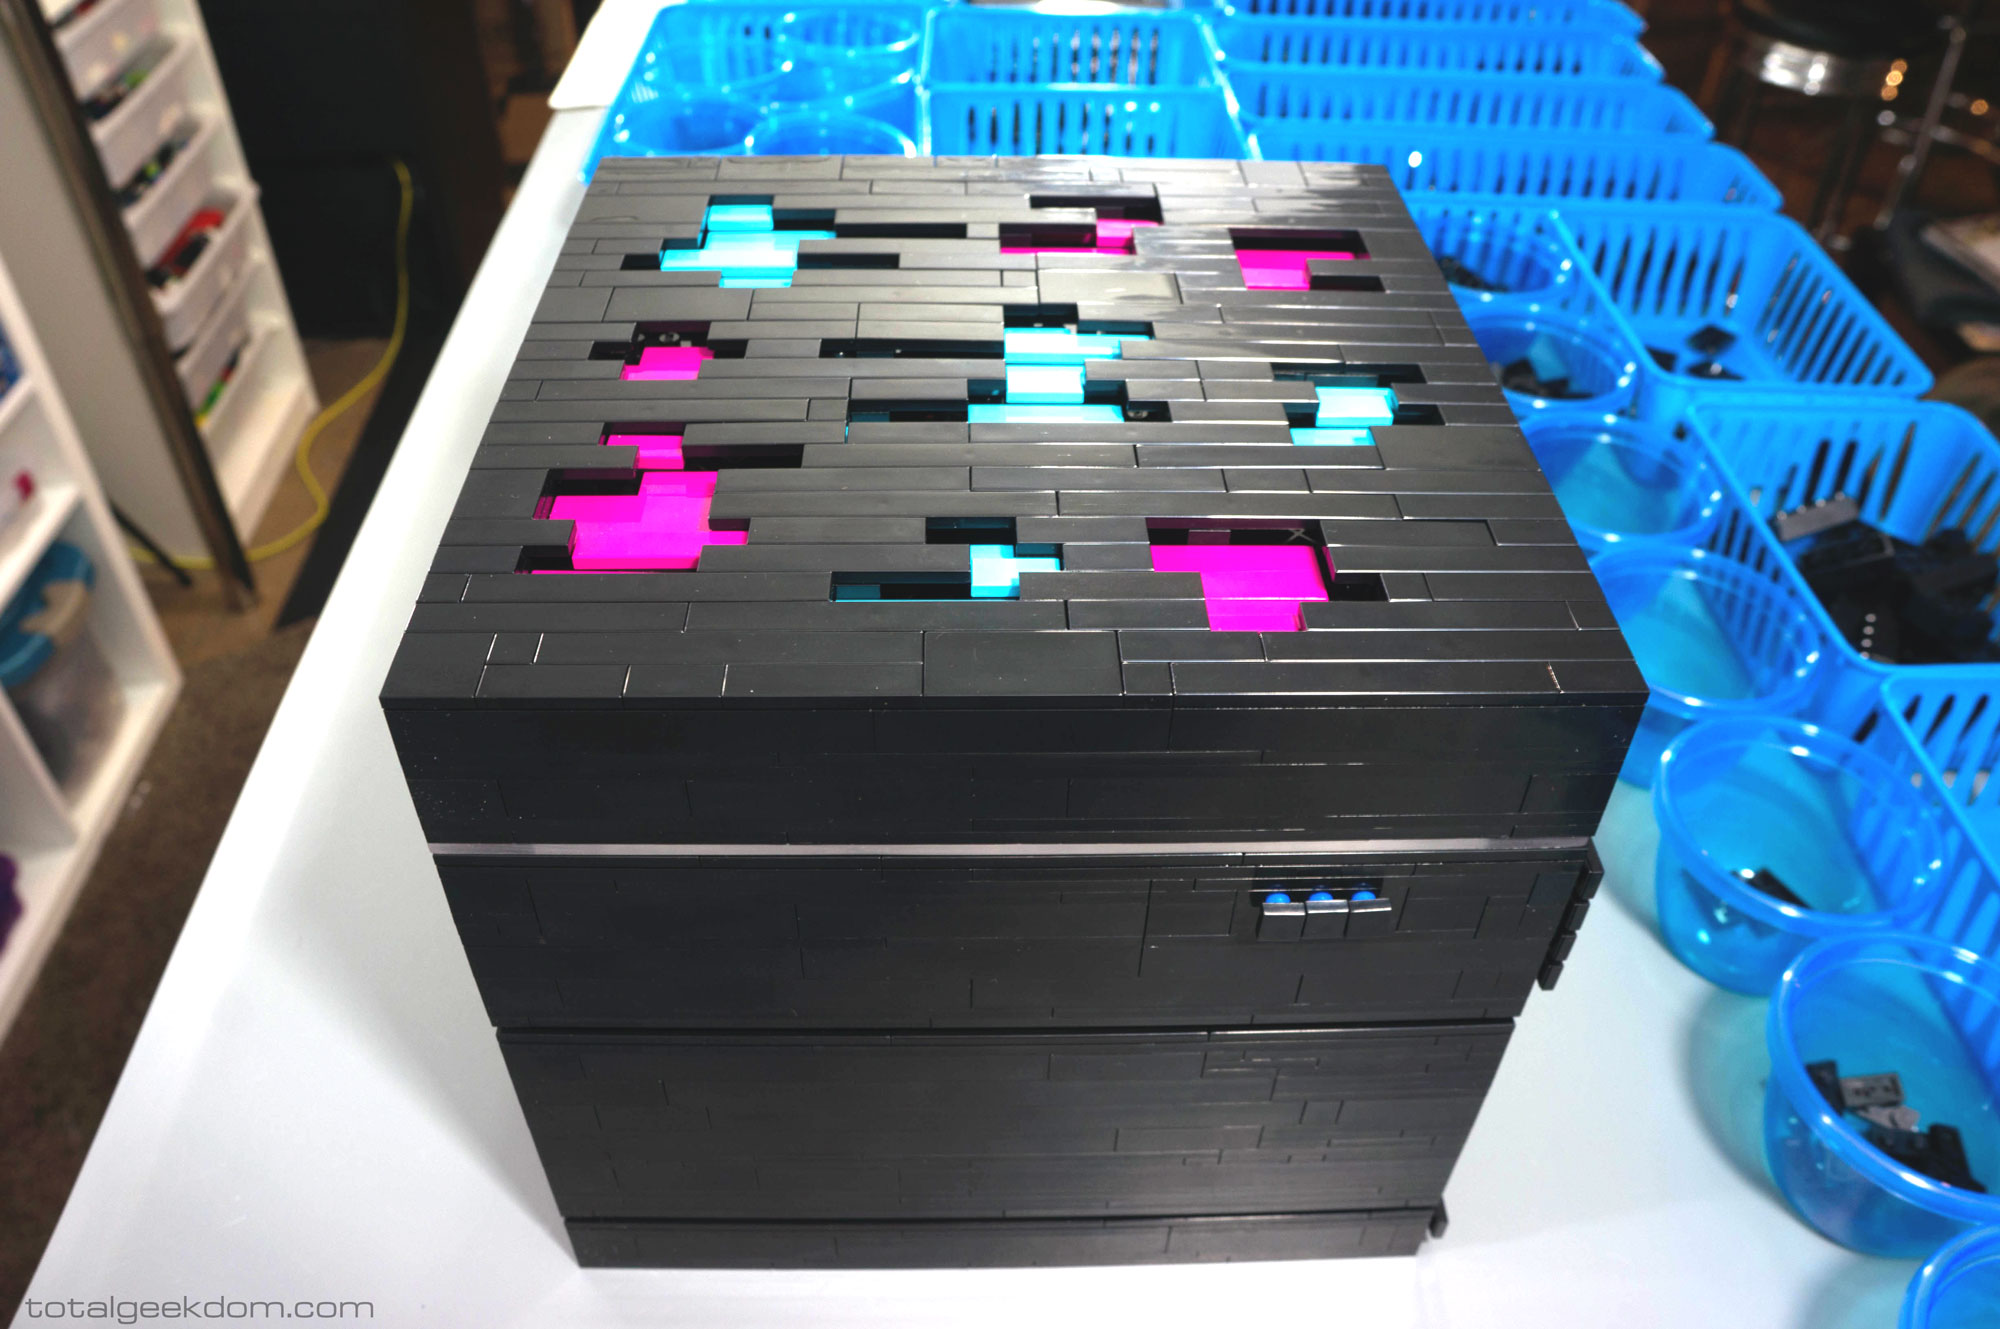
The new form factor for the Lego Server is just a little bit larger than the Mini Lego Computer, measuring just a hair larger than an 8″ cubed (though depending on the top design it is sometimes slightly taller than its length and width). This size allows for a very compact and small system, but one that is capable of handling a mini-itx motherboard.
This new design is built to accommodate multiple different types of servers, such as..
Virtualization Servers
Home Servers
File Servers
Web Servers
Development Servers
However, this specific build is going to cover the details of one of my more popular requests, the Virtualization server built as a Hyper-V machine.
System Design
The design of the system itself is built around a couple of core principals:
-Excellent Cooling Performance
-Excellent Reliability
-Excellent Acoustics
-Platform Versatility
-Extended Features
-Power Consumption
-Upgradable and Serviceable
Anyone who’s ever interacted with server grade equipment knows that a lot of noise is not usually a big concern when it comes to these kinds of systems. This is understandable considering a lot of these systems are usually in IT rooms or server rooms where minimal noise isn’t the first priority. Cooling performance is generally a combination of passive and active with most systems living in a climate controlled environment.
In the case of the Lego Server, however, I realized that due to its small form factor, a lot users would most likely have the system on a desk and that the room in which the system would be may not have air conditioning. So it was critical to properly design the cooling system to ensure adequate cooling performance, while also trying to keep noise levels under control.
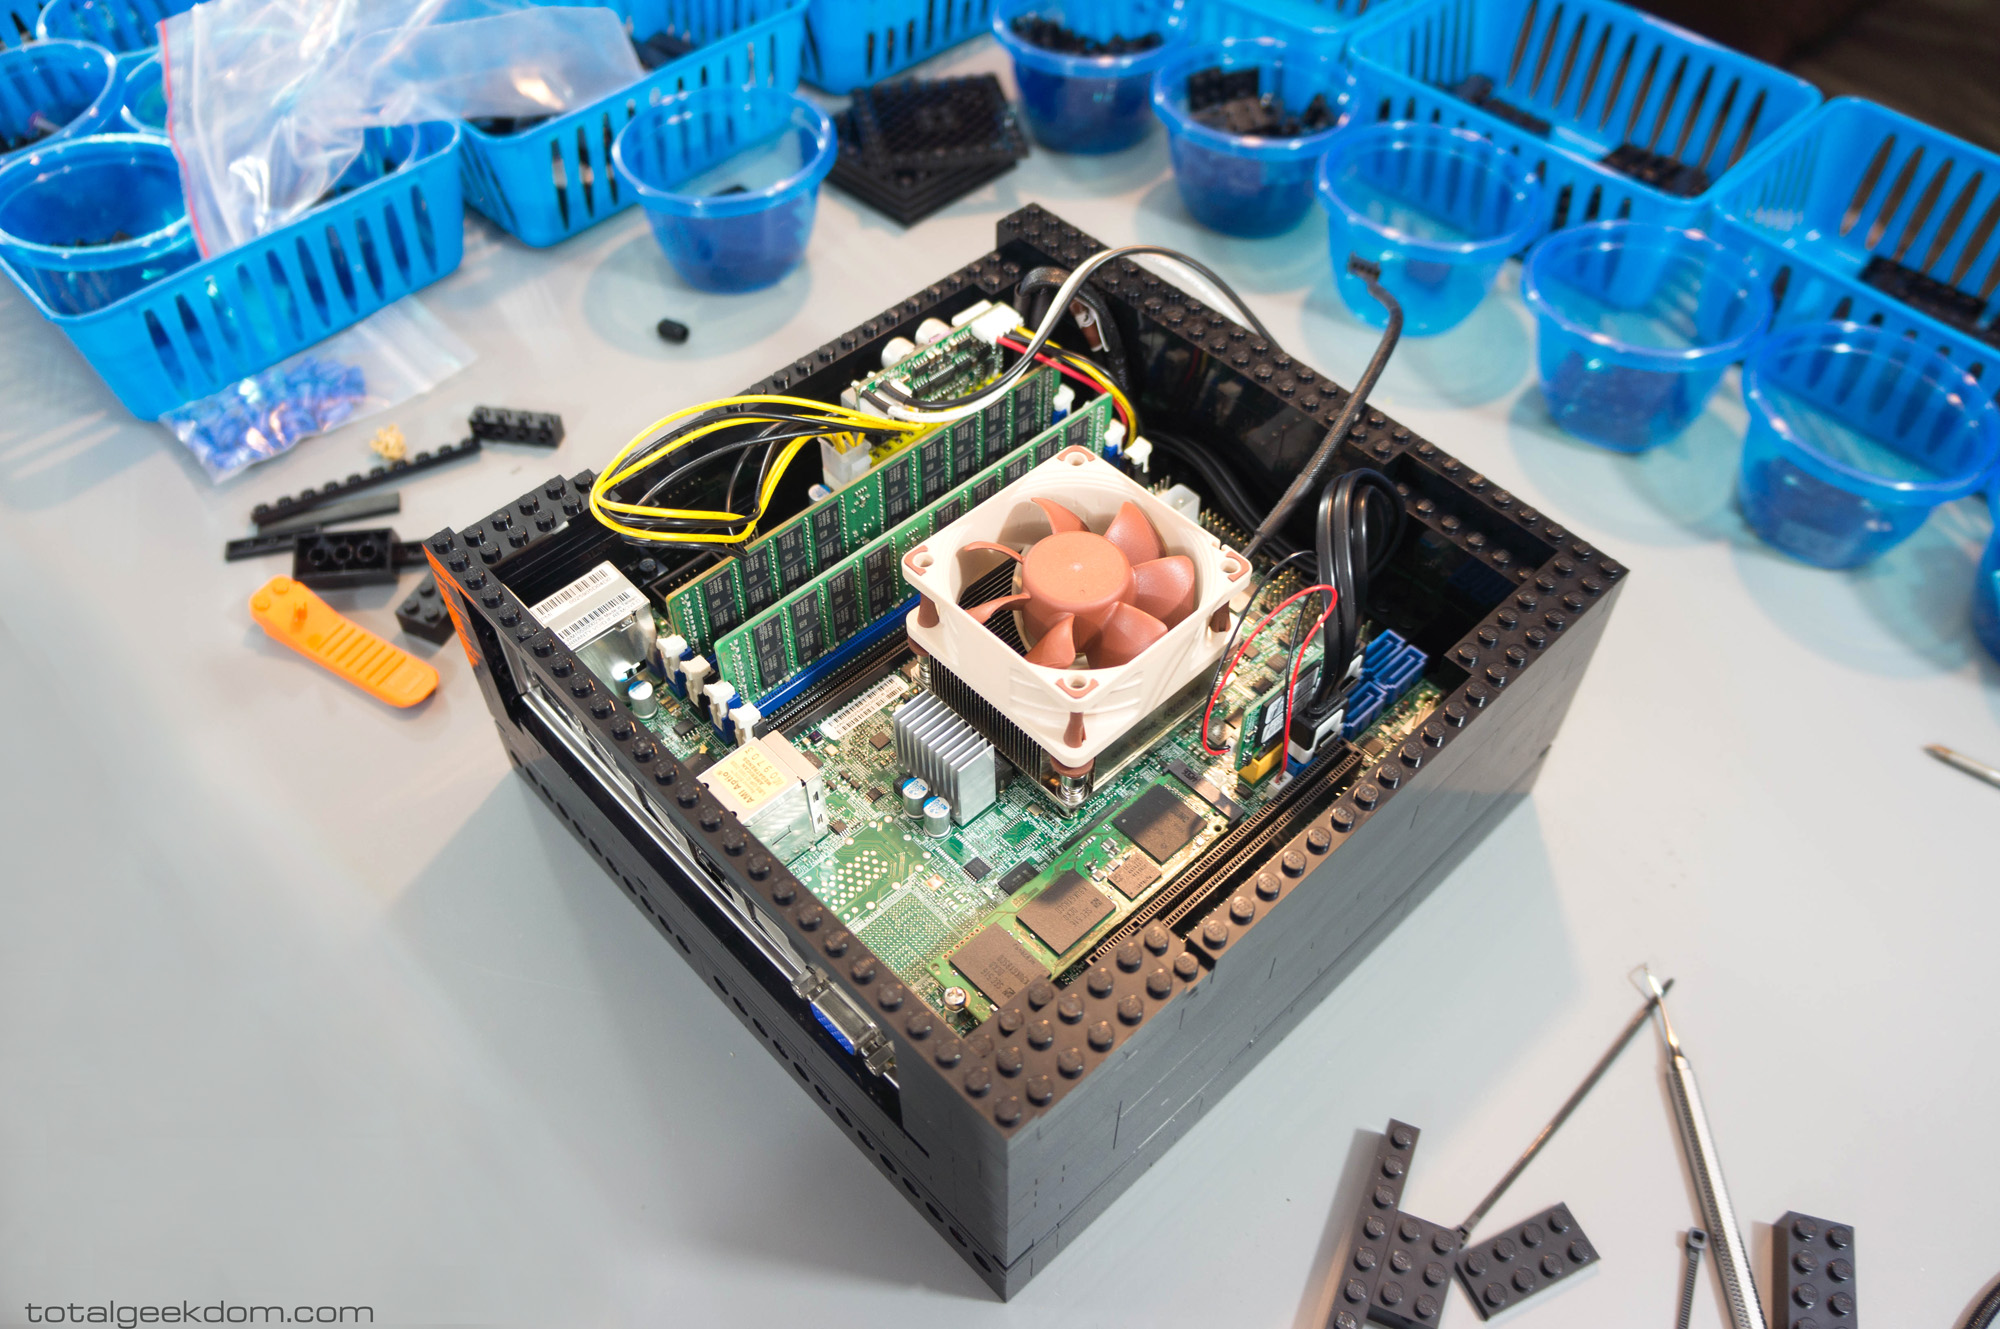
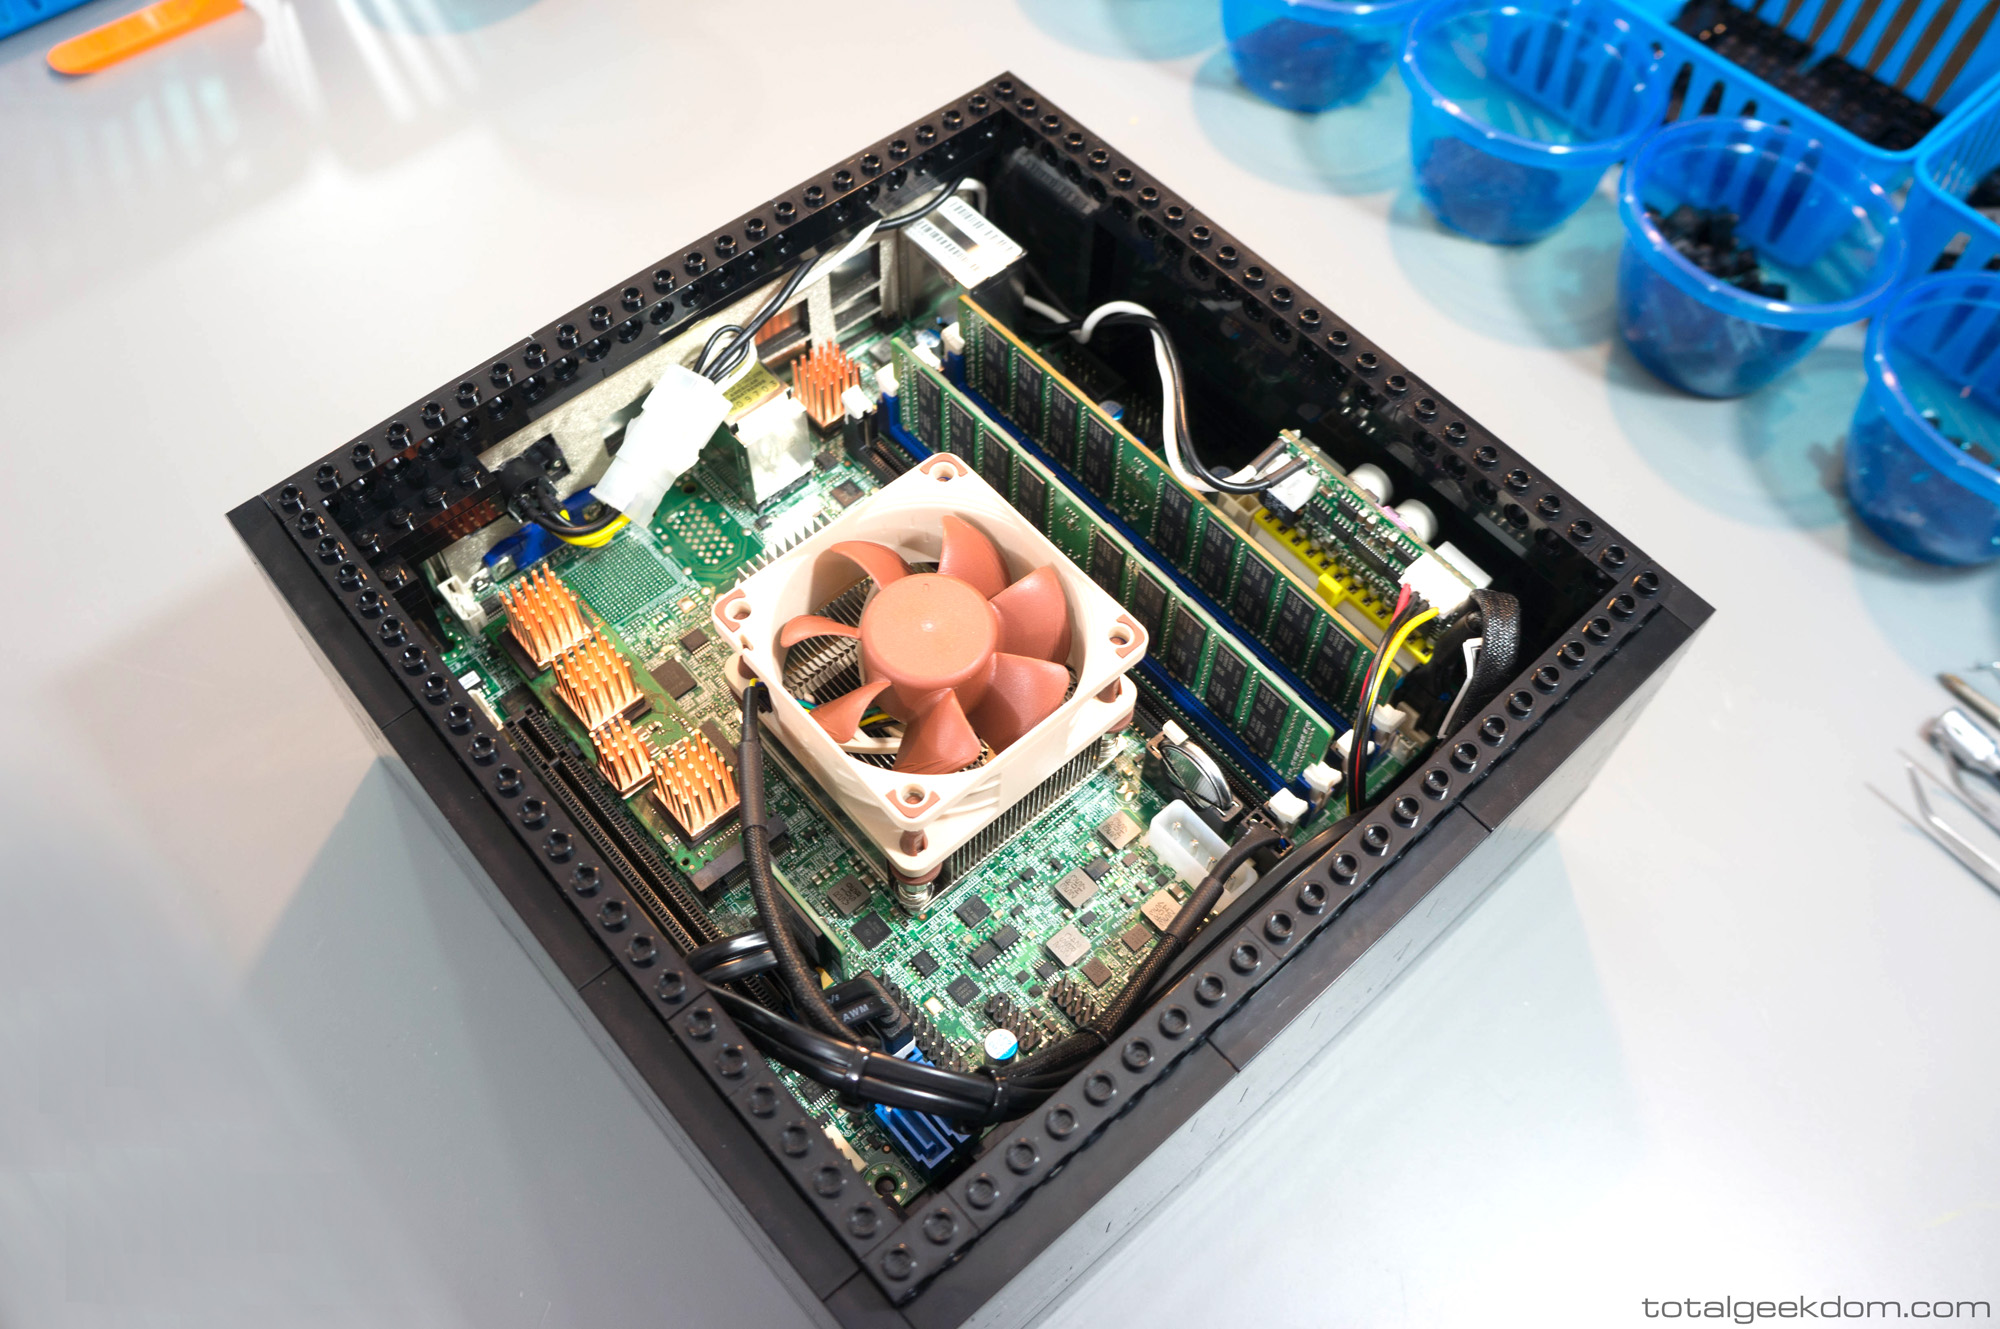
Given the requirements of a Hyper-V based machine, the system was going to need plenty of processing muscle, along with a lot of memory as well as a speedy data storage system to keep up with the high IO requirement that a lot of virtual systems can place on the hardware. Here is an overview of the hardware used in this particular build:
Motherboard- Supermicro X10sdv-f
Processor- Intel Xeon D-1540 (8 core/16 thread)
Memory- 64GB DDR4 ECC (Expandable to 128GB)
OS Drive- 32GB Supermicro DOM
System Drive 1- Samsung sm951 PCIe x4 M.2 SSD
System Drive 2- Samsung 850 Evo 1TB
System Drive 3- Samsung 850 Evo 1TB
Cooling Fans– Noctua 140mm – Noctua 92mm – Noctua 92mm – Noctua 60mm
PSU- Pico-PSU
The Xeon D-1540 is a pretty new offering from Intel, one of the first Xeon offerings built around Broadwell-DE architecture. Benchmarked against previous generation Atom server chips as well as some E3 and E5 Xeon offerings, the D-1540 comes out ahead in most every category. From a power to performance standpoint it also does extremely well. Having 8 cores and 16 threads is great for a Hyper V machine, as it allows spreading CPU resources around to multiple virtual machines at once.
For further reading and benchmarks comparing the Xeon D-1540 with Xeon E3 and E5 processors and more, here is a link with some excellent benchmarks: Xeon D-1540 Benchmarks
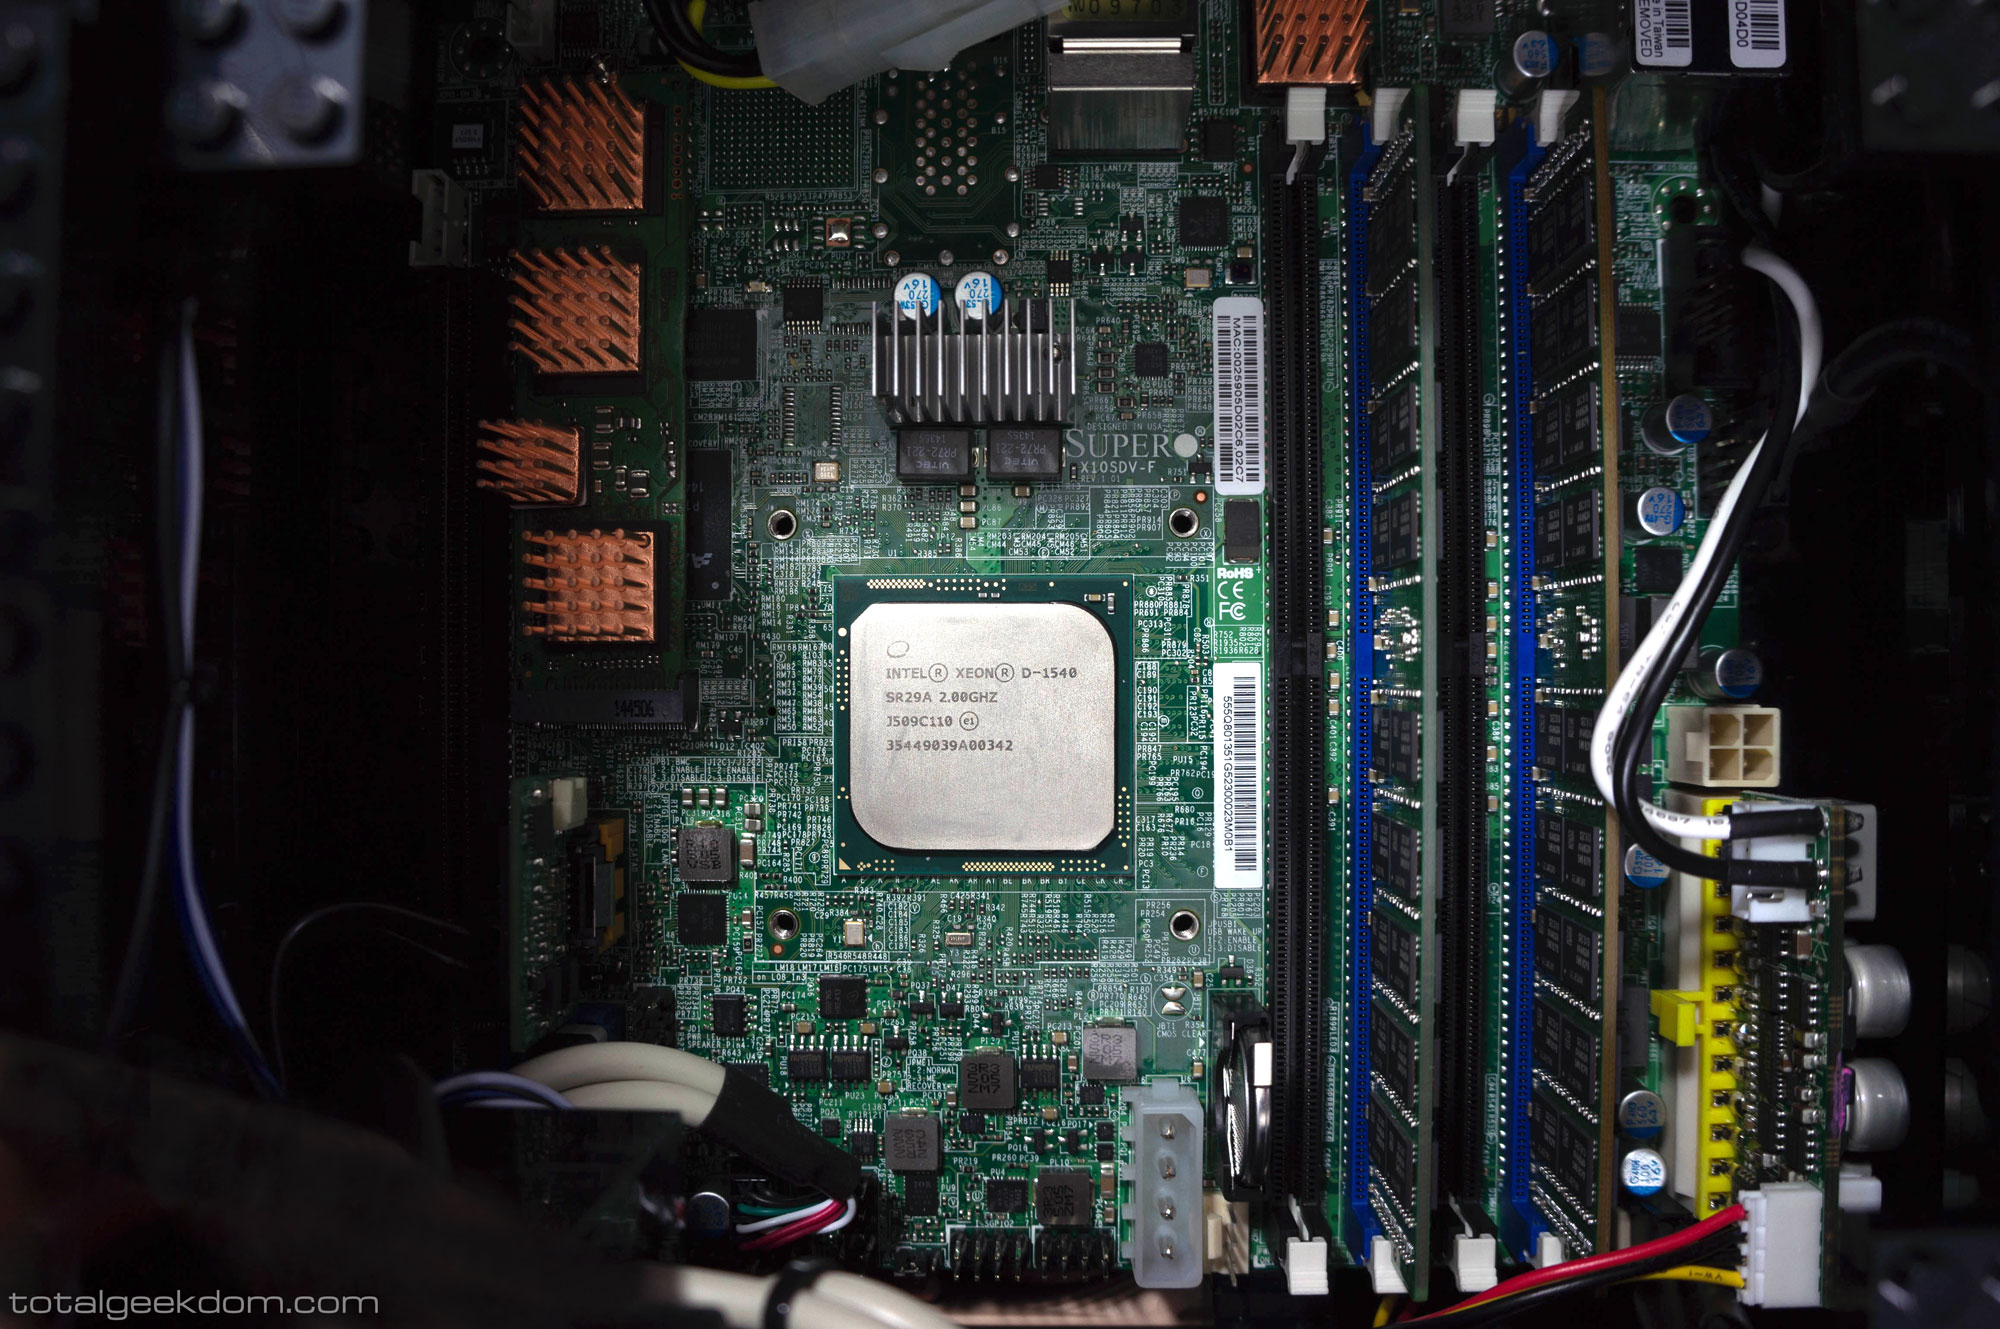
Lego Server Intel Xeon Processor
The majority of the virtual machines will be run off the Samsung sm951, with additional ones run off the other Samsung SSDs. Utilizing the PCIe interface, the sm951 is able to accomplish some amazing throughput and speeds. Here are some benchmark numbers from the drive:
Read- 2250 MB/s
Write- 1560 MB/s
IOps- 100,000+
The Samsung drive is able to really exploit the PCIe interface and let the drive reach its full potential. This kind of throughput is perfect for an IO heavy workload with lots of virtual machines running at once. The dual 1TB Samsung SSD drives are no slouch either, of course, and compliment the system well in running additional virtual machines with larger storage requirements.
This particular version of the Supermicro X10SDV-F motherboard utilizes a Gigabit LAN interface, along with all the normal goodies (IPMI, remote view, etc.) Though I’ve also built systems around the X10SDV-TLN4F, which expands further and offers dual 10 Gigabit LAN connections. For applications that will require more bandwidth, that board is an excellent option.
Lego Case Design
One of the more common areas for which I get questions about the design of a Lego-based computer is with regards to the case, and specifically the plastic properties of the Lego. The concerns that are most often raised are about heat and how the Lego must inherently hold more heat because it’s plastic.
While it’s true that Lego bricks are made of plastic (ABS plastic) and are not as conductive and will insulate more than metal, the actual real-world effects of a properly designed system almost completely negate this marginal factor. Many modern computer systems are designed with a combination of different materials, mostly metal and plastic. The thin wall metal enclosures do provide better conductivity than plastic would, but you have to look at the overall system design, not just the material properties.
Airflow
Most modern computer systems are mass produced and use a combination of passive and active cooling in conjunction with a box/rectangle shaped case. These systems utilize convection and functions as a basic air exchange system. Fresh (cooler) air is brought in from the front of the system, while the heated air is exhausted out of the back of the system. This system produces adequate results. However, the downfall of this technique is that it does not directly control the path of the fresh air brought into the system. It relies on merely exchanging the air, which results in certain components being locally hotter than others, as they don’t see a direct stream of fresh air over them. Again, it’s adequate and gets the job done.
The major advantage of designing a case out of Lego is that I can build it from scratch, which means I can directly design the airflow paths and control exactly where the fresh air is going to be. This is a big plus over a conventional case design. In addition to controlling air paths, the system can also control the case air volume, which is another factor that comes into play in the overall effectiveness of the cooling system.
In an air exchange system it’s important to introduce fresh (ambient), “cooler” air into the case and have that air to pass near the hot components, which allows for those components to transfer their heat into the air, cooling the component. From there the heated air is exhausted out of the system while drawing more “cool” air back into the system. This cycle occurs over and over again and is how the system components’ temperatures are kept in their ideal operating range. It’s important that the air moves through the system fast enough to remove as much heat as possible from the components but not so fast that it doesn’t allow the necessary time for the components to transfer their heat efficiently into the air.
Conventional case design usually employs a single intake and a single exhaust fan (though sometimes just an exhaust). This systems works well enough and gets the job done, but excelling where mass-produced systems do an adequate job is an essential aspect of my computer design. I aim to design a high-performance cooling system that offers maximum cooling performance. One of the challenges usually faced in smaller form-factor systems is heat and controlling thermals, but the design of these Lego cases takes that small form factor and uses it to our advantage.
In a normal computer case you have a given volume of air present in the system. This volume of air is then cycled by your intake and exhaust fan. Conventional systems tend to be larger in size and have smaller fans for the intake and exhaust. This means that there is usually a limitation to cooling performance as the fans can only cycle so much air. Putting in larger fans or higher flowing fans offers better cooling performance for the whole system, but sometimes at the expense of noise reduction. With the smaller form factor around the Lego Server, there is a much smaller volume of air to cycle through the case. I therefore designed the system to use a much larger system fan than found in most conventional cases. This allows for higher airflow as well as lower noise, as the larger diameter fan can spin at a lower RPM to move the same amount of air. So now we’re moving more air through the system faster using a larger fan spinning at a lower RPM making significantly less noise, all while offering better cooling performance.
Returning to the case design, the Lego Server is able to capitalize on being able to put the fan wherever we want to take yet another step towards improved cooling performance. Conventional systems place the fans at the front and rear of the case, while the components themselves occupy the middle of the case. This allows for air to slowly move past the components for cooling. The downfall, however, is that you’re not getting directed airflow – you’re getting air taking the path of least resistance, which usually means many of the components are not in the path of airflow and are not getting the benefit of direct fresh air. This allows for localized hot spots around certain components.
The Lego Server case integrates a large case fan placed directly over the top of the motherboard. This allows for direct airflow over the entire motherboard surface, aiding in cooling the processor but also cooling the power regulation circuitry, surface chips, LAN controller, and all the other components built onto the motherboard. This design prevents localized hotspots from forming and ensures that every component receives direct airflow and cooling.
Electronics reliability and long term durability can be tied to temperature. Running them hotter for extended periods of time can shave off a large percentage of their lifespan as well as effect system stability. Since complete system stability is essential, as is a long and healthy system lifespan where components are retired in still working order (as opposed to failing prematurely), the cooling system design is critically important.
So yes, Lego is made of plastic, and yes, plastic is not as good of a heat conductor as metal, but in this case I’m actually able to build a far superior cooling system that offers increased efficiency and cooling performance over a conventional case design. The plastic material of the Lego has therefore minimal effect, as the air is exchanged through the system at a high enough rate that the plastic never really has a chance to absorb a significant amount of heat.
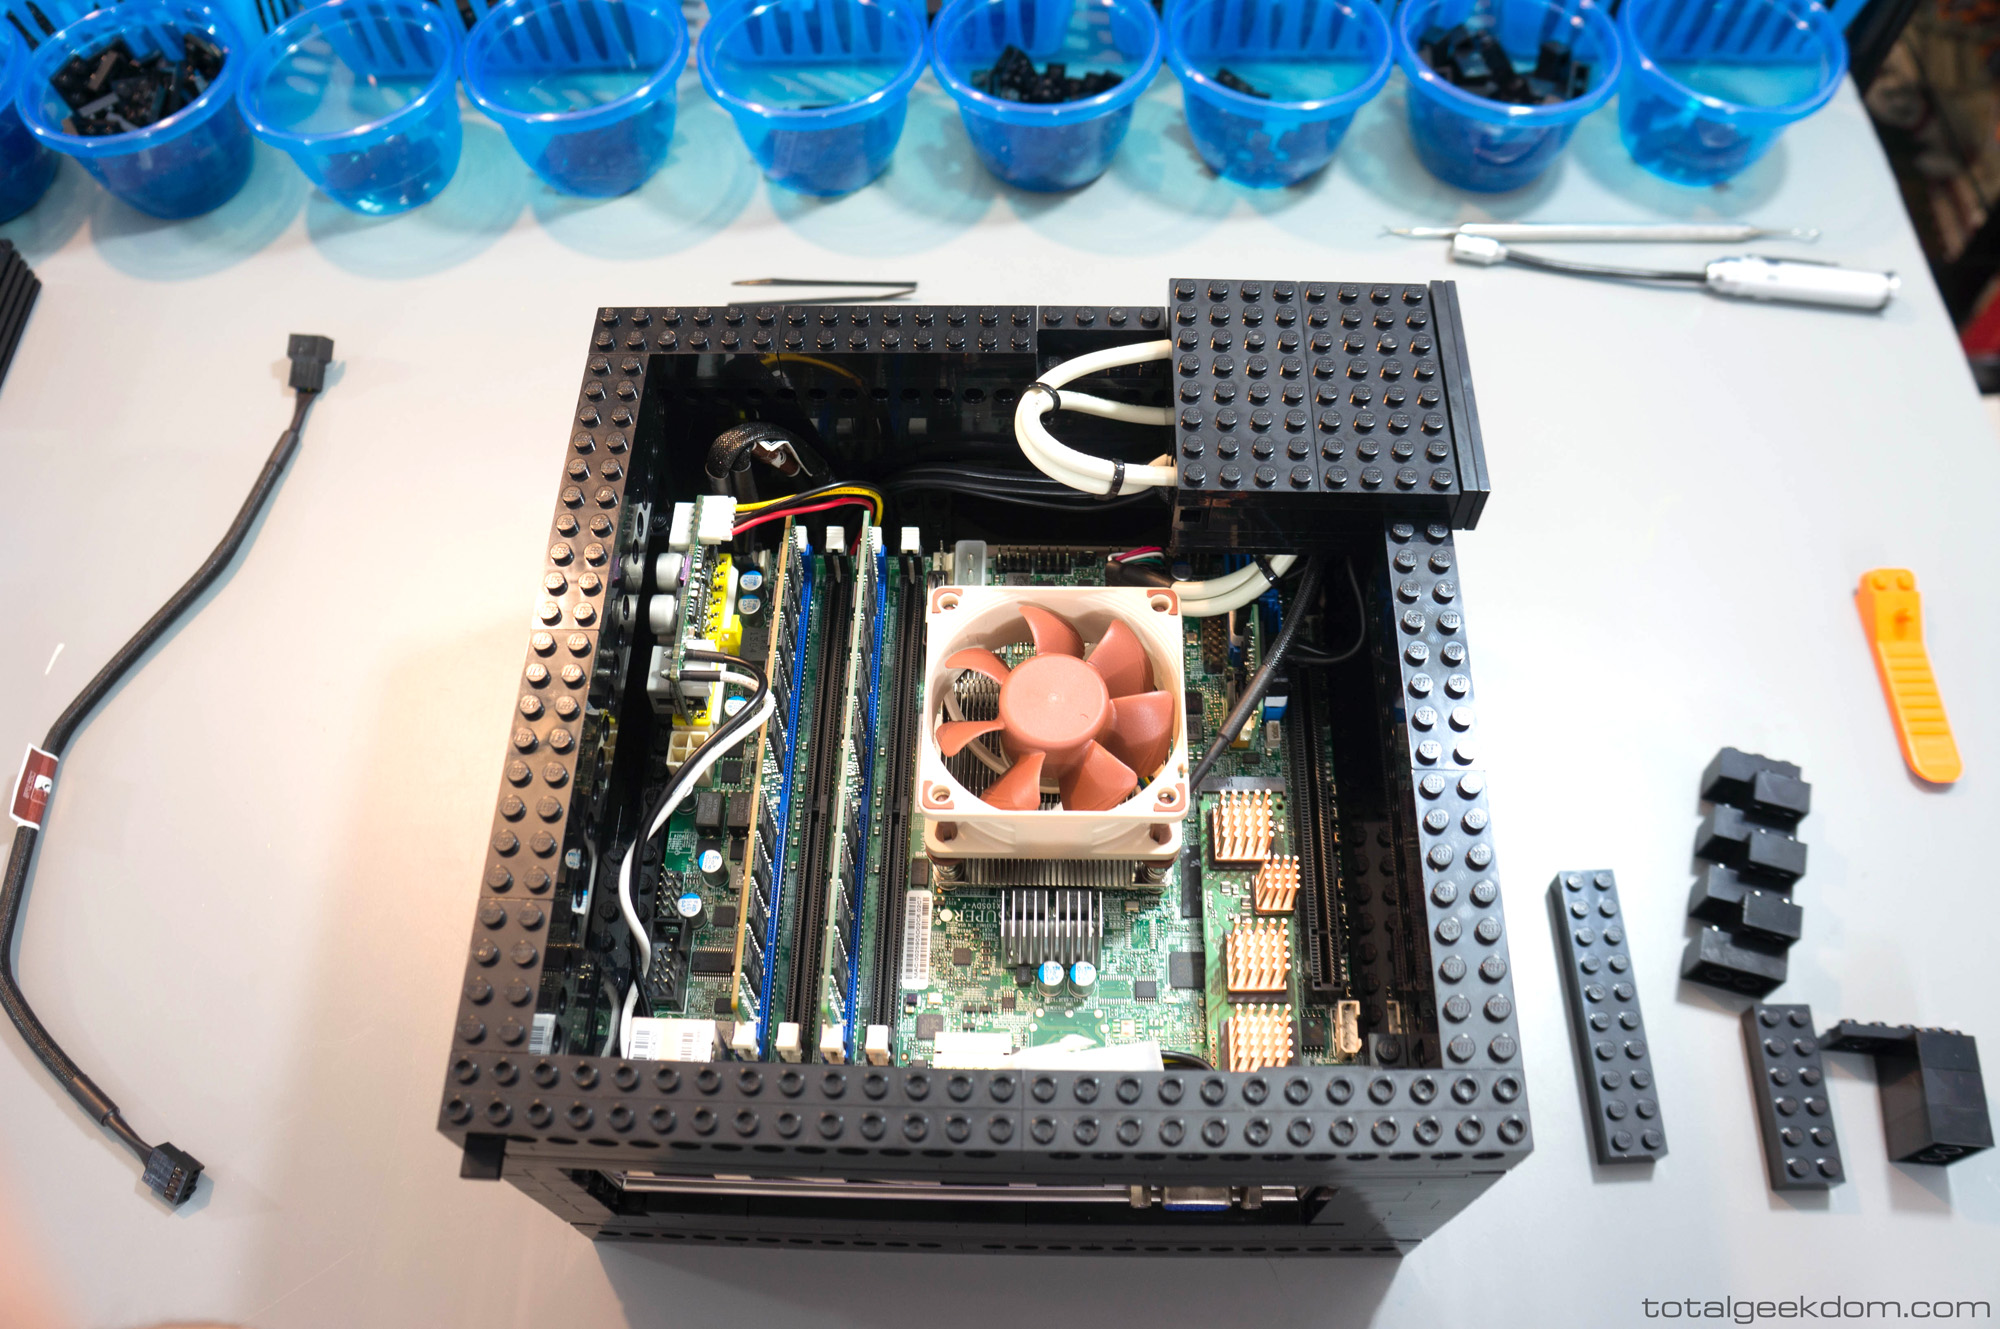
Lower Section
The lower section of the case houses the SSD drives and lower cooling fans. This particular version houses dual 1TB SSD drives, though it could accommodate 4 if desired. Since drive life can be tied to operating temperatures, a series of Noctua fans are again featured in the lower case section. These fans circulate air in the lower section of the system, cooling both the drives as well as the underside of the motherboard itself.
The lower section of the case can be opened to exchange drives or upgrade at a later date.

Lego Server SSD Storage
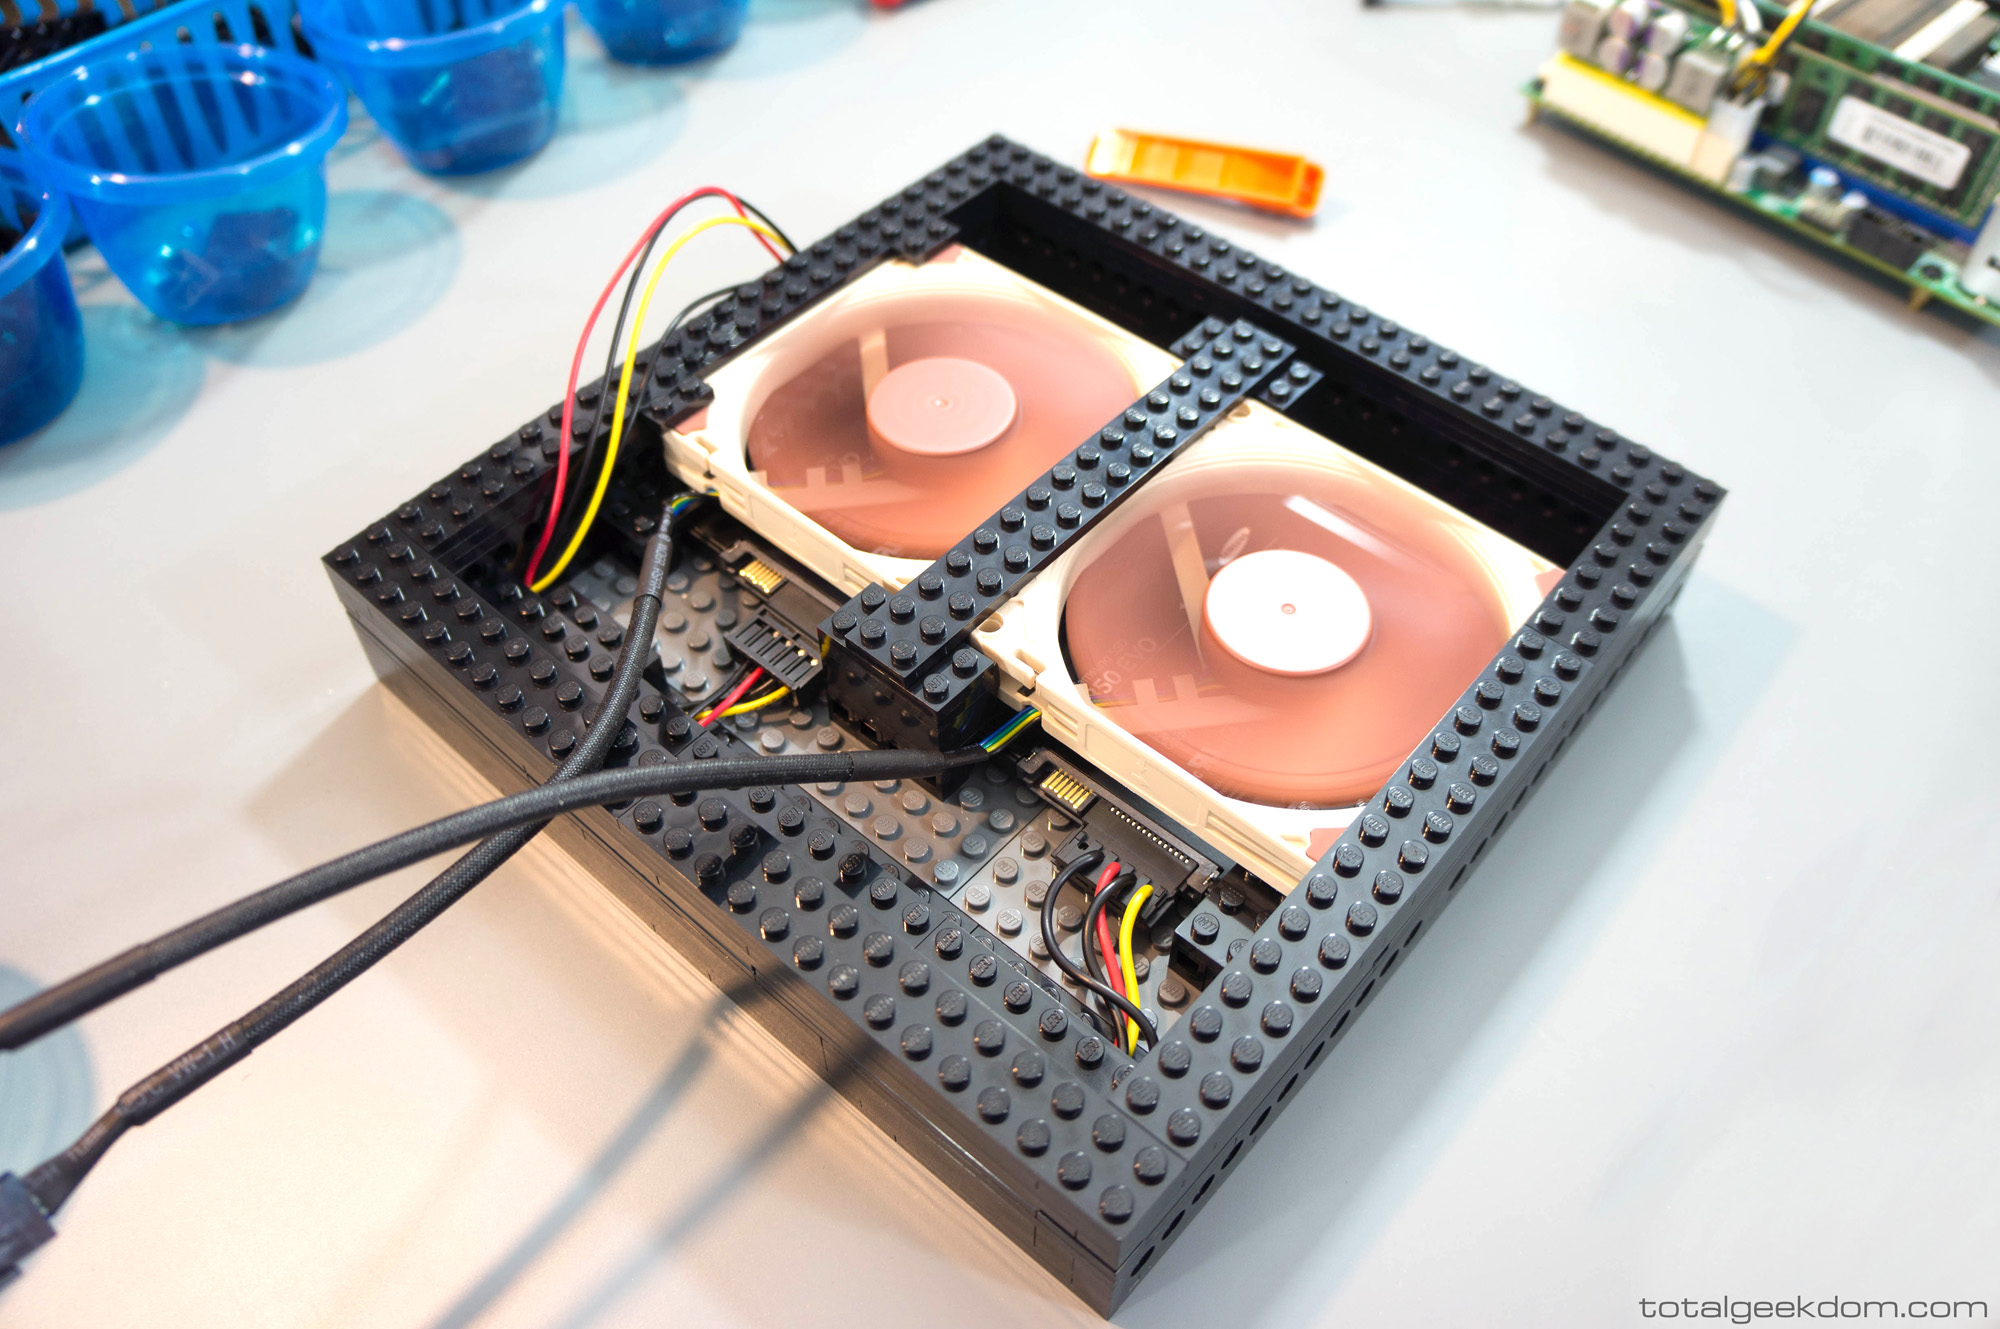
Lego Server SSD Fan Cooling
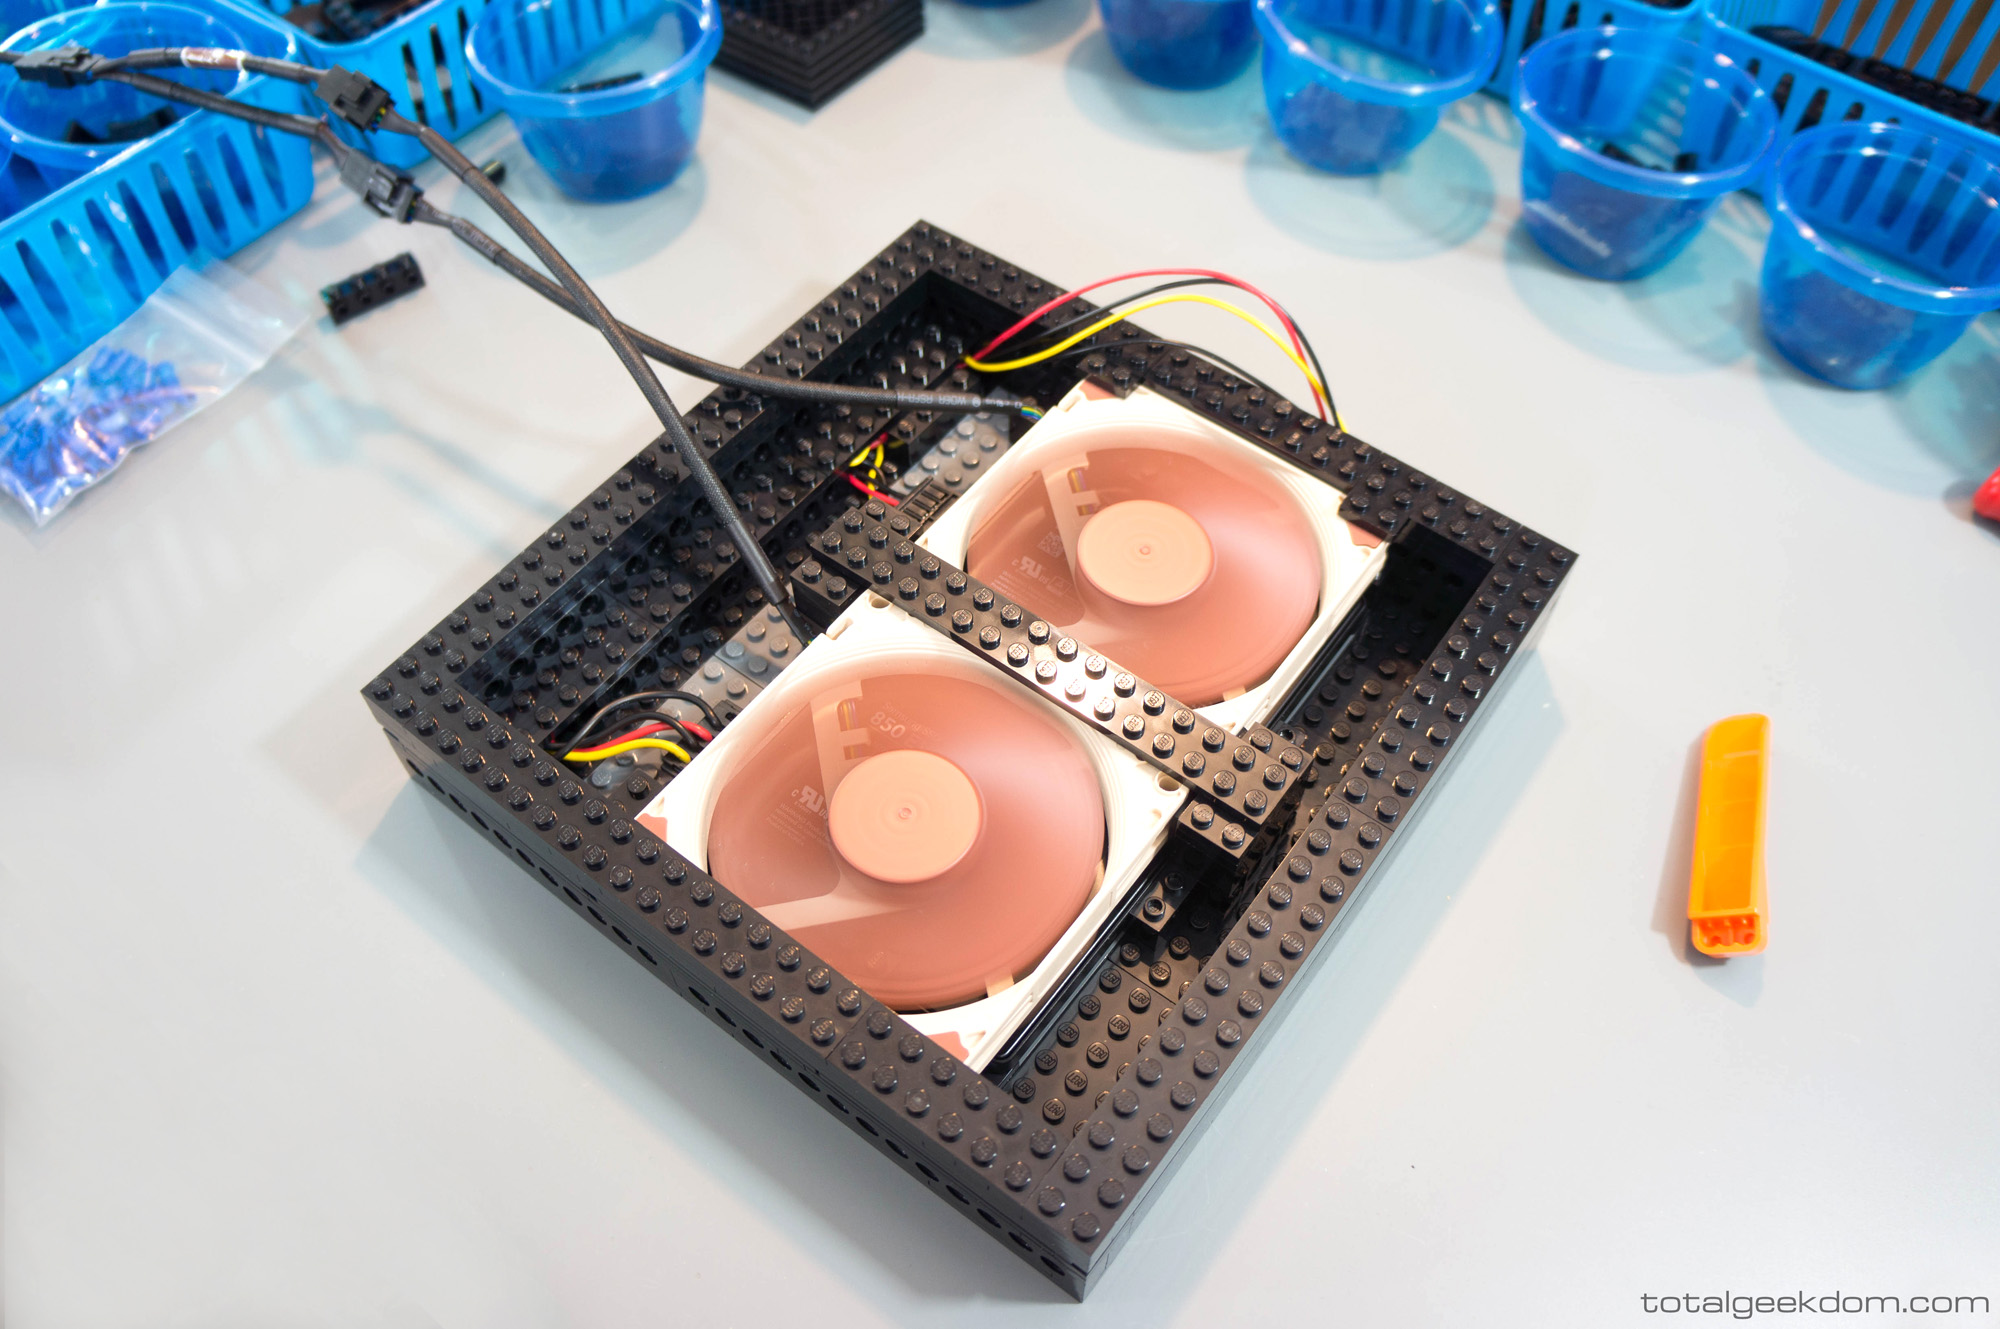
Lego Server Noctua Fan SSD Cooling
Middle Section
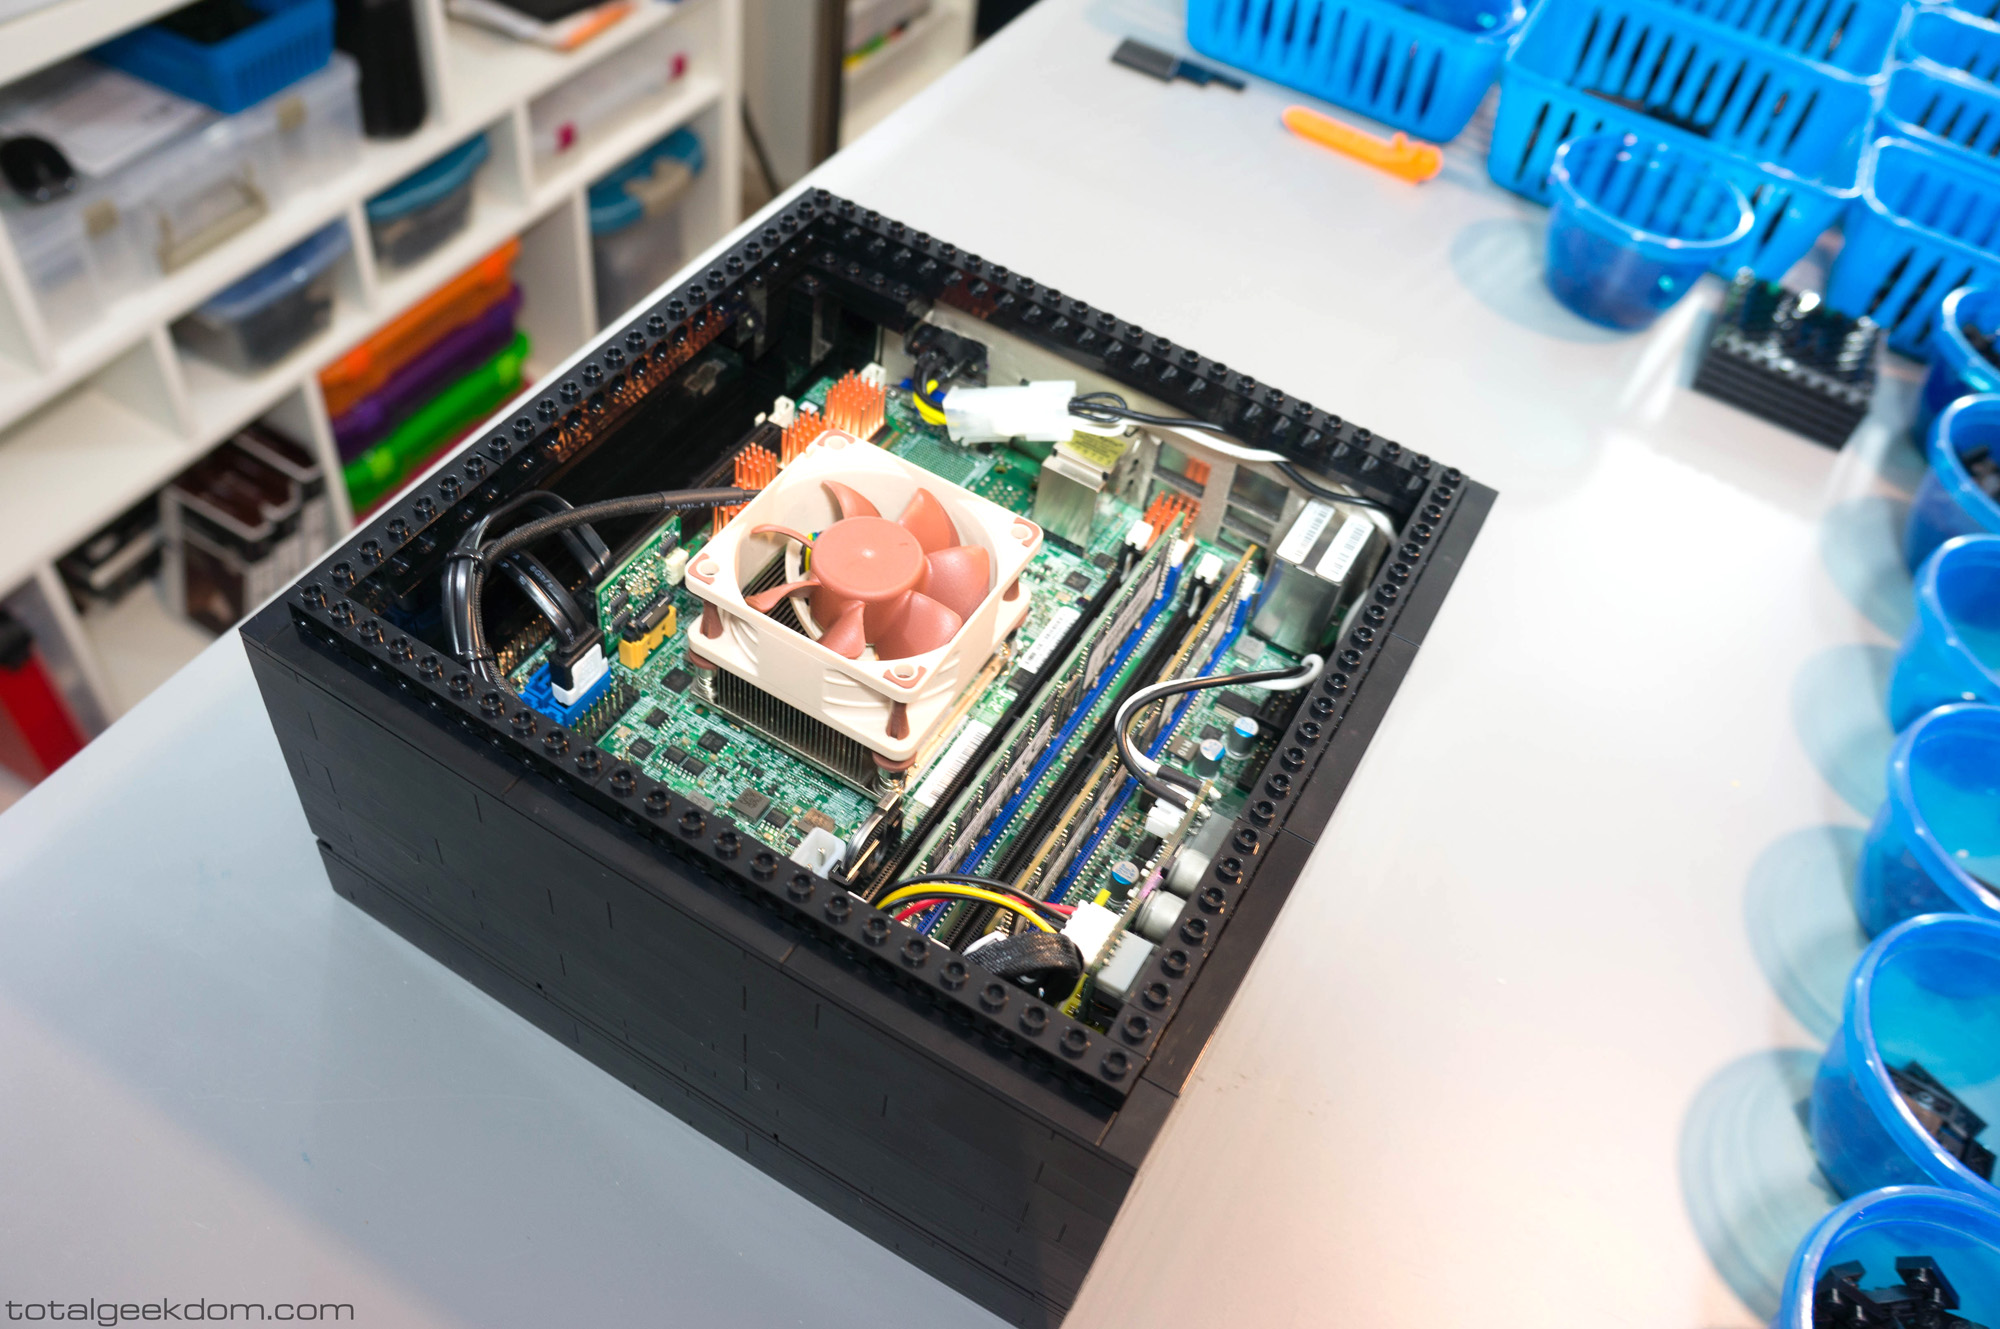
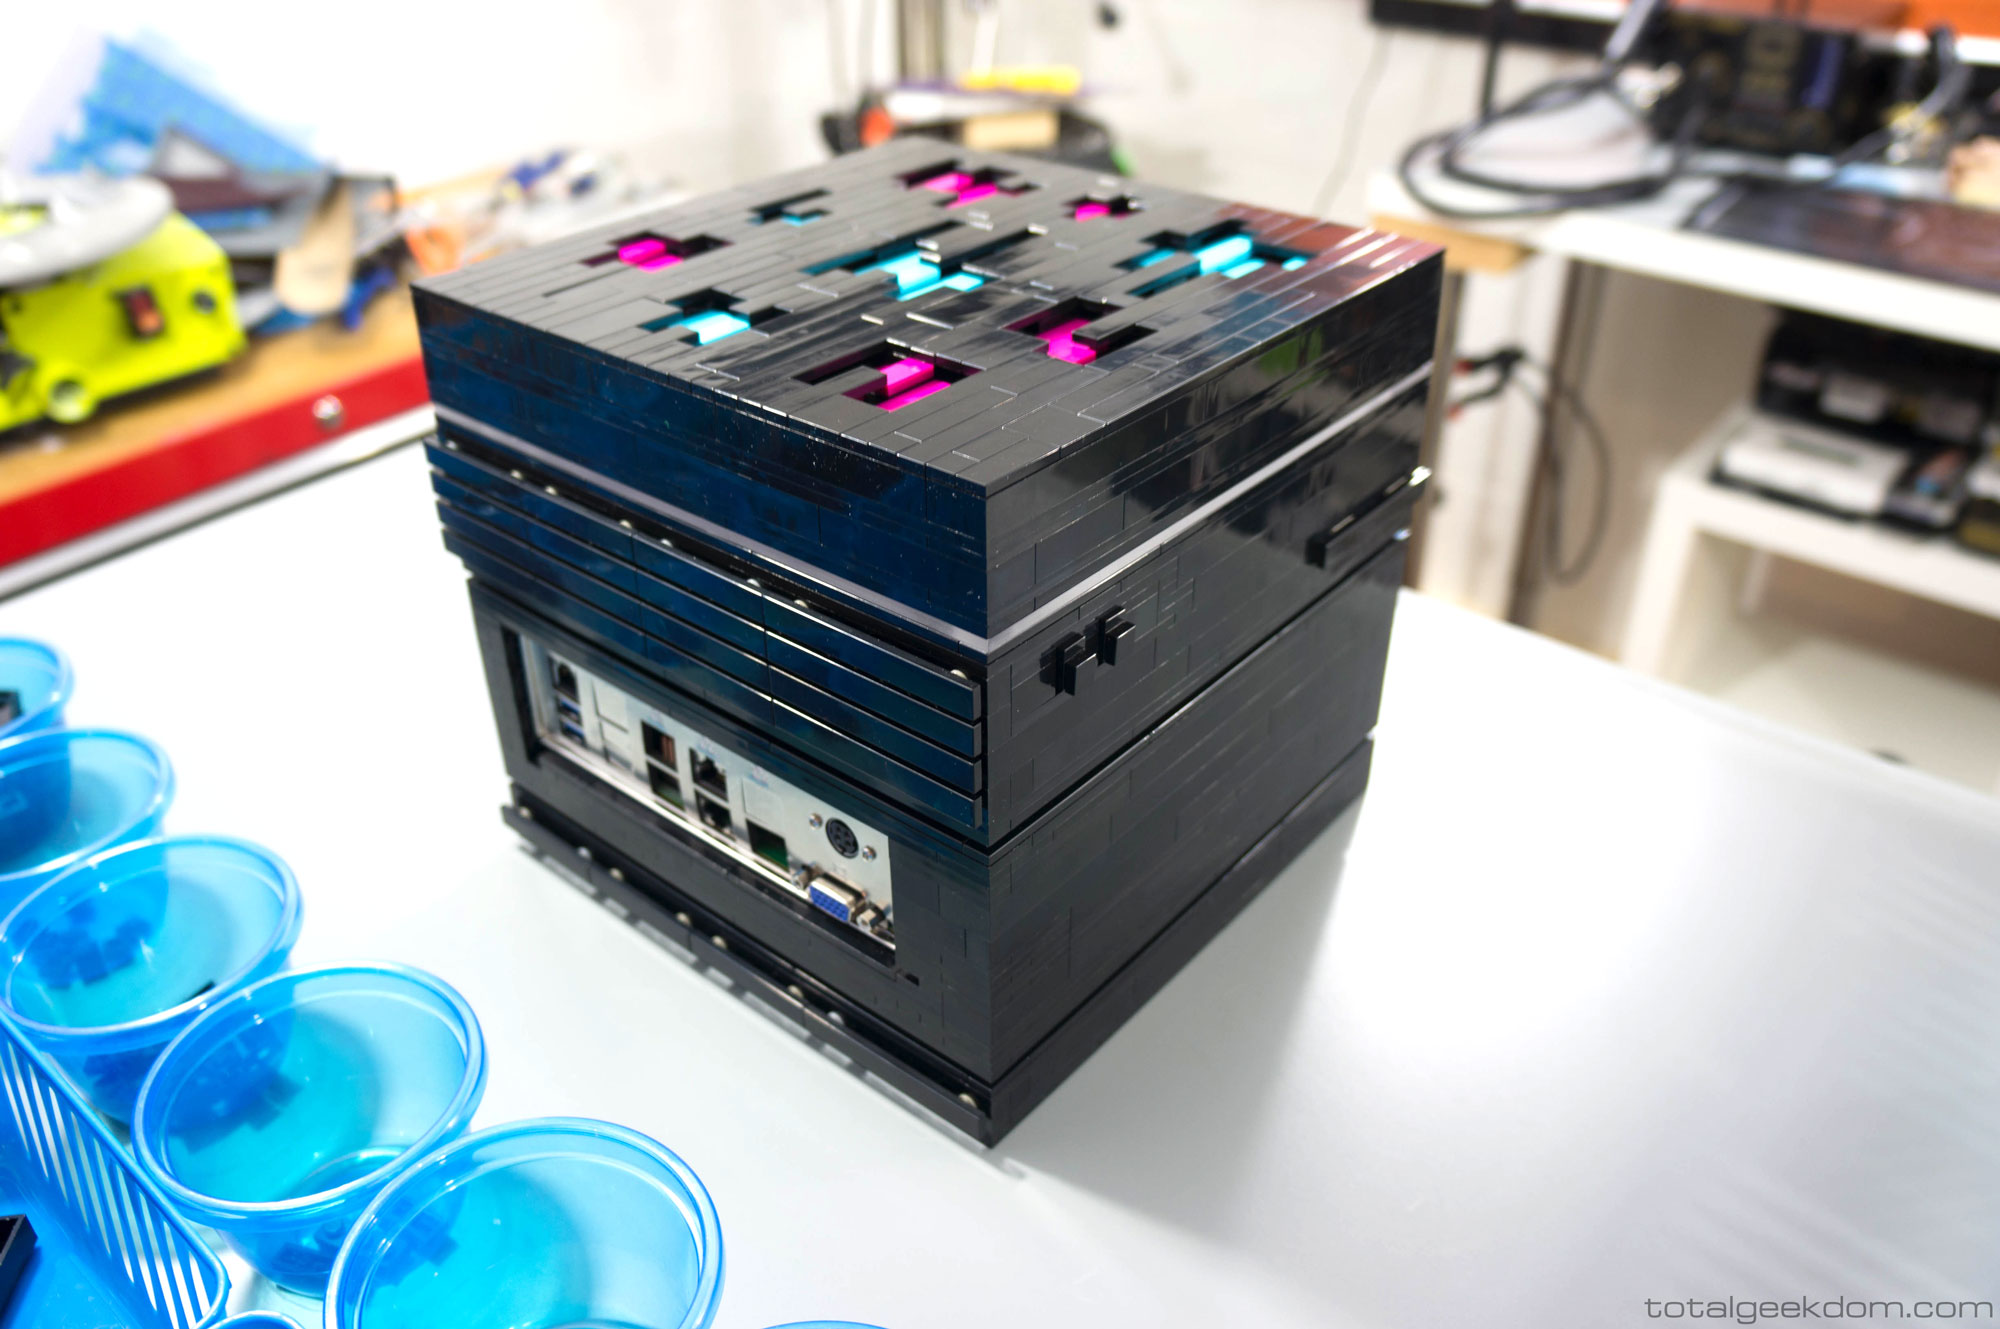
The middle section of the case houses the motherboard and is built to allow airflow to pass around and below it, providing more fresh air into the lower section of the case. The motherboard is built into the case and secured, with wires for the drives, power supply, and fans tied up and kept out of the way.
The case itself incorporates perimeter vents surrounding the system to allow heated air to be exhausted out of the system. Other elements built into the case include the front USB ports, which are concealed into the case and then hidden behind a swiveling Lego plate. The back IO panel is built into this section as well, allowing access to all the ports on the motherboard as well as adding a power connection hookup. The middle/upper section of the back of the case incorporates elements which allow for the exhaust of the heated air.
Lego Server Case Middle
Lego Server Wiring
Lego Server Processor Fan
Upper Section
The upper section of the case incorporates the power and reset buttons, which are built from Lego elements, as well as the buttons for the LED light system that is built into the case. This LED light system allows for the choice of one of 19 different colors as well as modes of operation, brightness and speed. The LEDs are housed behind a plastic diffuser.
Lego Server USB Ports
Top Section
The top section houses the air intake fan and inlet grill, both of which are concealed under the lid. The fan itself is a 140mm Noctua fan positioned directly over the motherboard. By using such a large fan and positioning it only inches away from the surface of the motherboard, excellent airflow occurs across the entire motherboard. The design in the top of the lid allows to conceal the grill and fan under its elements, which helps with minimizing noise, while still offering a large enough surface area for air intake.
Lego Server Hypercube Side Profile
Lego Server Hypercube Rear System
SSD Cooling
One of the great benefits of the Samsung sm951 PCIe SSD is its blazing speeds. But with all of that speed and performance it’s very important to properly cool the drive. The controller on these drives can run very hot when under heavy workload and for sustained transfers. If not properly cooled, the drive will reach its thermal limit and immediately start to throttle, which will cause a big performance loss. We definitely do not want to lose performance, nor do we want to run the drive at higher temperatures than we have too. In order to add additional cooling to the drive I’ve incorporated two improvements to facilitate better cooling.
The first improvement is ensuring direct airflow over the drive. In a conventional case design, the motherboard usually is mounted on the inner wall of the case, without direct airflow over the drive. In the Lego Server case design, the motherboard is mounted with the system fan placed directly over it, which allows for a direct path of airflow over the SSD drive.
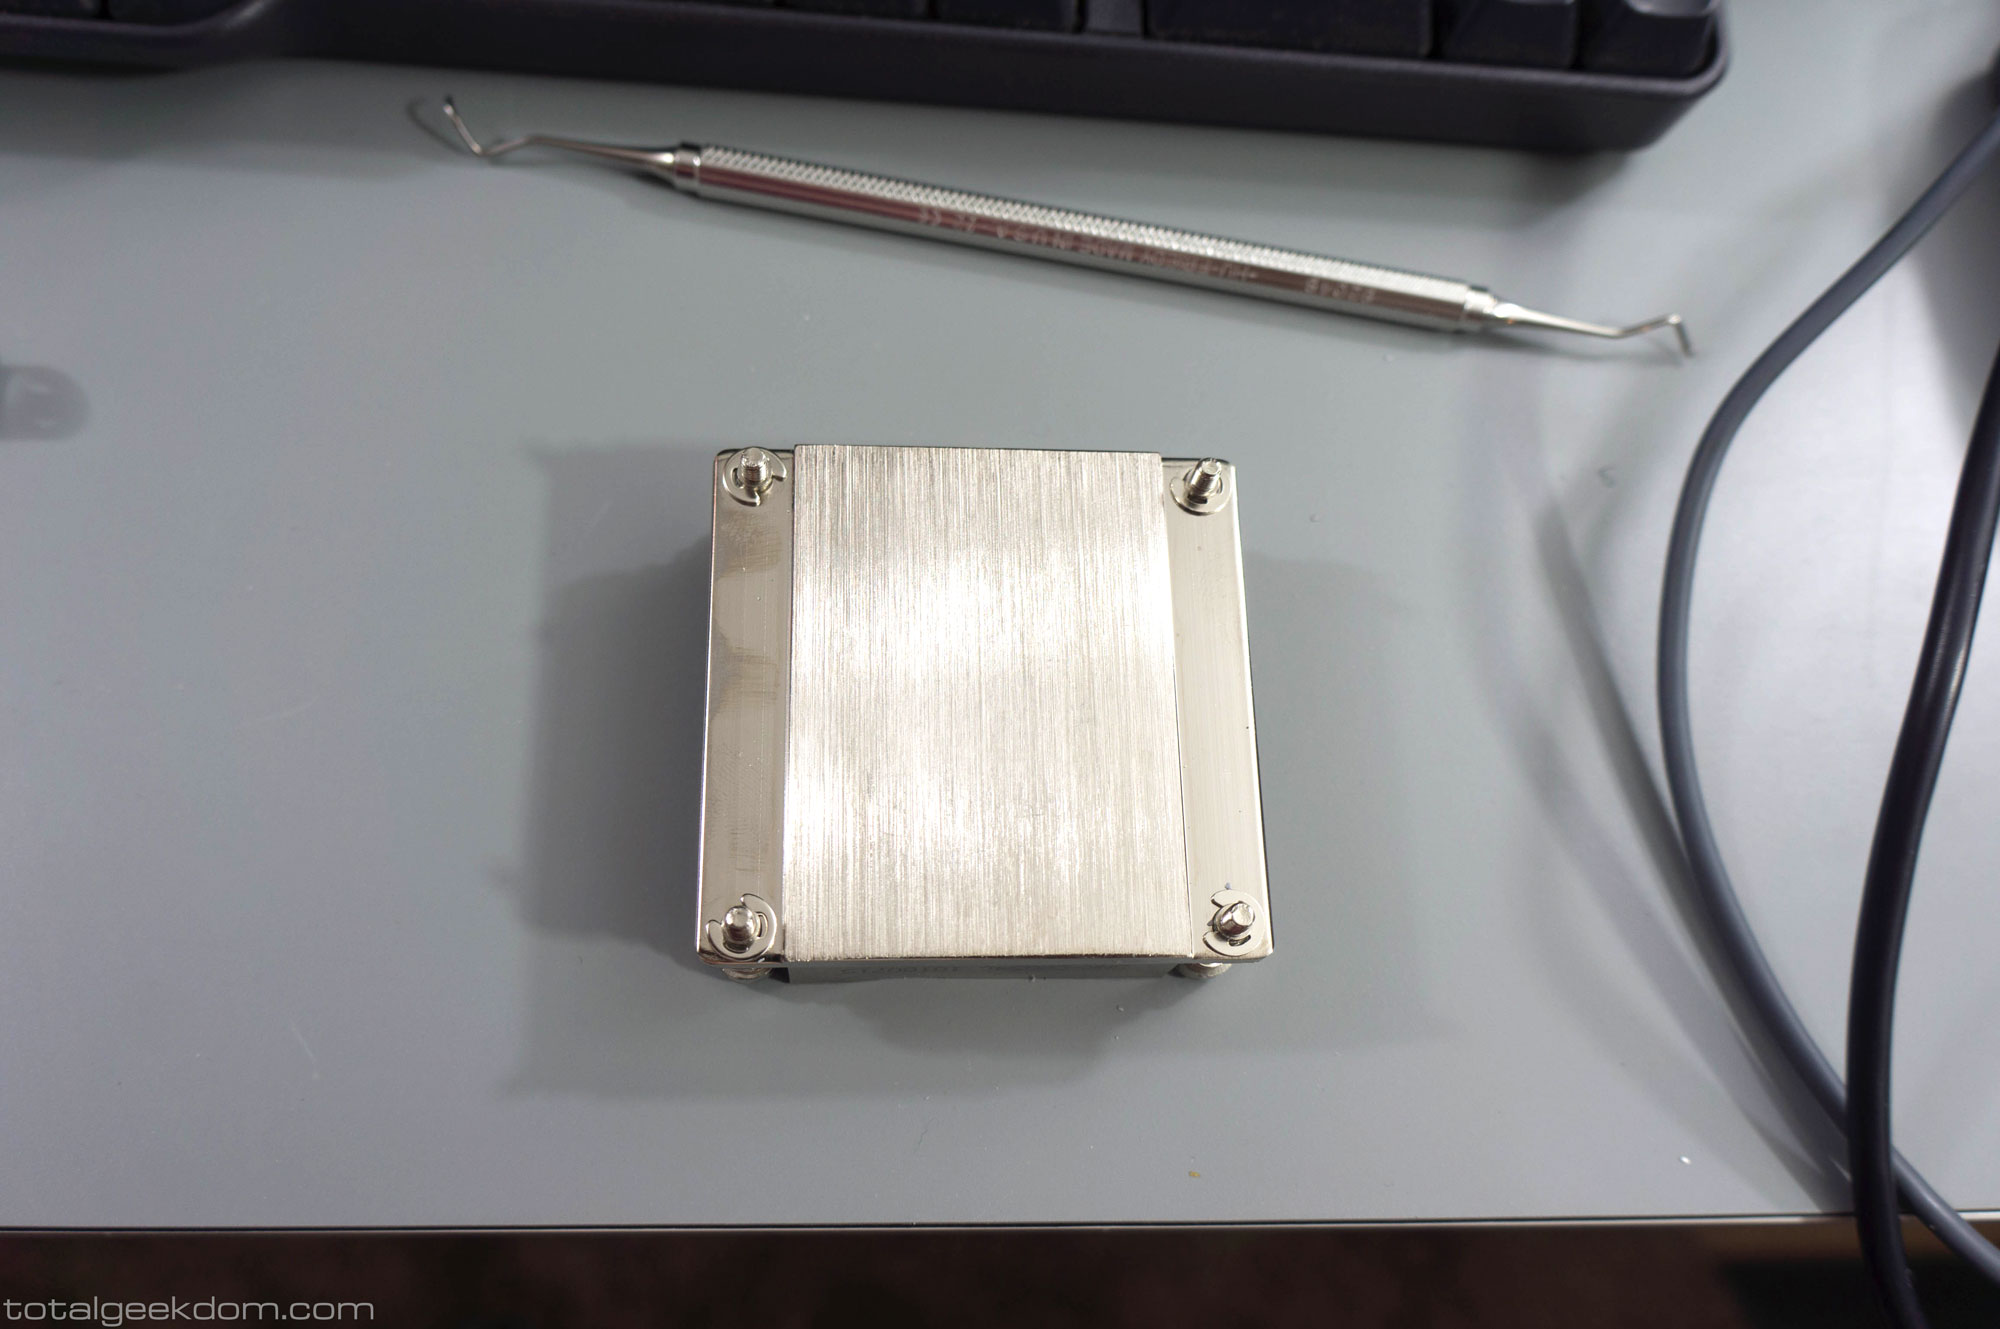
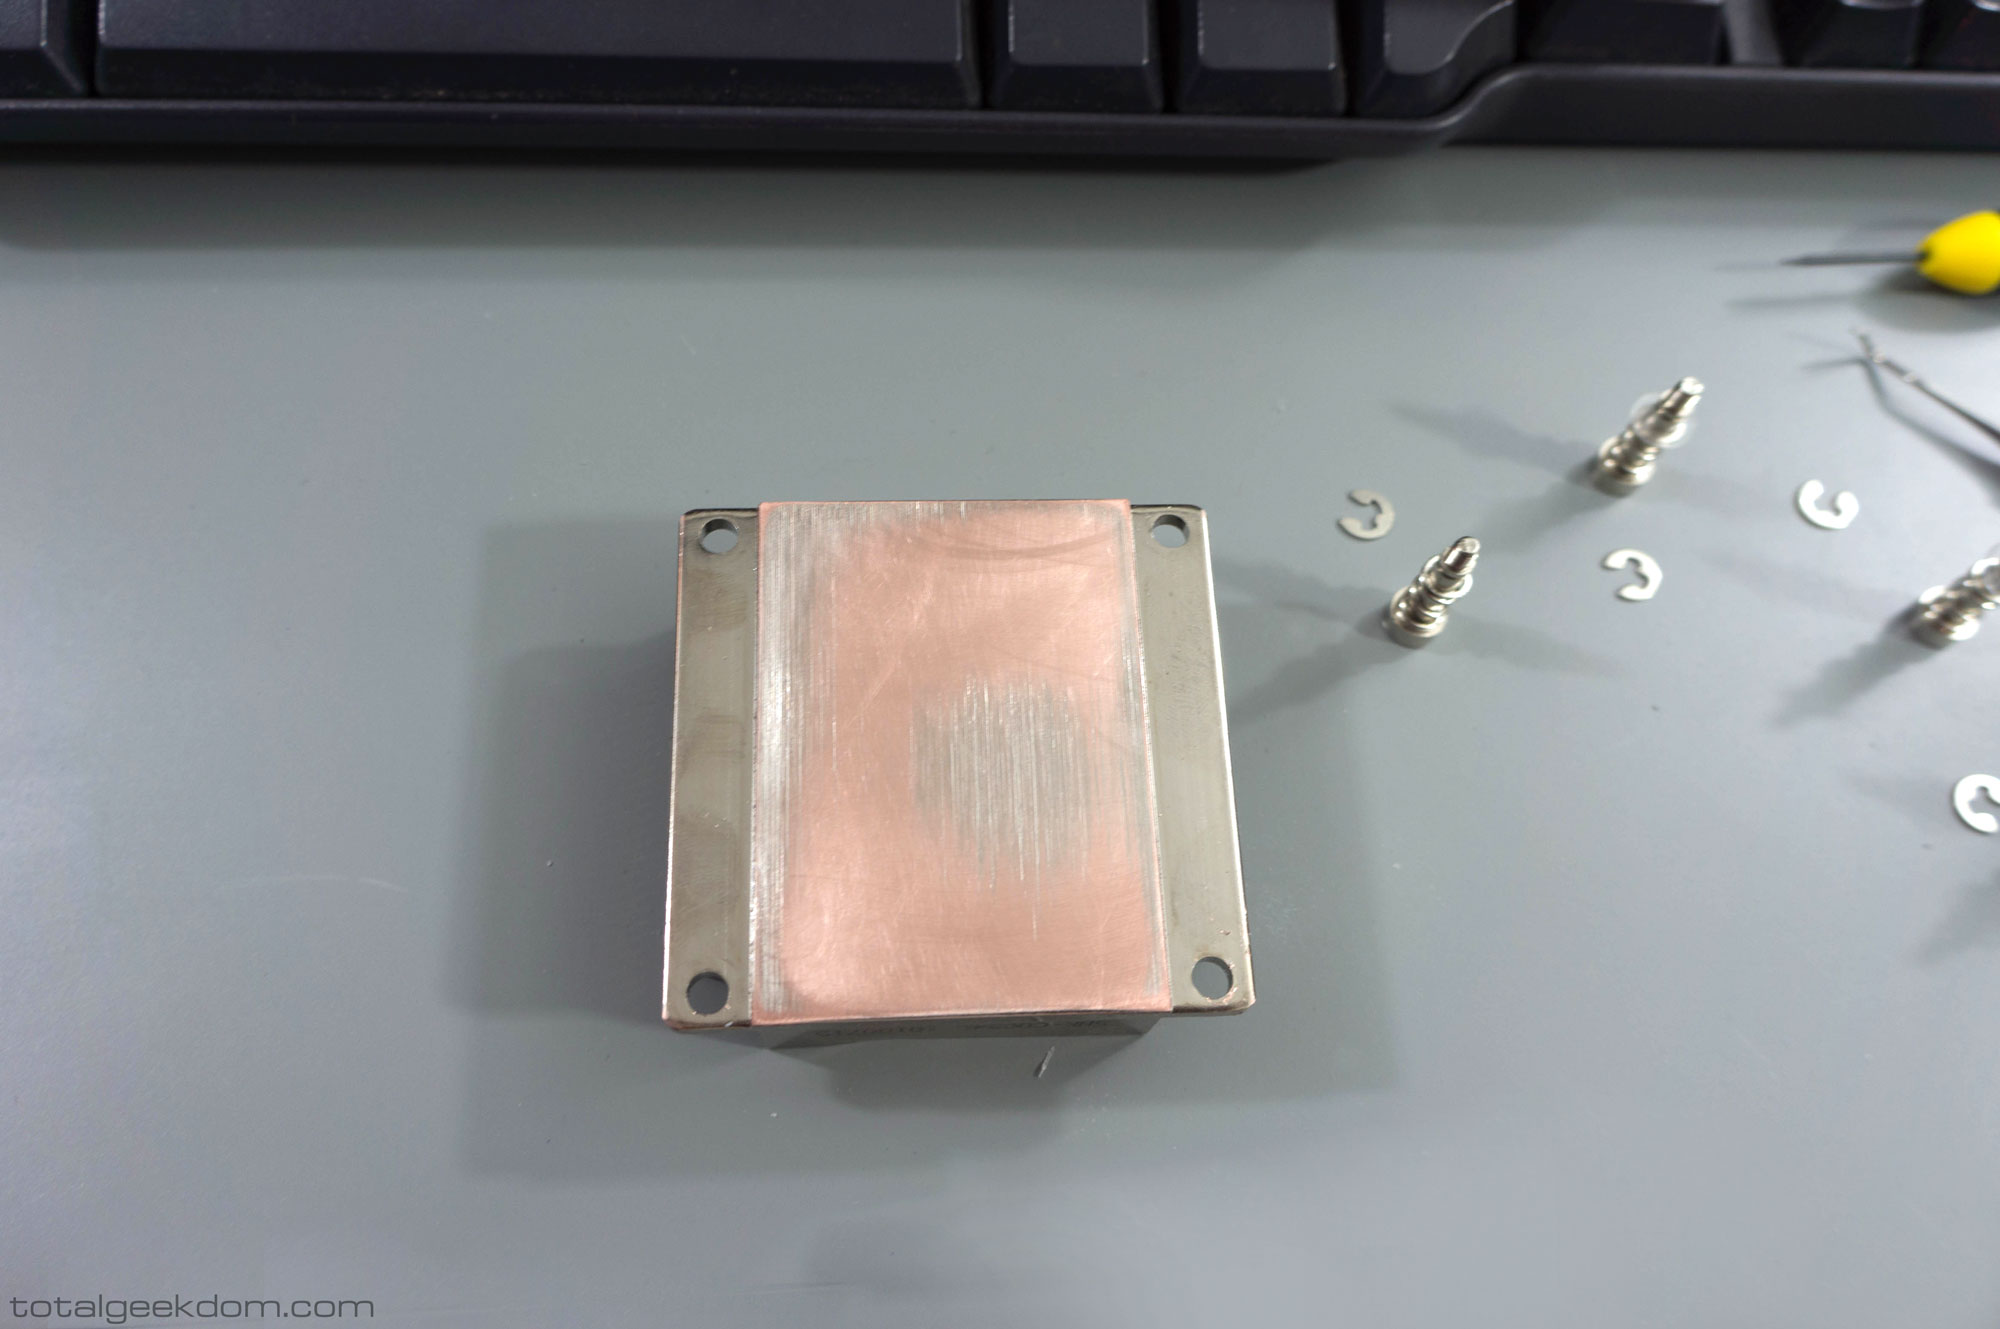
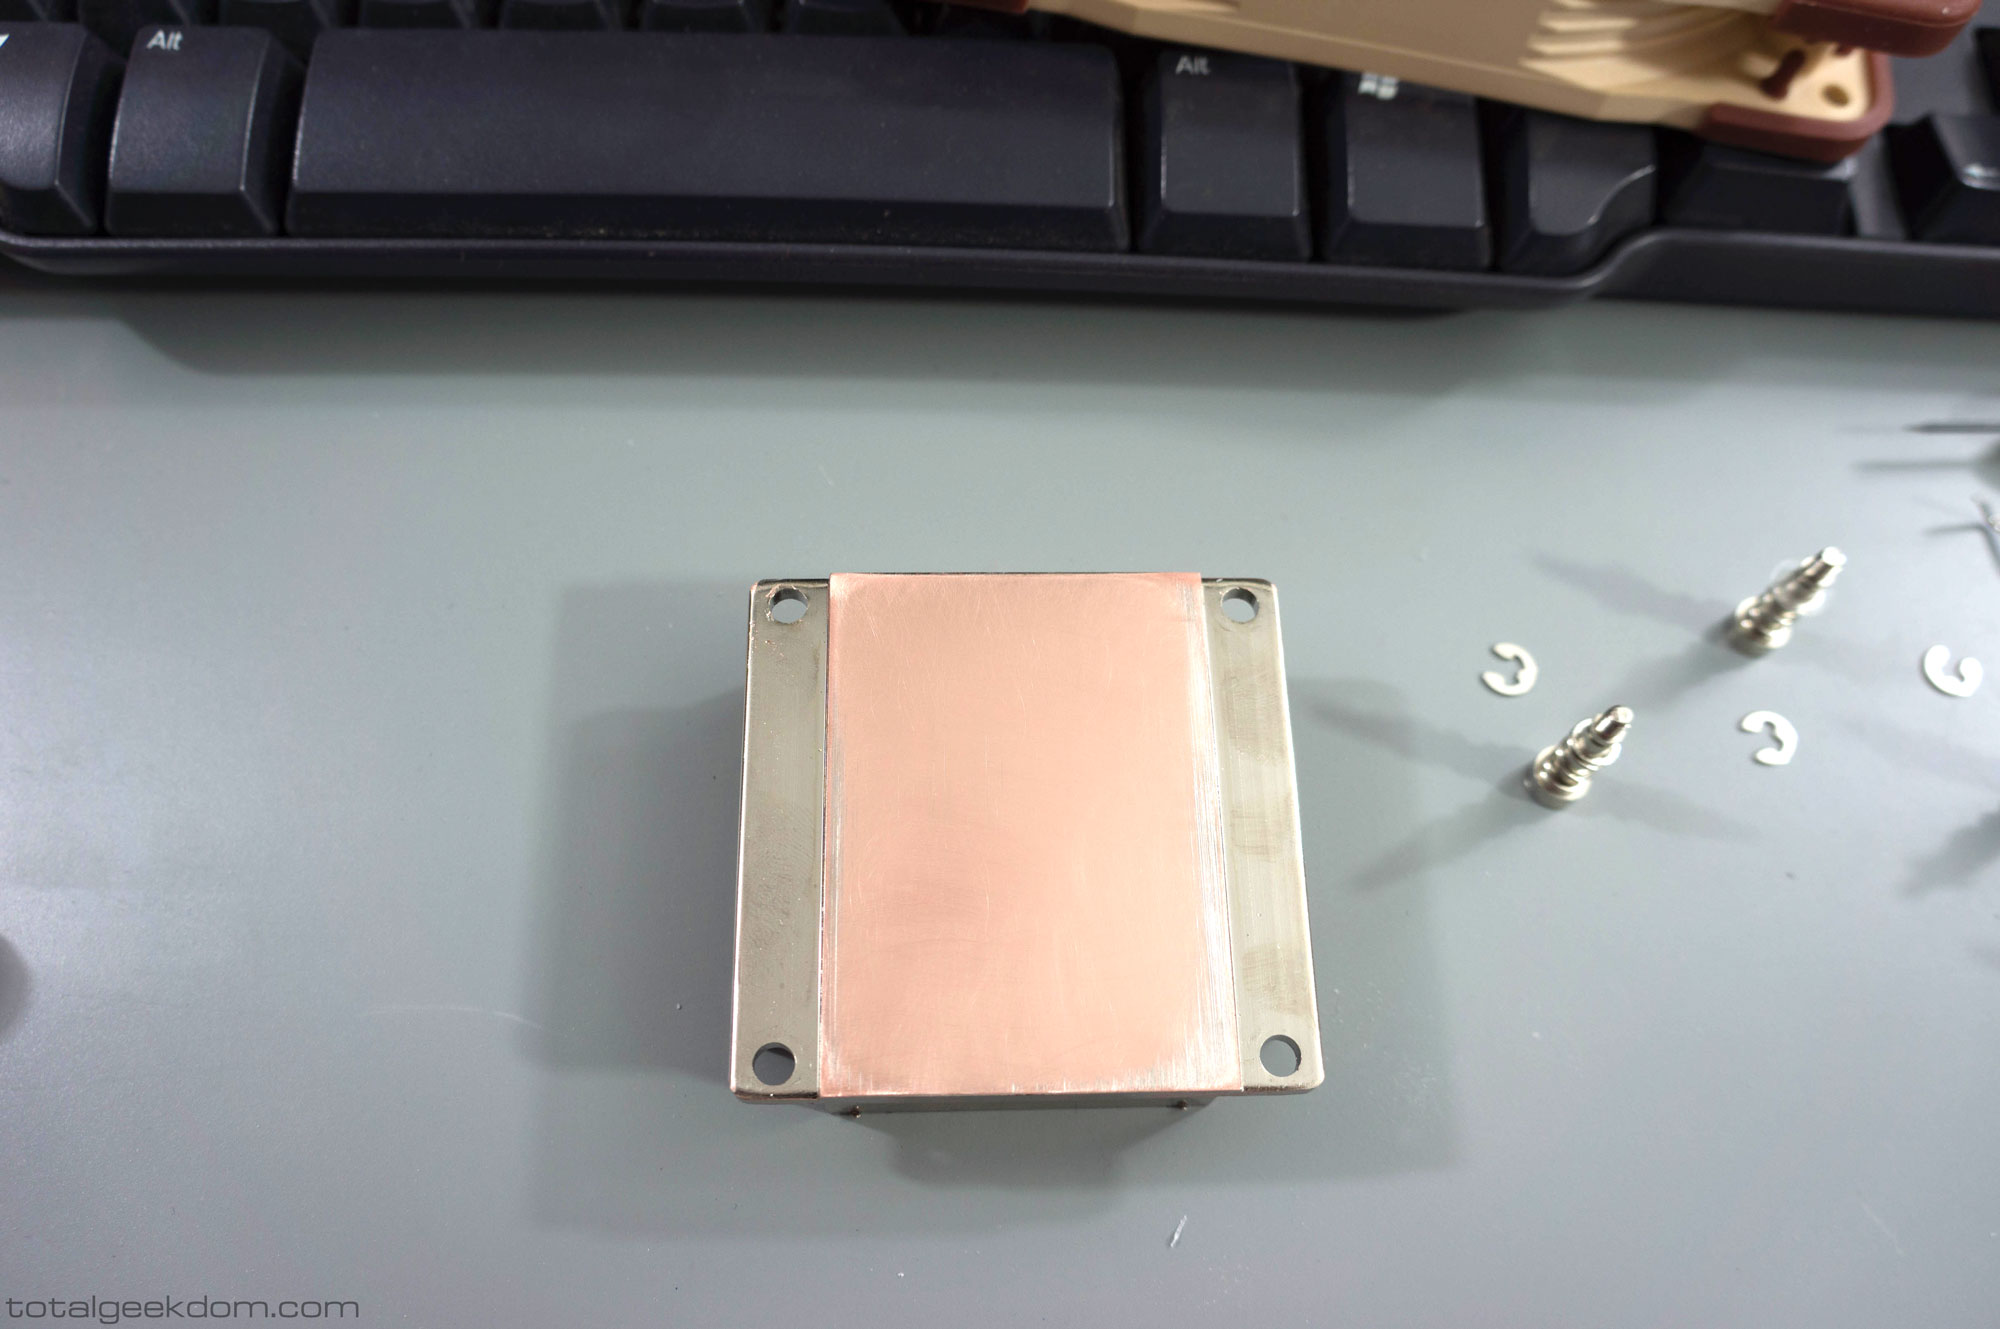
The second improvement in cooling the SSD drive is the addition of copper heatsinks. These copper heatsinks are attached directly to the controller of the drive as well as the storage chips. The controller produces most of the heat, so the copper heatsinks do an excellent job of dissipating heat from the controller. The copper heatsinks on the storage chips also serve to dissipate heat and lower the temperature of the SSD.
The direct airflow and the copper heatsinks significantly helps to lower drive temperatures. This prevents the drive from ever getting close to being hot enough to throttle and lose performance, and it also ensures that the drive lives a long and happy life.
Processor Cooling
The next area that I wanted to focus on was the cooling of the processor. The Supermicro motherboard is designed to be cooled passively, meaning there is only a copper heatsink attached to the processor without a fan on the heatsink. While this system is adequate in most cases, it doesn’t do as good of a job as it could since the heatsink has no air pressure to force air through its fins and remove heat.
To improve the cooling, I’ve added a Noctua 6omm cooling fan to the heatsink. This greatly improves the cooling of the processor by utilizing direct airflow over the entirety of the processor heatsink.
Taking things yet a another step (because what good modder doesn’t), I decided that I wanted to test the processor heatsink out further, so I removed the heatsink from the board to see what the interface was like between the two. Upon removal I found a very hard and almost brittle TIM (thermal interface material) that didn’t fully extend all the way to the edges of the processor heatspreader. It was also applied quite thickly. Furthermore, upon inspection of the heatsink surface, I found it to be quite rough and did not have an ideal surface for efficient heat transfer.
Based on all these findings, I went ahead and decided to lap the processor heatsink to improve both its flatness as well as its surface finish. Heatsink lapping has been around for a while now, and its the ultimate goal is to improve the heat transfer between the processor heatspreader and the heatsink.
Heatsink Lapping
There are a couple different schools of thought that go along with heatsink lapping, but the most proven method that yields the best contact (and lower processor temperatures) is accomplished by using progressively finer grits of sandpaper and working your way up to a well polished finish on the base of the heatsink. From my own personal testing and reading of engineering studies on the topic, the best finish is one that is quite smooth but not too smooth. While a mirror polished surface is a rewarding thing to look at after all the hard work of sanding, it doesn’t necessarily translate into the better results. The reason that “too smooth” doesn’t work as well as “just smooth enough” has to do with what is going on at a microscopic level. Surface finishes where only roughness is concerned are measured in RA (Roughness Average), which is a calculated number based on microscopic peaks and valleys. To the naked eye, a surface that looks smooth will look quite different at increasing levels of magnification. In this instance, the heatsink will have grooves and jagged looking edges and peaks at higher magnification.
What we want to do is smooth those peaks down to the point where they are mostly flat, leaving only small valleys. The reason that this is more effective at transferring heat than a completely microscopically flat surface has to do with surface area. The more surface area we have, the more contact area we have; and the more contact area we have between the heatsink and the processor heatspreader, the better the heat transfer will be. All those small valleys allow for the TIM (thermal interface material) to work it’s way in between the grooves and allow for more area to transfer heat into the heatspreader. So we want a polished surface, but not a perfectly polished surface.
Heatsink Flatness
The next area of concern is heatsink flatness, for which there are also a couple different schools of thought as to what is best. Conventional wisdom was always that you wanted the flattest surface for both the processor heatspread as well as the heatsink, as this in theory would offer the best contact between the two surfaces and therefore the best heat transfer.
From my own testing, however, as well as reading tests and reviews, as well as electronics cooling papers, what you actually want is not a perfectly flat surface. The reason for this has to do with how the processoer heatspreader, as well as the heatsink itself will deform under load when you screw down the heatsink to the board. Because of the 4 corner arrangement, where one screw is at each corner of the heatsink, you end up with distortion in the heatsink when it’s clamped down onto the processor heatspreader. This distortion varies depending on a couple of factors (board design, heatsink design, socket design, clamping mechanism), but in general the outer edge clamping loads at the corners are higher because they are closest to the screws. So when you clamp down the heatsink you slightly deform both it and the processor heatspreader, and the middle section of both loses some of that clamping and contact. Keep in mind of course I’m being pretty finicky about this, the system works fine and gets the job done, but I want the best possible performance I can get, so if it takes a little extra work to accomplish that I’m all for it.
Processor heatspreaders vary, some are convex, some are concave, some are flat. The same can be said for bottoms of most heatsinks. What we’re trying to do is create the most ideal contact between the two. In order to accomplish improving the contact between the two we need to take some measurements and get some data from both surfaces before we start. To do this we use a surface plate ( a ground flat surface), along with some machinist parallel blocks, and then a test indicator that measures at .00005. Using a fixture to hold everything we can then measure and plot the dimensions of the surface and create a map of what the surface looks like.
Pictured below we see the heatsink in factory form. Based on the measurements it shows concave in the middle. Concave in the middle tends to perform worse because the loading at the edge of the heatsink near the screws will further distort the middle of the heatsink pulling it further away from the processor heatspreader. I can verify the contact through the use of pressure film, which is a type of film that shows contact pressure when sandwiched between two surfaces.
Lego Server Hypercube Supermicro Heatsink Rough Finish
After some preliminary sanding you can see that the pattern that shows up (pictured below) matches what the readings that were obtained when I measured the surface. The center area does not contact the sanding paper as it’s lower than the rest of the heatsink surface. This creates less than ideal contact between the processor heatspeader and the heatsink.
Lego Server Hypercube Supermicro Heatsink Partially Sanded
When sanding is completed (pictured below) we see a uniform surface, without dips and concave sections. The very edge of the heatsink was still not contacting the sandpaper, but this was left intentionally as this part of the heatsink does not contact the proessor heatspreader, so it has no effect on heat transfer between the two.
Lego Server Hypercube Supermicro Heatsink Fully Lapped
After completing the final round of sanding and finishing, everything gets put back together for testing. The end result of all this extra work is I was able to shave off about 4-5 degrees (celsius) from peak load temperatures. This is a great result and helps keep the processor running cooler, while also keeping the system running cooler and quieter as the fans don’t have to work as hard to keep up. It’s definitely a fair amount of extra work, and I’m sure I could have just left it alone and it would have been fine, but the end result is worth it.
(I should note that it’s always wise to pay attention to the types of metals that will be in contact after any kind of lapping. The processor and heatsink often are nickel plated, though sometimes just one or the other is. Copper can oxidize, and dissimilar metals can corrode over time, so be aware of the types of metals and surface treatments.)
Overall Performance
With multiple versions of this specific (Hypercube) design of the Lego Server in the field I’ve had a chance to get a lot of feedback on the systems in real world usage scenarios. The feedback I’ve received has been excellent, with users reporting that the performance of the server in a virtualization environment is outstanding. The performance of the Xeon D-1540 and it’s 8 cores and 16 threads, coupled with the Samsung sm951 PCIe SSD drive and it’s incredible speed allows for loading up a bunch of virtual machines (10+) at once, plus handling other duties like database checking and more without the system missing a beat. The cooling system works great in keeping the system temperatures exactly where I want them, all while running fairly quietly for a system of this type.

Lego Server Hypercube Top
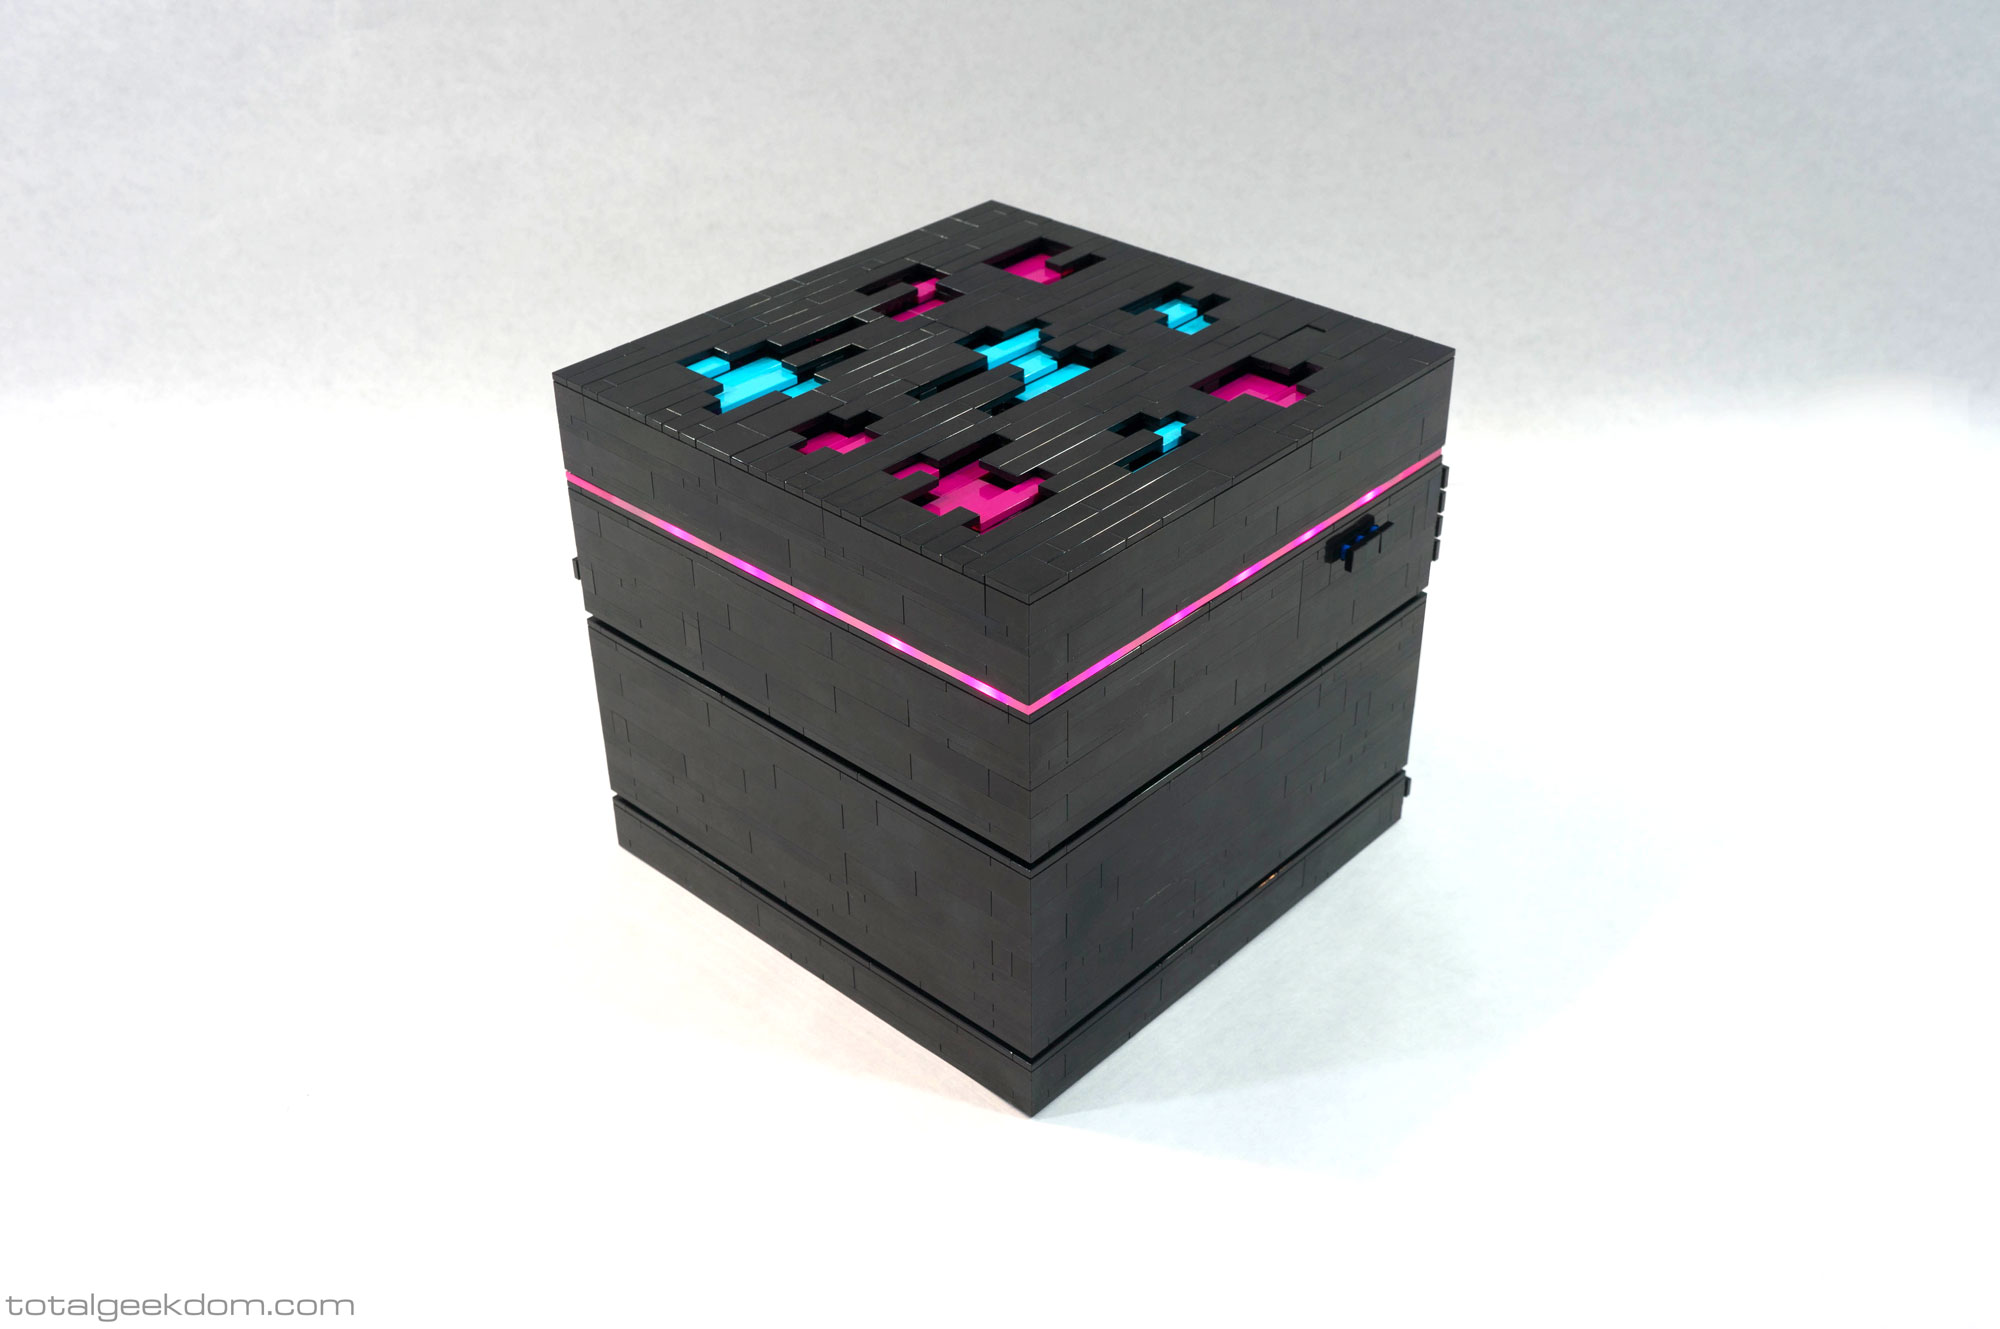
Lego Server Hypercube Pink LED
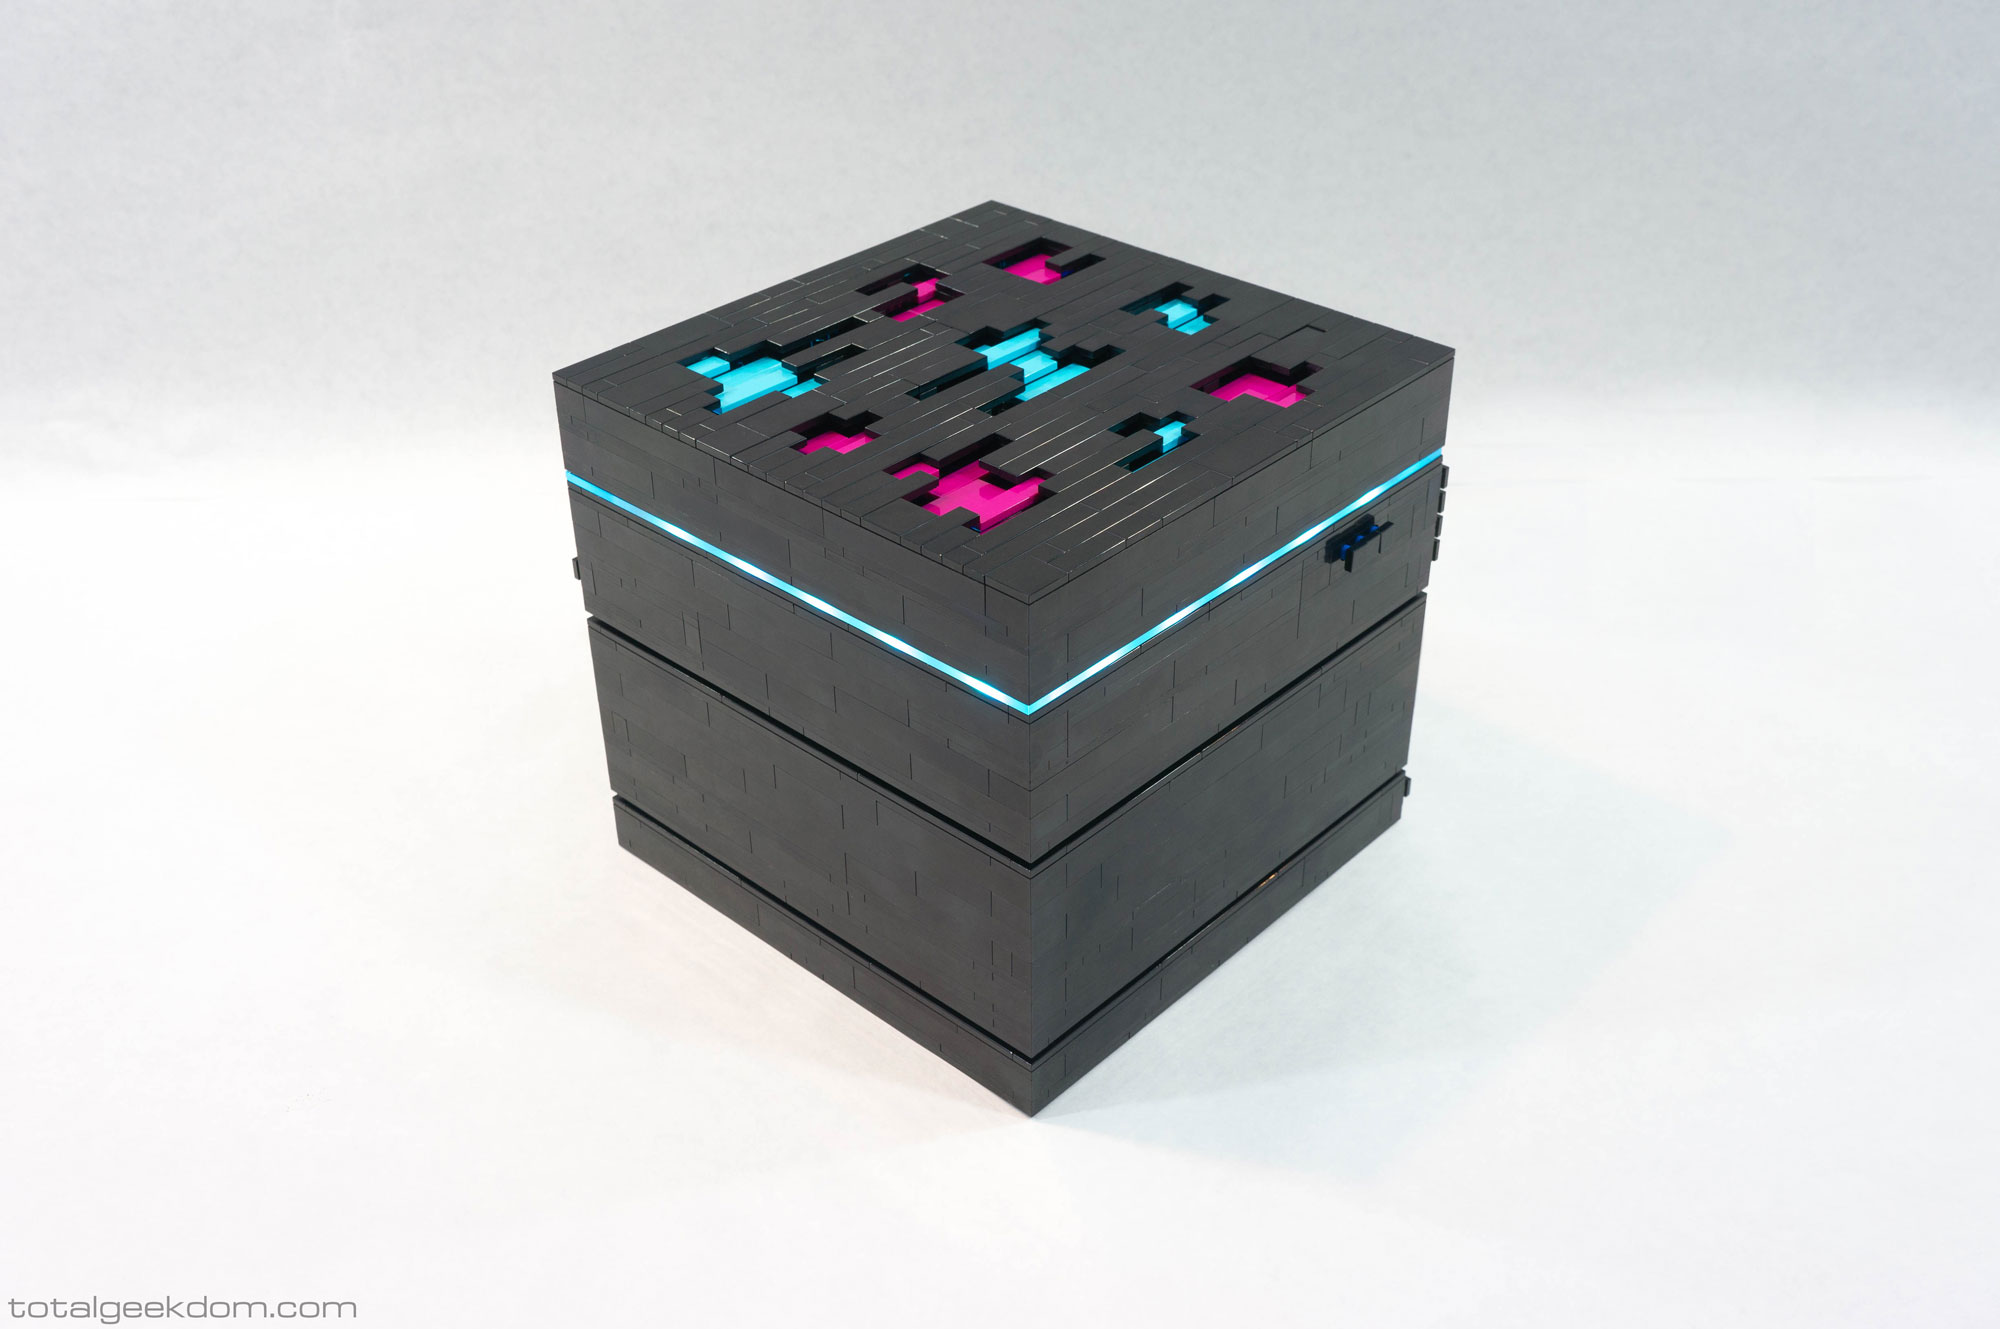
Lego Server Hypercube Blue
FOR MORE INFORMATION, PRICING, AND OPTIONS, VISIT THE LEGO SERVER PAGE PAGE.