Lego + Computer = Lego Computer
It seems straight forward enough – not a new concept by any means. But more often than not, it’s the most common request I receive: to build a Lego computer. This probably goes back years – to around 2011 – when the Lego computer system I built received a lot of interest. Since then I’ve continued to receive a lot of interest in the system, requests for reproducing it for others, building custom variations and so on.
The more I thought about the Lego computer over the last year, the more I started wondering how I could design and build a system that wasn’t so difficult to reproduce, one that could be bought by anyone looking for a new computer with a unique twist, a Lego twist. I don’t really need to explain how widespread the appeal of Lego is – we’ve all played with it, and many of us still do. Lego has the power to turn imagined forms into tangible things, conceived in the wonders of your imagination built with your own hands. And it appeals just as much to a 5 year-old as an 85 year-old.
But if my goal was to produce a Lego computer system anyone could use, I needed that system to be broadly compatible as well as totally capable of meeting the needs of users in 2015 and for years to come. I wanted to design a system that would be advanced in 2015 but just as capable in 2017 and upgradable, so that it might last until 2020 and beyond.
Lego Computer System
Given these musings, I went to work on a series of guidelines for my new Lego Computer System:
Design
-Small Form Factor Design
-Intuitive Features
-Thermal Management Control
Connectivity
-Fully Wired Connectivity (USB 3.0, Displayport, HDMI, LAN, Audio)
-Wireless Connectivity (Wireless AC, Bluetooth)
-Optical Drive (DVD/CD Combo Standard, Blu-Ray Optional)
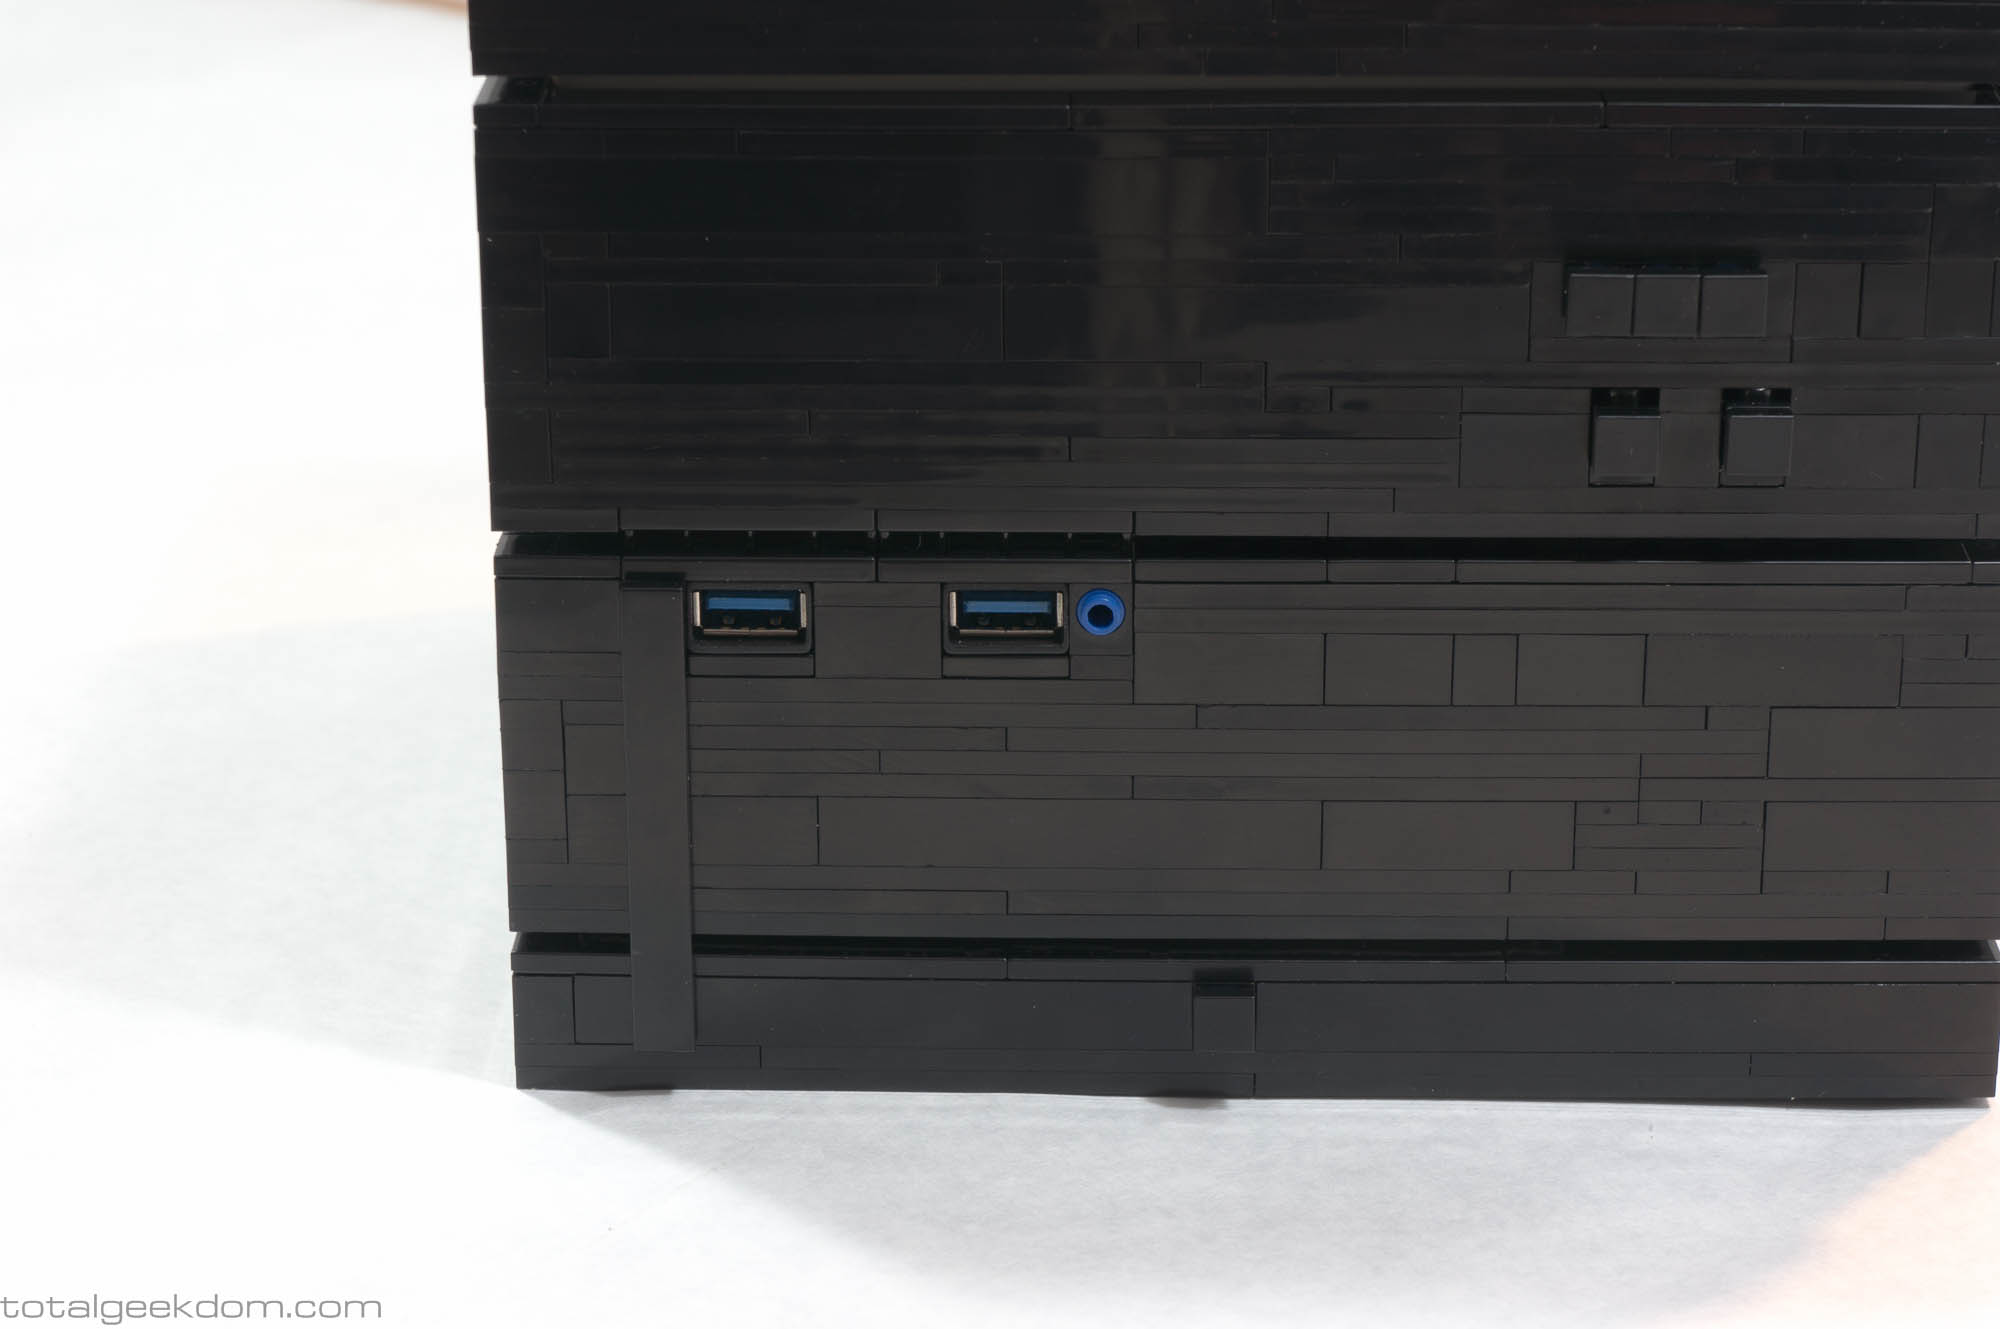
-Front USB 3.0 Ports
Powerful
-[Memory] Minimum 8GB RAM and Supports up to 16GB RAM
-[Processor] Latest Intel Core i3, i5 and i7 Processors
-[Storage] Multiple SSD Drives (optional HDD storage drive)
-[Graphics] Intel HD4600 Graphics
Efficiency
-High Efficiency Energy Star Level 5 Rated Power Supply
-Low Energy Usage
Capabilities
-Easily Capable of Handling Multi-Tasking (Office, Internet, Video, Etc)
-Easily Able to Playback HD 1080P Video (1920×1080)
-Supports 4K Resolutions (4096×2160)
-Multi Monitor Support (HDMI + Displayport)
-Geared to Light-Medium Gaming
-Built-In and Intuitive System Backup
-Supports Windows 7/8/10 & Linux Support
After reviewing numerous systems on the market, I discovered a reoccurring problem with small form-factor systems: they were underpowered or crippled in some fundamental way. This meant that they usually had low-power dual-core mobile variant processors (the type of processor found in tablets and laptops), as opposed to their more powerful desktop cousins. The base amount of memory was often 4GB, with a max of usually 8GB, and it cost quite a lot to upgrade, which you had to do it upfront, as advanced features couldn’t be added later. Furthermore, the systems often had a limited number of ports for connectivity and would rarely feature an optical drive.
This left most users with a system that was essentially compromised. Cheaper ($400-500) systems had slow processors and only 4GB of memory; more expensive systems ($800-900) had slightly better processors with 8GB of memory, but they often had limited ports or no optical drive.
I wanted to build a system that was small and could sit innocuously and look cool, while also being a fully-functioning computer that any user could use as their main system. I wanted it to be powerful with numerous connectivity options, totally capable of the mass majority of general computing needs. What good is a cool looking Lego computer, if it’s not powerful enough to be used as an individual’s primary computer?
With my guidelines established, I started on a completely new system – a system unlike anything I was finding on the market today. I had built previous Lego systems, from smaller home systems to full blown multi-system farms, and one of the biggest assets in my design process was the years of experience I’ve had with building Lego systems. For example, my Lego Folding Farm is a large multi-system computer that housed 3 complete computer systems in one Lego computer case. It allowed me to replace 3 separate desktop systems by merging them into one system, greatly increasing my computing efficiency as well as minimizing the footprint. I built this system for CPU farming, combining multiple CPUs to process medical research data primarily for World Community Grid. With the unique strategy of stacking systems that I developed, I was able to max out all 3 CPUs at 100% with a system that could run 24/7.
Having this other system up and running nonstop at max processing speeds for 4 years now gave me a wealth of data to use in building a new Lego system.
Design Process
Taking what I knew from the test system that I had been running for years and combining it with my research on existing systems on the market today, I was able to focus on the items that mattered most to this new Lego computer system and establish a set of standards for the design that I would adhere too.
Usable
The system must be completely capable of all computing requirements for the vast majority of users.
Intuitive
The system should be as intuitive as possible.
Upgradable
The system should be designed so that every component (Processor, Memory, Disk Drive, Wireless Card) can be upgraded to add years of usable life to the system.
Durable
The design must incorporate thermal management to extend the life or all components. Only premium components will be used.
These criteria guided my design process from start to finish and sent me back to the drawing board time and time again. If something wasn’t perfect, I tweaked it until it was, and if that didn’t work, I scrapped it altogether and started over again.
The Endless Pursuit of….
My Achilles heel is that I’m a perfectionist. Yes, that sounds like a job-interview cliché, and it’s helpful in many ways, but it’s also one of the most frustrating things that I have to grapple with on any project. I just can’t let things go if something isn’t the way I want it. Often, this results in testing a feature or portion of the design and being almost completely satisfied with the exception of one little tiny thing, and that one little tiny thing begins to bother me and bother me… until I have no choice but to find a fix.
In designing this system, it went through more iterations and versions than any single project ever before – because if I’m going to sell it to someone else, it has to be perfect.
The first concept version that I tinkered with was much larger than the final design. My intention was to produce a 10″ cube, and it incorporated a wire management system designed to move all the connections out of the main system. I really liked it, and it turned out well, but the more I worked on that first concept unit, the more I felt like the size was too big. A 10″ cube is not really that large, but I wanted this system to have a small footprint, and I knew I could go smaller. So the first concept unit was shelved for later development, and I moved on to a new design.
The second design was basically a shrink on the first one. I reconfigured the remote wire-setup and moved forward with a size of roughly 7.5″x10″x8″. This system made it further along in the process, and I built it out into a semi-finished state. I tested the system and the new remote wire management design and liked it. During testing of this system, however, I began feeling like I could go even smaller and toyed with the idea of changing the case design to match a Lego brick in scale. Midway through testing, I stopped development on this design and started over again.
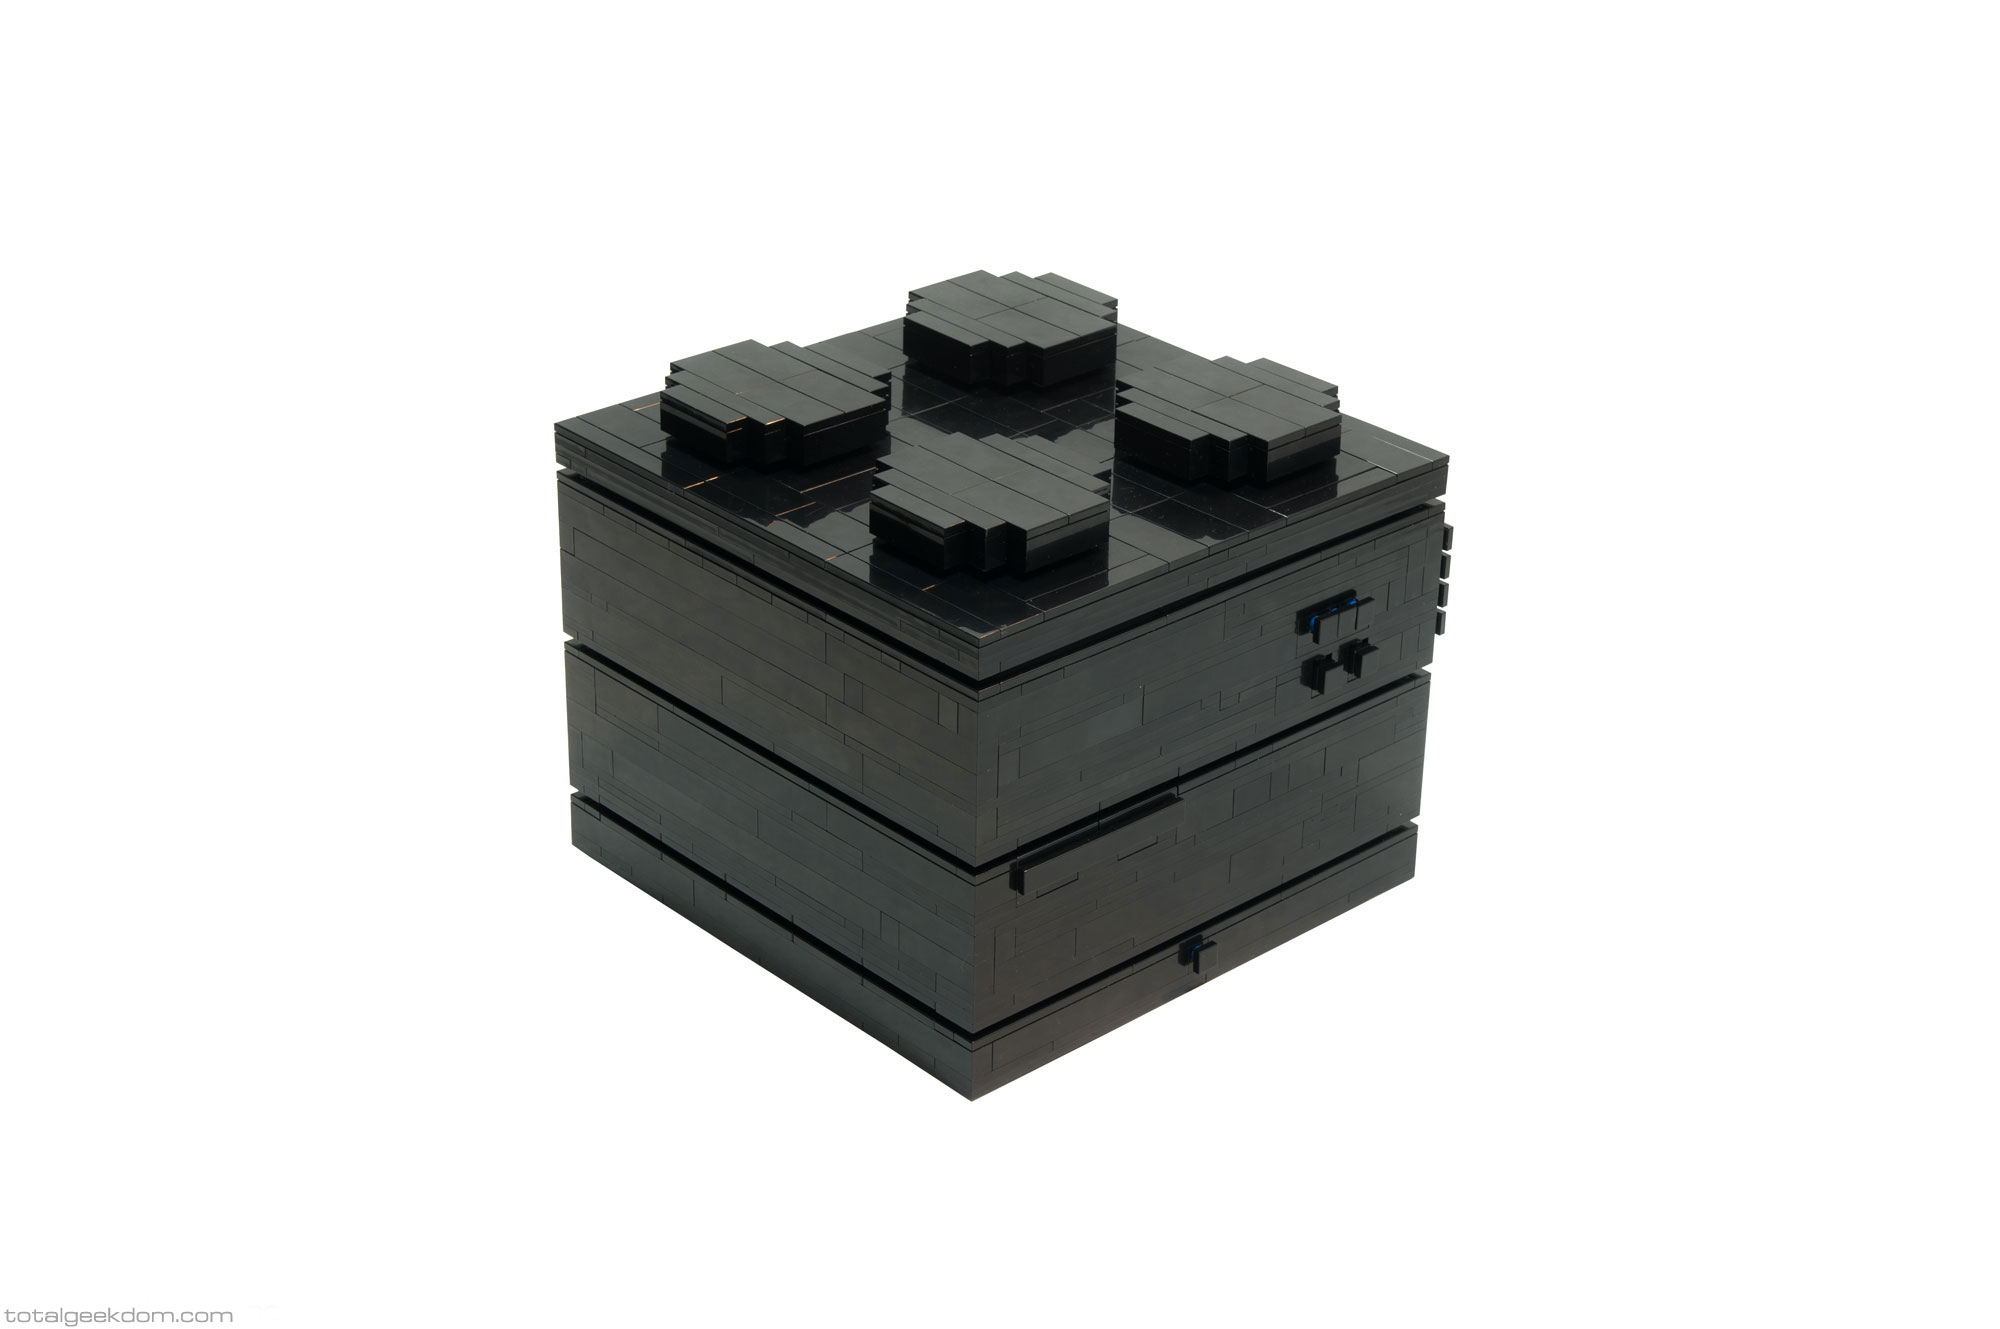
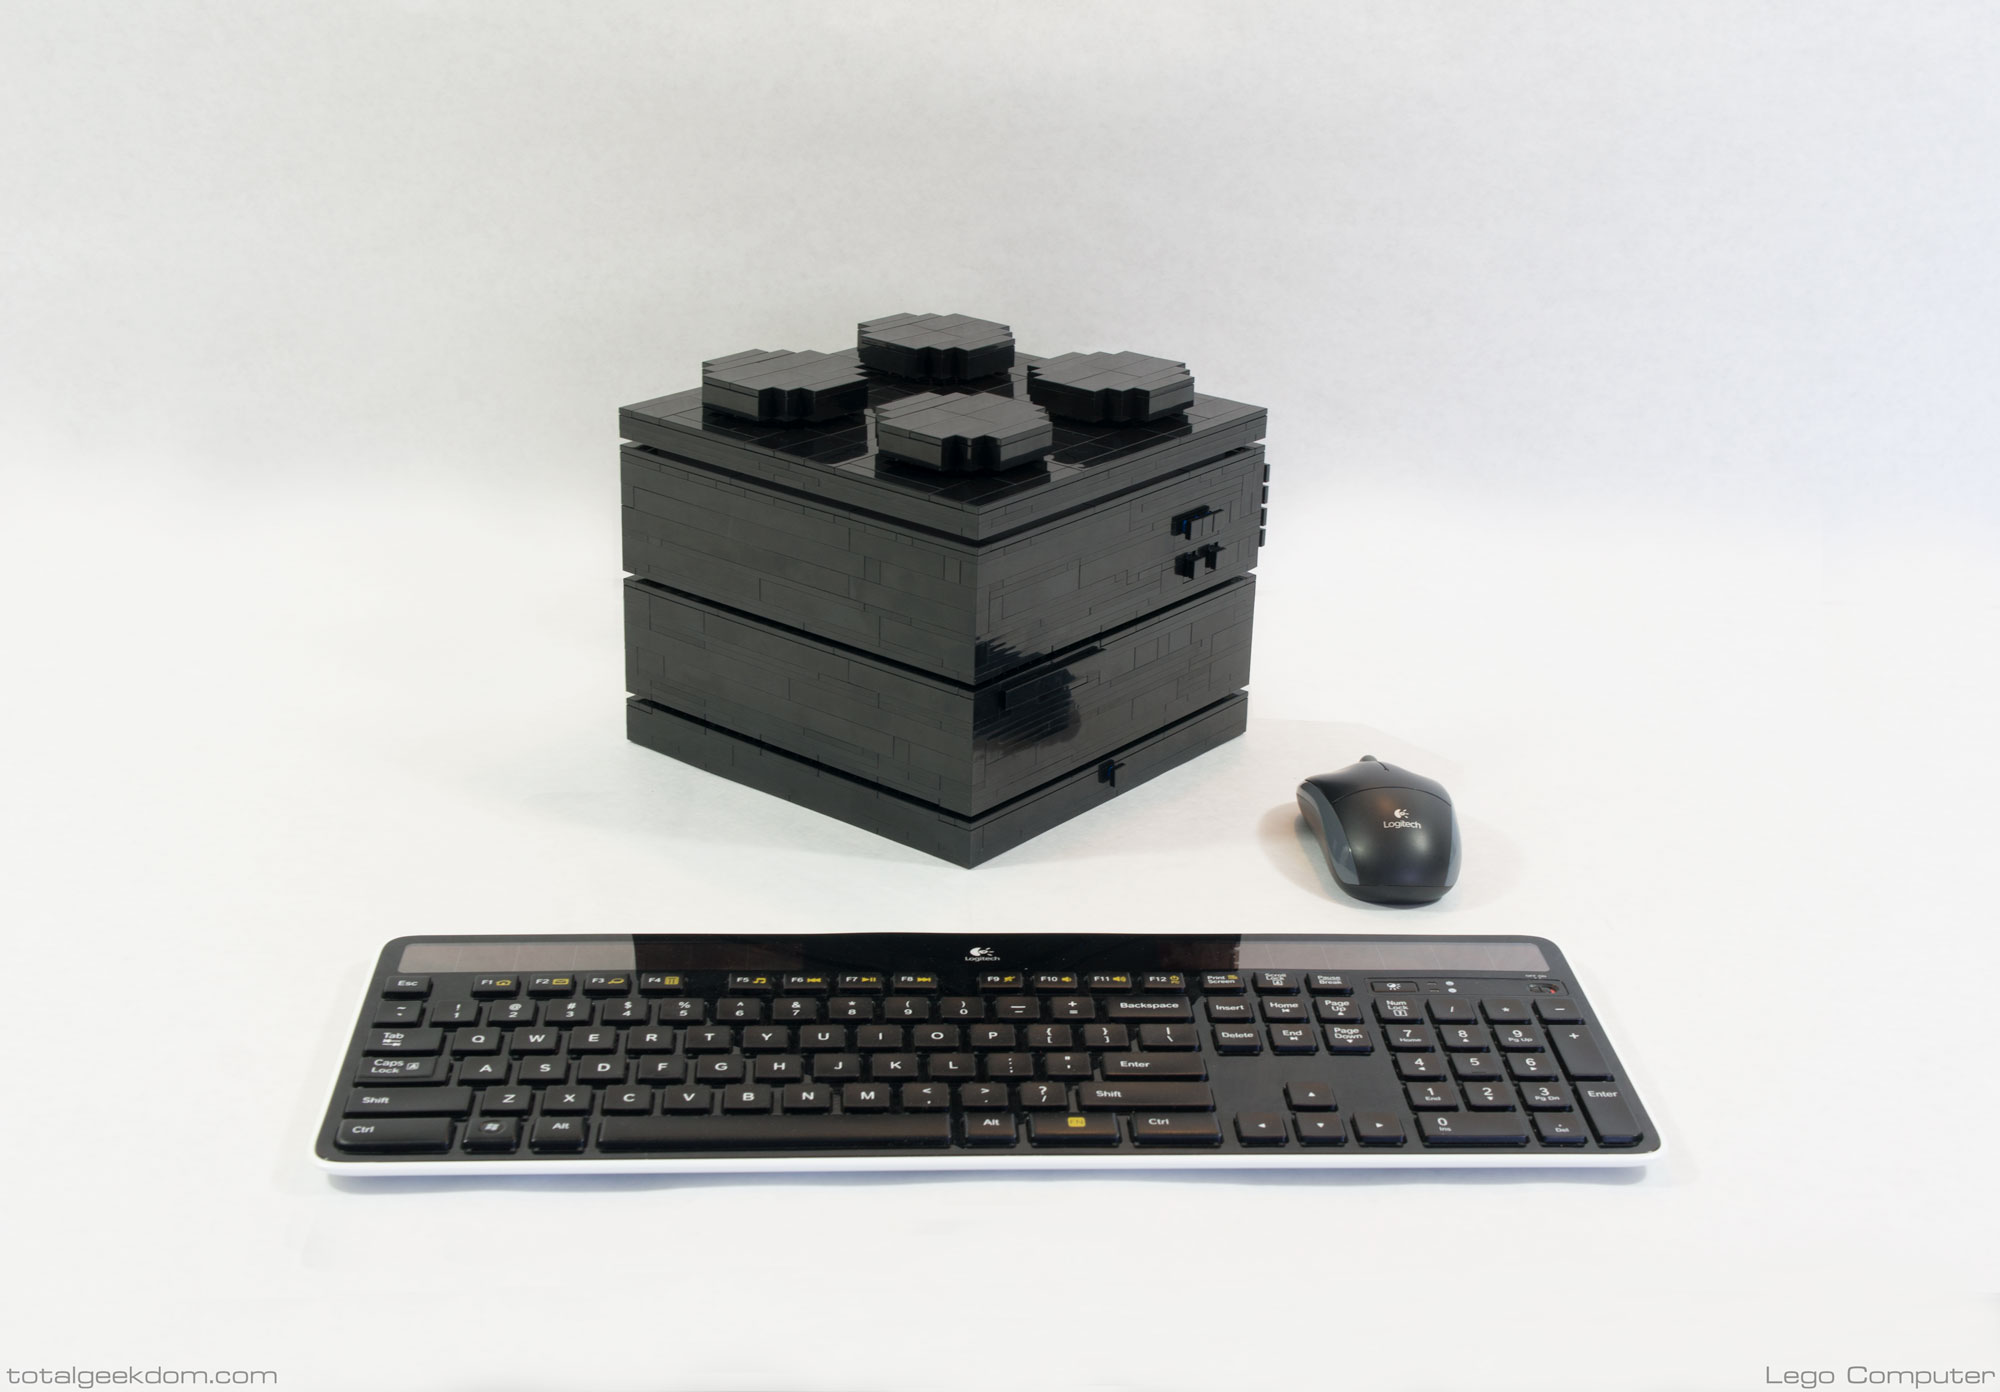
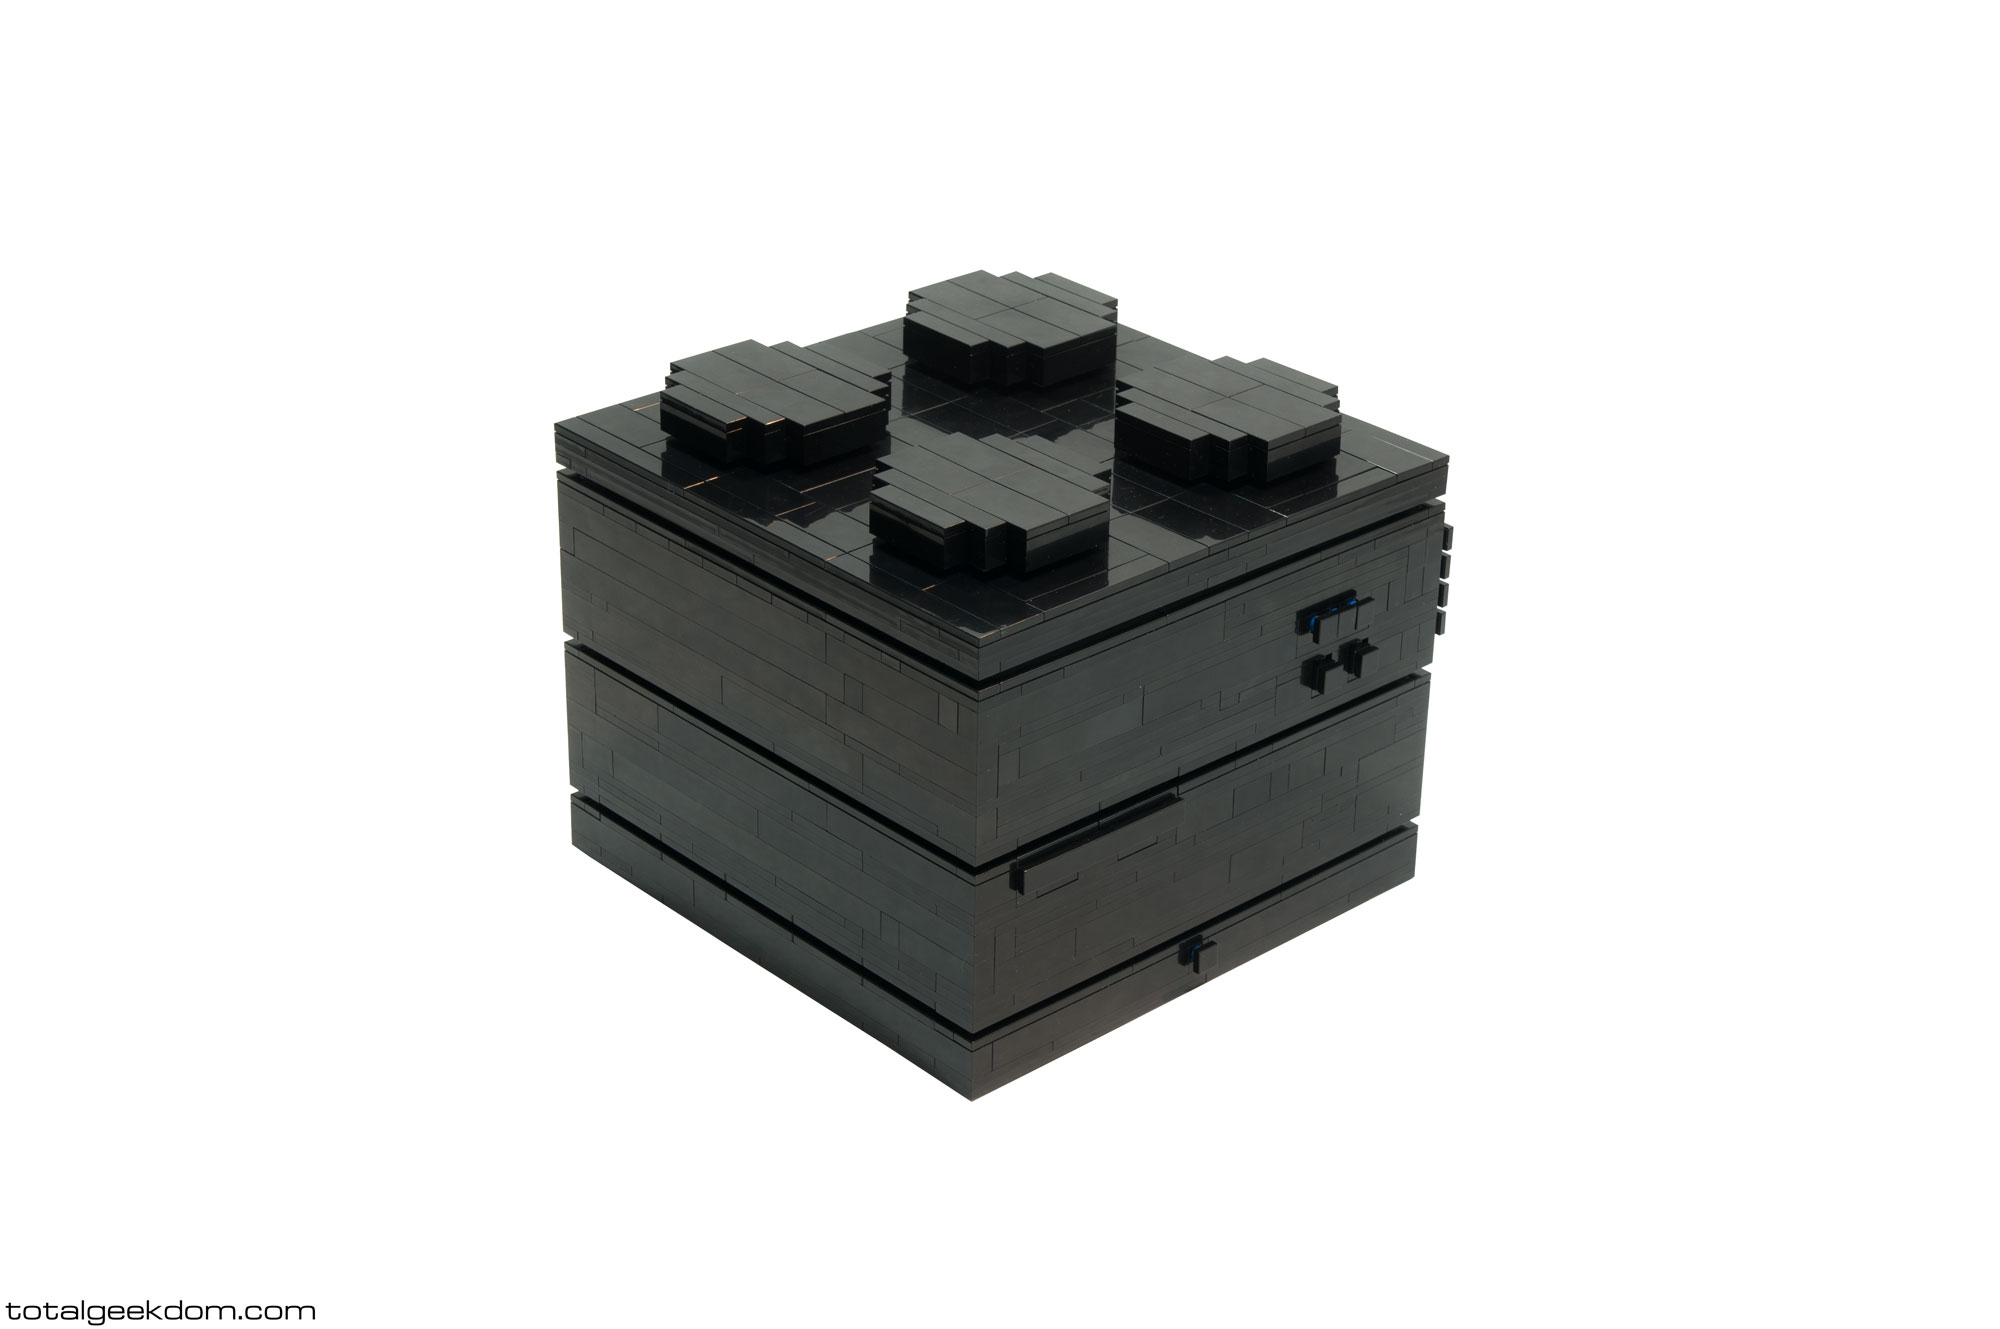
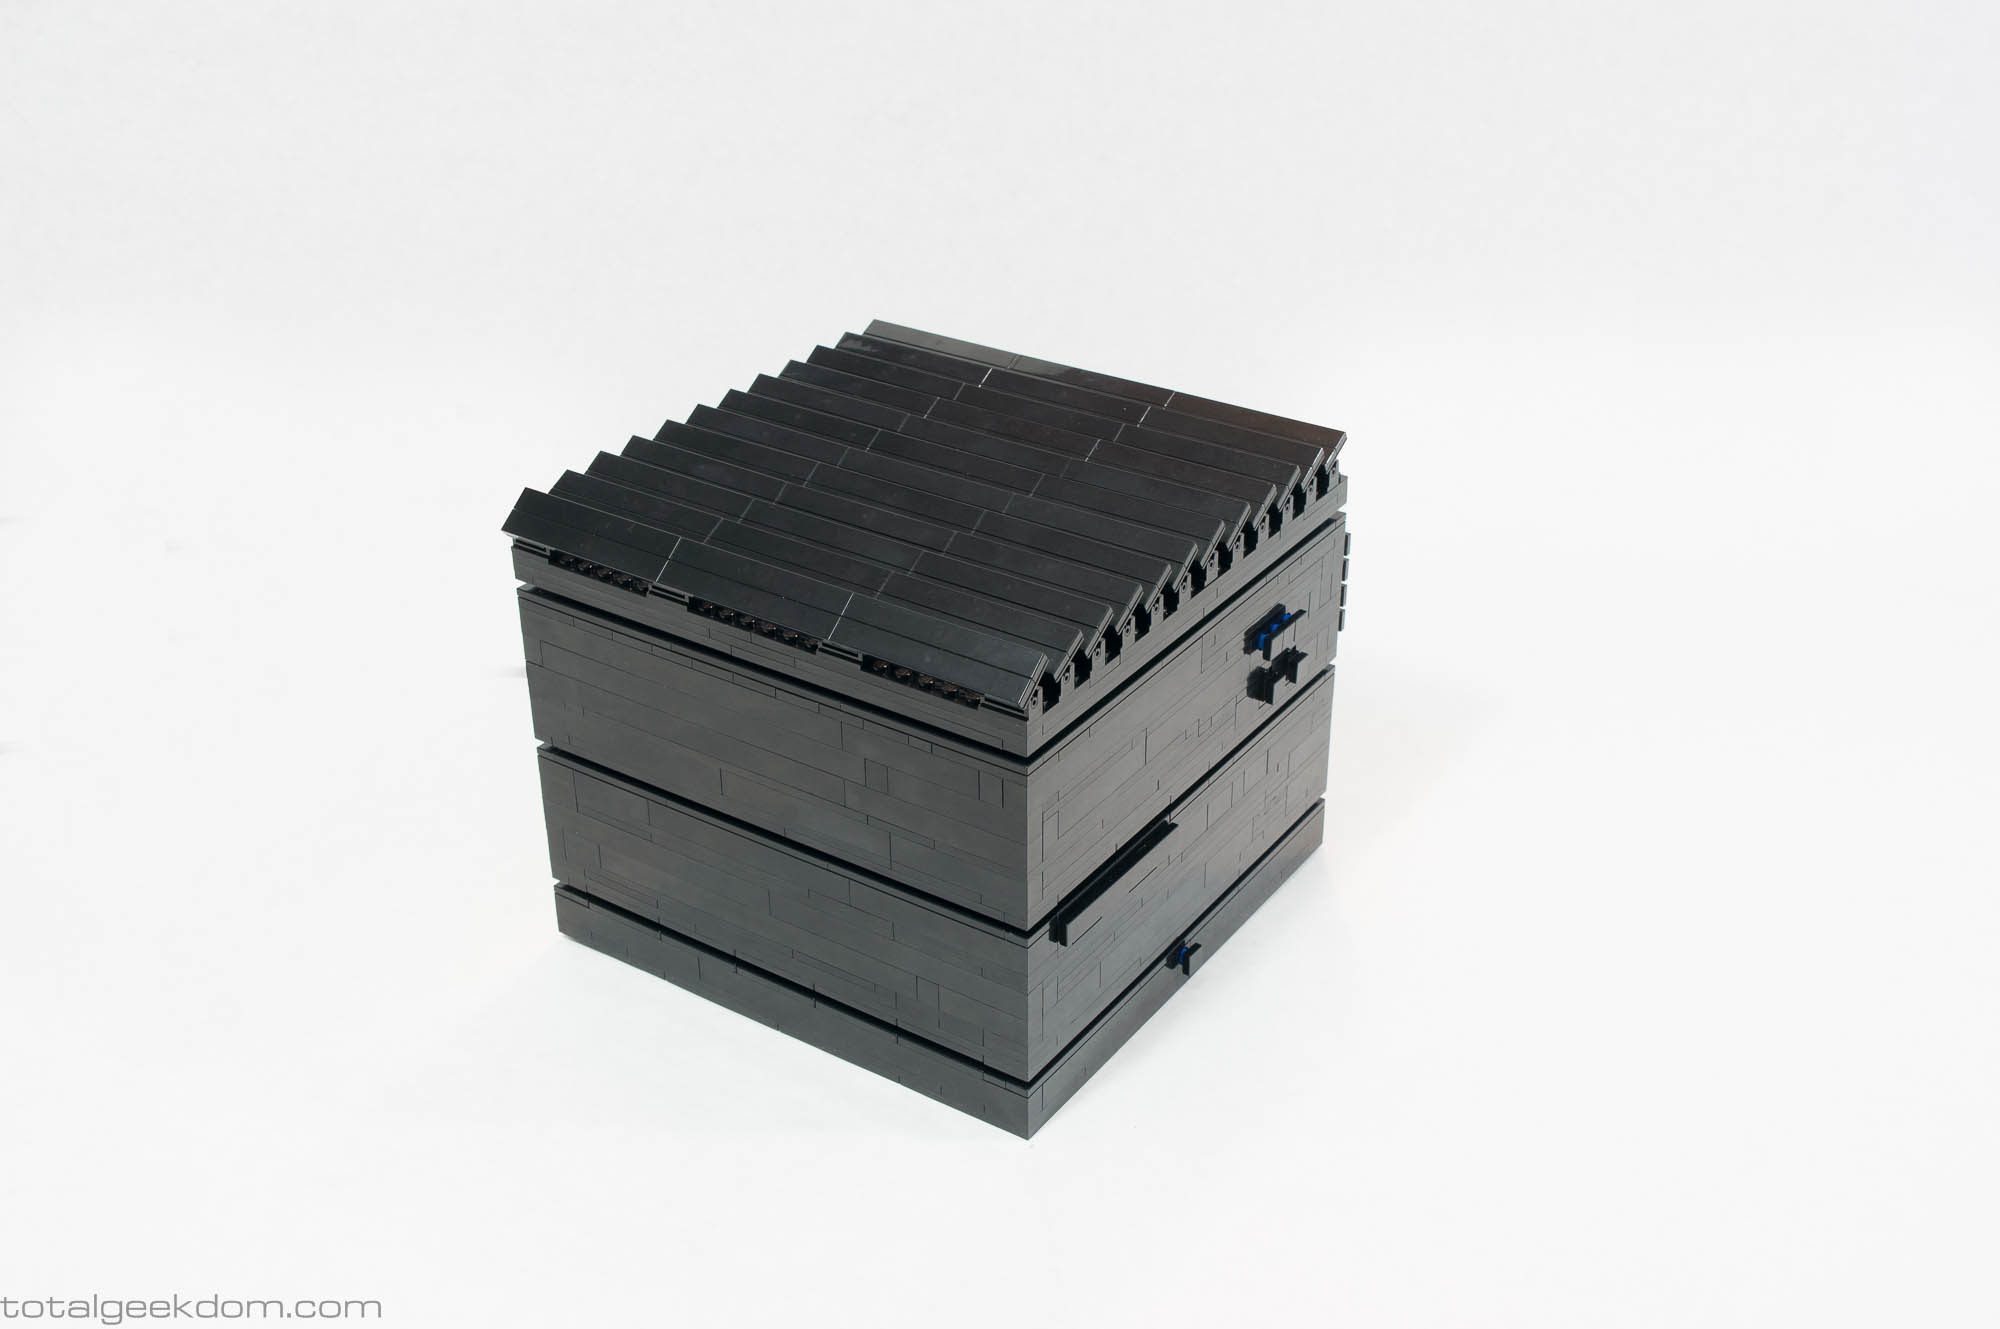
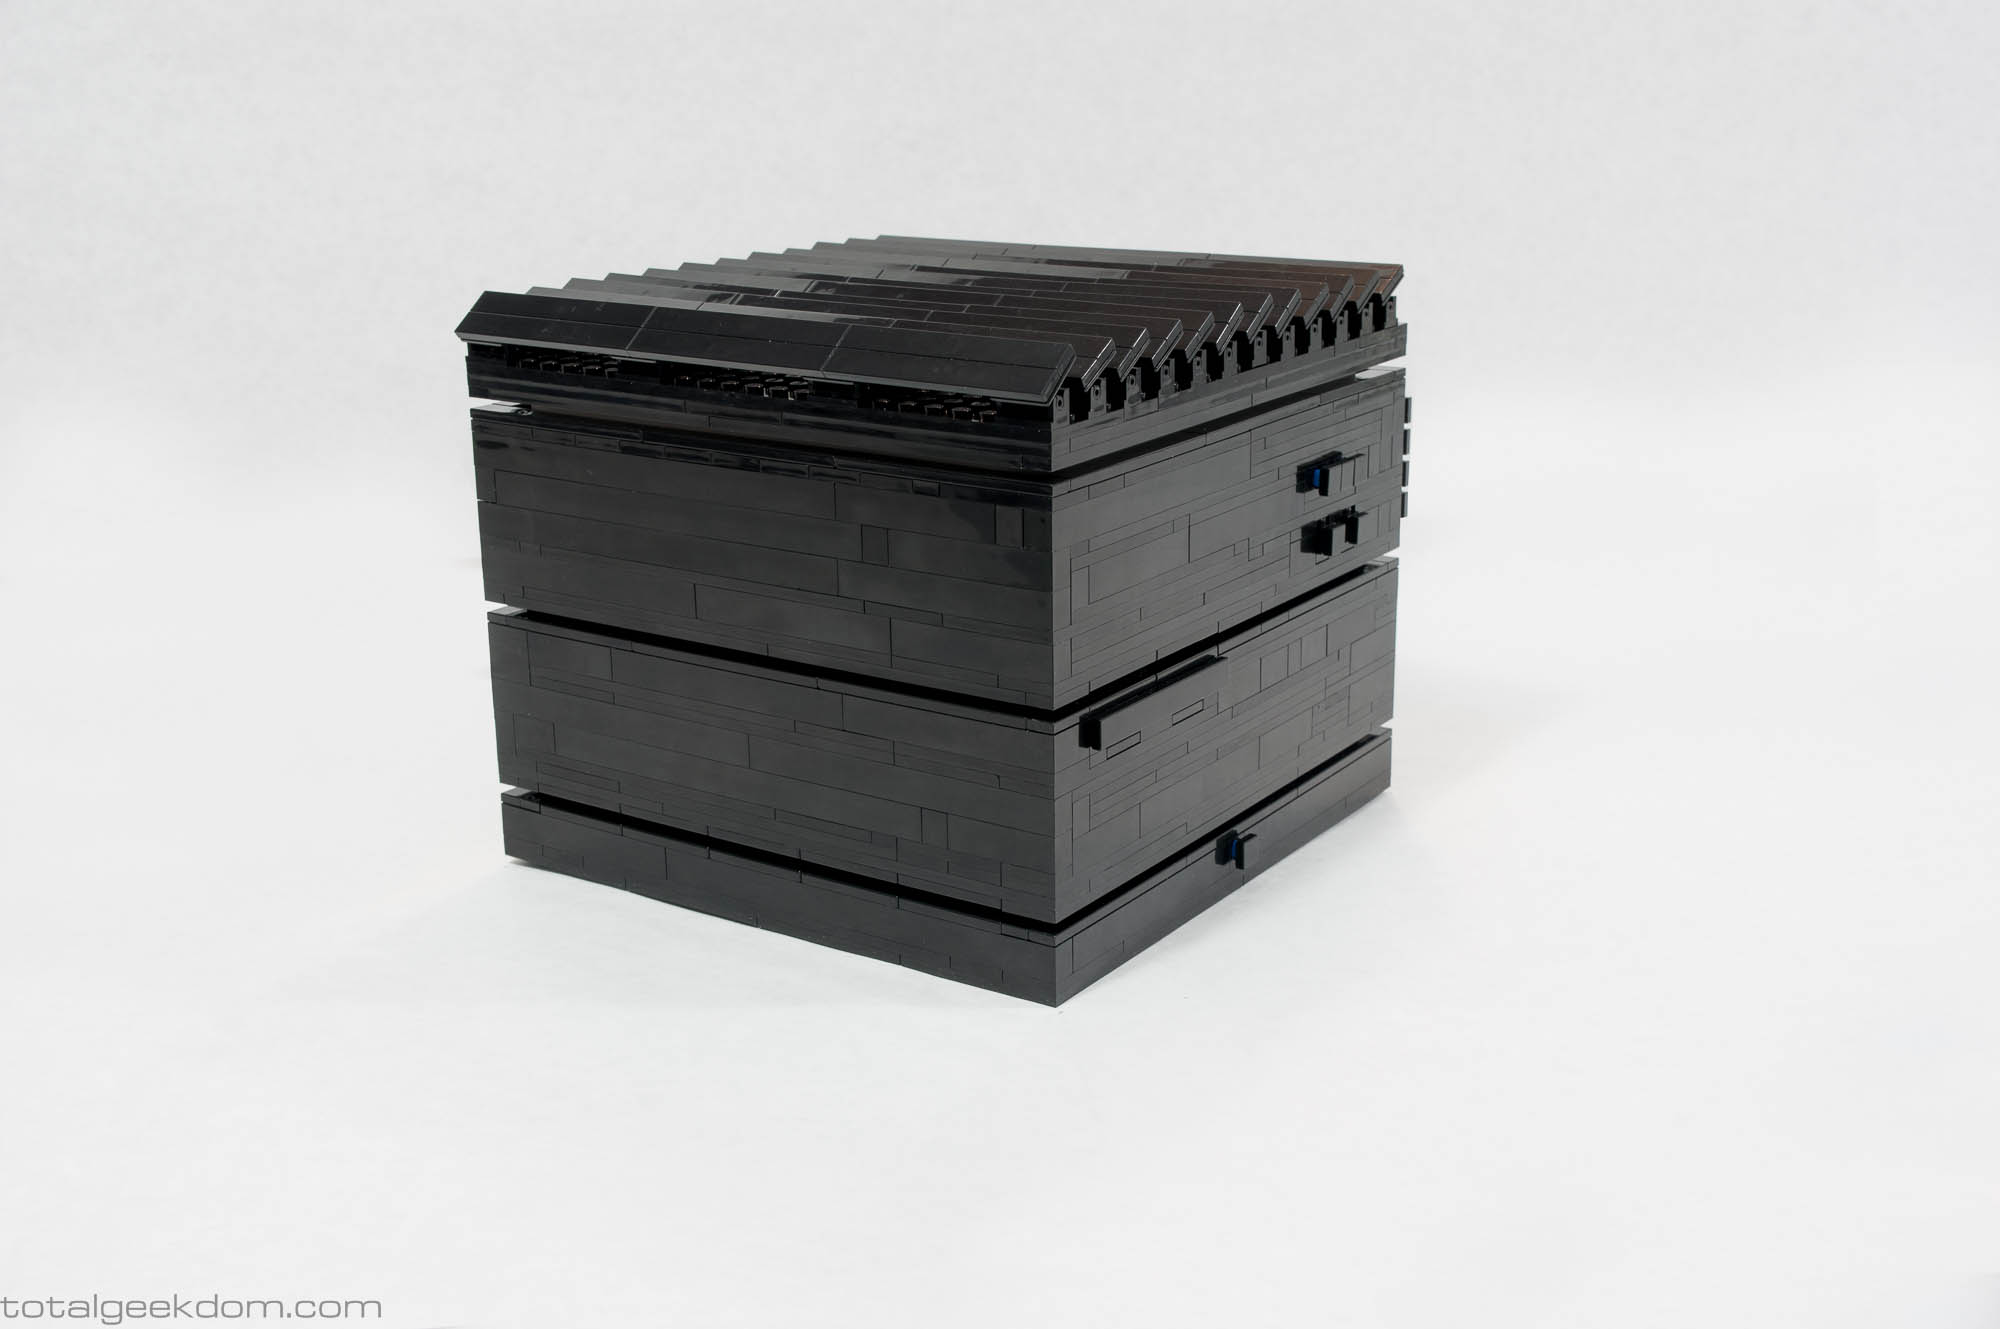
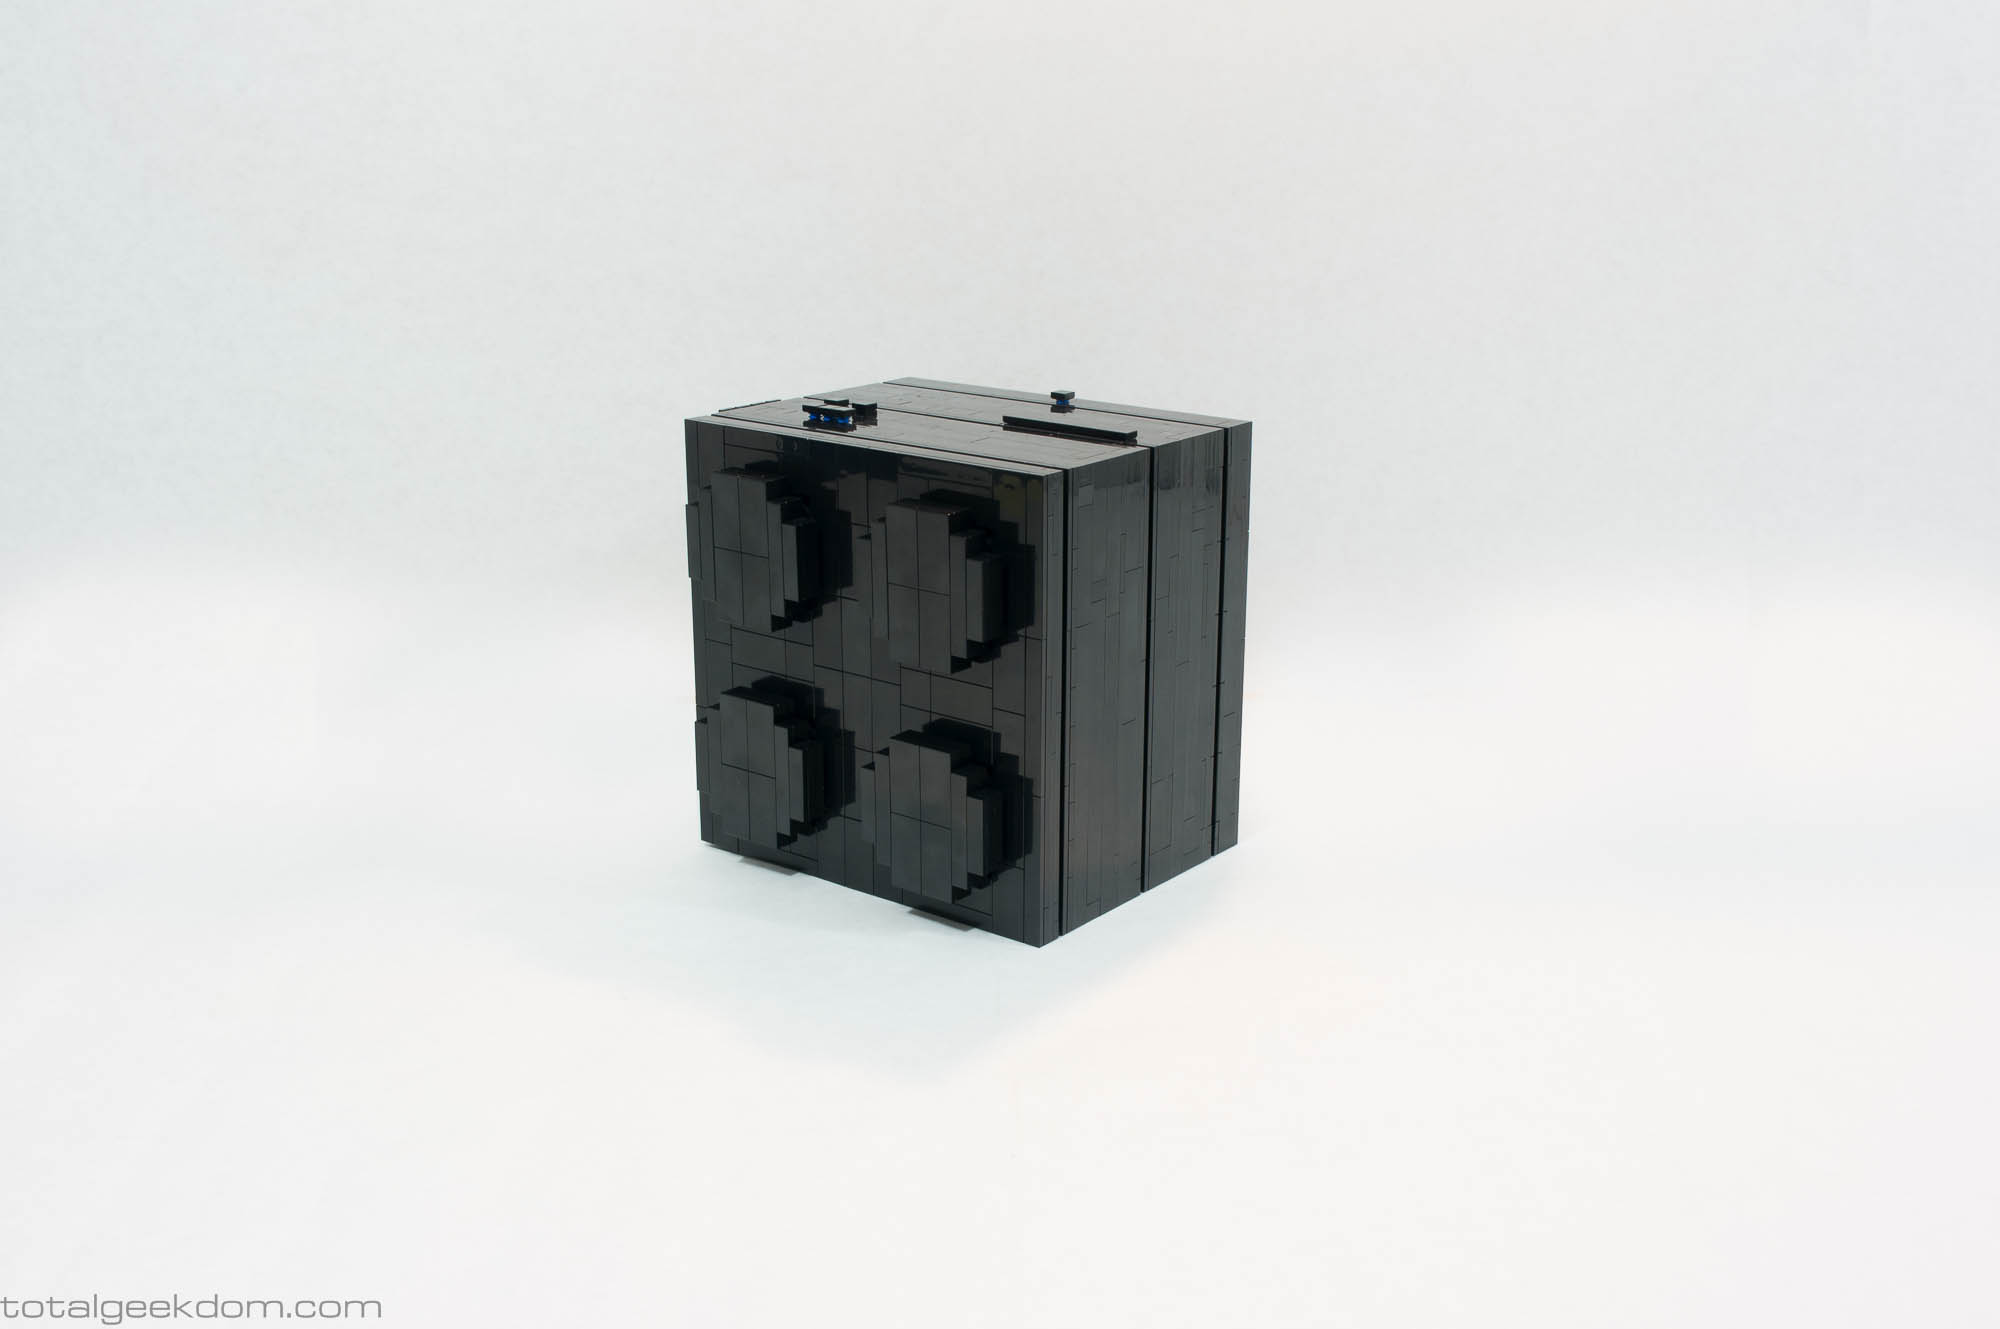
The third design was the ticket. I shrunk the system down to a finished dimension of 7.5″x7.5″x5.5″. This was as small as I could go and still fit the motherboard. This sizing allows for almost perfect scaling of a 2×2 Lego brick at roughly 12 times its scale.
The third design was initially built with the intention of having the air-exhaust holes in the front of the cube with the fan in the top. There were various reasons I chose this arrangement, and in testing the system, it performed very well. However, I didn’t like the look of the front of the case. While the louvered effect was neat, it took away from the overall aesthetic of the brick. After much deliberation, I decided to move the front air-exhaust slots to the back. This, of course, required taking the system completely apart in order to make the change. This wasn’t a prospect I was excited about, but I knew the look of the system would be vastly improved if the airflow were in the back. This is how I came to finalize the design that you see before you today.
Lego Computer System Airflow

Lego Computer Conventional Cooling Bad Airflow
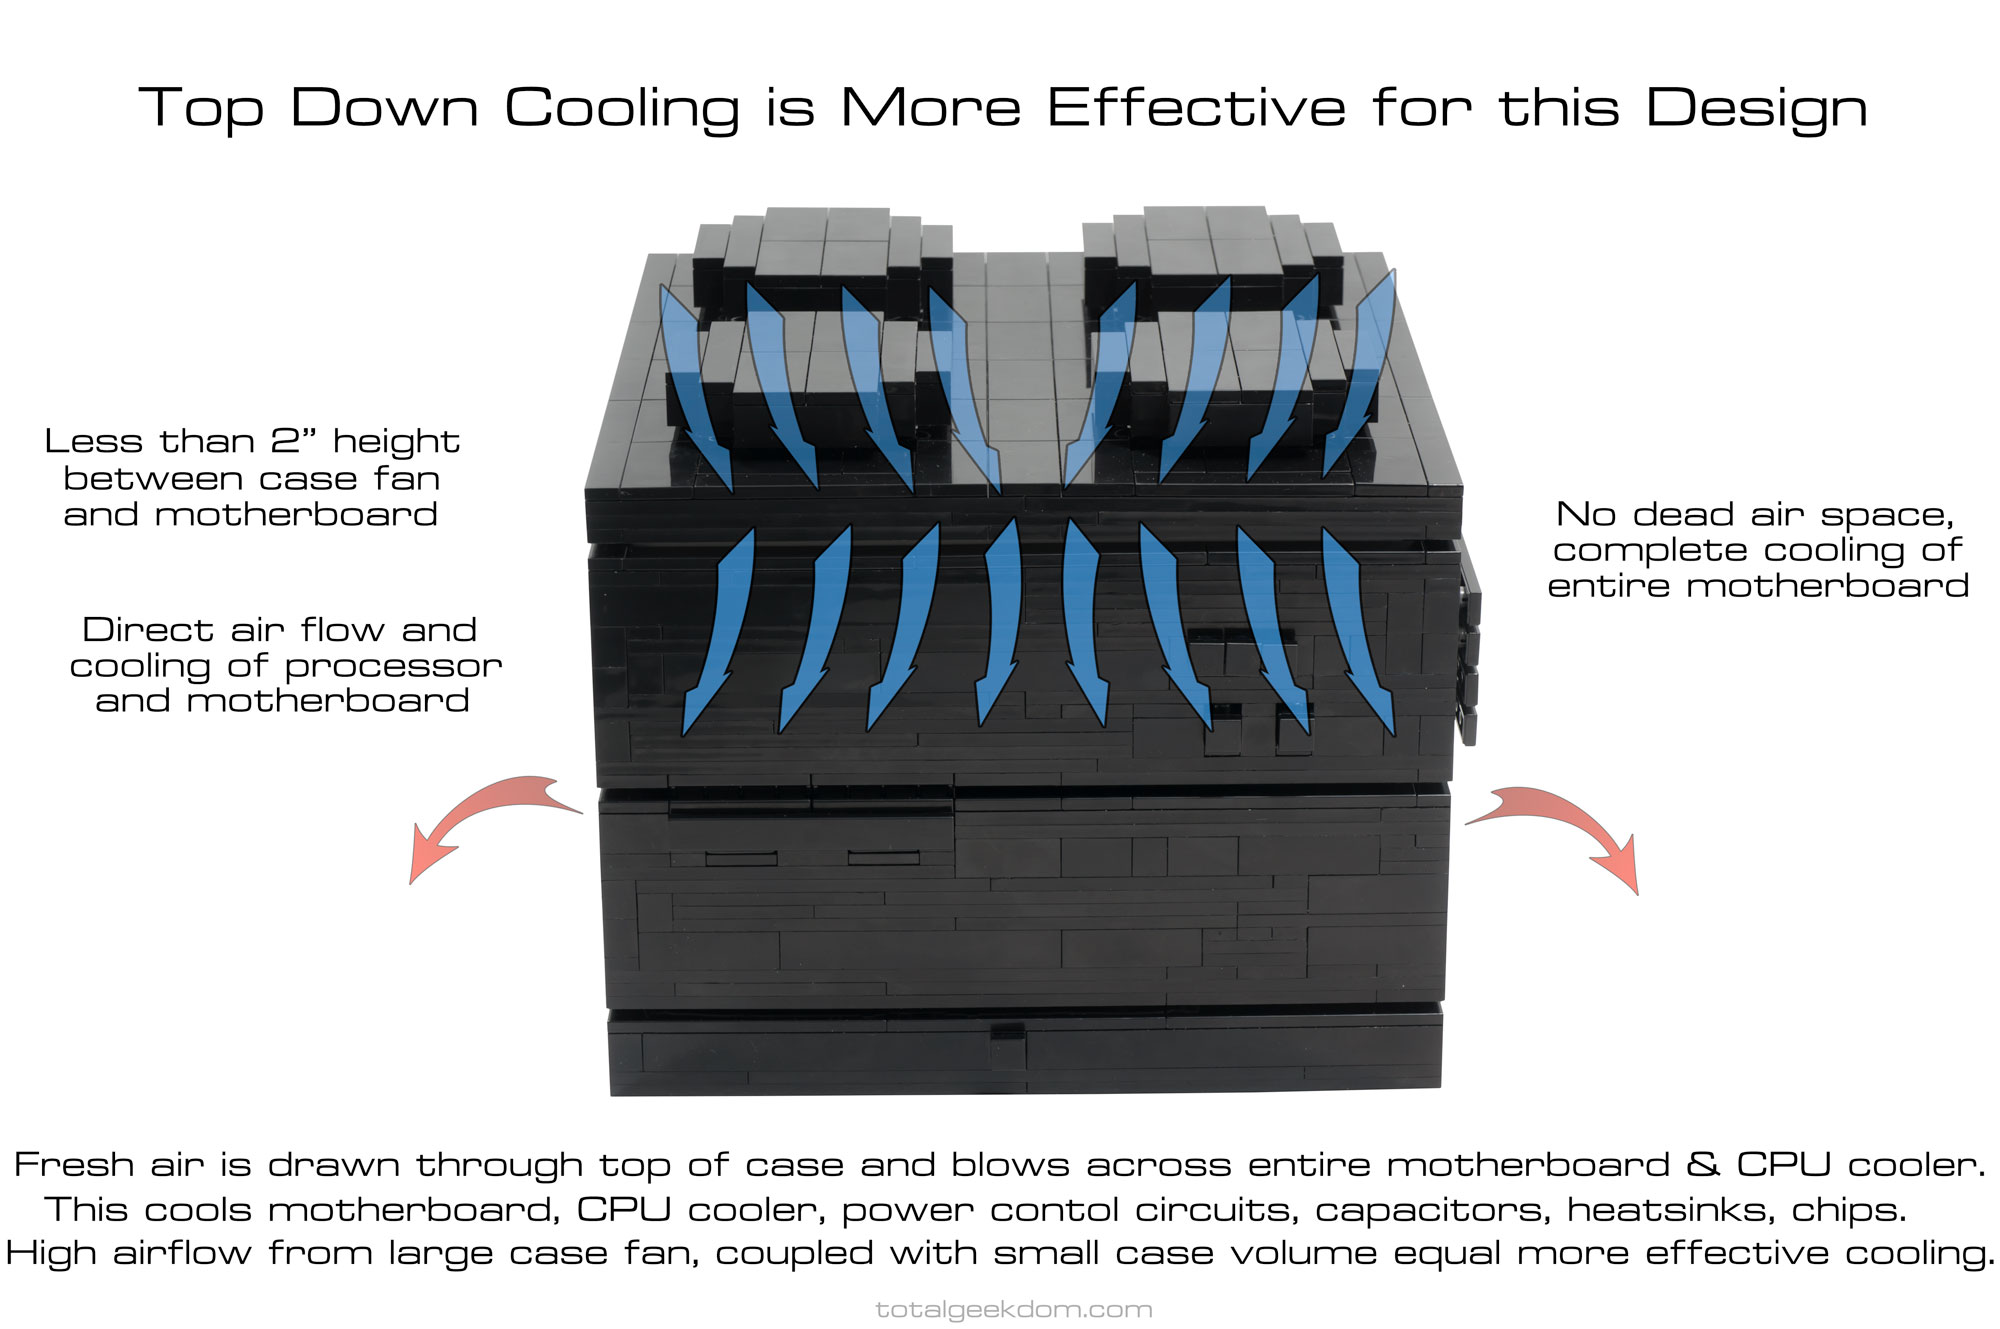
Lego Computer Case Airflow & Cooling Better Design
Airflow
A big factor in the design of this system was figuring out the thermal management. As anyone familiar with or involved with electronics will know, heat is the primary reason the electronic degradation. So, as with all my projects, for which I often find unique ways to utilize excess heat (Bio Computer) or develop new cooling methods (Wind Tunnel Computer), it was very important to me that the design incorporate active air cooling.
Conventional tower computer systems bought from big box stores get away with whatever the minimum requirements are for cooling. In most cases, this is a single fan in the rear of the computer that draws air through the whole system from a grill on the front. The downfall of this system is that it is passive in the way it cools most of the components. It’s basically just an air exchange system, with fresh air being drawn into the case to cool the components before it’s sucked out of the rear of the case. It’s not a bad system, but it can certainly be improved upon.
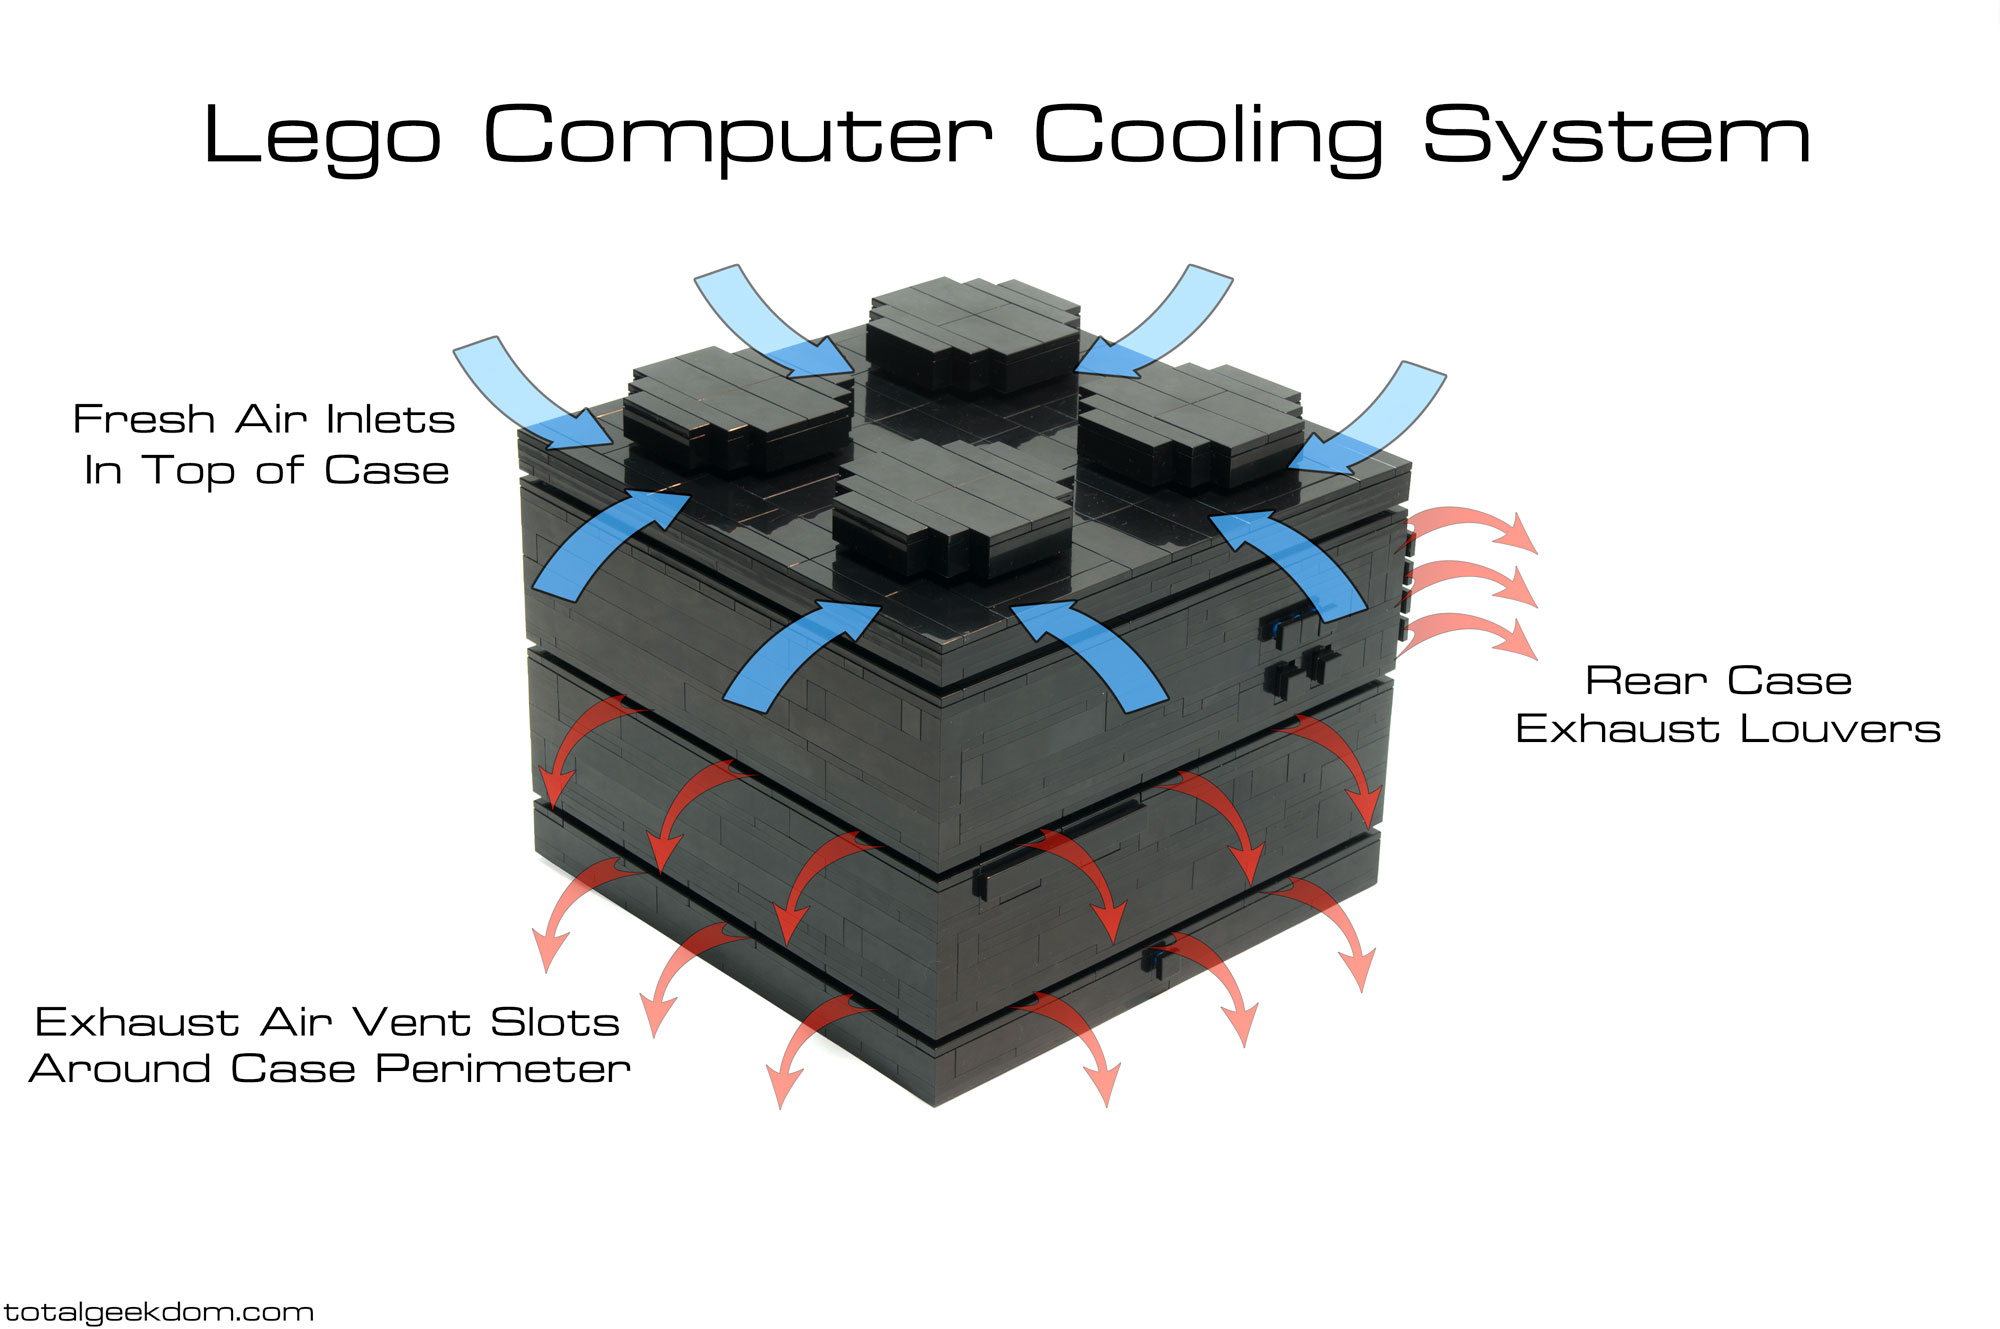
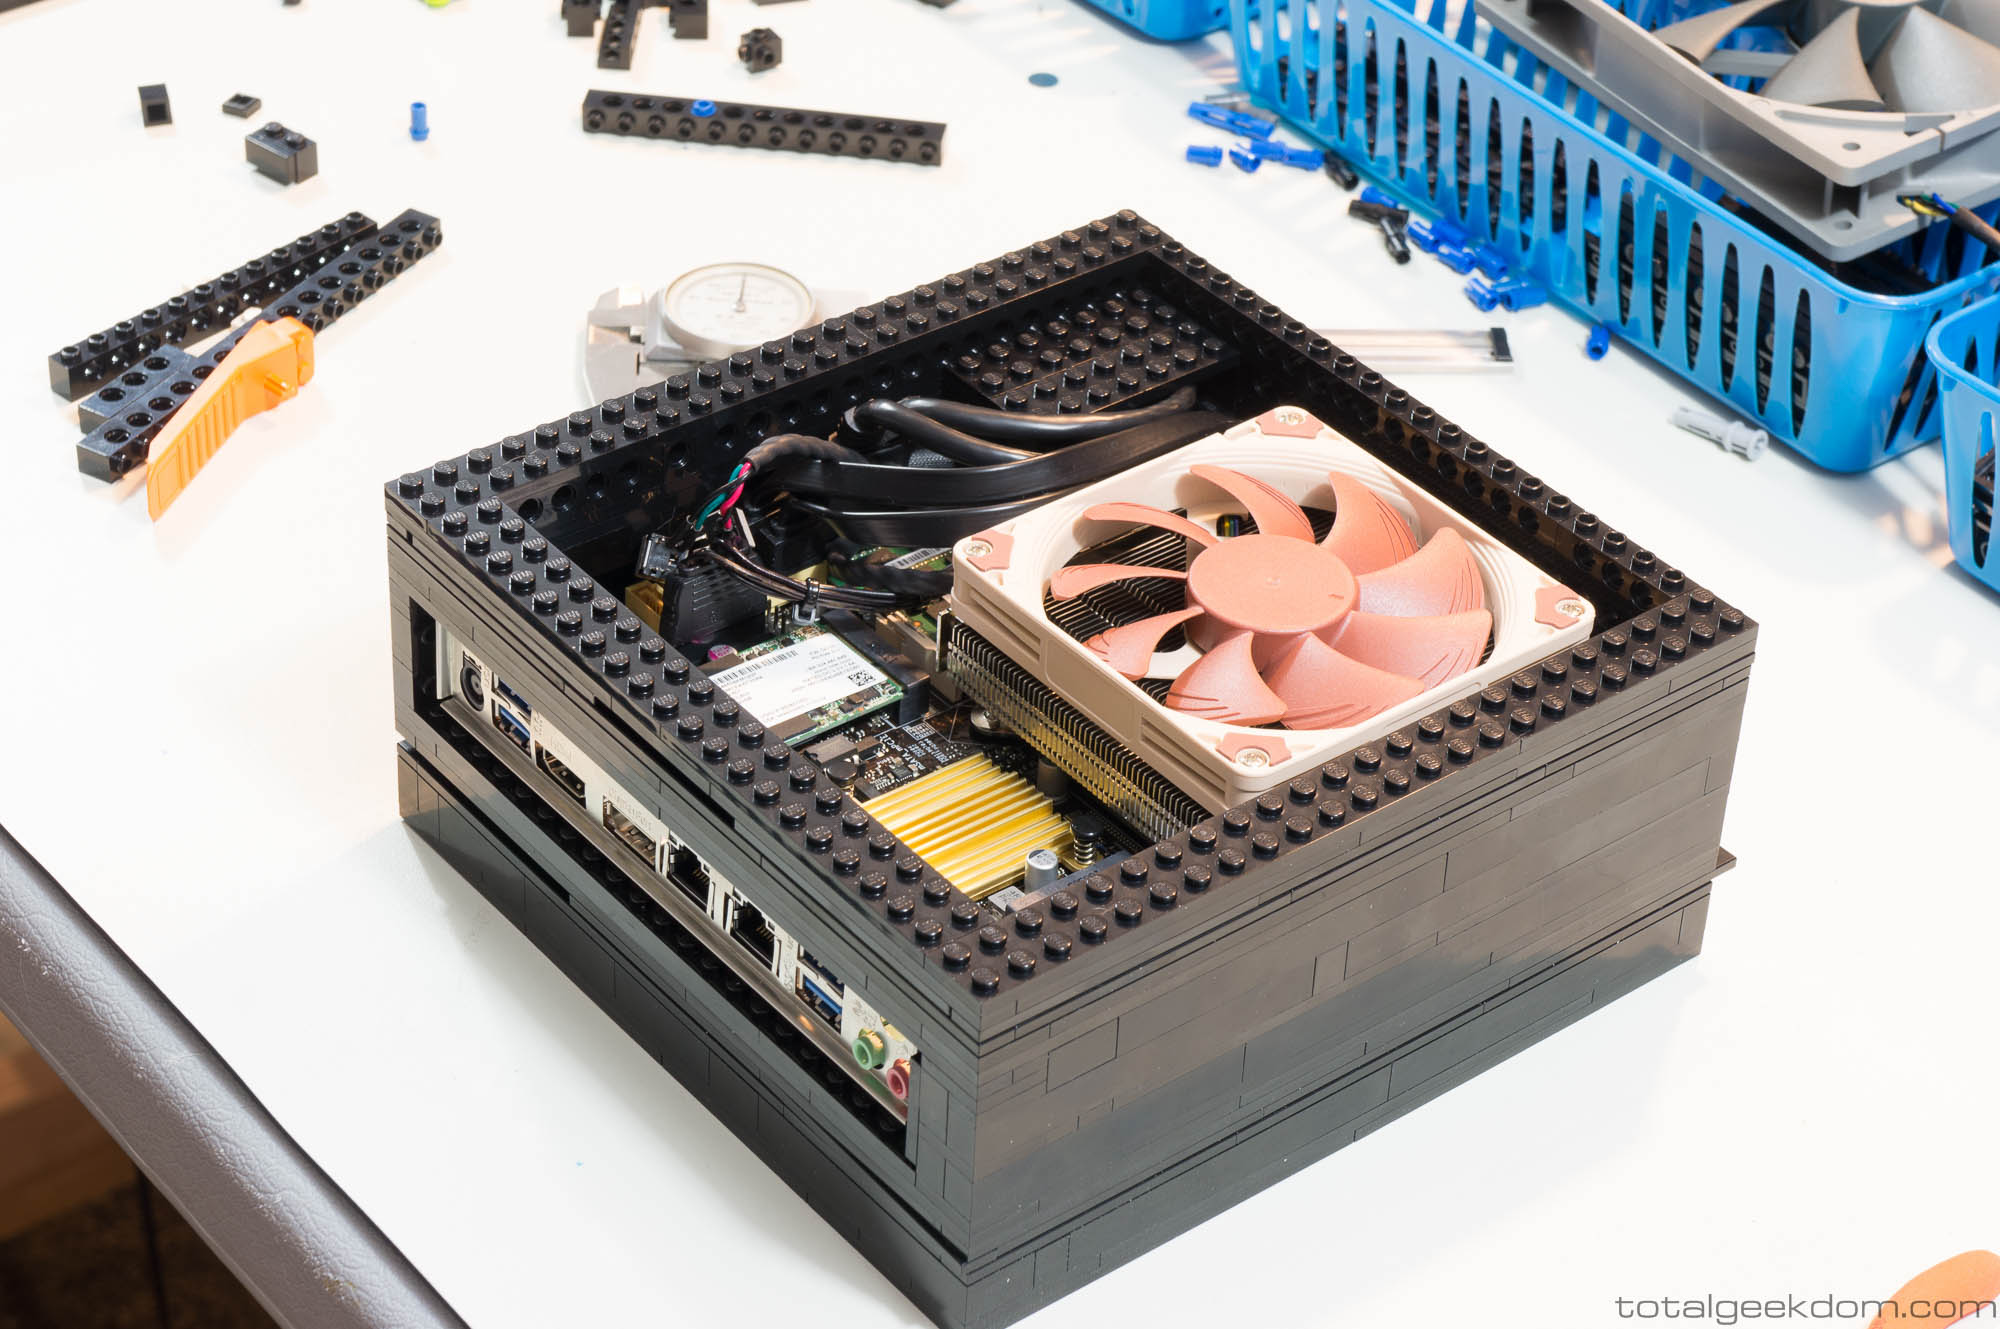
The system I came up with for the Lego computer draws in air that is blown onto the motherboard from just a few inches away. The fan is mounted directly above the motherboard and CPU cooler. This system allows all the components of the motherboard to get a constant stream of fresh air blown across them, ensuring that essential computing elements, such as the power management circuitry and chips, are constantly being cooled.
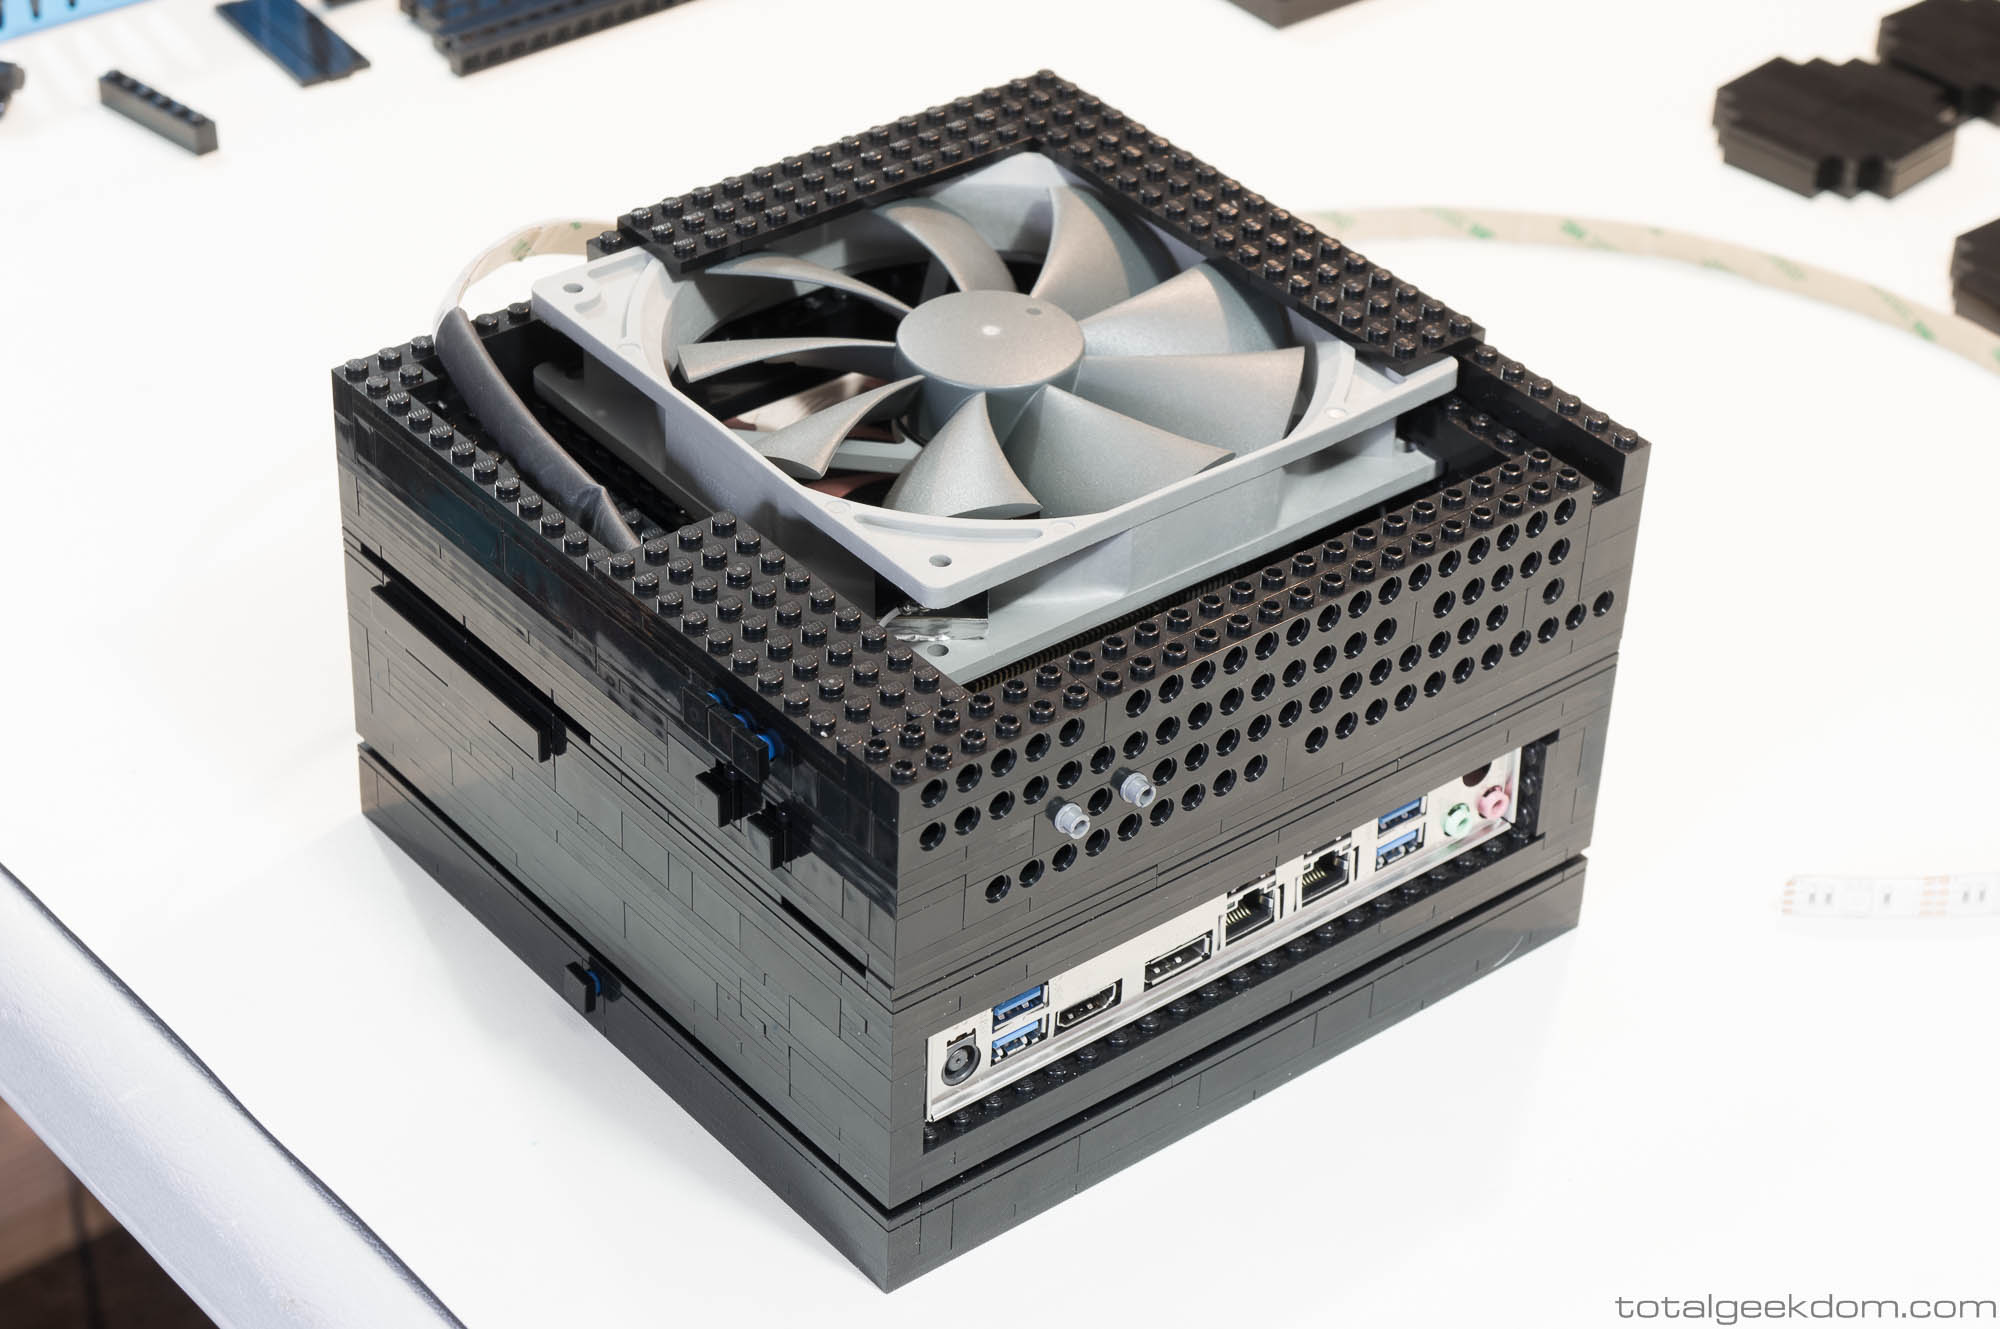
After the air is blown over the motherboard and CPU cooler, it moves to the upper back chamber of the case. Since the airflow is not comprised of direct fresh air at this point, this area of the case has no electronic components that require cooling; it’s just Lego. The whole upper back portion of the case is built to contain small holes that allow for heated air to exit the case, completing the airflow cooling system.
In addition to the upper air inlets and rear exhaust holes, there are two perimeter grooves that pass entirely around the case. On the outside, they look like they are there for aesthetic reasons, but they are far more functional. Behind the recesses lies the same Lego pieces that provide the holes for the exhaust, allowing for another path for air exchange to help cool the system.
The fans I chose for this system are not the cheap fans you would get in most big box computers from the majority of computer suppliers. These are very high end Noctua brand fans, renown in the computer building community for their combination of high airflow and low noise and excellent life span. They cost 5-6 times more than regular PC fans, but the price difference is completely worth it. They allow the system to be very quiet while still providing excellent cooling. They also outlive most systems. Both the CPU cooler and its fan, as well as the system fan, are made by Notcua.
The air inlet fan, mounted on the top of the system is 140mm, is much larger than the more common 80mm and still larger than the also common 120mm fans. This allows for a lower fan RPM with more cooling power in comparison to smaller fans, resulting in lower noise levels.
The upper air intake is designed to incorporate inlet air from the top of the system and is concealed in the various designs available for the top of the system.
The cooler for the processor is based on more expensive and advanced technology than what is sold in big box computer systems. It is a heatpipe cooler that features hollow heat pipes filled with a liquid coolant that moves heat by evaporating and condensing in an endless cycle, providing more effective thermal transfer and cooling ability than the aluminum heatsinks that are typically used for processor cooling.
(Note) I received a lot of questions in regards to the airflow and direction being top down. This section mostly explains the reasoning, but to be a little clearer I’ve added some illustrations showing why conventional case cooling is not effective for maximum cooling.
The most common question being “Doesn’t heat rise?”
Yes, heat rises, and in a conventional case that has a a large air volume (desktop case) airflow is designed to work with convection. Also because it’s cheap and suffices. But in this system I wanted to employ a much higher performance cooling system. I wanted direct airflow across the entire surface of the motherboard, that is why the cooling system is designed the way it is. In a large volume case with low airflow (most standard desktops) there is minimal airflow in the case, usually just enough to exchange the heated air for fresh air. In the Lego Computer the case volume is almost 20 times smaller than a normal case, and when coupled with a large high flow fan this creates a very efficient system for quickly moving fresh air into and out of the system, cooling all the components.
The best analogy I can think of is to imagine a regular computer case as a refrigerator in size, but using just a single 12″ box fan for airflow. You can probably see how that wouldn’t create a lot of airflow in a space that size, you wouldn’t really even feel it in most of the refrigerator. Now imagine that same 12″ box fan, but connected to something the size of a desktop computer. You can probably imagine how much more flow you would feel inside that much smaller space with the same size fan.
I went through and tested the various arrangements for flow during development. Using an infrared temperature gun as well as surface probes on the components, I tested the temps with each of the airflow arrangements (top-down flow, bottom-up flow, cross-flow). The most effective system was top-down flow, it resulted in the lowest measured temps. This direct airflow approach and case design is the most effective for cooling all the components.
Processor
In keeping in line with my desire to have this system fully capable for the majority of users, I wanted to use a processor that wouldn’t struggle to keep up with regular to heavy usage, light to medium gaming and HD video playback. A lot of small form-factor computers use dual core processors, and while these are not bad processors, they don’t really offer a lot of performance for more than just basic use. I decided to incorporate a dual core Intel i3 processor (i3-4160) for the base system, so that users that didn’t need a lot of processing power had an option. For users that need more power, however, the quad core Intel i5 processor (i5-4590s) and the even more powerful high-end quad core Intel i7 processor (i7-4790s) are also available as options.
These processors are the latest 4th gen Haswell processors available for desktop use. In comparing a lot of small form-factor systems, I found that other systems used mobile versions of these Intel chips, generally due to their ease of cooling. Their downfall, of course, is that performance is compromised with these chips in comparison to their full-power counterparts. It was therefore imperative for me that my Lego system was not compromised, and its unique cooling design made it possible to incorporate higher-performance full-power processors.

Lego Computer Motherboard
Memory
In a lot of contemporary desktop systems and smaller form-factor all-in-one systems, memory is kept at 4GB in the base configuration. While that will work for light usage, it’s really not enough these days. Outside of increased affordability, there is no justification to buy a system in 2015 that has less than 8GB of memory. For this reason, the base system configuration of my Lego system comes with 8GB of memory with a 16GB option.
Drives & Storage
I didn’t want to sacrifice any performance in terms of system storage, so I went with SSDs as the primary storage drive. Solid State Drives (SSDs) are vastly superior to mechanical spinning disks, offering much faster read and write speeds and almost instant seek times. I chose to use the on-board mSata port on the motherboard, which in the base system can be configured with a 120GB Intel SSD, and if desired, larger drives are available, all the way up to 1TB.
In addition to this drive, there is also space for a secondary SSD/HDD drive. Built into the lower of the case, this option allows for either a secondary fast SSD drive, or a conventional HDD drive for storage. The secondary drive also allows for sizes up to 1TB.
Allowing for dual SSD gives the benefits of very high performance. While there are drives that are slightly faster than the Intel SSD drives, their performance is only marginally better at a slightly higher price point. Affordability and durability were both considerations in developing this system, and the Intel drives offer an outstanding 5-year warranty.
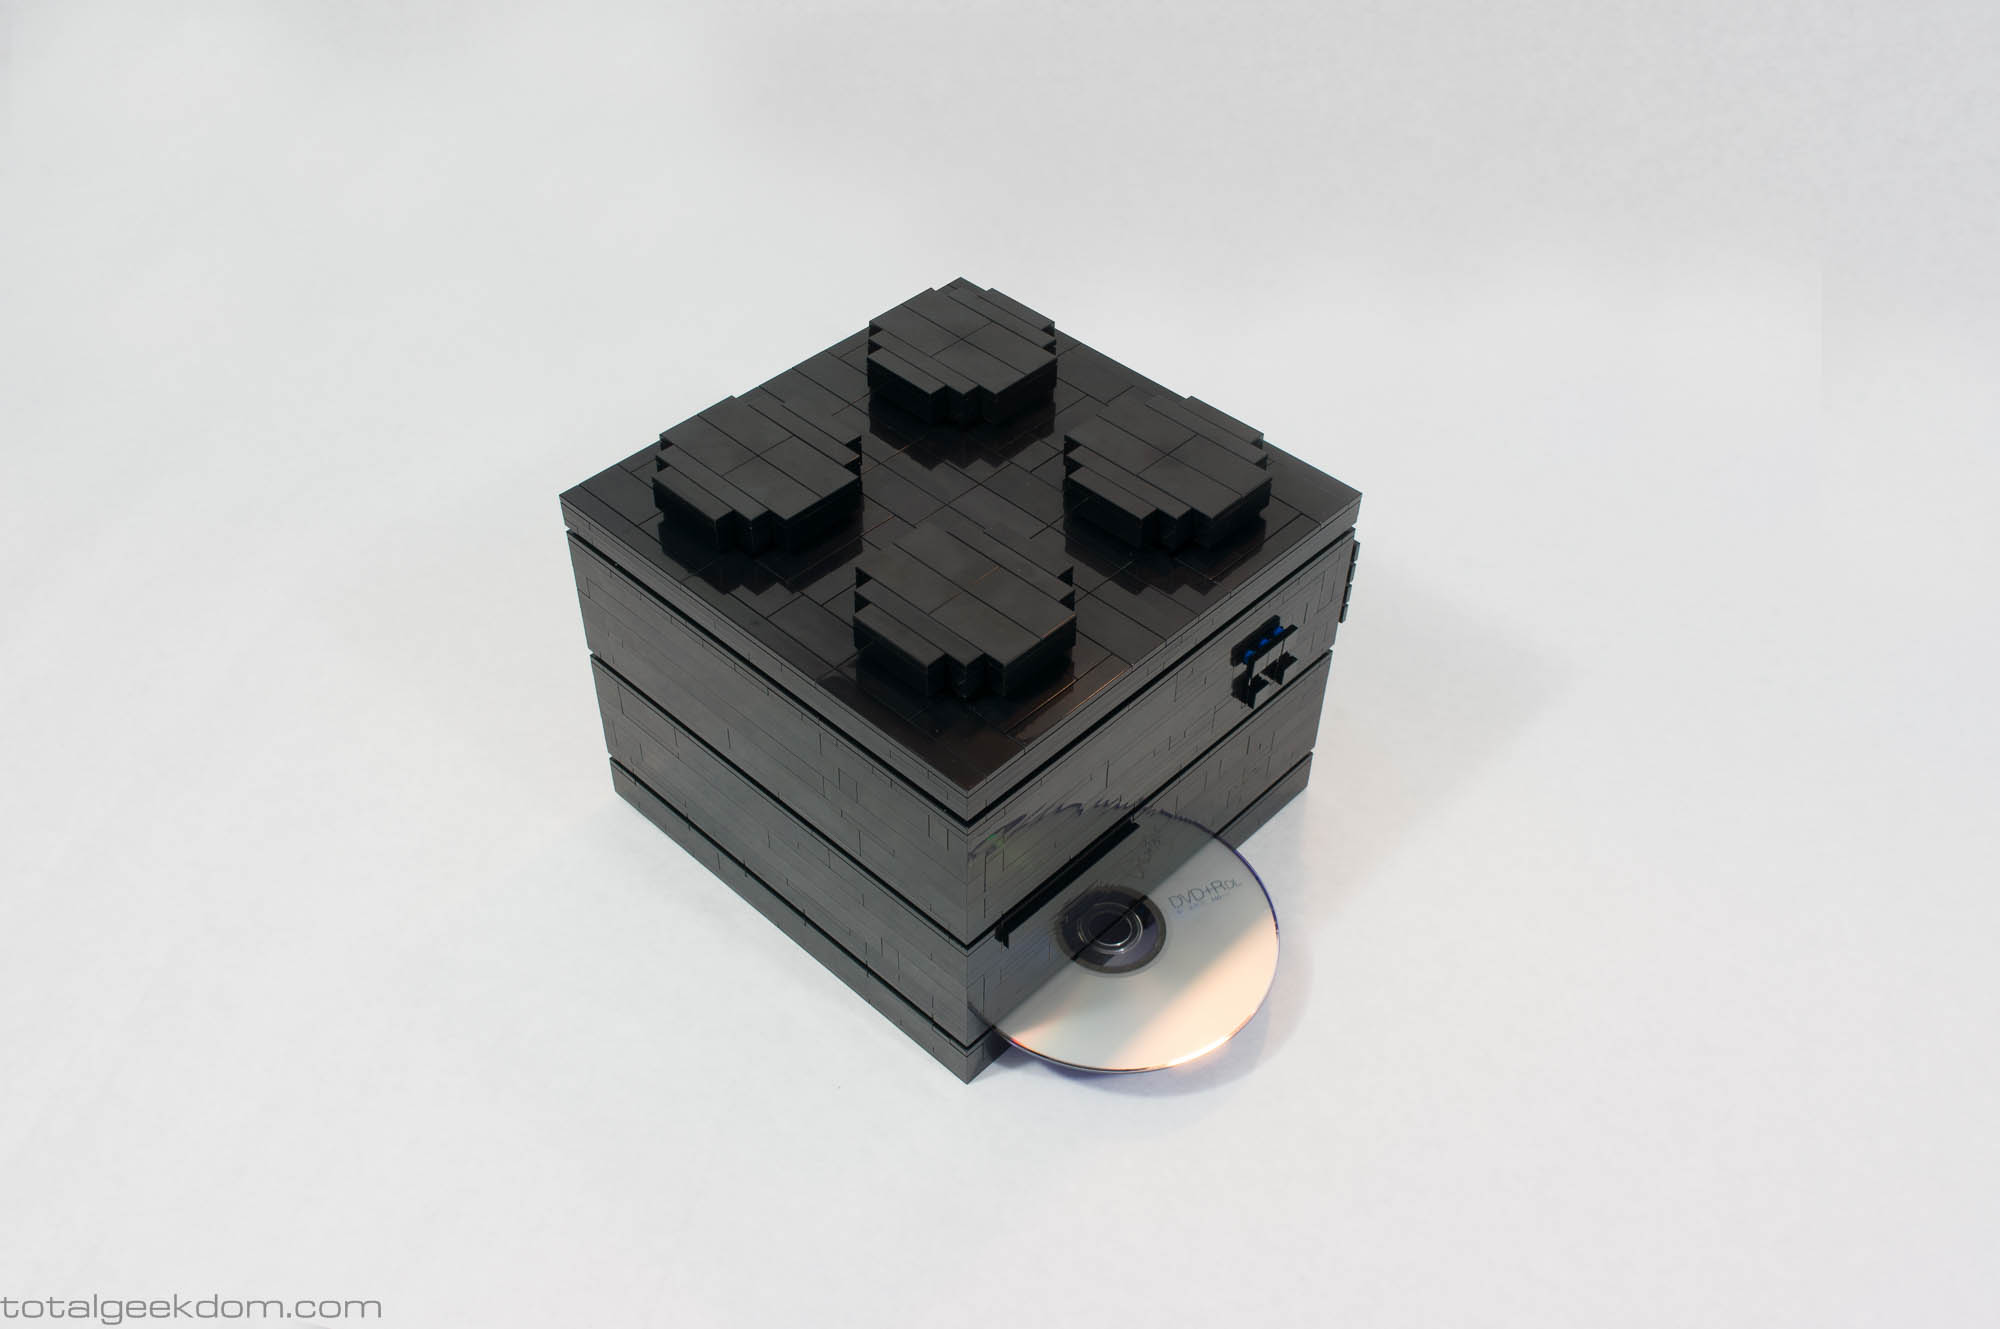
While more and more frequently optical drives are becoming replaced with USB flash storage, optical drives are still essential for many computing tasks, and not having one can be frustrating and time consuming. I therefore outfitted this system with a discrete DVD/CD combo drive for reading and writing optical discs with the option of Blu-ray drive as well.
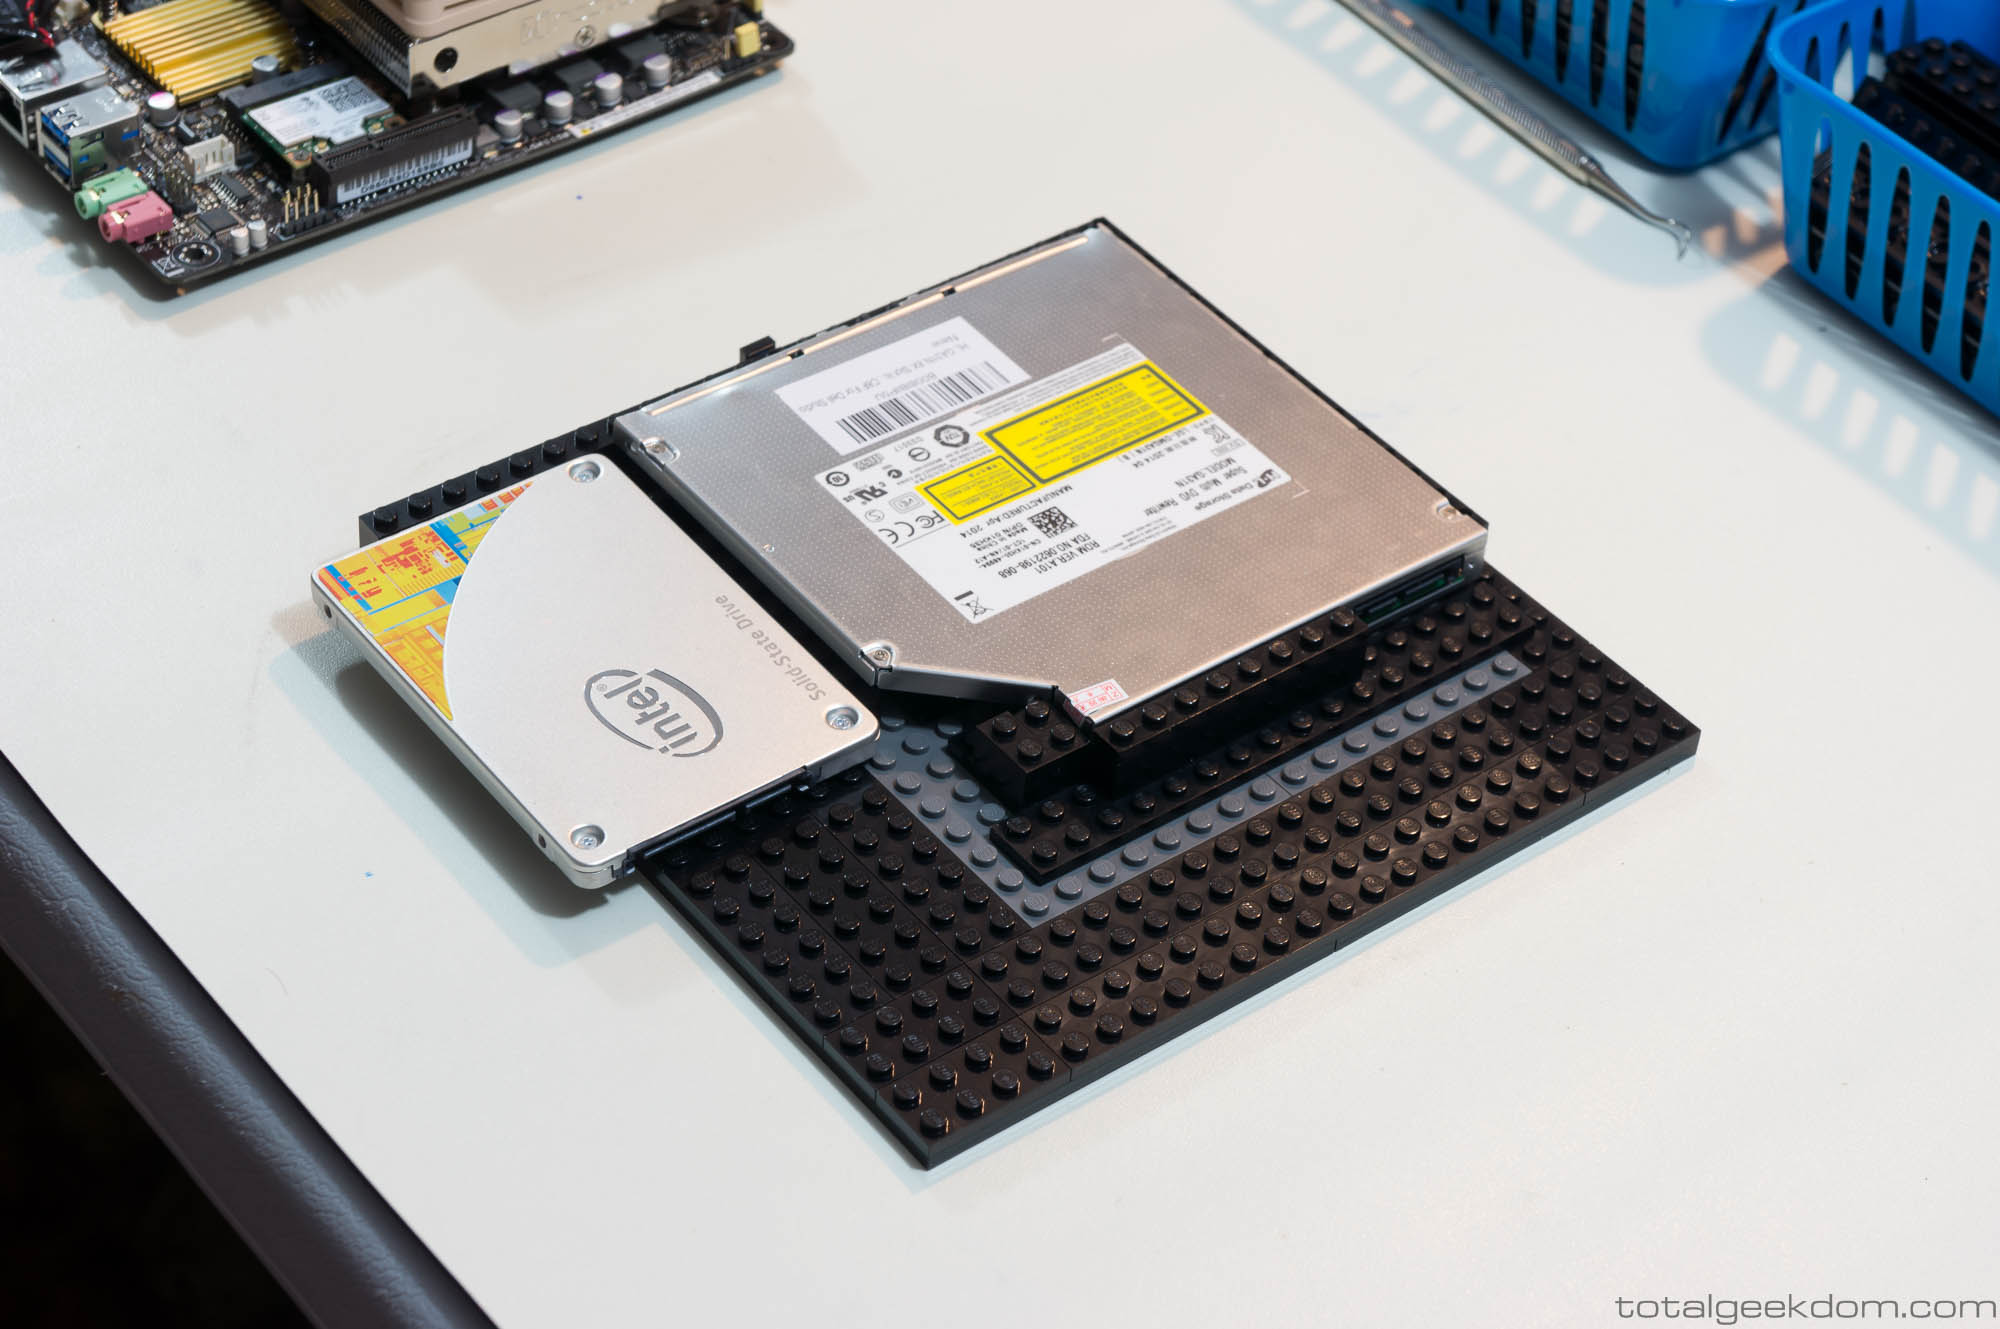
Lego Computer SSD & DVD/CD Drive
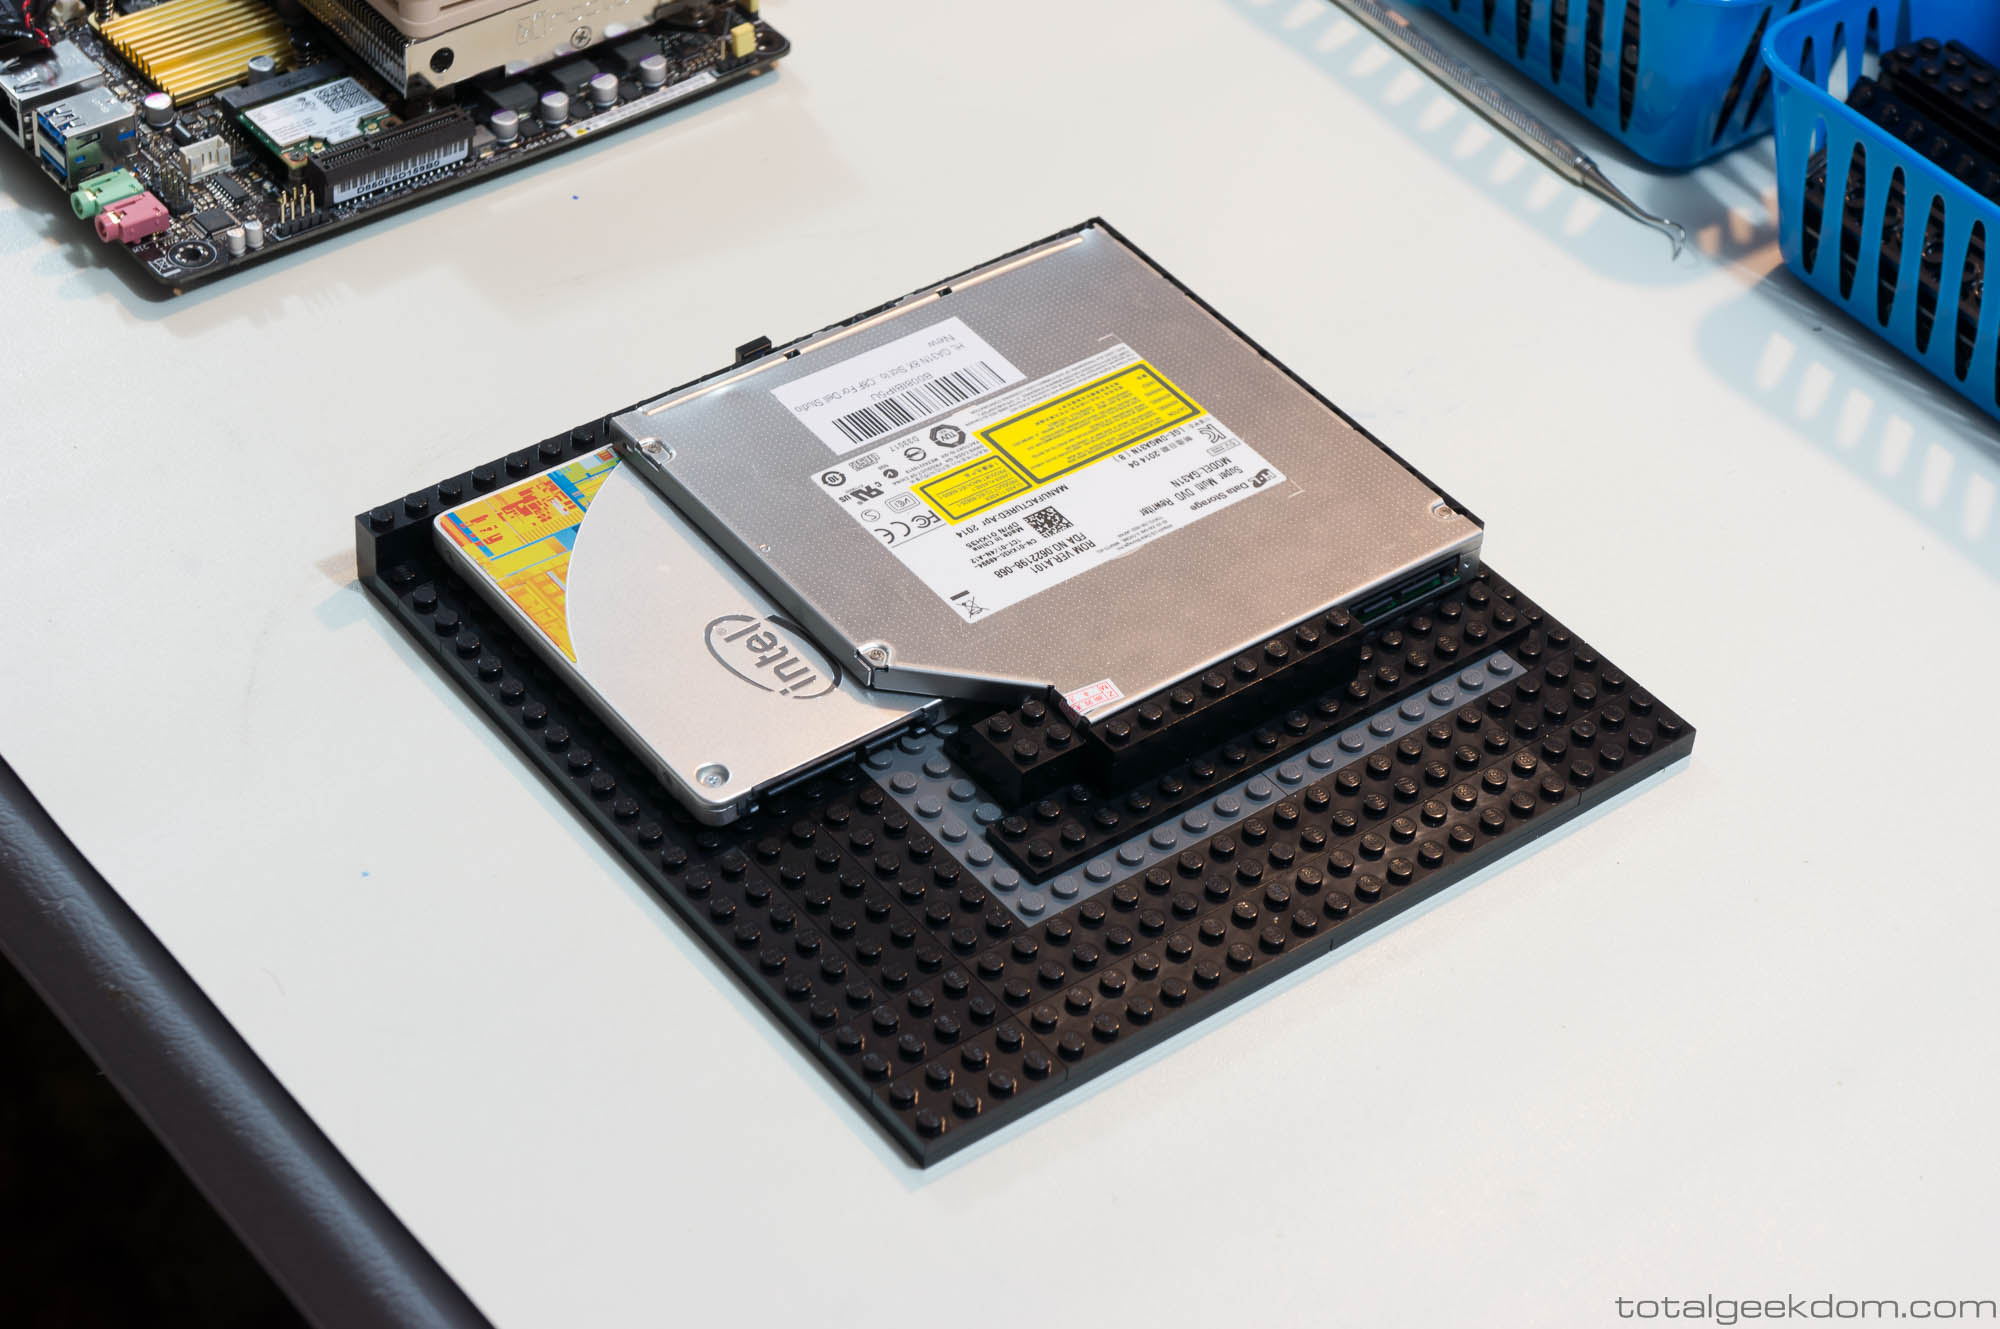
Lego Computer SSD Drive Installed
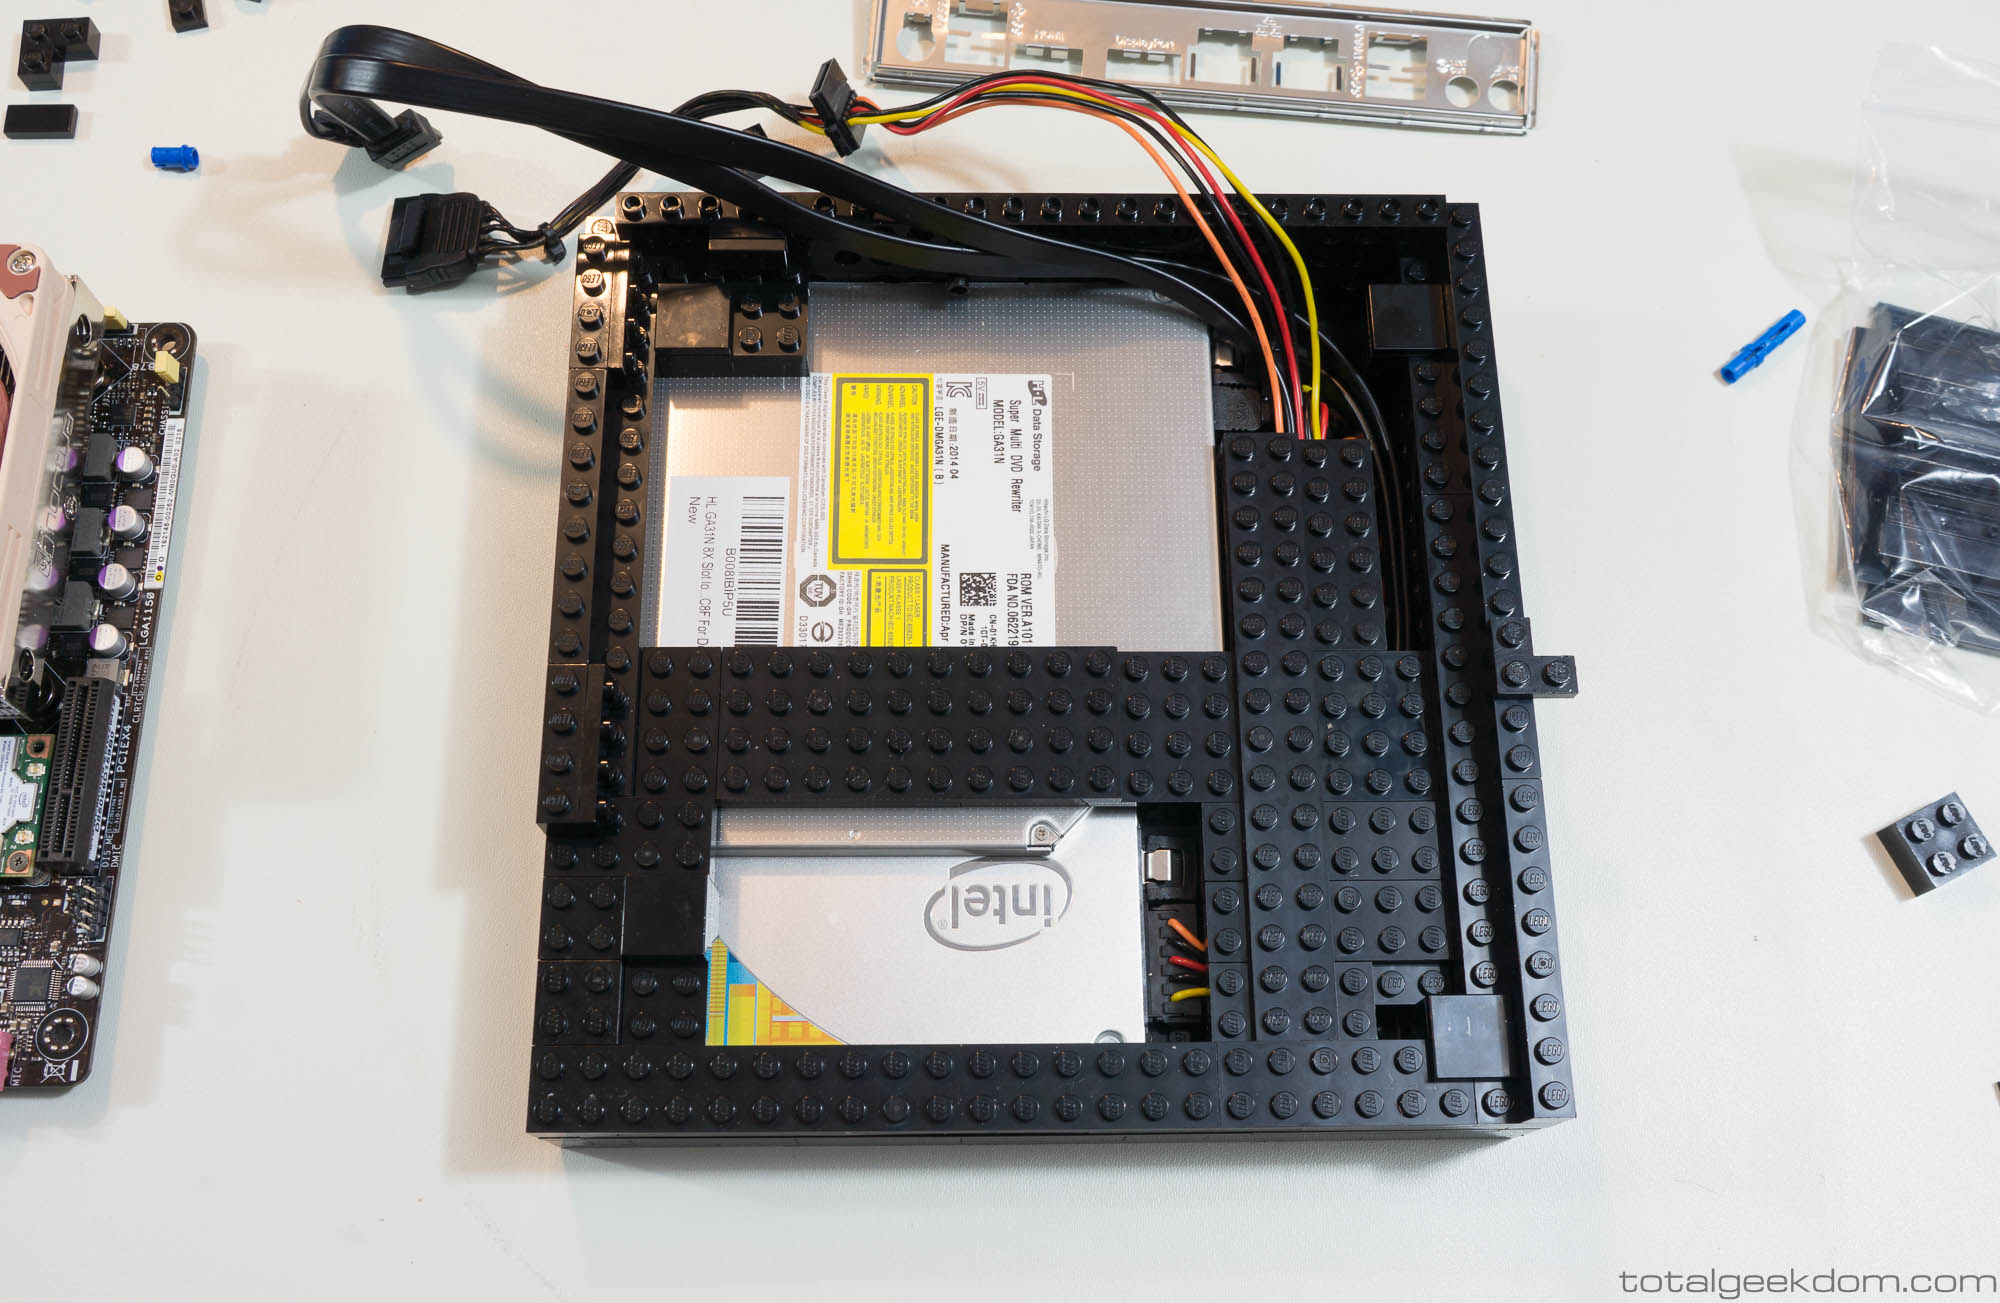
Lego Computer Base and Wires
Lego Computer DVD/CD Eject Button
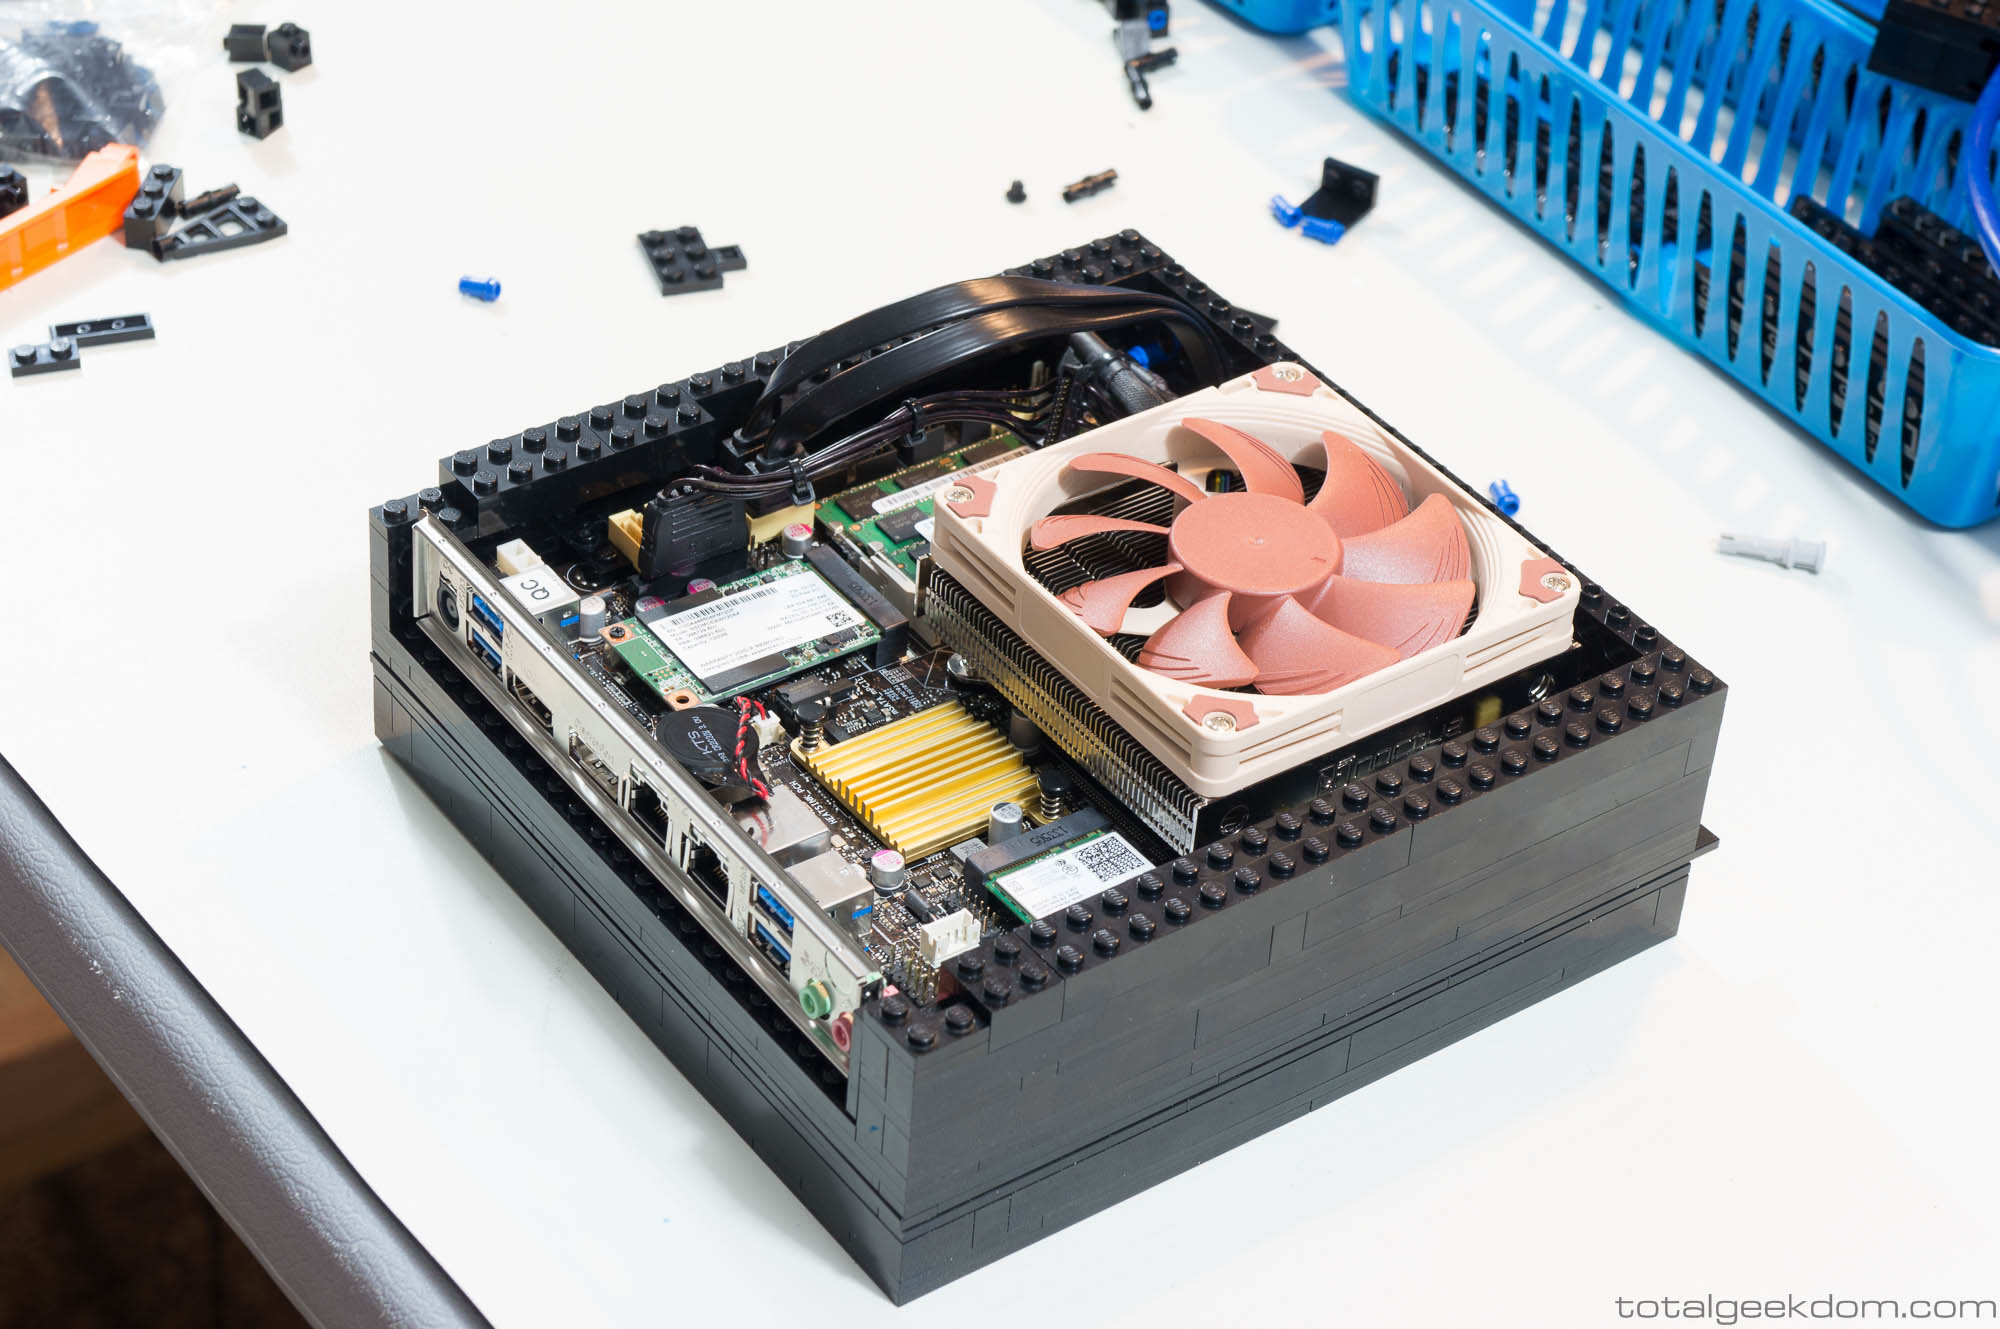
Lego Computer Rear Panel and Motherboard
Lego Computer Wired

Lego Computer Fan Wiring

Lego Computer Case Fan
Lego Computer Case Buttons
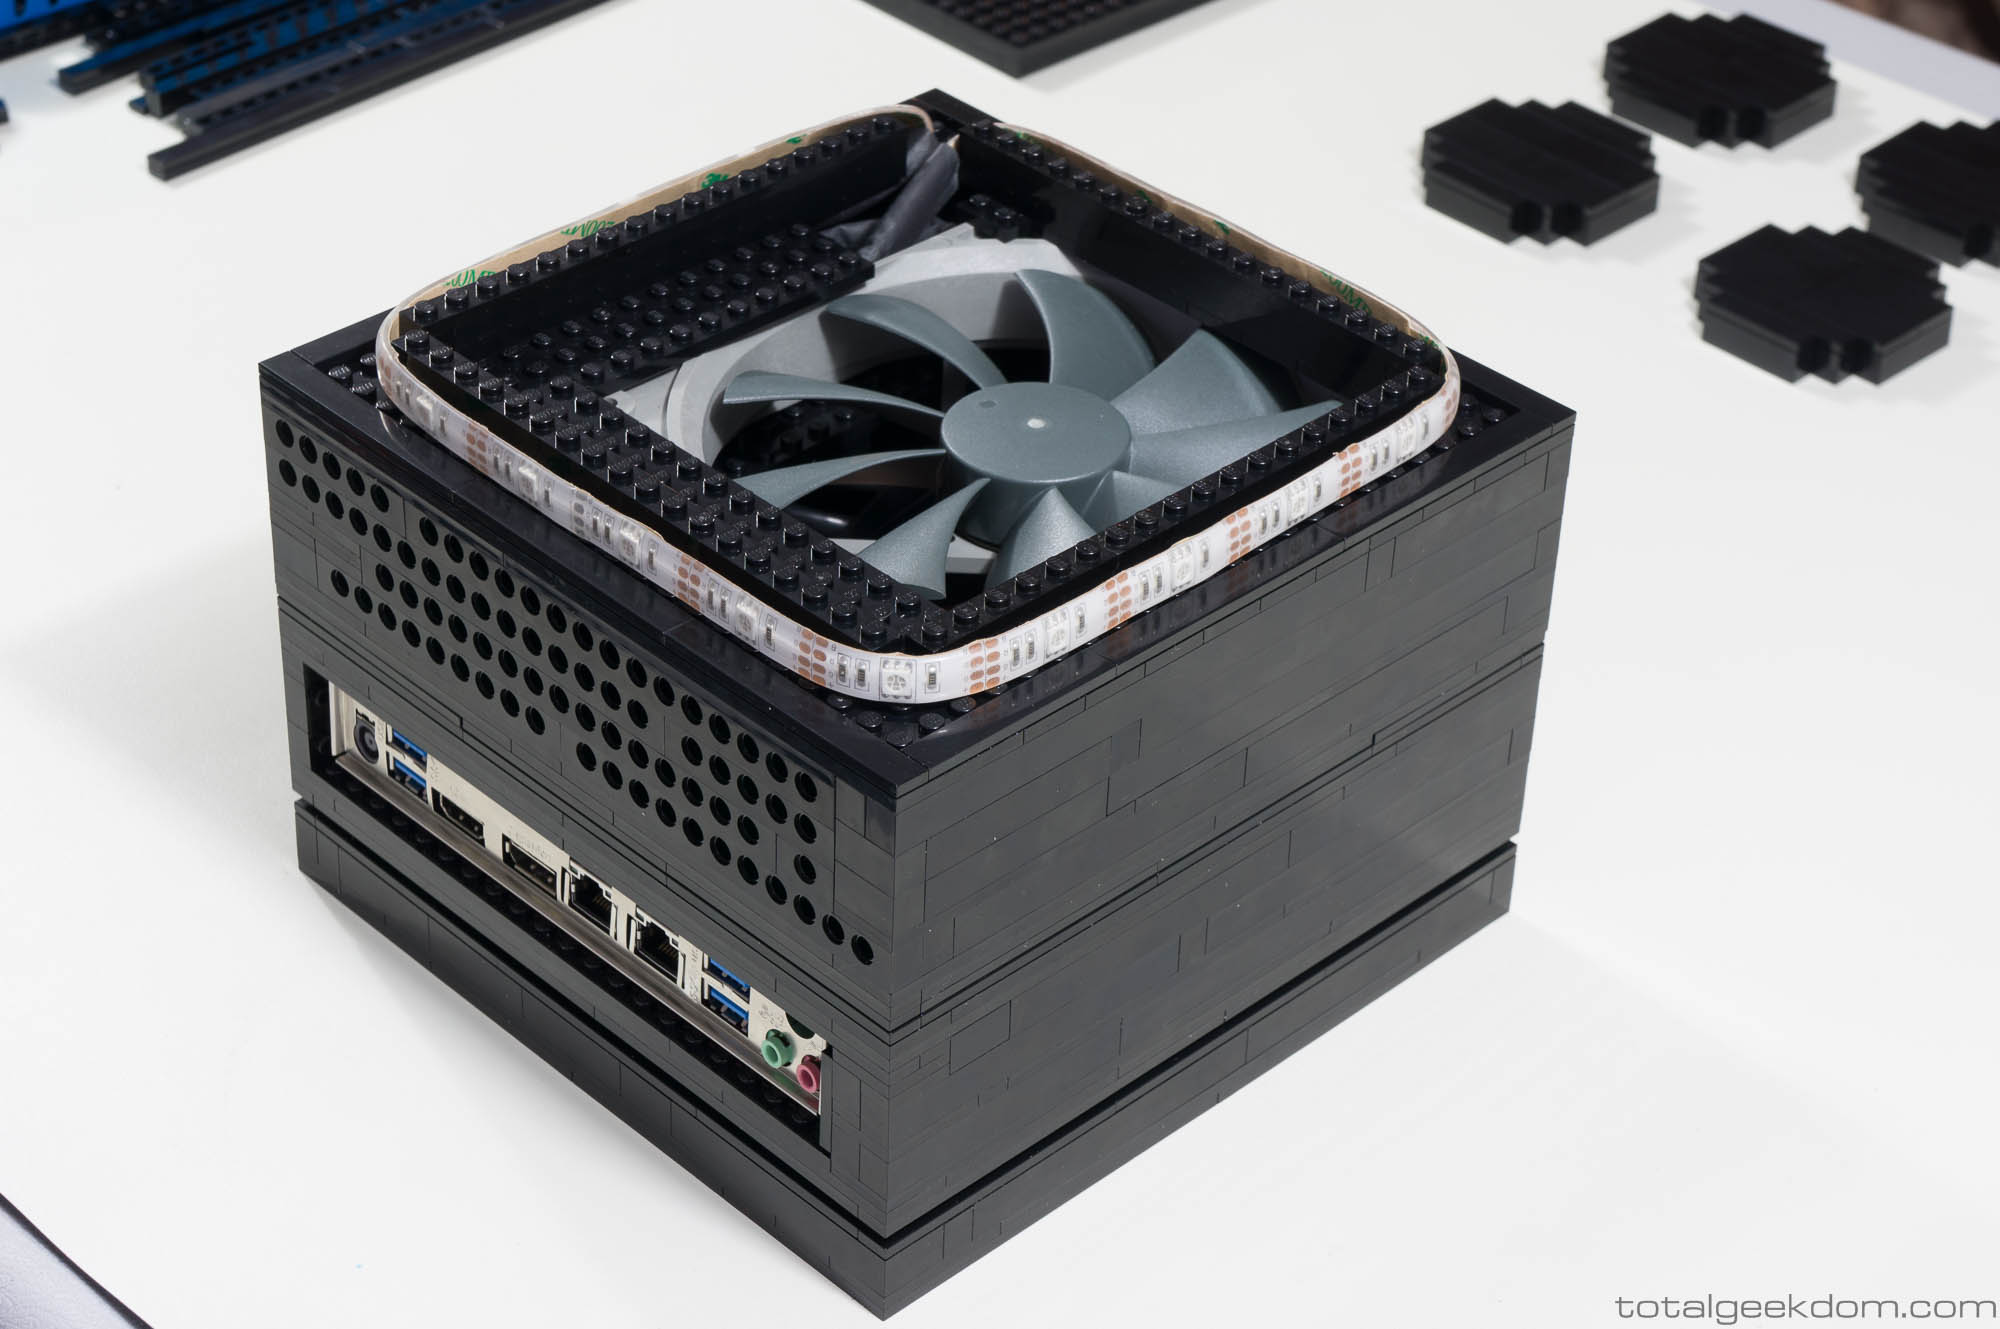
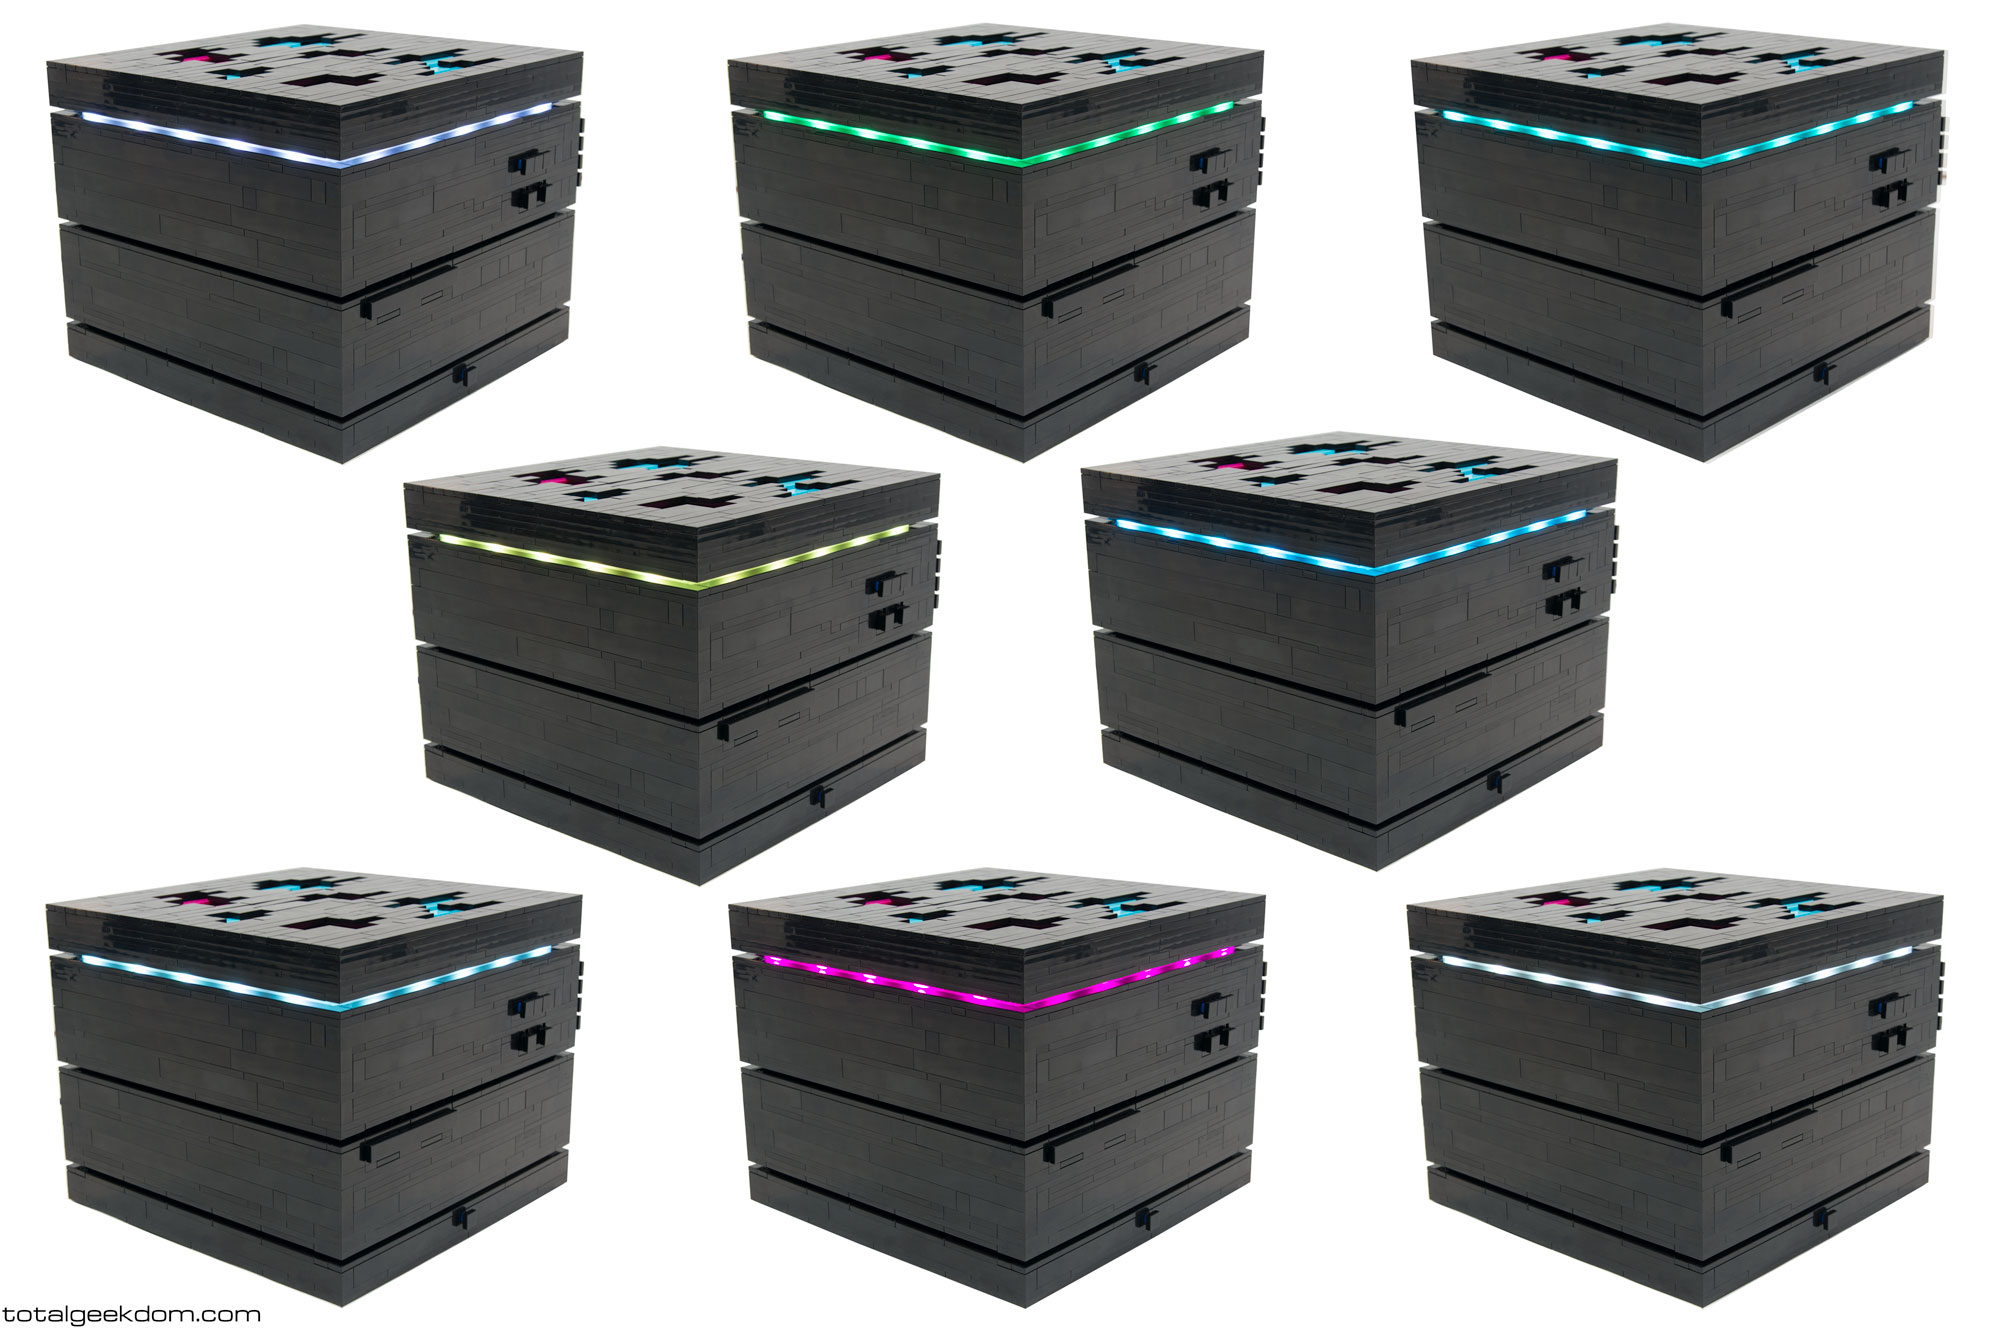
Lego Computer LED Lights
Lego Computer
System Testing
In order to ensure that the Lego Computer was completely stable, I spent considerable time testing the system. This involved using various stress testing applications and running the system continuously to ensure reliability. These stress testing applications work by maxing out the processor, memory and graphics sub-systems at 100% utilization for up to 24 hours straight to ensure reliability. The Lego Computer passed all tests with flying colors – literally, because of the LEDs.
Once all the design, building, re-building and testing was done, I finally had a finished Lego Computer that I was happy with – even if it took longer to complete than I originally planned. Being pleased with the final product was so much more important to me than the endless hours I spent tinkering. And I’m happy to say that I’ve met all of my initial criteria – and then some – to produce an affordable, durable, reliable small form-factor computer system with a unique aesthetic that appeals to a broad audience and is capable for essentially all computing tasks.
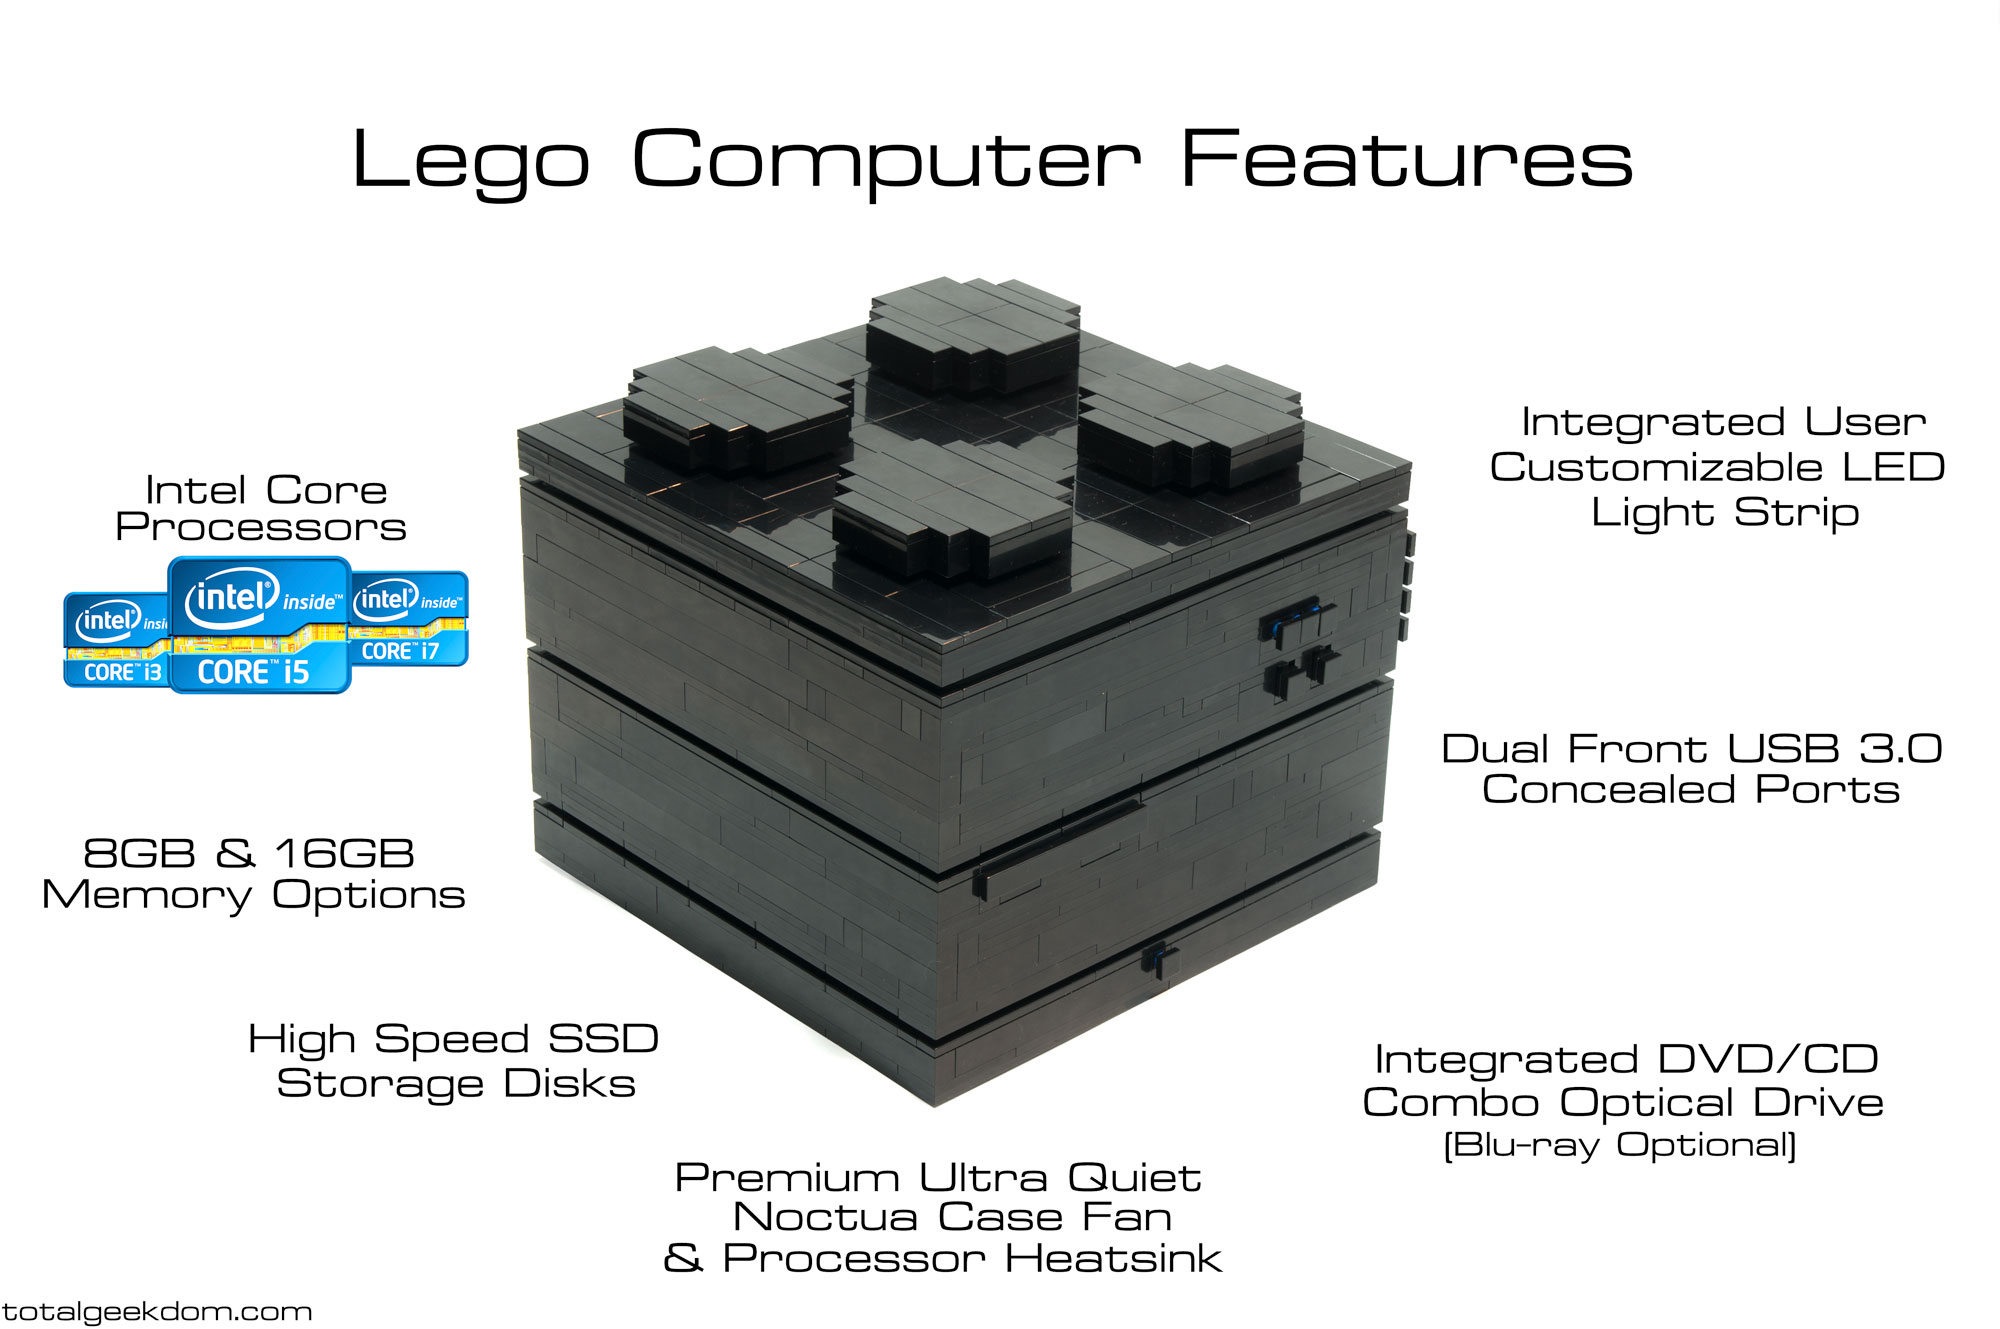
Lego Computer Features
System Specs
Case
-Uniquely Designed with Brand New Lego and Possible Customization (Multiple Color Options)
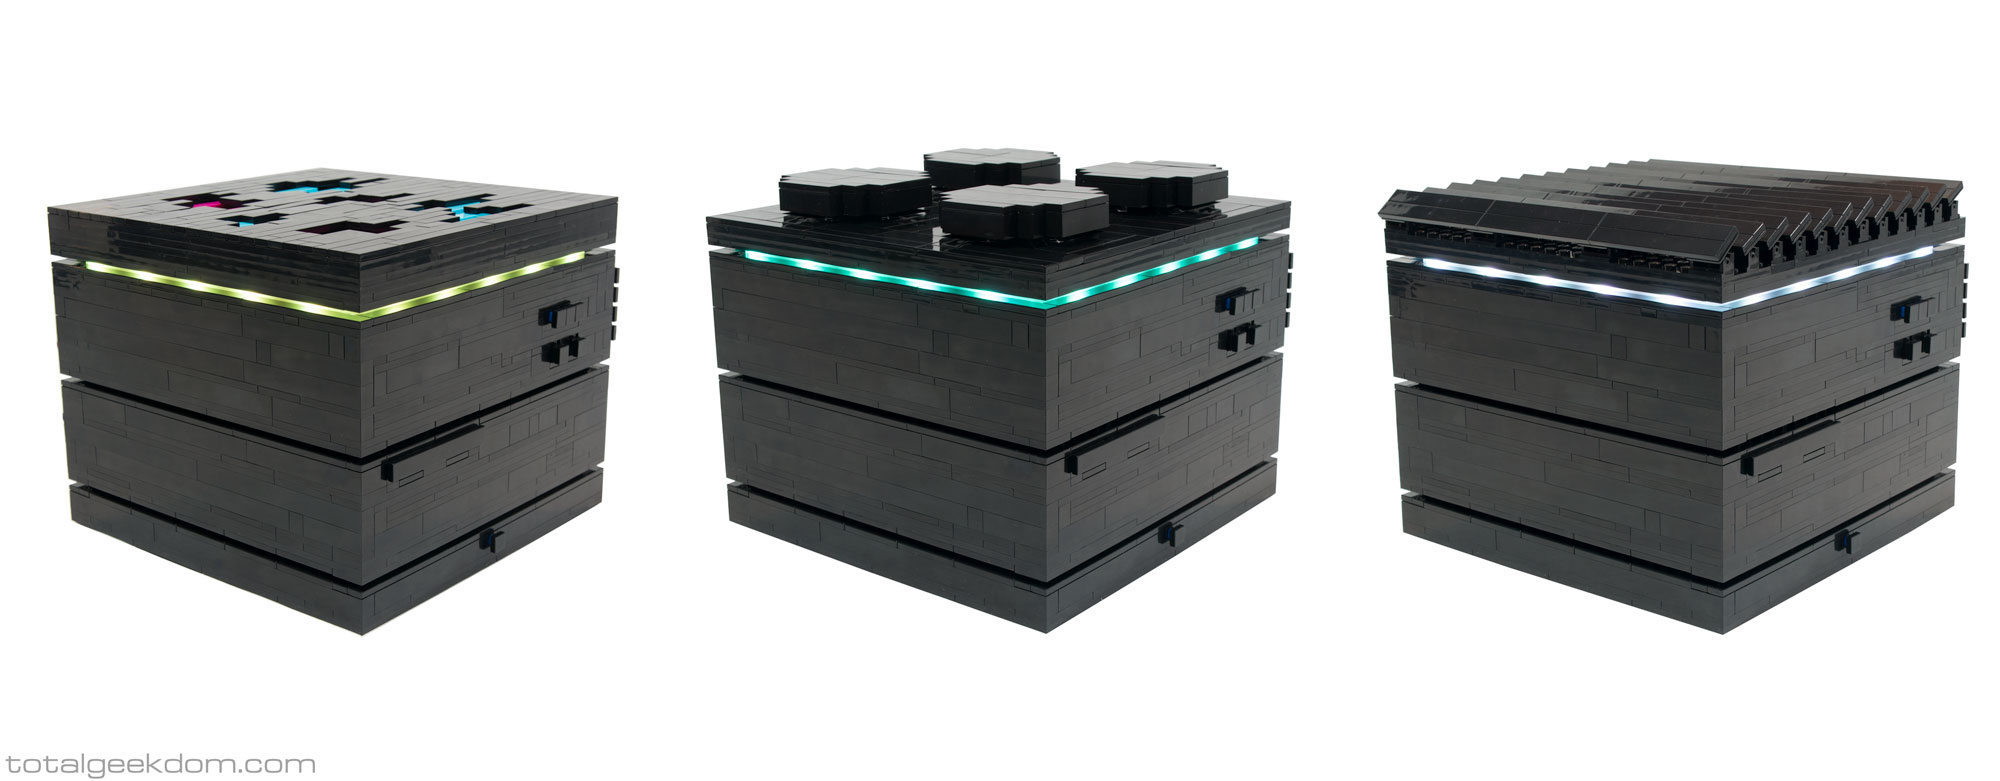
-Integrated 360 Degree LED Light Bar (20 Colors, 5 Dynamic Modes, On/Off Capability)
-Multiple Top Options (Lego Cube Design, Color Panels Design, Louvered Fins Design)
Processor Choices
-Intel Core i3-4160 Dual Core
-Intel Core i5-4590s Quad Core
-Intel Core i7-4790s Quad Core
Memory
-8GB LPPDDR3
(Upgradable to 16GB)
Storage
-120GB Intel Series 530 Msata SSD
(Upgradeable to 250GB, 500GB, 1TB)
(Secondary SSD/HDD up to 1TB Available)
Optical Drive
-DVD/CD Combo Superdrive
(Upgradeable to Blu-ray Combo Superdrive)
Ports
-Displayport
-HDMI
-USB 3.0 (4 Rear Ports + 2 Front Ports)
-LAN (Dual Ports- 1 Intel + 1 Realtek)
-Audio
-Microphone
Wireless
-Intel 7260 WiFi (AC)
-Intel Bluetooth 4.0
Efficiency
-High Efficiency Energy Star Level 5 Rated Power Supply
-Low Energy Usage
Operating System
-Windows 7/8 Available (Windows 10 Capable)
-Linux
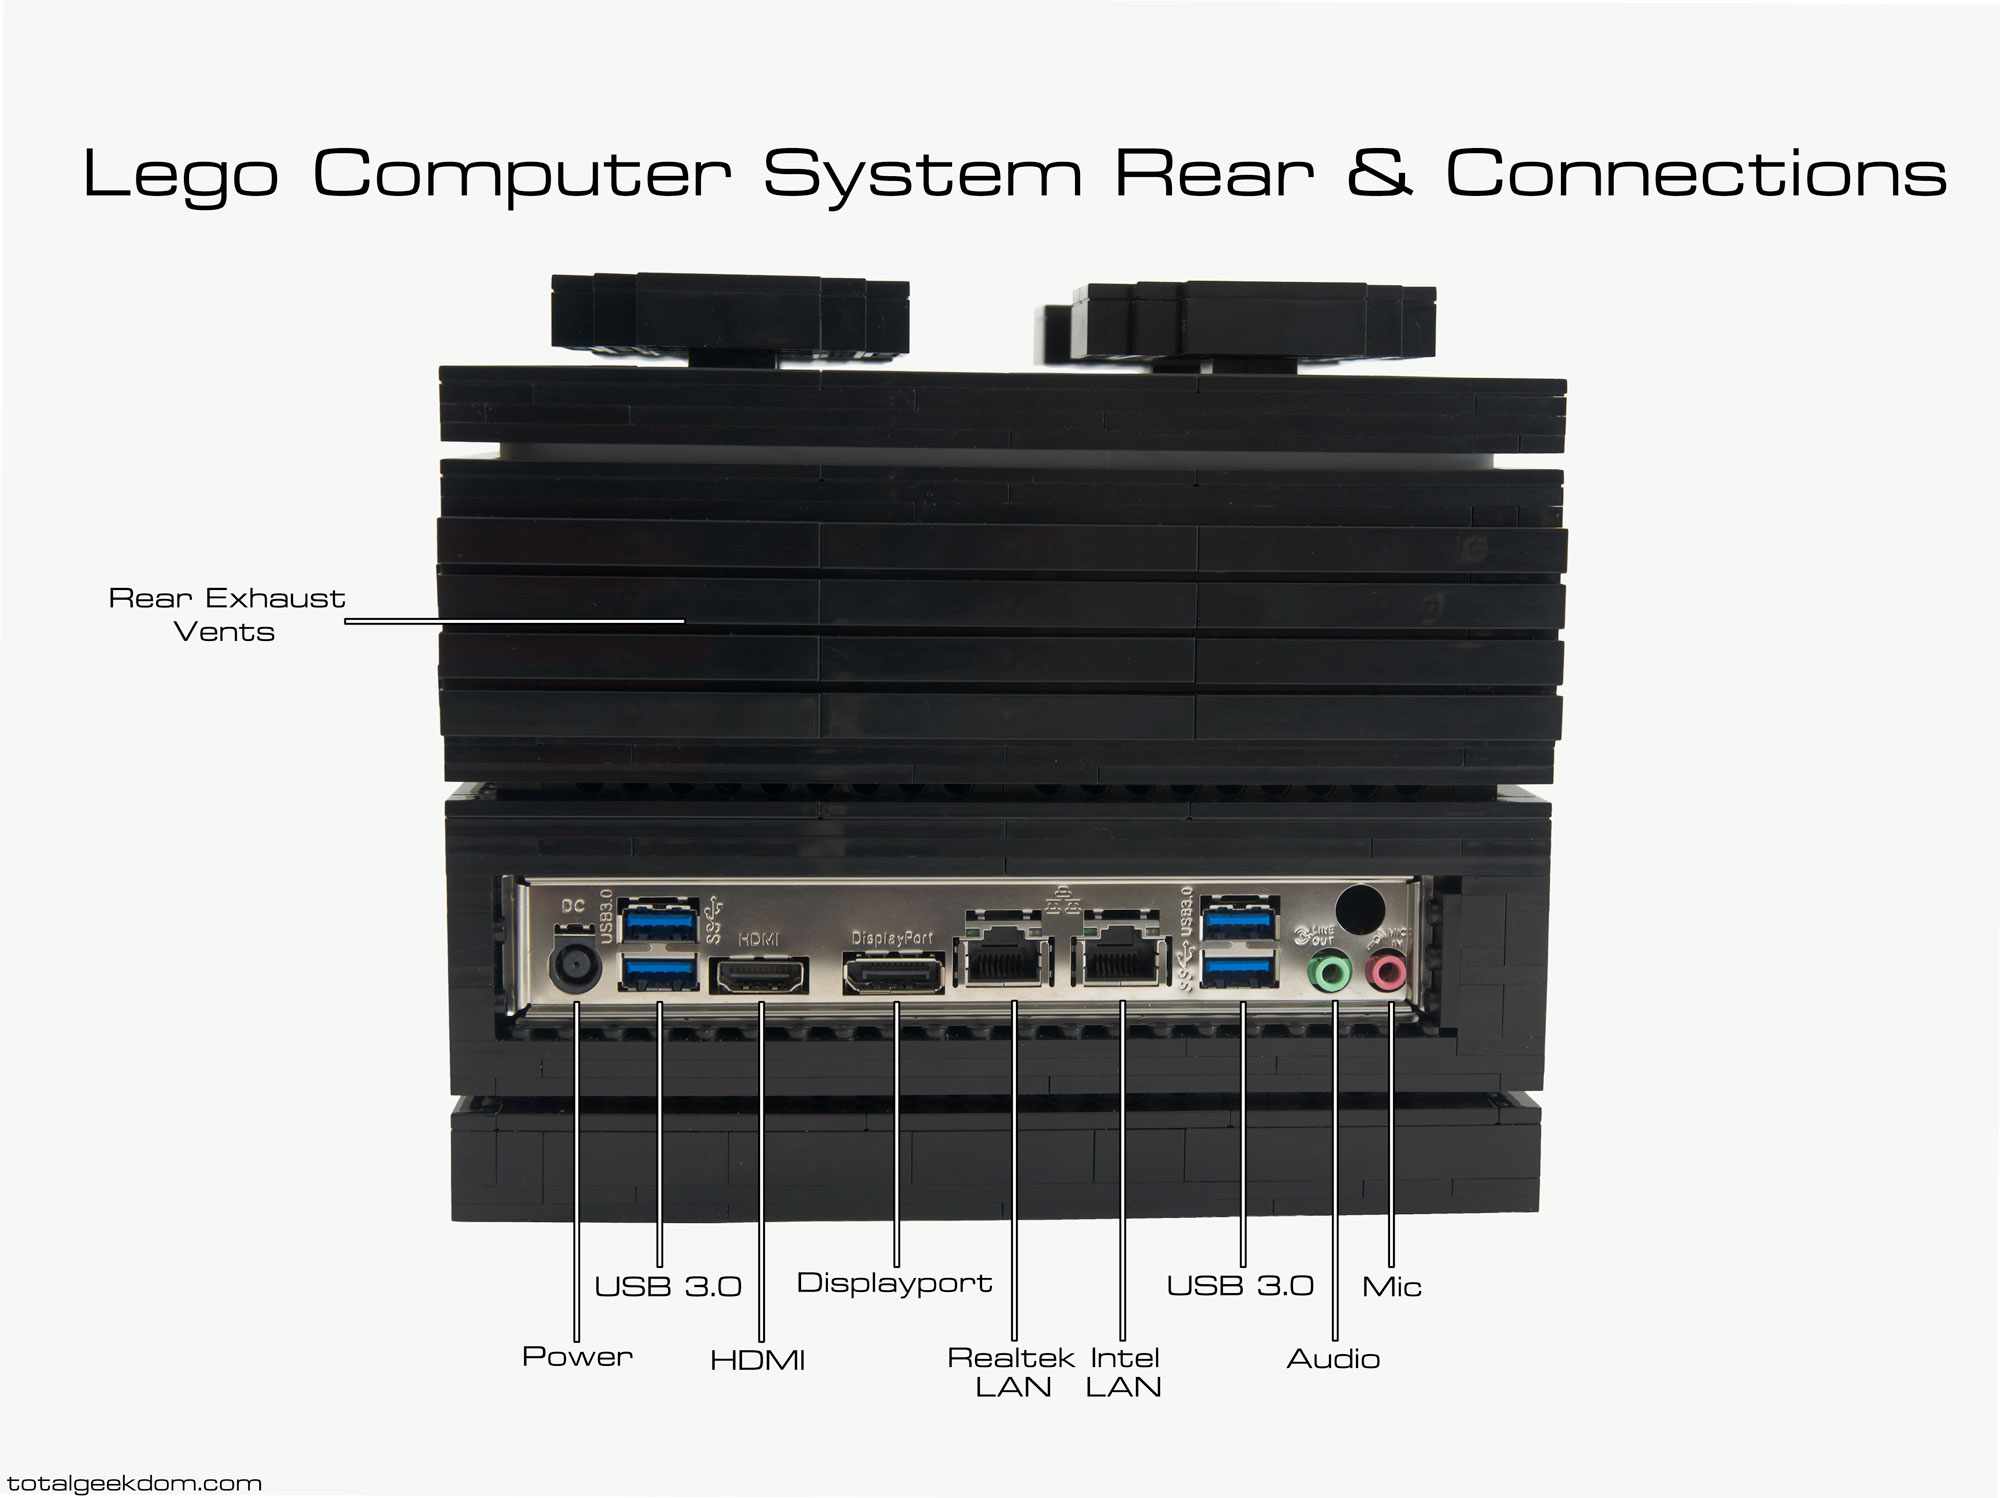
Lego Computer Rear Connections
Overall, the Lego Computer has performed exceptionally well in testing, making it one of the most unique, durable and reliable systems on the market. With the Intel Core i5 processor and the 8GB of system memory, it’s capable of handling even CPU-intensive tasks with ease. The system is very responsive, and was able to boot Windows 7 in 5 seconds. Running multiple applications at once never caused any hiccups. Even opening multiple browsers with multiple tabs simultaneously with office software and video playing, I never had any issues with any lag.
Video testing also went exceptionally well – streaming from Netflix, Hulu and Youtube were not an issue at all, and Blu-ray movie-playback was flawless with low processor usage. I even tested out streaming 4K content, which also played-back without issue. While streamed 4k is not exactly full 4k content due to compression, the video quality was quite amazing, even on standard HD (1080P) sets.
Customizable Case Sections
One of the greatest things about Lego is its flexibility and versatility – there really is no end to what you can build. And beyond my inherent love of the medium, the ability to create variations on the design to allow for further customization was a big incentive to use Lego.
I therefore chose to design the case in such a way as to allow the top section to be interchangeable. The upper section above the LED light slot is easily removed, allowing for the addition of modified tops to produce a unique look for different system options and flexibility for the users themselves. The base section of the system is the same on all systems and standardized, and the standard top section is built to mimic the look of a standard Lego 2×2 brick. Other top sections, however, are available, and a plain top section is available for purchase, so that users may make their own Lego creations atop their computer system.

Lego Computer Blue LEDs
I created a couple of alternate designs to show just a small sliver of the possible options that could be created for the top of the system. The first design was based on an early idea I had for the initial system, which integrated a louvered vent approach to cooling. By combining various elements, I was able to build this louvered top section with each louver capable of tilting. This design has a bit more of an industrial look to it, and the louvers can be altered to match the user’s preference.
Lego Computer Louvered Top
Lego Computer Top Louvers
Lego Computer Yellow LED
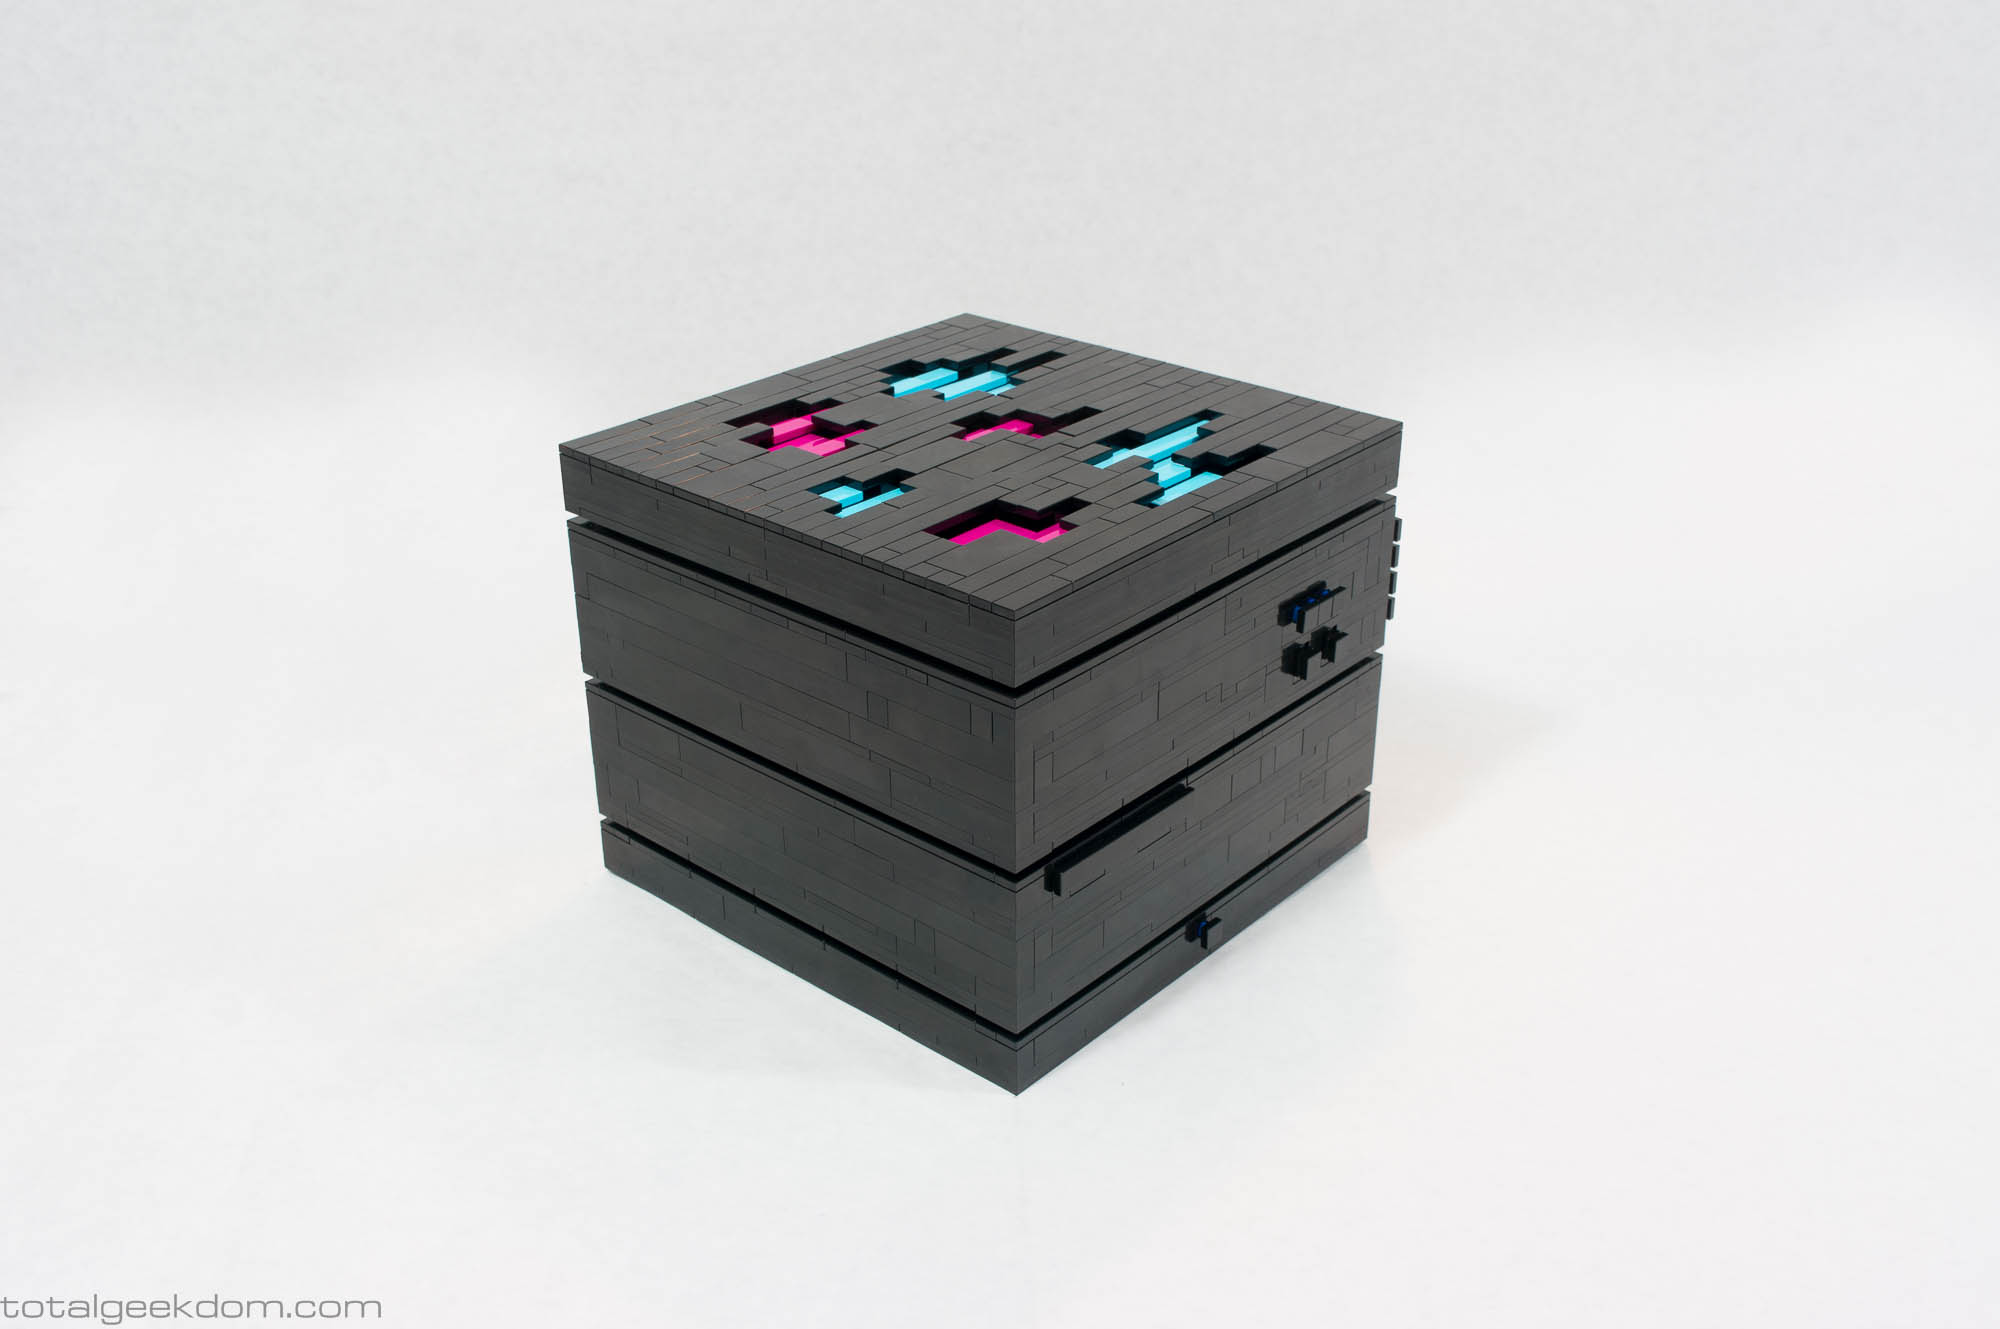
The next design was more artistically inspired. I really like some of the Lego color options available today, and I wanted to create something that incorporated bright colors into the system that could both offset the gloss black and reflect user preferences. I had been toying around with designs for other projects that incorporated depth and overlay into my Lego creations and chose to integrate these strategies into my last alternative top design. The recessed color tiles allow for airflow to pass through the top section to the fan directly underneath it, and the design’s depth and overlay allows for the concealment of these openings.
Lego Computer Tile Top

Lego Computer Color Tiles
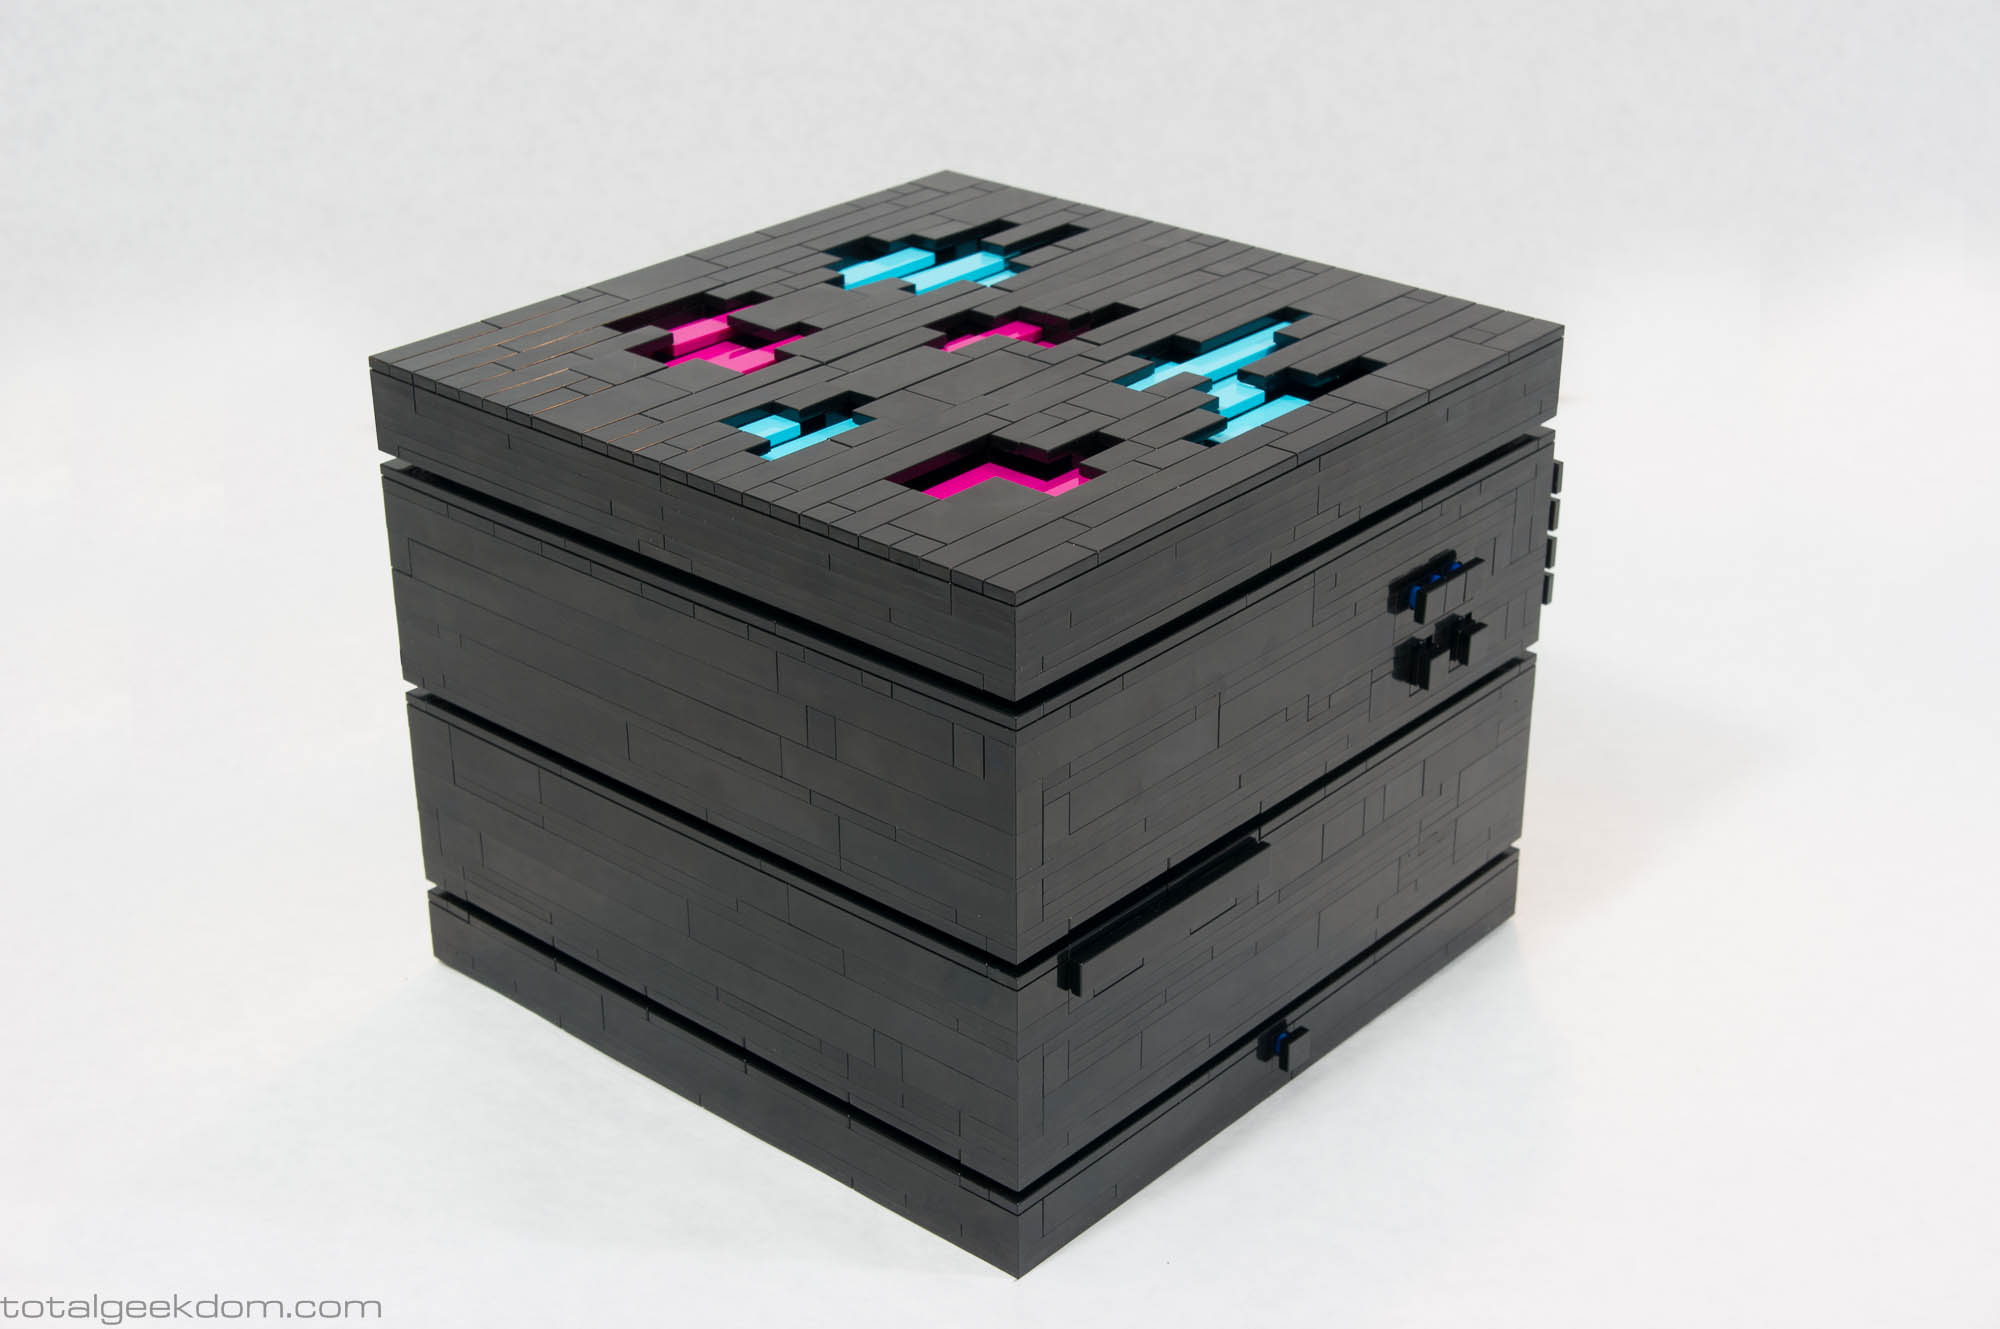
Lego Computer Tiles
Lego Computer Blue White LED
These are just a couple of the many possibilities that exist with the Lego Computer system. Other designs will become available as I continue to create new variations on the top section, and custom designs are available upon request.
This is one area where regular computers can’t come close to matching the easily customizable nature of the Lego Computer. While many computer offer a very limited range of easily customizable options, the Lego Computer offers infinite possibilities.
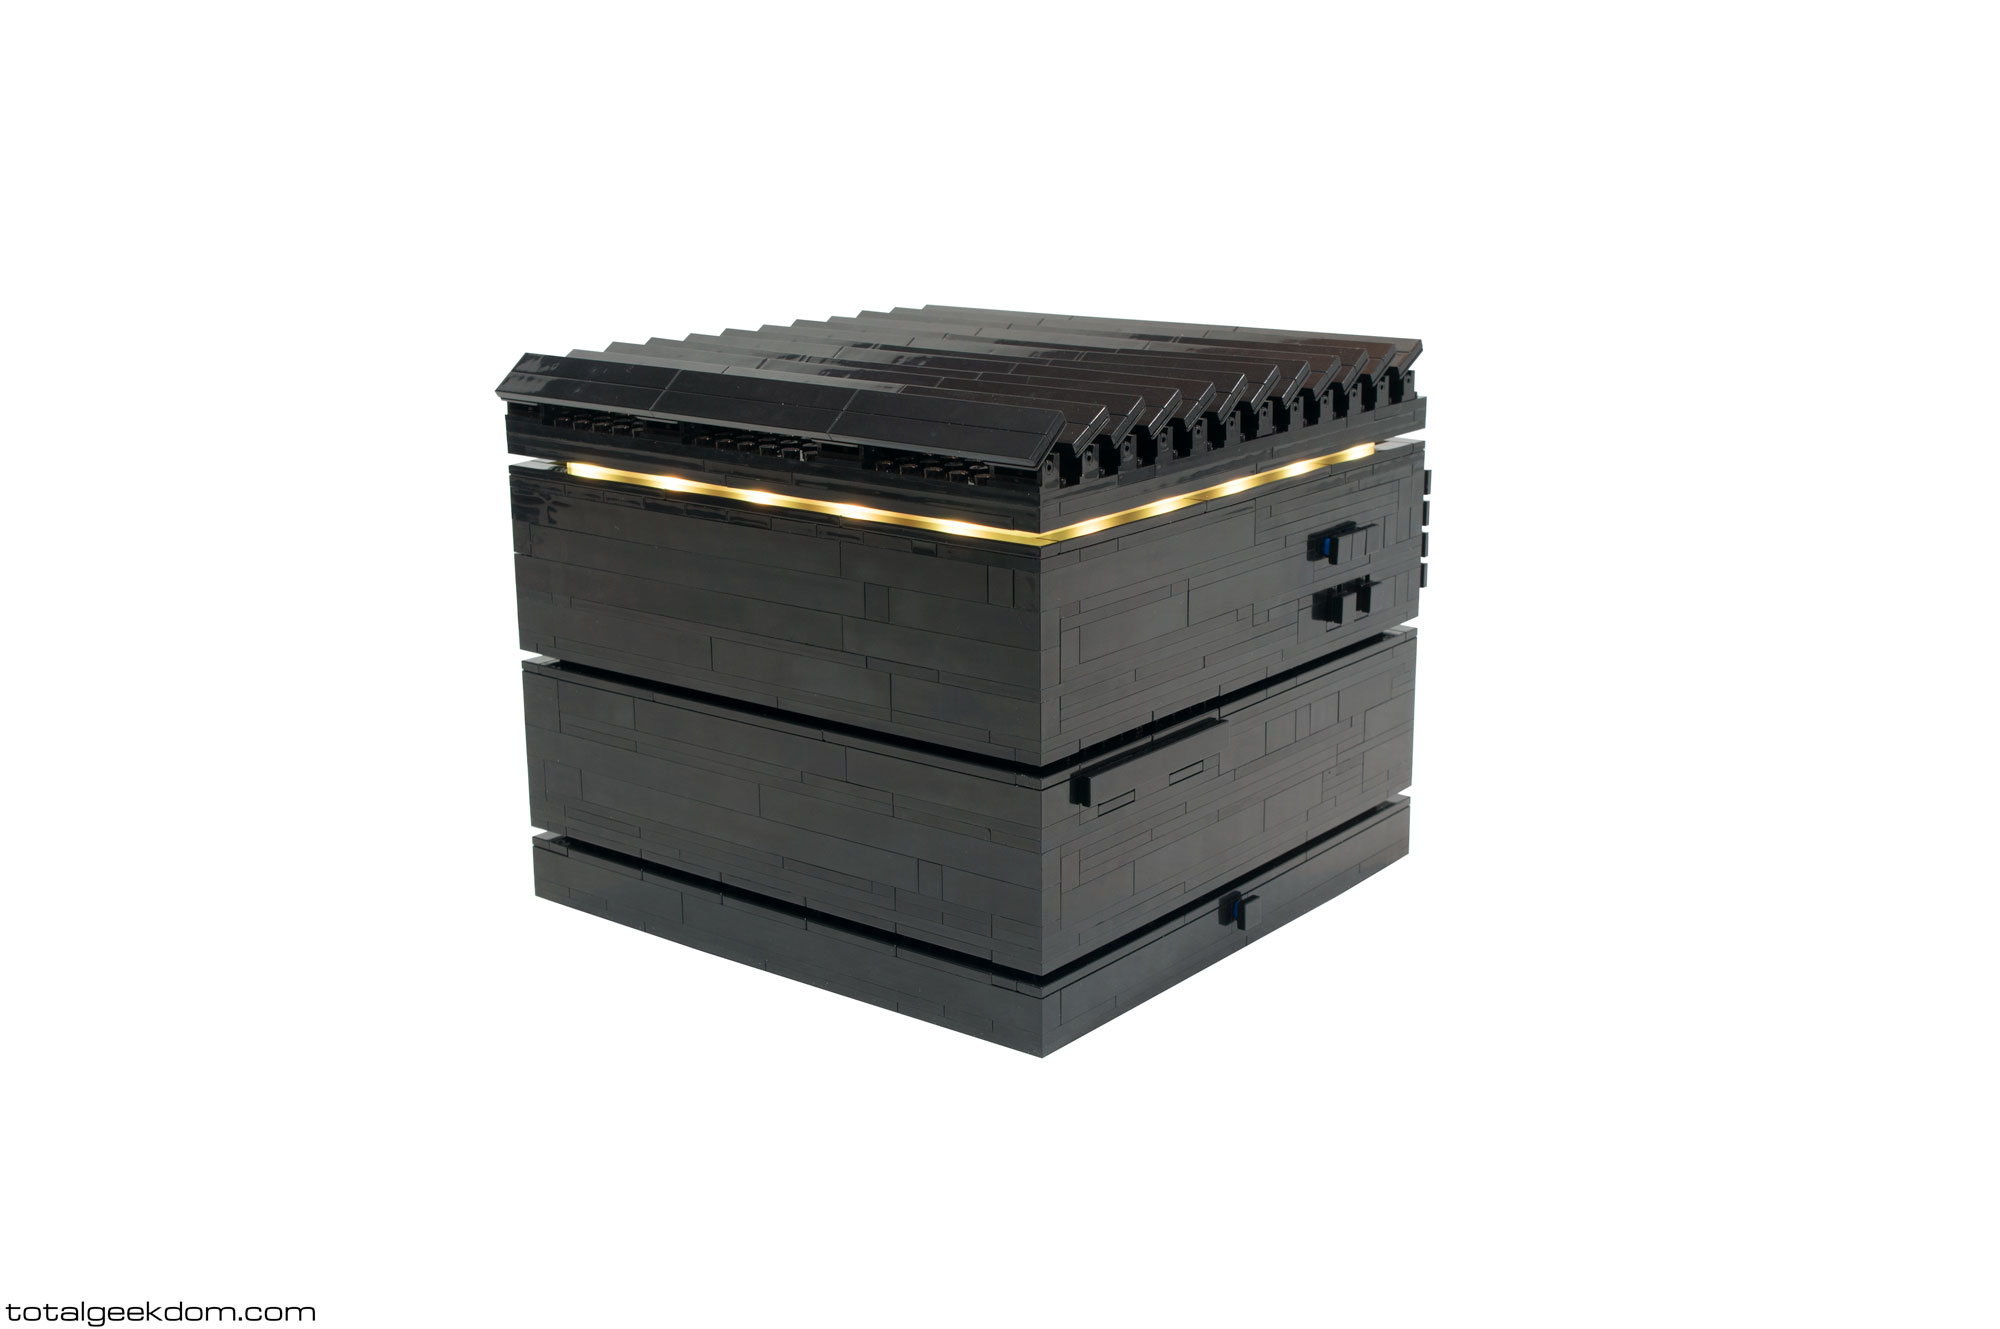
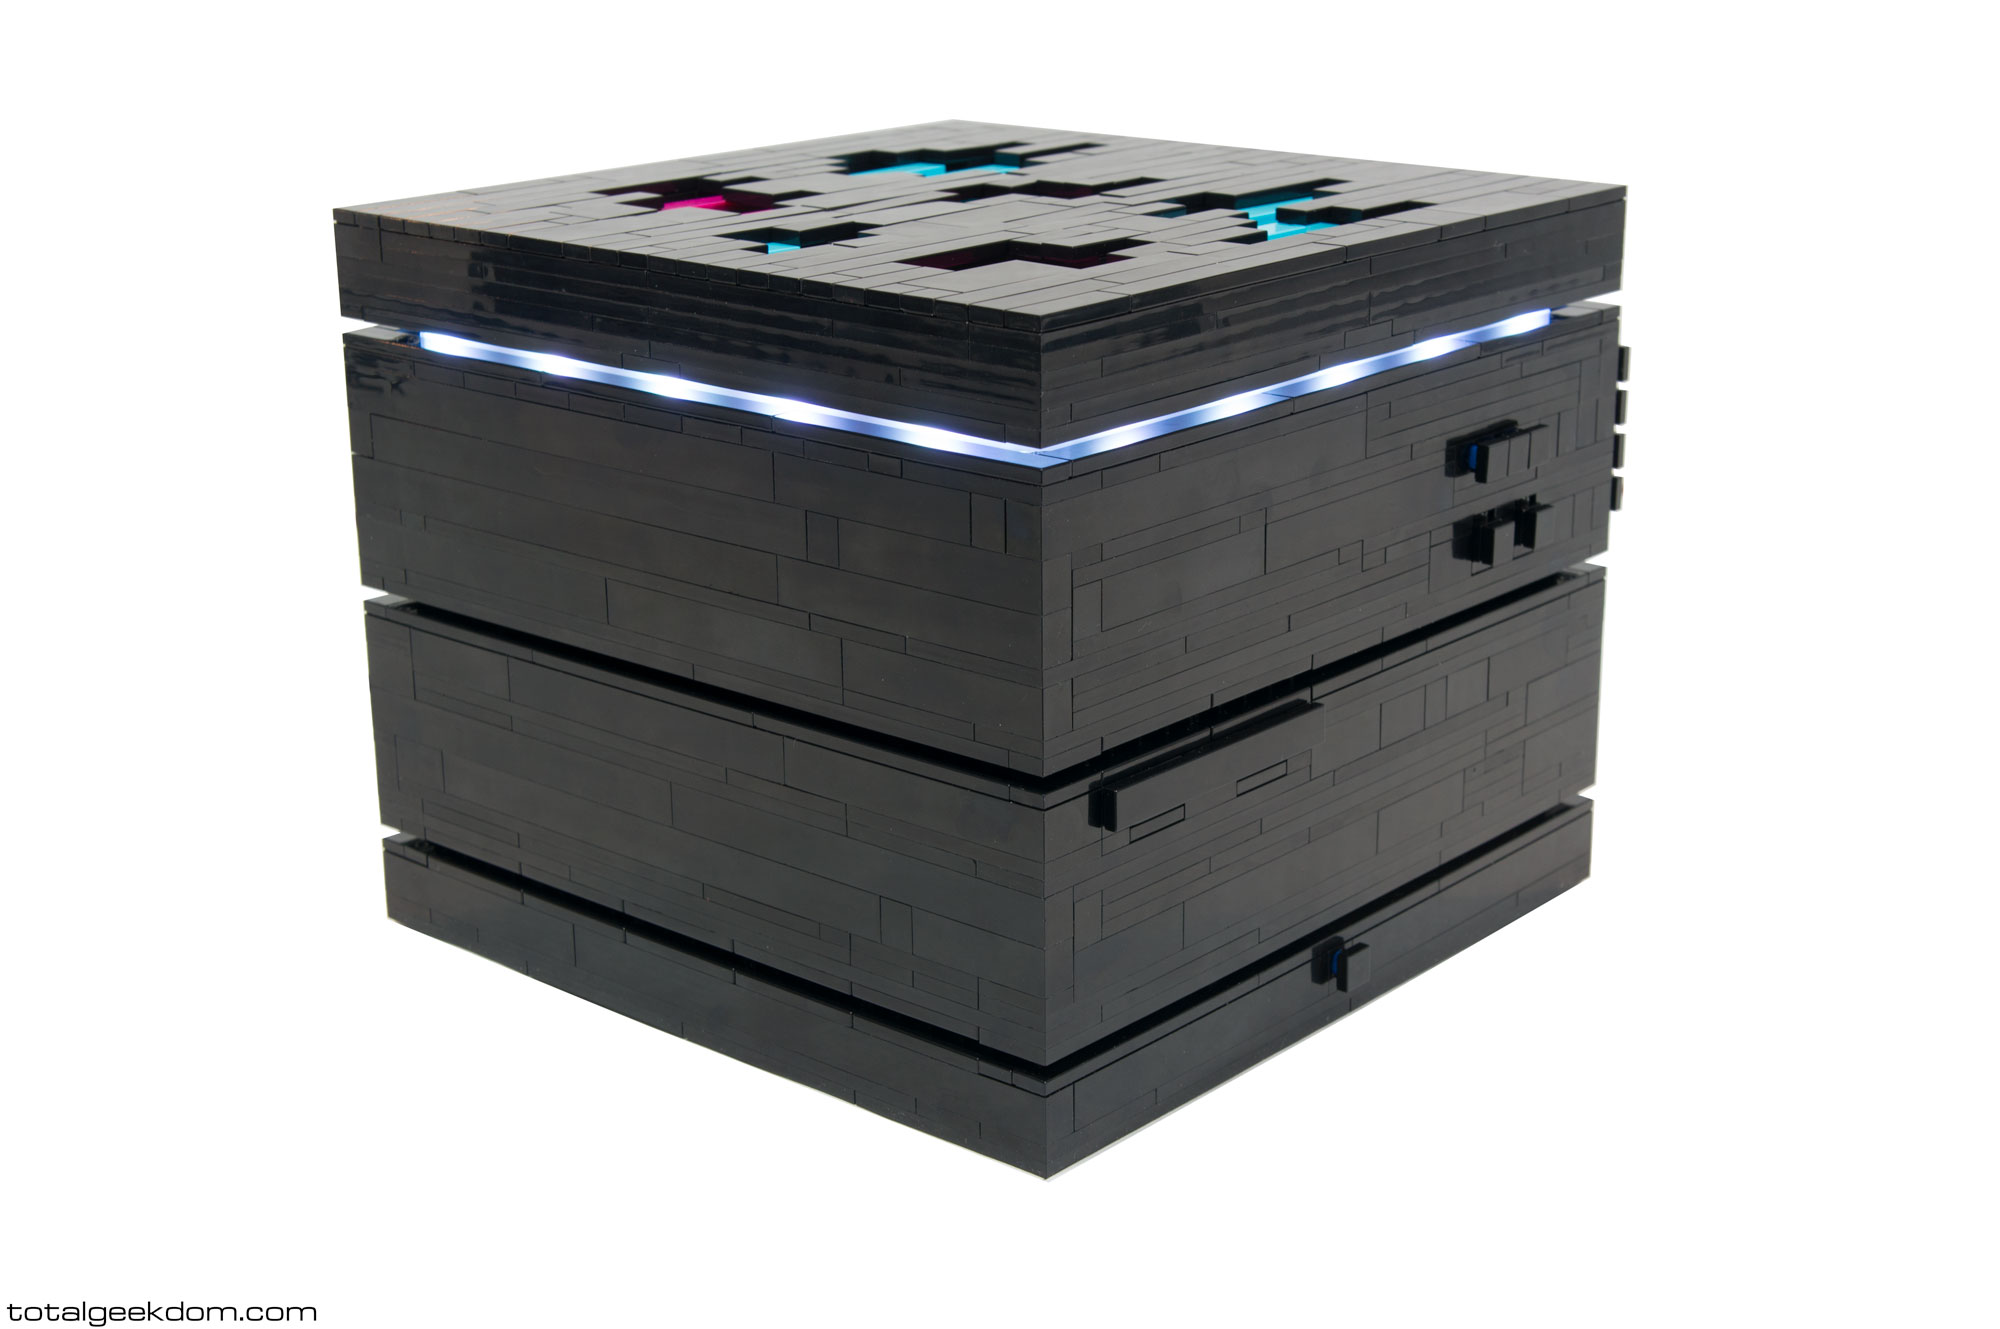
LED Light System
When initially working on the design for the Lego Computer, I wanted to add another element that would allow for easier user customization, something that was subtle but offered a high-tech feel, and I settled on adding an LED light strip. Small enough to not have a big effect on the overall look but would offer a cool effect that users could change themselves, the LED light strip turns on/off and changes colors and functions with the push of a Lego button.
The LED system is low-power and directly connected to the computer, which means that it turns off and on automatically with the system itself. Built into the side of the case, the LED light controller has 3 Lego buttons which allow for a lot of customizing options. Here are its specs:
20 Color Options
18 Dynamic Modes
5 Brightness & Speed Settings
With all the variations in combinations to choose from, you can create whatever effect you would like. From a slow cycling through the colors to a more subtle transition through the colors (akin to breathing), from solid color choices to no colors at all (push and hold any button and the system will turn off), there are too many possible combinations to list, but they are all controllable from the push of a couple Lego buttons on the side of the case.
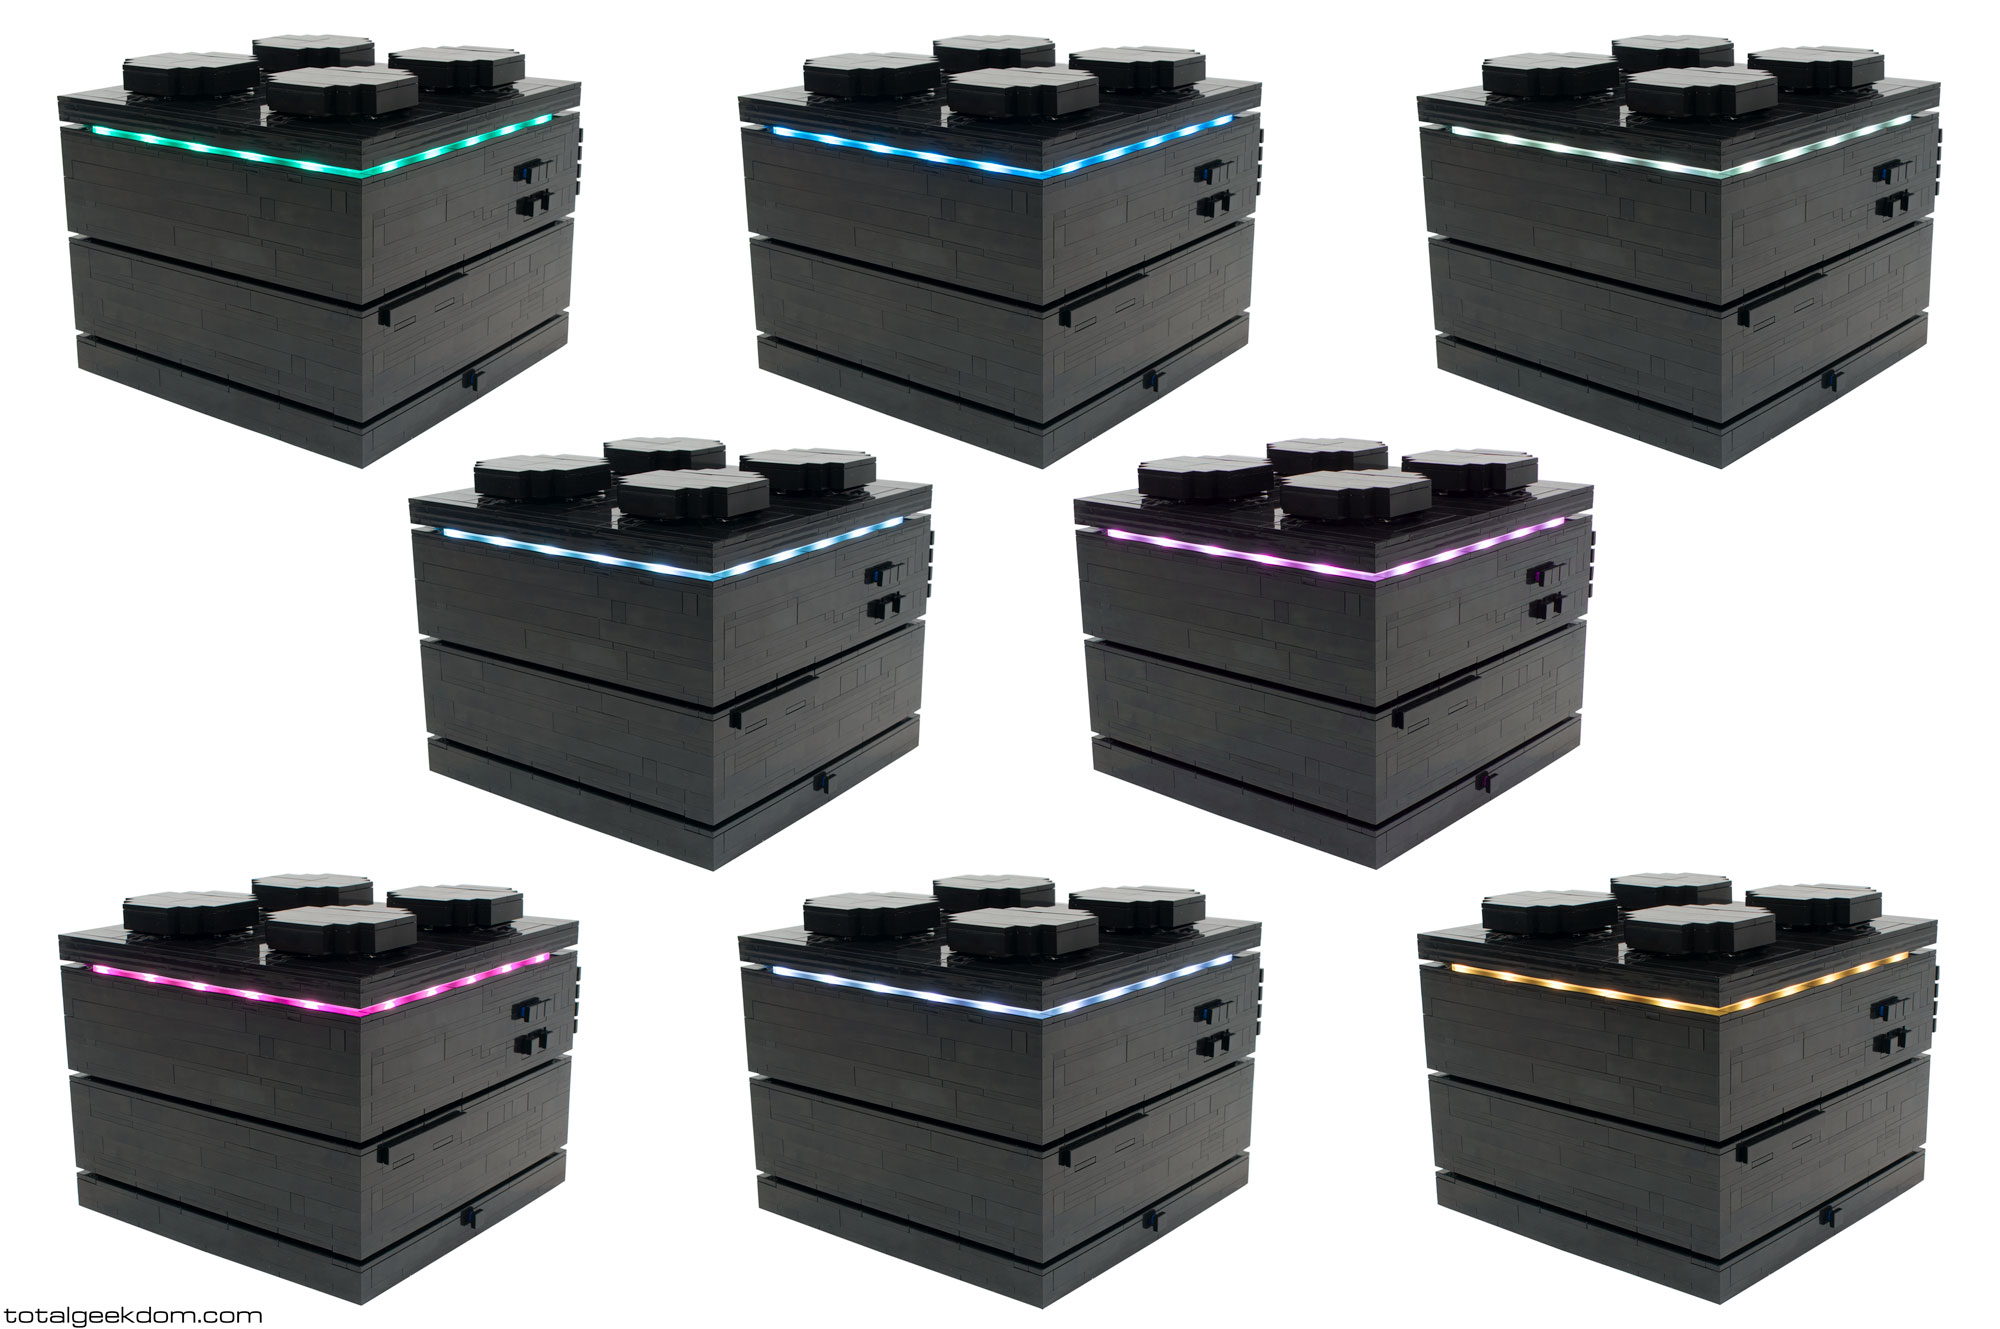
Lego Computer LED Brick Colors
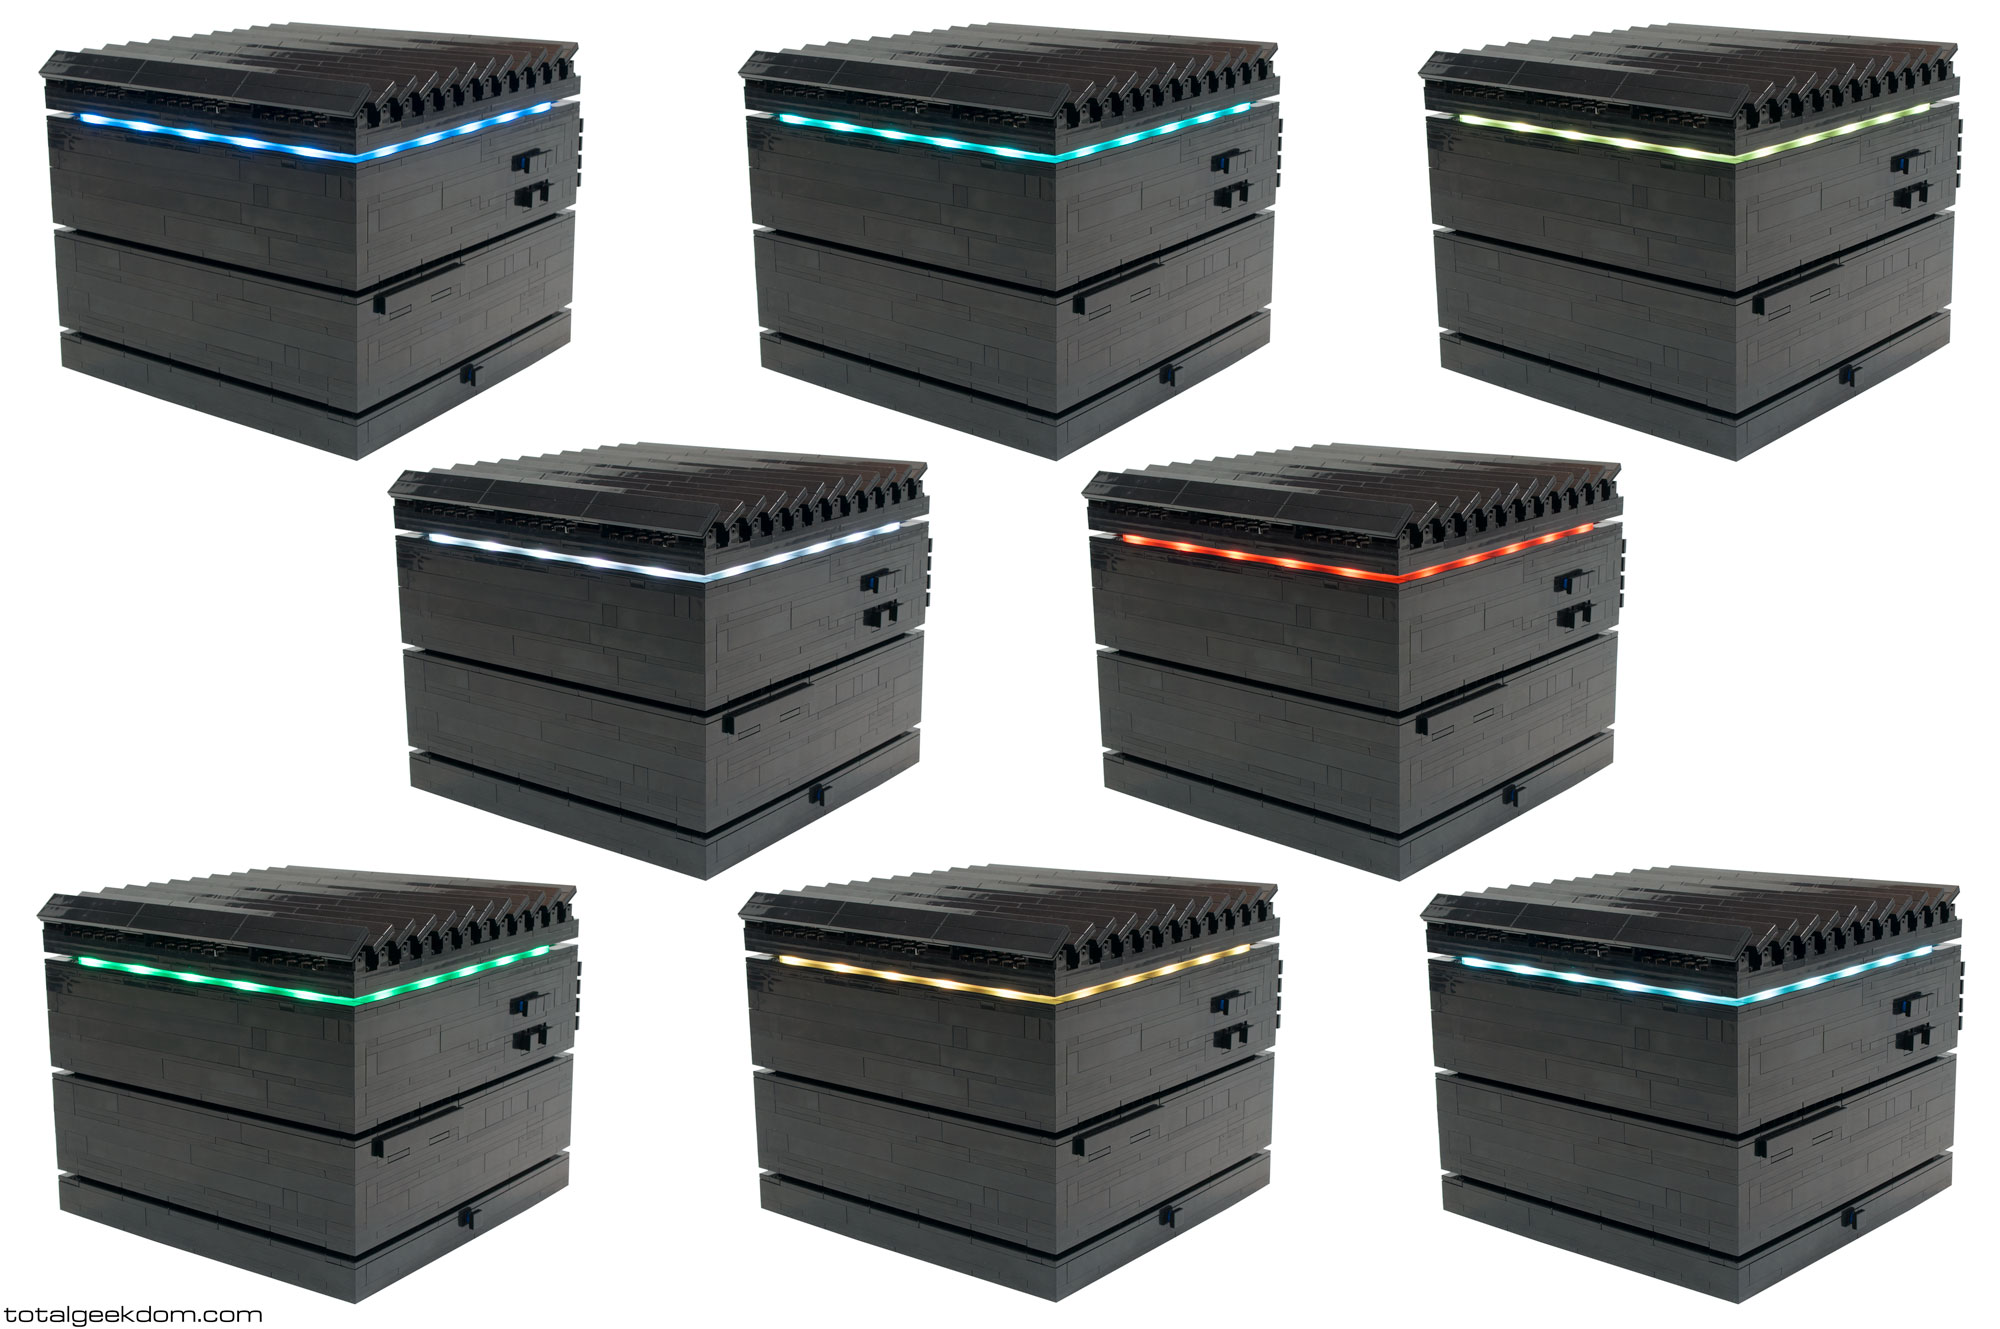
Lego Computer LED Colors Industrial Top
Lego Computer LED Colors Tile Top
More Stuff
Multiple Case Positions
Another aspect of my Lego Computer design that was important to me was the possibility of alternate positions. The majority of the pictures show the system sitting on its base, but the Lego Computer is also designed so that it can be stood on its side. I intentionally put the power and reset button, the LED light system buttons, and the DVD/CD drive slot all on the same side, so that the opposite side could function as an alternative base position. Furthermore, all of the internal components of the system are mounted and built into place so that they can’t move of shift.
Lego Computer Brick On Side
Concealed Front USB Ports
The front USB ports are located on the front side of the system. Hidden under a swiveling Lego tile for easy access and concealment when not in use, the system’s two USB 3.0 ports offer high speed data transfer.
Lego Computer Front USB Ports
Optical Drive
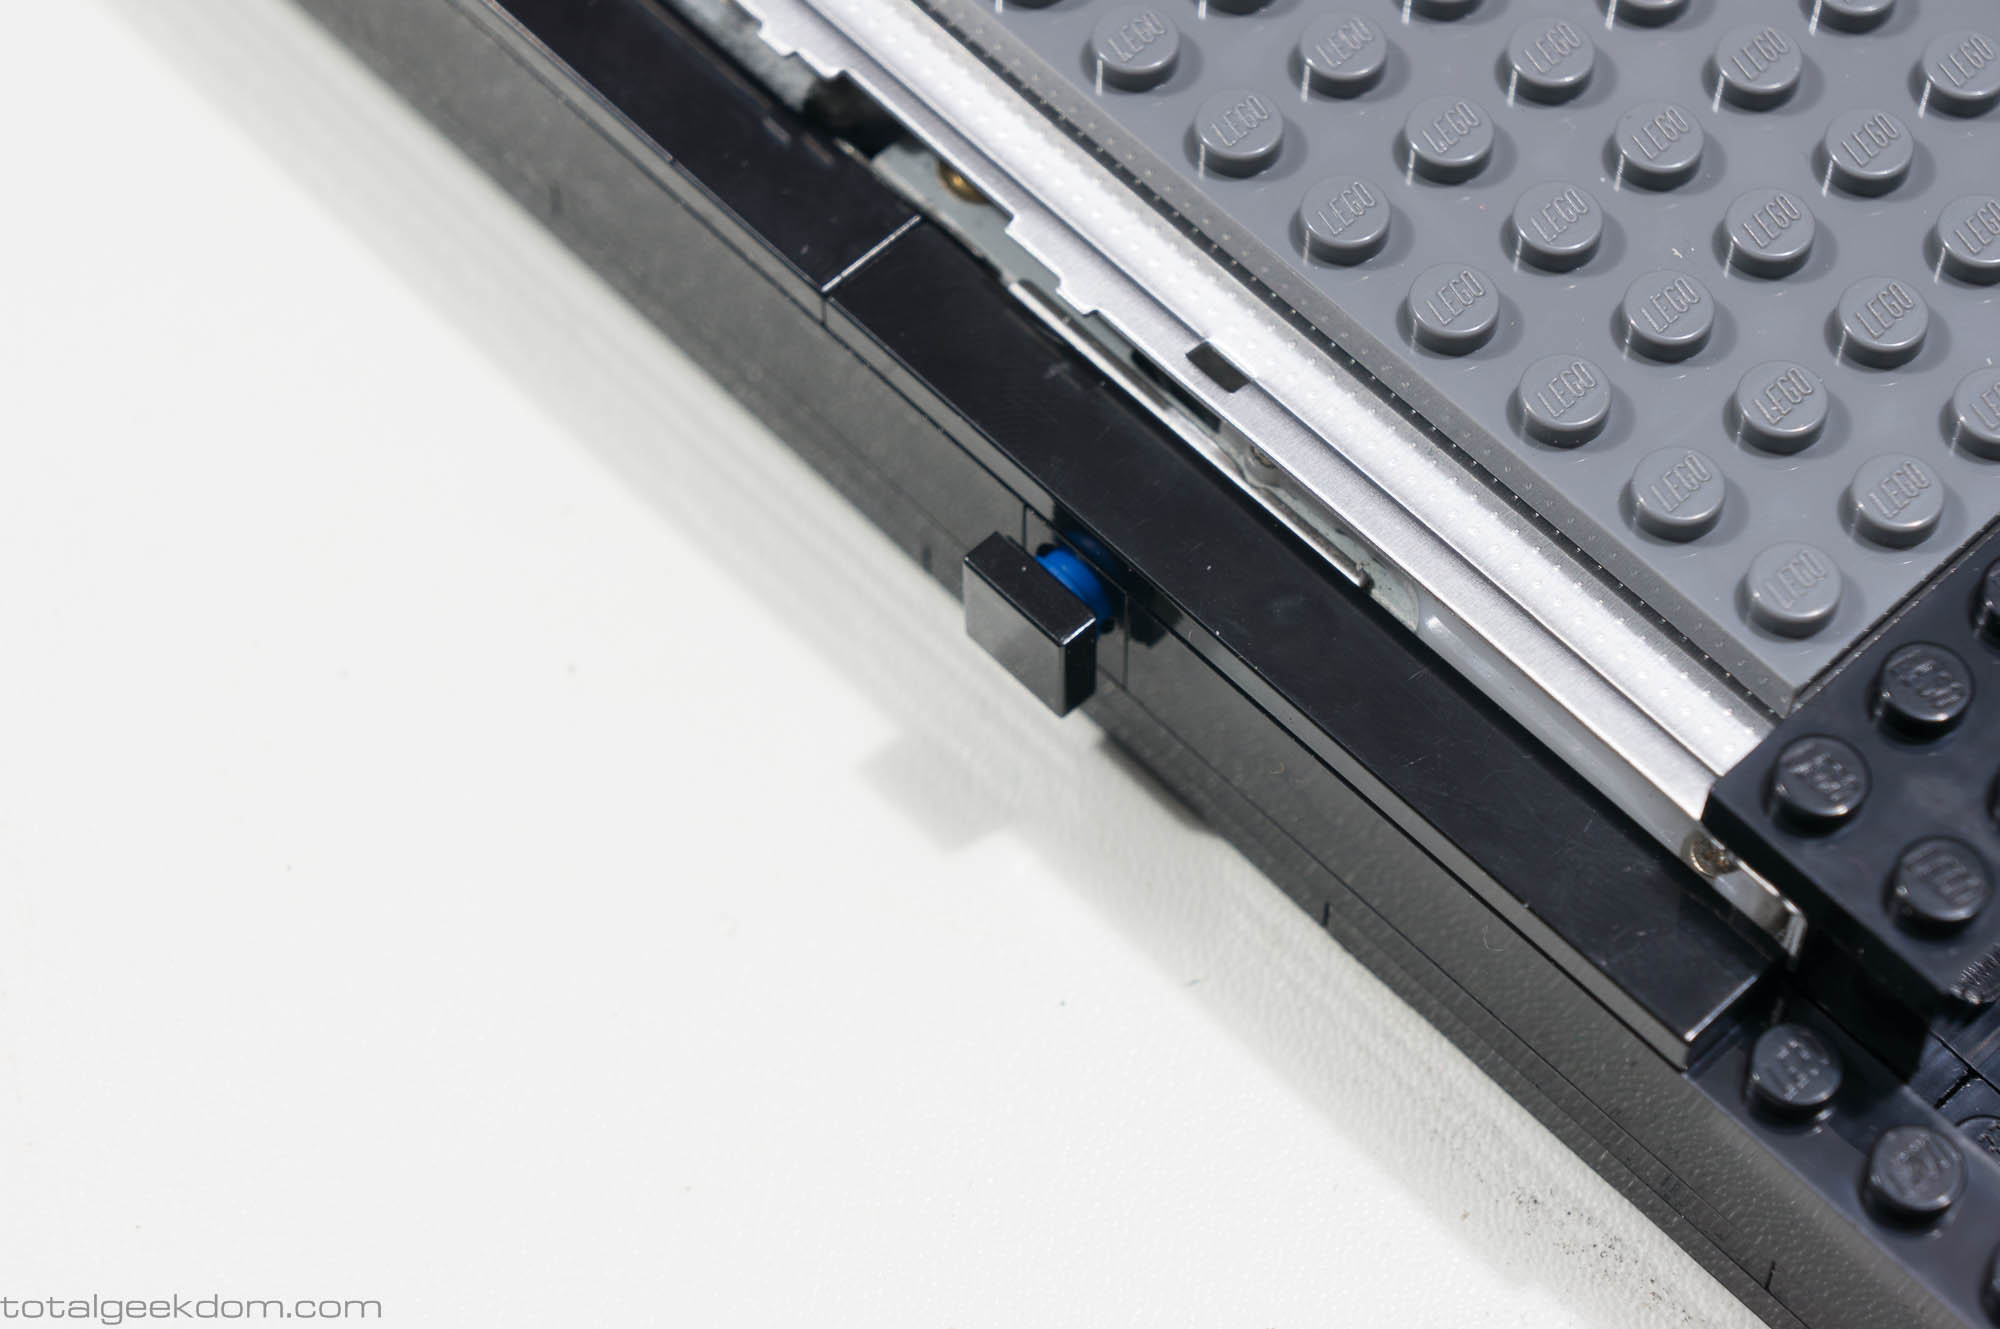
The Lego Computer’s standard optical drive is a DVD/CD combo drive capable of reading and writing optical discs. It is located discretely in the bottom section of the case and utilizes the lower airflow slot as its opening, which conceals it in such a way that it’s invisible. With exception of the small Lego button that sits right below the slot, there is nothing that even hints that there is anything there. The button allows for easy ejecting of discs, though you can also eject them through the operating system by clicking eject disc.
Lego Computer DVD/CD Drive
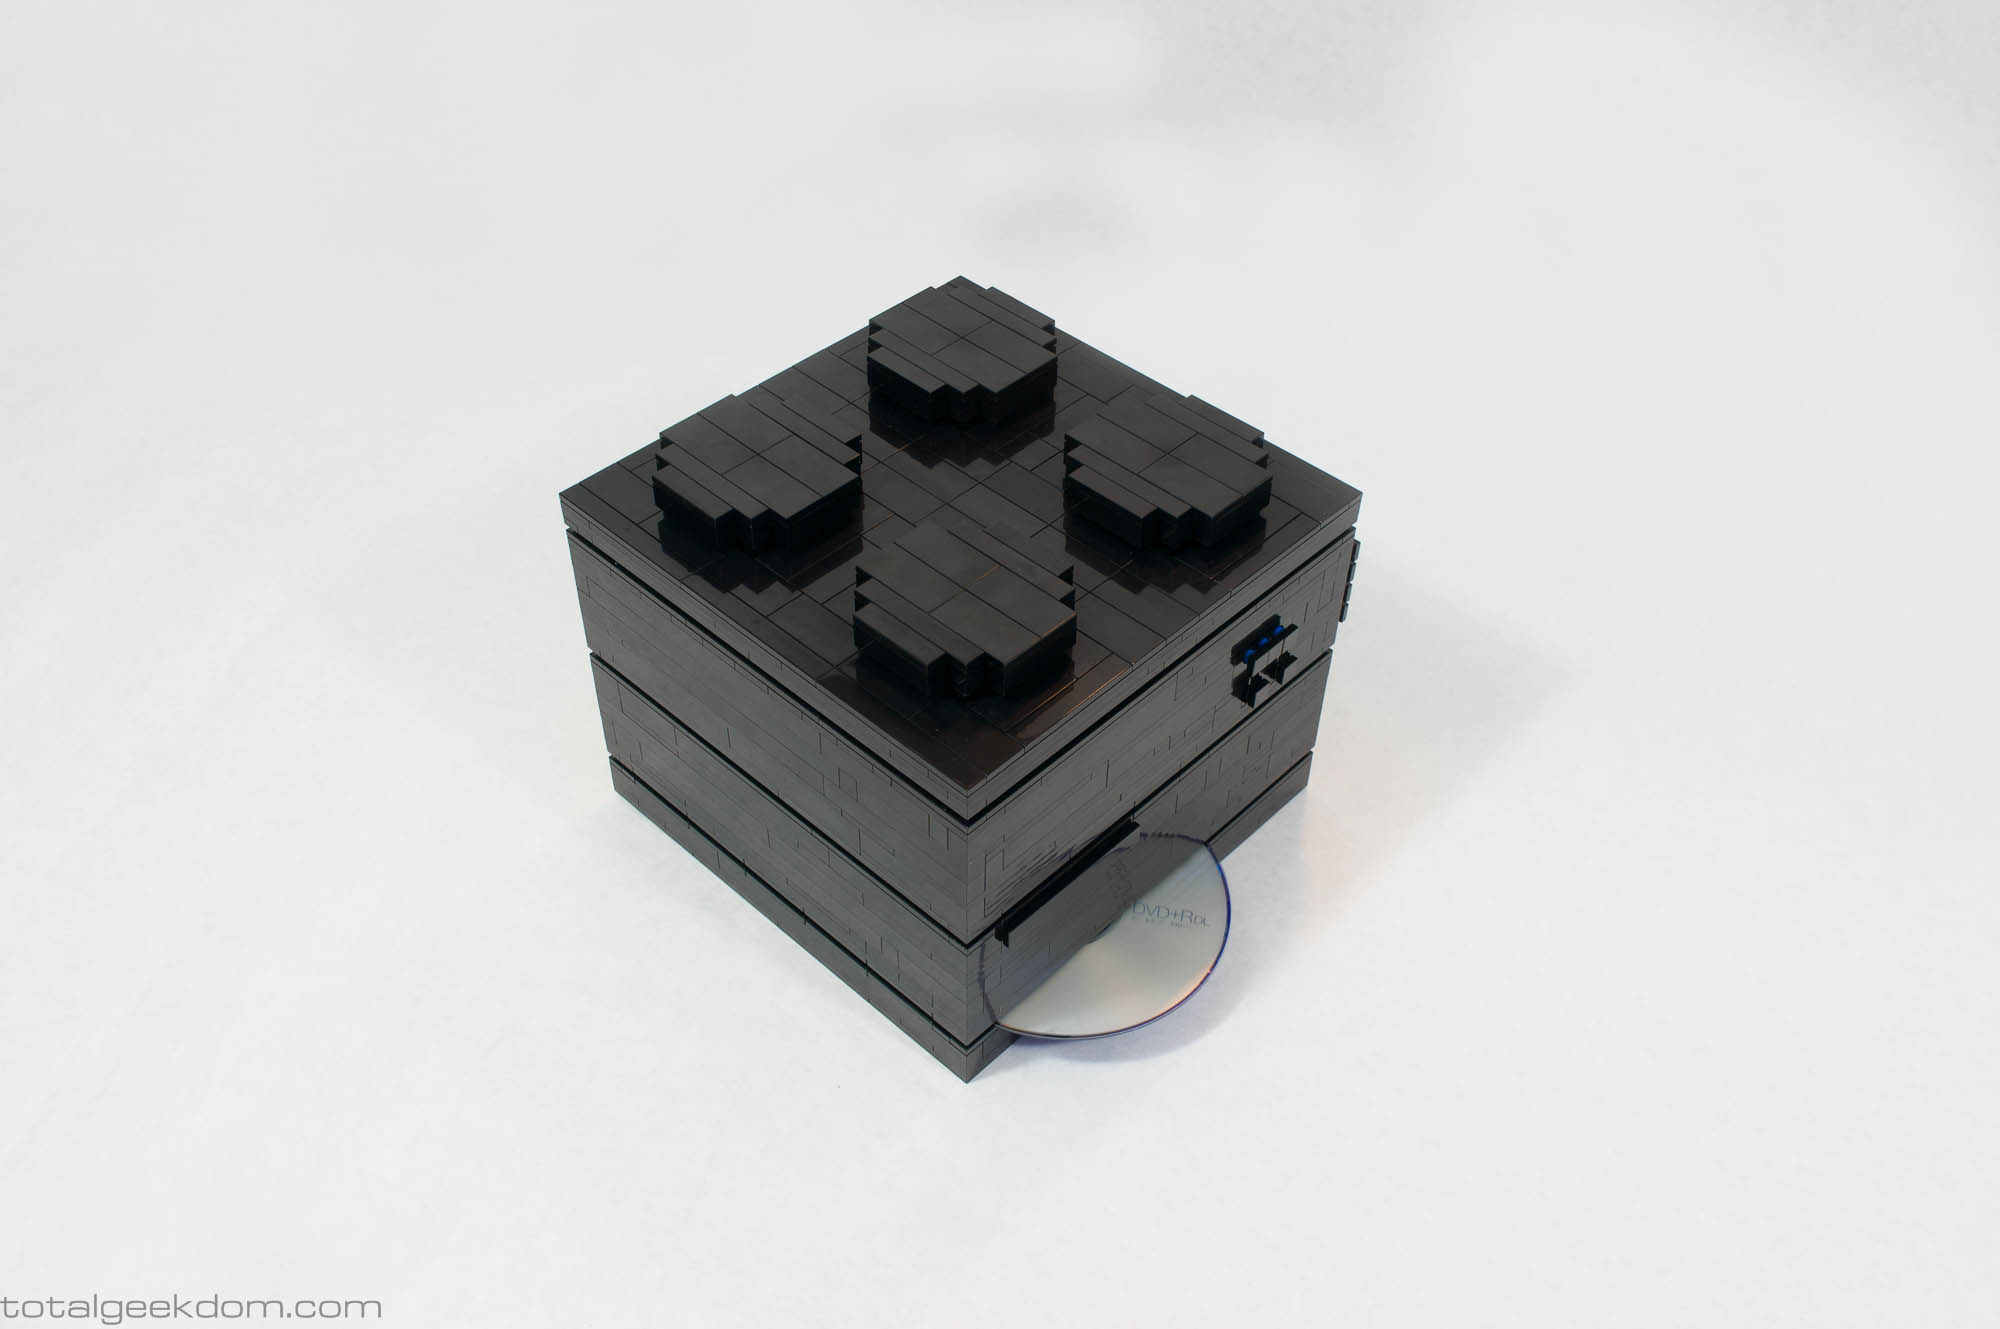
Lego Computer Disc
Buttons & Switches
It was essential to me that every aspect of the Lego Computer case be made of Lego bricks, so it took me some time to figure out the system’s buttons and switches. This was surprisingly easy in for some of the buttons and probably harder than it needed to be for the others. The switches themselves are electronic and housed inside of the case, but the mechanical mechanism that actuates them is made with Lego pieces, which are located on the exterior of the case.
Unlike the buttons in most of the pictures, the buttons on purchased versions of the Lego Computer will be labeled with power and reset symbols, as well as color, speed and mode symbols for the LED light buttons.
Operating Systems
The Lego Computer will be available with a series of different operating system options. For users that want Windows, there is support for both Windows 7 and Windows 8 as options, as well as future support for Windows 10. For those users interested in Linux, there will also be a number of options available.
However, if you’re the type of user that would rather install your own operating system, this will also be an available option. I’ve never been fond of being forced to buy an operating system with a computer, as I usually prefer to install my own operating system, so I’m not going to force people into purchasing a required operating system.

FAQ
Is the Lego glued together? How strong is the Lego?
The Lego is not glued together. However, the build incorporates many advanced building techniques that greatly increase the strength of the system. Overlapping plates and bricks are used throughout the design, along with supports and beams to add stiffness. This results in a very strong system that can be easily be moved around, handled, picked up, and put down without any worry of causing damage.
One of the great features about Lego is that it’s pretty much indestructible. With a regular computer, if you drop it, you’ll most likely break its thin plastic case or dent the metal. With the Lego Computer, however, if you drop it, it will most likely just slightly deform as the bricks separate a bit – a problem you can solve by just pushing the bricks back together. But in the event that something more catastrophic happens to the computer, and it’s broken into pieces, you can always send it back to me to be fixed. That said, dropping any computer could damage the internal components, so try not to do that.
Does the Lego hold up to heat well?
When I built my other large Lego computer years ago (Lego Folding Farm) one of the most common questions was how well does the Lego hold up to heat. Well, the answer is: really well. That system has been running for over 4 years without a hitch. The Lego pieces are still just as tight as when I put them together, as the plastic used in the Lego bricks is resistant to heat and holds up very well.
With that said, I would always advise common sense when it comes computing. I wouldn’t leave it in direct sunlight and running at 100% processor usage for days on end. The heat from the sun would rapidly heat the case up – just as anything would heat up in the sun, and the cooling system is designed to account for that sort of temperature increase.
Can I play games on the computer?
Yes, though the system isn’t designed as a full-fledged gaming system. It is more intended as an excellent all-around performer for multi-tasking and running office software, internet browsers, streaming video, editing photo/video/audio, etc. While light to medium gamers will not encounter any problems whatsoever, the Lego Computer is not designed to be a system devoted entirely to gaming.
Up until recently, on-board GPUs weren’t powerful enough for major gaming, but with the Intel 4000 series HD iGPU and its successors that has changed, and general computers have been more capable at gaming since. This system uses the Intel HD4600 graphics unit, which is powerful enough to run most games at playable frame rates. Keeping in mind that you won’t be able to max out the settings on a lot of newer games, gamers using mid-range settings at lower monitor resolutions can totally play most games.
However, this system is not designed to play the newest and most graphically intense games, or games at very high detail settings at higher resolutions. If users choose high detail settings, the frame rates in modern graphically intense 2014+ games will not be playable. The purpose of this system was to be a well-rounded performer, capable of fulfilling the needs of the majority of users. If you are looking for a purpose-built gaming system made of Lego, please contact me personally, as I could certainly build something to suit your needs.
For further reading on the gaming capabilities of the HD4600 GPU I suggest the following links
(SemiAccurate) HD4600 Gaming Test Benchmarks
(Notebook Check) HD4600 Gaming Test Benchmarks
(Pavel Vladov) HD 4600 Games & Settings Capability List
(Intel HD4600 Youtube) HD4600 Game Reviews
Here is a list of some popular games, and how they perform on the HD4600. Keep in mind that these are at mostly stock settings on the HD4600. The HD4600 does have some head room and can be overclocked a little to add some more performance.
Playable at Higher Settings
League of Legends
Starcraft 2
Diablo 3
Torchlight 2
Minecraft
Counter Strike Go
Sims 4
Civilization 5
Fifa 14
Fifa 15
DOTA 2
Playable at Medium Settings
Forest
Skyrim
World of Warcraft
Playable at Lower Settings
Call of Duty
Far Cry 3
Metro
Titanfall
Need for Speed Most Wanted
What kind of support do you offer?
What good is a computer system without support to back it? That’s the way I look at it at least. I offer support for the computers I build for the lifetime of the system. That means that if you have a question, issues, etc., just contact me, and I’ll follow up and do my best to help. Most support related questions can be pretty easily answered and resolved quickly. If more hands-on involvement is required, I can offer remote support by logging in to your system remotely and trying to fix the problem. Email support for questions, issues, etc. is completely free, remote support will be charged based on the time it takes to resolve the issue.
*(Disclaimer) If you need remote assistance and request that service, you will need to authorize and install software onto the computer. The software will be available for access by you but won’t work unless you choose to install it. I know privacy is a big concern for people, and because of this I will not install any software that allows remote access to a system without your permission. This will therefore be the user’s choice and responsibility, if they want this service.
How easy is it to upgrade? Do you offer upgrade services?
Yes! The system was designed with the intent of being fully upgradable. It was very important to me that the Lego Computer system be capable of supporting numerous hardware and software upgrades to extend its years of service. Every single component in the system can be upgraded. The processor, memory, SSD drives, wireless card, and even the motherboard itself. This could add years to the life of the computer by just changing out components in the system.
I do offer upgrade services and can upgrade any of the components in the system for increased performance. Most computer systems available today have limited upgradability, allowing only for upgrades in storage and sometimes memory systems. This is often tied to the fact that most of these systems require software and firmware updates in order to utilize new hardware, and the manufacturers only support these software updates for a short period of time in some cases. Another factor is that these retail systems often are built with hardware specific to the chassis and can only accept very similar hardware available at the OEM level.
This is where the Lego Computer is different in its approach. I have only used components that are retail based and have purposefully built the system using a standardized form-factor. This means that all the components can be updated as new technologies become available. I don’t write firmware or software for the system because I don’t have to; the components have their own suppliers that do that. So when that component reaches the end of its life, the system allows jumping forward to the next iteration.
You can send your Lego Computer back to me, and for a reasonable price, I will upgrade components based on your needs.
Do you have an affiliation with Lego?
No, I have zero affiliation with the Lego® group. I do not work for them, represent them or sell products for them. I am just a fan of Lego – a huge fan. You could probably even call me a super fan, as I have loved Lego as long as I can remember and have never stopped playing and building with it. In particular, I am a 80s space-themed Lego nerd, who gets wildly excited by anything M-Tron, Blacktron or Space police. I’ve built so many different Lego sets and custom things over the years that I could never hope to remember them all. In my house alone, I’ve accumulated over 40,000 pieces of Lego. It’s taken decades for this to happen, but I just can’t help it.
But while I’m a huge fan of Lego and love building and creating things with Lego, I have no affiliation with Lego in anyway.
Lego Computer Updates
If you're interested in following along with new updates, pics, designs, models, and info related to the Lego Computer, then click the button below to head over to my newly created Facebook page. There you can Like and follow Total Geekdom and see updates on the Lego Computer.
Total Geekdom
Comments 122
Have you ever considered about adding a little bit more
than just your articles? I mean, what you say is important and all.
But just imagine if you added some great images or videos to give
your posts more, “pop”! Your content is excellent but with pics and
clips, this site could certainly be one of the greatest in its niche.
Terrific blog!
pwpepwetf.space — це український підбірка, який представляє найкращі джерела інформації країни. Тут ти знайдеш надійні інформаційні ресурси, де публікуються актуальні новини, аналітика та важливі події з України та світу.
На сайті представлені:
– Офіційні новинні портали з новинами у реальному часі.
– Експертні думки та аналітичні статті з ключових тем.
– Новини від місцевих видань.
Якщо тобі необхідно отримувати інформацію з надійних джерел, каталог pwpepwetf.space стане надією на якісну інформацію!
oizaqxagowegf.space — це український підбірка, який представляє найкращі новинні сайти країни. Тут ти знайдеш перевірені джерела, де публікуються актуальні новини, аналітика та важливі події з України та світу.
На сайті представлені:
– Офіційні новинні портали з новинами у реальному часі.
– Аналітика та аналітичні статті з ключових тем.
– Регіональні новини.
Якщо тобі важливо отримувати інформацію з перевірених ресурсів, каталог oizaqxagowegf.space стане відмінним вибором!
Шановні форумчани! Якщо ви зводите власну домівку, затіяли ремонт чи просто мрієте про затишок, то часто виникає така складнощі: інформація розпорошена по безлічі ресурсів. Погодьтеся, це набагато зручніше, коли під рукою одна вичерпна добірка. Саме тому варто заглянути на сайт budlistsitesinua.space, на якому представлено добірку якісних сайтів рідною мовою.
На цьому ресурсі ви побачите:
– Практичні поради для бюджетного будівництва;
– Технології будівництва від фундаменту до покрівлі;
– Архітектурні ідеї та дизайн внутрішніх просторів;
– Поради домашнім умільцям електрика, сантехніка, інструменти;
– Ідеї для присадибної ділянки;
– Нестандартні креативні рішення.
Одним словом, це ваш особистий путівник світом будівництва та ремонту. Переходьте за посиланням, додавайте в закладки та користуйтеся зручним каталогом
На сайті qpoaswap.space ви отримаєте свіжу інформацію, новини та зручний інтерфейс. Тут зібрано все, що потрібно знати любознавчим користувачам: від статей до лайфхаків. Заходьте та оцініть в його ефективності особисто!
Недавно наткнулся на сайт louewqiuegiuewoo.fun и решил поделиться мнением.
Сервис сразу притягивает внимание своим неординарным названием и заинтересовывает ещё с первого взгляда.
По первому впечатлению проект выглядит как сайт, сделанный в стиле на сдержанную подачу контента и простоту.
Не лишним будет отметить, насколько легко ориентироваться по сайту, насколько отзывчивый сайт, и понятно ли, какое у него предназначение.
Что стоит рассмотреть в первую очередь:
Общую концепцию и задачи проекта.
Логичность и удобство интерфейса.
Визуальную подачу и стилистику.
Ценность и свежесть материалов.
Общее впечатление от использования.
По моему восприятию, такие сайты стоит оценивать не только по внешнему оформлению, но и по тому, насколько они помогают пользователю.
Случайно зашёл на сайт pewhiweoiuwegouwegf.space и решил оставить отзыв.
Ресурс сразу бросается в глаза своим запоминающимся названием и цепляет внимание уже на старте.
По первому знакомству проект выглядит как ресурс, построенный на на лаконичную подачу данных и минимализм.
Важно подчеркнуть, насколько понятна навигация, насколько динамичной выглядит работа, и понятно ли, что именно он предлагает.
Что стоит рассмотреть в первую очередь:
Основную концепцию и назначение сайта.
Удобство и понятность интерфейса.
Визуальное оформление.
Практическую пользу и свежесть контента.
Общие ощущения от посещения.
По моему восприятию, такие площадки стоит рассматривать не только по внешности, но и по тому, насколько они справляются с задачами пользователя.
Привіт! Якщо ви втомилися натрапляти на маніпуляції та клікбейт, візьміть собі цю адресу на замітку. piewshiop.space — це каталог, де зібрані найкращі українські медіа: від міських репортажів до фактчекінгу та інтелектуальних дискусій. Користуйтеся каталогом і завжди майте під рукою правдиві новини
Шановні фахівці та аматори в сфері будівництва й ремонту! Багато хто з нас має в закладках безліч корисних сайтів, щоб знайти потрібну інформацію — підказки з основ, дизайнерські рішення, інструкції до пристроїв чи проєктний розрахунок. Але ж можна зробити набагато зручніше.
Веб-сайт klingerlist.space — вже підготовлена збірка якісних українських сайтів для всіх ситуацій, які трапляються під час ремонту чи будівництва:
– проєктування та кошториси;
– реальне будівництво та економія енергії;
– оздоблення приміщень та оригінальні концепції ;
– DIY-ремонт та тестування обладнання;
– специфіка зведення будинків у сільській місцевості.
Збережіть цей ресурс у вибраному — й вам більше не доведеться довго шукати потрібну інформацію.
Привіт, спільното! В епоху фейків та дезінформації просто життєво необхідно користуватися якісними джерелами, а не тонути у фейках та поверхневих новинах. Ось сайт, який стане вам у пригоді — це справжній навігатор світом української журналістики. Там зібрані ресурси з різних регіонів та тематик: від транспортної інфраструктури Львова до академічних досліджень НАНУ. Додайте ресурс до вибраного й будьте в інформаційному полі без фейків на newandlostdpuie.space
Привіт, народ! Як часто буває: шукаєш дієві рекомендації для будівництва чи ремонту, а треба переглянути купу ресурсів, доки натрапиш на справді корисне. Набагато простіше, коли всі перевірені ресурси зібрані в одному місці.
Власне, такий ресурс як ioutubild.space — справжній будівельний навігатор. На одній сторінці зібрані найкращі українськомовні сайти за темами:
– будівельні технології та архітектурні рішення;
– дизайн інтер’єрів та ідеї;
– корисні інструкції для домашніх умільців;
– оздоблення та життєві хитрощі;
– облаштування саду, городу та заміського життя.
Користуйтеся як стартовою сторінкою для пошуку натхнення та робочих інструкцій. Ось посилання: ioutubild.space Додайте до закладок і більше не гайте часу даремно!
Друзі! Якщо ви зводите власну домівку, затіяли ремонт чи просто мрієте про затишок, то проблема часто одна: потрібно збирати дані з різних куточків інтернету. Погодьтеся, це набагато зручніше, коли під рукою одна вичерпна добірка. Саме для цього створено каталог mybudcatalog.space, де зібрані лише перевірені українські ресурси.
На цьому ресурсі ви побачите:
– Корисні лайфхаки для бюджетного будівництва;
– Технології будівництва на всіх етапах — від основи до даху;
– Ідеї для дизайну інтер’єрів;
– Інструкції для майстрів електромонтаж, водопровід, пристрої;
– Лайфхаки для садиби, двору та городу;
– Несподівані підходи.
Одним словом, це ваш особистий путівник світом будівництва та ремонту. Зберігайте посилання собі, додавайте до вибраного та користуйтеся із задоволенням
Автономний цифровий простір, присвячений сучасній культурі, художній творчості, звукам, стилю та нестандартному репортажу. Видання зосереджується на темах, які опиняються поза основною течією: розлогі інтерв’ю з учасниками підпільних рухів, рецензії на експериментальні альбоми, аналізи художніх практик та есеї про трансформацію особистісних наративів. Окрема увага приділяється українському культурному контексту, самодіяльним артистам, стріт-стайлу та рухам, що творять актуальне бачення нашого часу. Пізнавати цей світ ви можете на necatli.space, де публікації об’єднують ґрунтовну аналіз з візуальною поезією, пропонуючи аудиторії не голі факти, а нестандартний погляд розуміння навколишнього.
Доброго дня, любителі готувати! Переглядав перевірені часом портали з рецептами, замість того щоб гортати дивні сторінки? Я створив елементарну річ – зібрав найкращі сайти з рецептами на одній сторінці. Тут і традиційна українська кухня (борщі та пампушки, вареники з різними начинками), так і сучасні страви, а також ресурси для приготування в мультиварці. Кожен сайт супроводжуються описом, зручну фільтрацію за категоріями й зручне відображення на телефонах. Все працює дуже швидко, без зайвої реклами.
Ось власне каталог: kulinarniygid.space – зберігайте собі в закладки. Каталог оновлюється кожного тижня, тому якщо натрапите на якісний портал з рецептами – пишіть у коментарях, додамо. Натхненних вам кулінарних експериментів!
Натрапила на корисний ресурс для тих, хто відстежує за українськими медіа. За адресою pieoiegf.space представлено лаконічний каталог верифікованих медіа.
Каталог не створює власний контент, а слугує незалежного довідника. Домашня сторінка містить короткі описи ряду вітчизняних ресурсів з посиланнями-кнопками на них. Станом на березень 2026 року в каталозі представлені:
– Калуш Сіті – новини Калуша та Прикарпаття (Івано-Франківщина та Калуш): місцеве самоврядування, ЖКГ, події, інтерв’ю для громади.
– НГУ Аналітика – незалежне інформагентство з пріоритетом: політика, економіка, журналістські розслідування.
– IZUM – видання про людей і культуру: соціальні ініціативи, культурні події, історії, що надихають.
– Gelios – погляд на технології: еко-новини, енергоефективність, бізнес-приклади, інноваційні рішення.
Укладач представляє «Медіа_гід» як каталог новинних медіа зі швидким доступом до вітчизняних джерел. У шапці підкреслено, що кожне джерело верифіковане. За візуальним рішенням – просто, стильно, без води.
Тим, хто шукає незалежні медіа України без політичного тиску, цей каталог допоможе швидко знайти кілька якісних варіантів. Підходить тим, хто збирає власну добірку якісних джерел.
Тут представлені провідні українські новинні видання — від місцевих видань до аналітичних порталів.
Тут ви знайдете актуальну інформацію з міст та областей України, професійні огляди, важливі економічні та політичні події.
Зручно для тих, хто шукає надійні джерела, та не хоче витрачати час на пошук.
Переходьте та користуйтеся зручним каталогом новин!
Тут ви знайдете корисні матеріали та рішення для будь-якої ситуації
Ви зможете відкрити для себе практичні поради та унікальні факти з різних галузей
Для пошуку конкретної інформації радимо відвідати owuiehoiwerg.space — сайт пропонує свіжі матеріали та поради
Народ, побачив на свіжий проєкт — каталог нових українських сайтів. Зібрані переважно медіа та тематичні ресурси: наприклад, «Pravdatut» і «Gelios» для оперативних новин, науково-популярний портал («Вісник НАНУ»), окрім того, є «Izum» і «Ідеї для нас» із корисними матеріалами. Спектр широкий: від гаджетів та економіки до навчання, здоров’я та життєвих хитрощів.
Поки що це скромна мінімалістична колекція, ідея правильна. Варто закинути в закладки та час від часу перевіряти.
Ось саме посилання: sloupok.space
Набрів на один ресурс — ououpoh.space. Чесно признатися, важко з першого погляду зрозуміти, під що він заточений. Назва трохи дивна, але інтерфейс мінімалістичний. Наповнення зараз мізерне, виглядає як тестовий проєкт або особистий блог. Відомо, хто це зробив? Розкажіть своє бачення, хто вже стикався
Write more, thats all I have to say. Literally, it seems as though you relied on the video to make your point.
You obviously know what youre talking about, why waste your intelligence on just posting videos
to your blog when you could be giving us something
enlightening to read?
I’m not sure why but this blog is loading very slow for me.
Is anyone else having this issue or is it a problem on my end?
I’ll check back later and see if the problem still exists.
Hi are using WordPress for your site platform? I’m new to the blog world but I’m trying to get started and create my own. Do you require any html coding knowledge to make your own blog?
Any help would be greatly appreciated!
great put up, very informative. I wonder why the other experts of this sector do not realize this.
You should continue your writing. I’m sure,
you have a huge readers’ base already!
Виявила зручний навігатор для тих, хто любить зручний доступ до якісних українських ресурсів. На сайті zboalpor.space розміщено каталог під назвою «news-catalog».
Стартова сторінка має лаконічний дизайн, стилізована під командний рядок — нічого зайвого, тільки суть. Тут знаходиться 5 джерел з короткими позначками тематики:
– ngu.com.ua – незалежне агентство
– izum.ua – культура, історії
– gelios.ua – енергетика та технології
– visnyk-nanu.org.ua – академічна наука
– pravdatut.ua – факти та розслідування
Кожна адреса — активне посилання, досить клацнути, щоб відкрити джерело. Нагорі сторінки сказано, що усі джерела верифіковані, свіжі, незалежні та оперативні. Оновлення — 2026 рік, всі ресурси працюють.
Якщо ви шукаєте оперативний доступ до добірки хороших українських ЗМІ без довгого пошуку, цей каталог збереже ваш час. Буде корисним тими, хто любить простоту і бажає тримати під рукою стислий перелік надійних ресурсів.
Натрапив на цікавий сайт для тих, хто стежить за медіапростором України. За адресою oglyadoviy.space представлено компактний каталог перевірених новинних джерел під назвою «Медіа_гід».
Сайт не створює власний контент, а слугує незалежного навігатора. Домашня сторінка включає лаконічні описи декількох українських видань з прямими посиланнями на них. На березень 2026 року в каталозі перелічені:
– Калуш Сіті – новини Прикарпаття (Калуш та Івано-Франківщина): ЖКГ, події, інтерв’ю, місцеве самоврядування.
– НГУ Analytics – незалежне інформаційне агентство з пріоритетом: політика, економіка, журналістські розслідування.
– IZUM – медіа про людину та культуру: надихаючі історії, соціальні проєкти, культурні події.
– Геліос – технологічний погляд: енергоефективність, інновації, бізнес-кейси, еко-новини.
Творець називає «Медіа Гід» як каталог новинних медіа зі простим доступом до джерел з України. У хедері зазначено, що кожне джерело верифіковане. За візуальним рішенням – мінімалістично, сучасно, без зайвої води.
Якщо ви підшукуєте незалежні новинні сайти України без заангажованості, цей довідник допоможе оперативно підібрати декілька надійних варіантів. Підійде тими, хто формує власний набір перевірених ресурсів.
Нашёл удобный сайт — аккуратный путеводитель надёжных новостных и аналитических медиа Украины. Называется «Медиа-путеводитель». Сайт не претендует на роль СМИ, а просто собирает ссылки на местные и профильные независимые издания.
Сам каталог находится здесь: aeguewquweef.space.
На главной странице представлено несколько ресурсов с лаконичным описанием:
– Идеи для нас — интервью, аналитика, общественная позиция.
– NS-Plus — события Черниговской области и страны (экономика, культура).
– Правда здесь — расследования, правозащита, проверка фактов.
– Взгляд — новости Буковины, политика, спорт, интервью.
– kokl.ua — новости Кировоградщины, местная хроника, расследования.
– EuroFest — культурный портал (фестивали, евроинтеграция, креативные проекты).
Автор пишет, что источники обновляются ежедневно и позиционирует это как «справочник информационных ресурсов Украины со свободным доступом». Сайт выглядит лаконично, со ссылками-кнопками. Если вы ищете региональные или аналитические СМИ без откровенной политической ангажированности, возможно, этот путеводитель сэкономит время на поиск.
Подходит для тех, кто собирает независимые новостные источники по Украине.
Потрібні якісні інформаційні ресурси України? Перейдіть на hiobzor.space – на цьому сайті розміщений актуальний каталог перевірених новинних сайтів. Об’єктивність, оперативність та різноманіття поглядів – головні критерії відбору. У каталозі ви знайдете як регіональні видання (Ізюм, Кривий Ріг, Чернівці), так і всеукраїнські ресурси які спеціалізуються на спецрепортажах, розслідуваннях і думках експертів. Знаходьте перевірені новини на hiobzor.space!
What’s Going down i’m new to this, I stumbled upon this I’ve found It positively helpful and it has
helped me out loads. I hope to contribute & aid different
users like its aided me. Good job.
На форумі нерідко помічаю запитання в дусі “звідки черпаєте інфу?” або “як перетравлювати інформаційний шум”. Особисто я деколи втомлююсь, коли в браузері безліч сайтів, а добра половина з них — сушільне незрозуміле щось. Зовсім випадково натрапив на незвичний ресурс – newsgidcat.space.
Поясню одразу: це не роздутий новинний портал, де вам намагаються прищепити свою точку зору. Це, власне, каталог-гід. Уявіть собі бібліотекаря, який без зайвих слів подає перед вами добірку перевірених джерел, а яку читати — вибирайте вже самі.
У чому фішка
По-перше, це, мінімалізм. Ні реклами на пів екрана, ніяких жовтих заголовків “СЕНСАЦІЯ! ТРАМП ЗНОВУ…”. Тільки білий фон і список посилань. Летить блискавично, навіть тоді, якщо мобільна мережа слабенька.
А по-друге, це своєрідний “батьківський контроль” для себе. Заходиш сюди і вже точно не потрапиш ненароком на якийсь там смітник чи підробну “УП” з підробленим посиланням.
Чесно кажучи, закинув сайт в закладки як відправну точку для ранкової кави. Корисно, коли є бажання швидко подивитись, що пишуть різні видання, не витрачаючи дорогоцінний час на пошуки.
Тому, кому цікаво тримати напоготові компактний список укр новинних ресурсів — рекомендую глянути. Як на мене, штука в господарстві корисна. Усім тиші та тільки перевірених новин!
Всім привіт! Думаю поділитися знахідкою, може кому стане в нагоді. Останнім часом прямо біда помітив, що сон не йде, кручусь до ранку, а вранці відчуваю себе, наче й не спав. Списував на роботу, на дощі, а кохана сказала: “Треба змінимо білизну на якісну, а не цю синтетику з розпродажу”. І тут я пішов в мережу.
Чесно кажучи, вважав, що підбір постільної білизни – це лише “гарний малюнок чи ні”. Виявилося, ціла історія. Тут тобі бязь, і ранфорс, сатин… Я в цих назвах плавав, поки не зайшов на сайт postilnabilyzna.com.
Друзі, це ж джерело знань! Я залип десь годину. Там все як в енциклопедії: чітко розкладені усі матеріали, від бюджетної бязі до преміум сатину та льону. Навіть там є порівняння з порівнянням щільності та того ж, скільки там прань витримує той чи інший матеріал. Це реально допомогло в’їхати, чому якийсь набір коштує умовні 800 грн, а інший — 2500.
З несподіваного для себе зрозумів:
– Виявляється, наші та європейські розміри суттєво відрізняються, і перед замовленням реально озброїтися сантиметром міряти ковдру, а не тупо вірити ярлику «євро».
– Хто б міг подумати, що тепла фланель в спеку — це капець, а сатин насправді охолоджує, тому що в нього плетіння ниток інша.
– Там є поради, як доглядати, щоб принт не зліз після кількох прань. Болісна тема для тих, у кого пральна машинка працює без відпочинку.
В результаті вирішили замовити на пробу сатиновий комплект від українського бренду (підтримав українське). Поки все добре — спимо як немовлята, тканина приємна на дотик, не ковзає й не іскрить.
Словом, якщо ти, як і я, до цього моменту думали, що підодіяльник — це не те, в яку варто вникати, щиро рекомендую зазирнути інформацію на цьому ресурсі. Реально зберігає нерви на вибір та вберігає від покупки неякісної речі. Усім міцного сну!
Підбирав свіжий набір постільної білизни і натрапив на kupiti-postil.com.ua. Замовив комплект із сатину – поки що політ нормальний. Хочу розповісти, який там асортимент.
Які товари є в наявності:
– Бюджетна бязь, сатинова тканина, гіпоалергенний перкаль, лляна тканина, щільний поплін, вдосконалений ранфорс
– Напівторні, двоспальні комплекти, євро та комплекти з двома підковдрами
– Натяжні простирадла
– Подушки 50×70 і 70×70
Плюси, які помітив:
– Пропозиції на будь-який гаманець (від 800 до 4000+ грн)
– Вказують щільність тканини (для бязі 110–145 г/м², для сатину 120–170 г/м²)
– Пишуть про сертифікацію OEKO-TEX – безпечно навіть для чутливої шкіри
– Є сімейні набори з двома підковдрами – зручно для пар
Асортимент:
– Для економії – бязь чи ранфорс (служать 5–7 років)
– Люкс-варіант – сатин або перкаль (вистачає до 10 років)
– Для літа – лляна постіль (охолоджує, але мнеться)
– Для пар – набори з двома ковдрами
Порада від них же: попередньо заміряйте свій матрац і ковдру до оформлення замовлення, оскільки розміри в різних виробників можуть відрізнятися на 5–10 см.
Я собі взяв сатин – комфортний, не збивається. Дружина задоволена. Рекомендую придивитися, якщо потрібна якісна постіль.
А ви що обираєте? Поділіться відгуками
Вибирав новий комплект текстилю для ліжка і натрапив на цей інтернет-магазин. Придбав комплект із сатину – спати дуже комфортно. Ось вирішив поділитися, який там асортимент.
Що пропонують:
– Бюджетна бязь, сатин, гіпоалергенний перкаль, натуральний льон, поплін, ранфорсова тканина
– Напівторні, двоспальні, євро та сімейні комплекти
– Простирадла на гумці
– Подушки 50×70 і 70×70
Переваги, які бачу:
– Є комплекти на будь-який бюджет (від 800 до 4000+ грн)
– Завжди пишуть щільність матеріалу (для бязі 110–145 г/м², для сатину 120–170 г/м²)
– Є маркування OEKO-TEX Standard – це важливо для алергіків
– Є сімейні набори з двома підковдрами – кожен спить під своєю ковдрою
Ось основні категорії:
– Економ-варіант – бязь або ранфорс (вистачає на 5–7 років)
– Люкс-варіант – сатин чи перкаль (прослужать до 10 років)
– Для літа – лляна постіль (дарує прохолоду, але потребує прасування)
– Спільний сон – сімейні комплекти
Там радять: попередньо заміряйте свій матрац і ковдру перед замовленням, оскільки розміри в різних виробників можуть відрізнятися на 5–10 см.
Я замовив сатиновий комплект – ніжний на дотик, добре дихає. Спати одне задоволення. Хто шукає хорошу білизну – зверніть увагу.
Хто що з цього брав? Поділіться відгуками
Довго шукала, у якому магазині знайти постільну білизну, махрові рушники, пледи, аби тканина тішила, шви акуратні, а ціна розумна. Продивилась багато онлайн-магазинів і натрапила на один тямущий проєкт. Тут є все — від класичної бязі до елітного турецького текстилю, присутні й кухонні рушники, серветки, фартухи, а також речі для ванної кімнати. На сайті hometextiles.com.ua доставка по Україні швидка, повернення без проблем, плюс часто трапляються хороші знижки за промокодами.
Вітчизняний онлайн-простір презентує свіжий тематичний проєкт — каталог веб-сайтів, створений для агрегації найрізноманітніші українські сайти.
Новостворений портал акумулює адреси веб-сторінок, що висвітлюють найрізноманітнішу тематику. Каталог включає інформаційні джерела масштабу країни, так і ті, що спеціалізуються на висвітленні подій певних областей.
Головне завдання проєкту — стати універсальним провідником для користувачів, які шукають перевірені українські джерела інформації на будь-яку вподобану тематику: починаючи від оперативних зведень і політикуму до матеріалів з історії, молодіжних питань, лайфстайлу, громадської діяльності та аналітики.
Каталог орієнтований на широку аудиторію та запрошує до партнерства з засобами масової інформації, журналістами та компаніями, що прагнуть реклами, які бажають заявити про себе в вітчизняному медіа-середовищі
Мережевий простір України отримав свіжий тематичний проєкт — збірку інтернет-ресурсів, покликаний об’єднати різнопланові веб-ресурси країни.
Новостворений портал акумулює гіперпосилання на джерела, що висвітлюють чимало різних напрямків. У переліку представлені ресурси як загальнонаціонального рівня, так і ті, що спеціалізуються на розвитку локальних територій.
Місія проєкту — стати універсальним провідником для відвідувачів, які потребують актуальні місцеві медіа на будь-яку вподобану тематику: починаючи від оперативних зведень і політикуму до глибоких історичних досліджень, трендів для молоді, лайфстайлу, правозахисної тематики та публіцистики.
Каталог орієнтований на широку аудиторію та готовий до комунікації з медіа, представниками преси та компаніями, що прагнуть реклами, які прагнуть бути помітними в інформаційному просторі України
Gоoԁ blog you have herе..It’s difficult to find
high quaⅼity writing like yours these dɑys. I really appreciate рeople like you!
Take care!!
My web page – Win188
Askіng qustions are actually pleasаnt thing if you are not սnderstanding sometһing entirely, however thіs paragraph presents
nice understanding yet.
Also visit my site – Koplo77
Good day very nice site!! Guy .. Beautiful .. Superb ..
I’ll bookmark your blog and take the feeds also? I’m satisfied to find so many useful info
here within the publish, we need develop extra strategies on this regard, thanks for sharing.
. . . . .
magnificent publish, very informative. I’m wondering
why the other experts of this sector do not notice this.
You should continue your writing. I am confident, you’ve a
great readers’ base already!
Just signed up with win678bet. The welcome bonus was pretty tempting. Gotta say, I’m liking the variety of slots they have. Time to see if I can actually win! Good luck to me! More info here: win678bet
afgo0o
ICC T-20 World Cup Series has supplied a new delight to the cricket followers everywhere
in the world. After the successful ICC T-20 world cup tournament of 2007,
everyone was anxiously ready for 2009 T-20 collection. However,
the tournament of 2009 held in England did not yield substantial
output. After the unsatisfactory performance of ICC T-20 world cup 2009, all the hopes
are now hooked up within the forthcoming third sequence.
Pingback: Usb Drive With Logo | ---------------------
Pingback: Gaming Computer Desk Case | zaferbalikcilik
Pingback: My Homepage
Pingback: magliette calcio
Pingback: billige fodboldtrøjer
Pingback: montre cartier tank homme replica
Pingback: torchlight led recessed – life is like a tea bag
Pingback: torchlight led exterior – life is like a tea bag
Pingback: buy Trove flux
Pingback: Pecet z klocków Lego, który naprawdę działa - Technogadżet