With that addition of the server that I built last year I’m finding that I’m using my network at home much more than I had in the past. From streaming movies and music around the house, to transferring files both large and small, I’ve grown to be more used to accessing content from the nearest computer. In addition, I’ve found that I often remotely access my home network and server if I need to a get a file or remote manage from outside my home. A huge perk is streaming music to my phone, from my server, no matter where I am.
The issue that has arisen with all these new found uses for my home network is that often times my cable modem has been flakey. If I’m doing a lot at once, like streaming content, and trying to transfer files or download files simultaneously, then I get some lag here and there. Everything on the network slows down to a crawl. I understand that there are limitations based on what the hardware and software can do when heavily tasked. As a home user none of this stuff is especially critical, but since I like to tinker I figured I would investigate ways to improve upon the performance I was seeing.
The first and most glaring issue I ran into was my occasionally flakey internet connection. After doing a little research I noted that the physical condition of the modem seemed to be okay with all connections intact. I did note, however, that the modem did seem to get excessively hot during extended heavier usage. Here is where it gets a little dicey. I’m 99% sure I don’t own the modem. I think I rent it from my cable internet provider. Upon talking to my cable internet provider (the only one available in my area) I was told that its normal for them to get hot and it might affect performance slightly but all I can do is bring the box in and they would exchange it. The person informed me that most likely I needed to just buy a better modem and that would solve my problems.
I did not really like the idea of buying another modem if all I needed to do was tweak something in the one I had. I took the modem apart at that point. Using an IR heat gun I took temperatures of the various chips and areas on the motherboard first during light usage, and then during heavy usage. I noted a couple key areas where as the temperatures rose above a certain point my connection would start to drop. Given this condition I decided to try and cool off the board. The modem is a passively cooled unit with a plastic housing with a series of holes in it. Inside there is a small metal tin which contacts some areas on the board and I believe is supposed to function as a heat sink to dissipate temperatures. I left the top of the case off and temporarily attached a 120mm PC fan I had laying around. I repeated the tests and noted how much cooler the temperatures were. The best part was finding that with a little air cooling my connection was now rock solid, no drops at all. It seemed it was just a cooling issue.
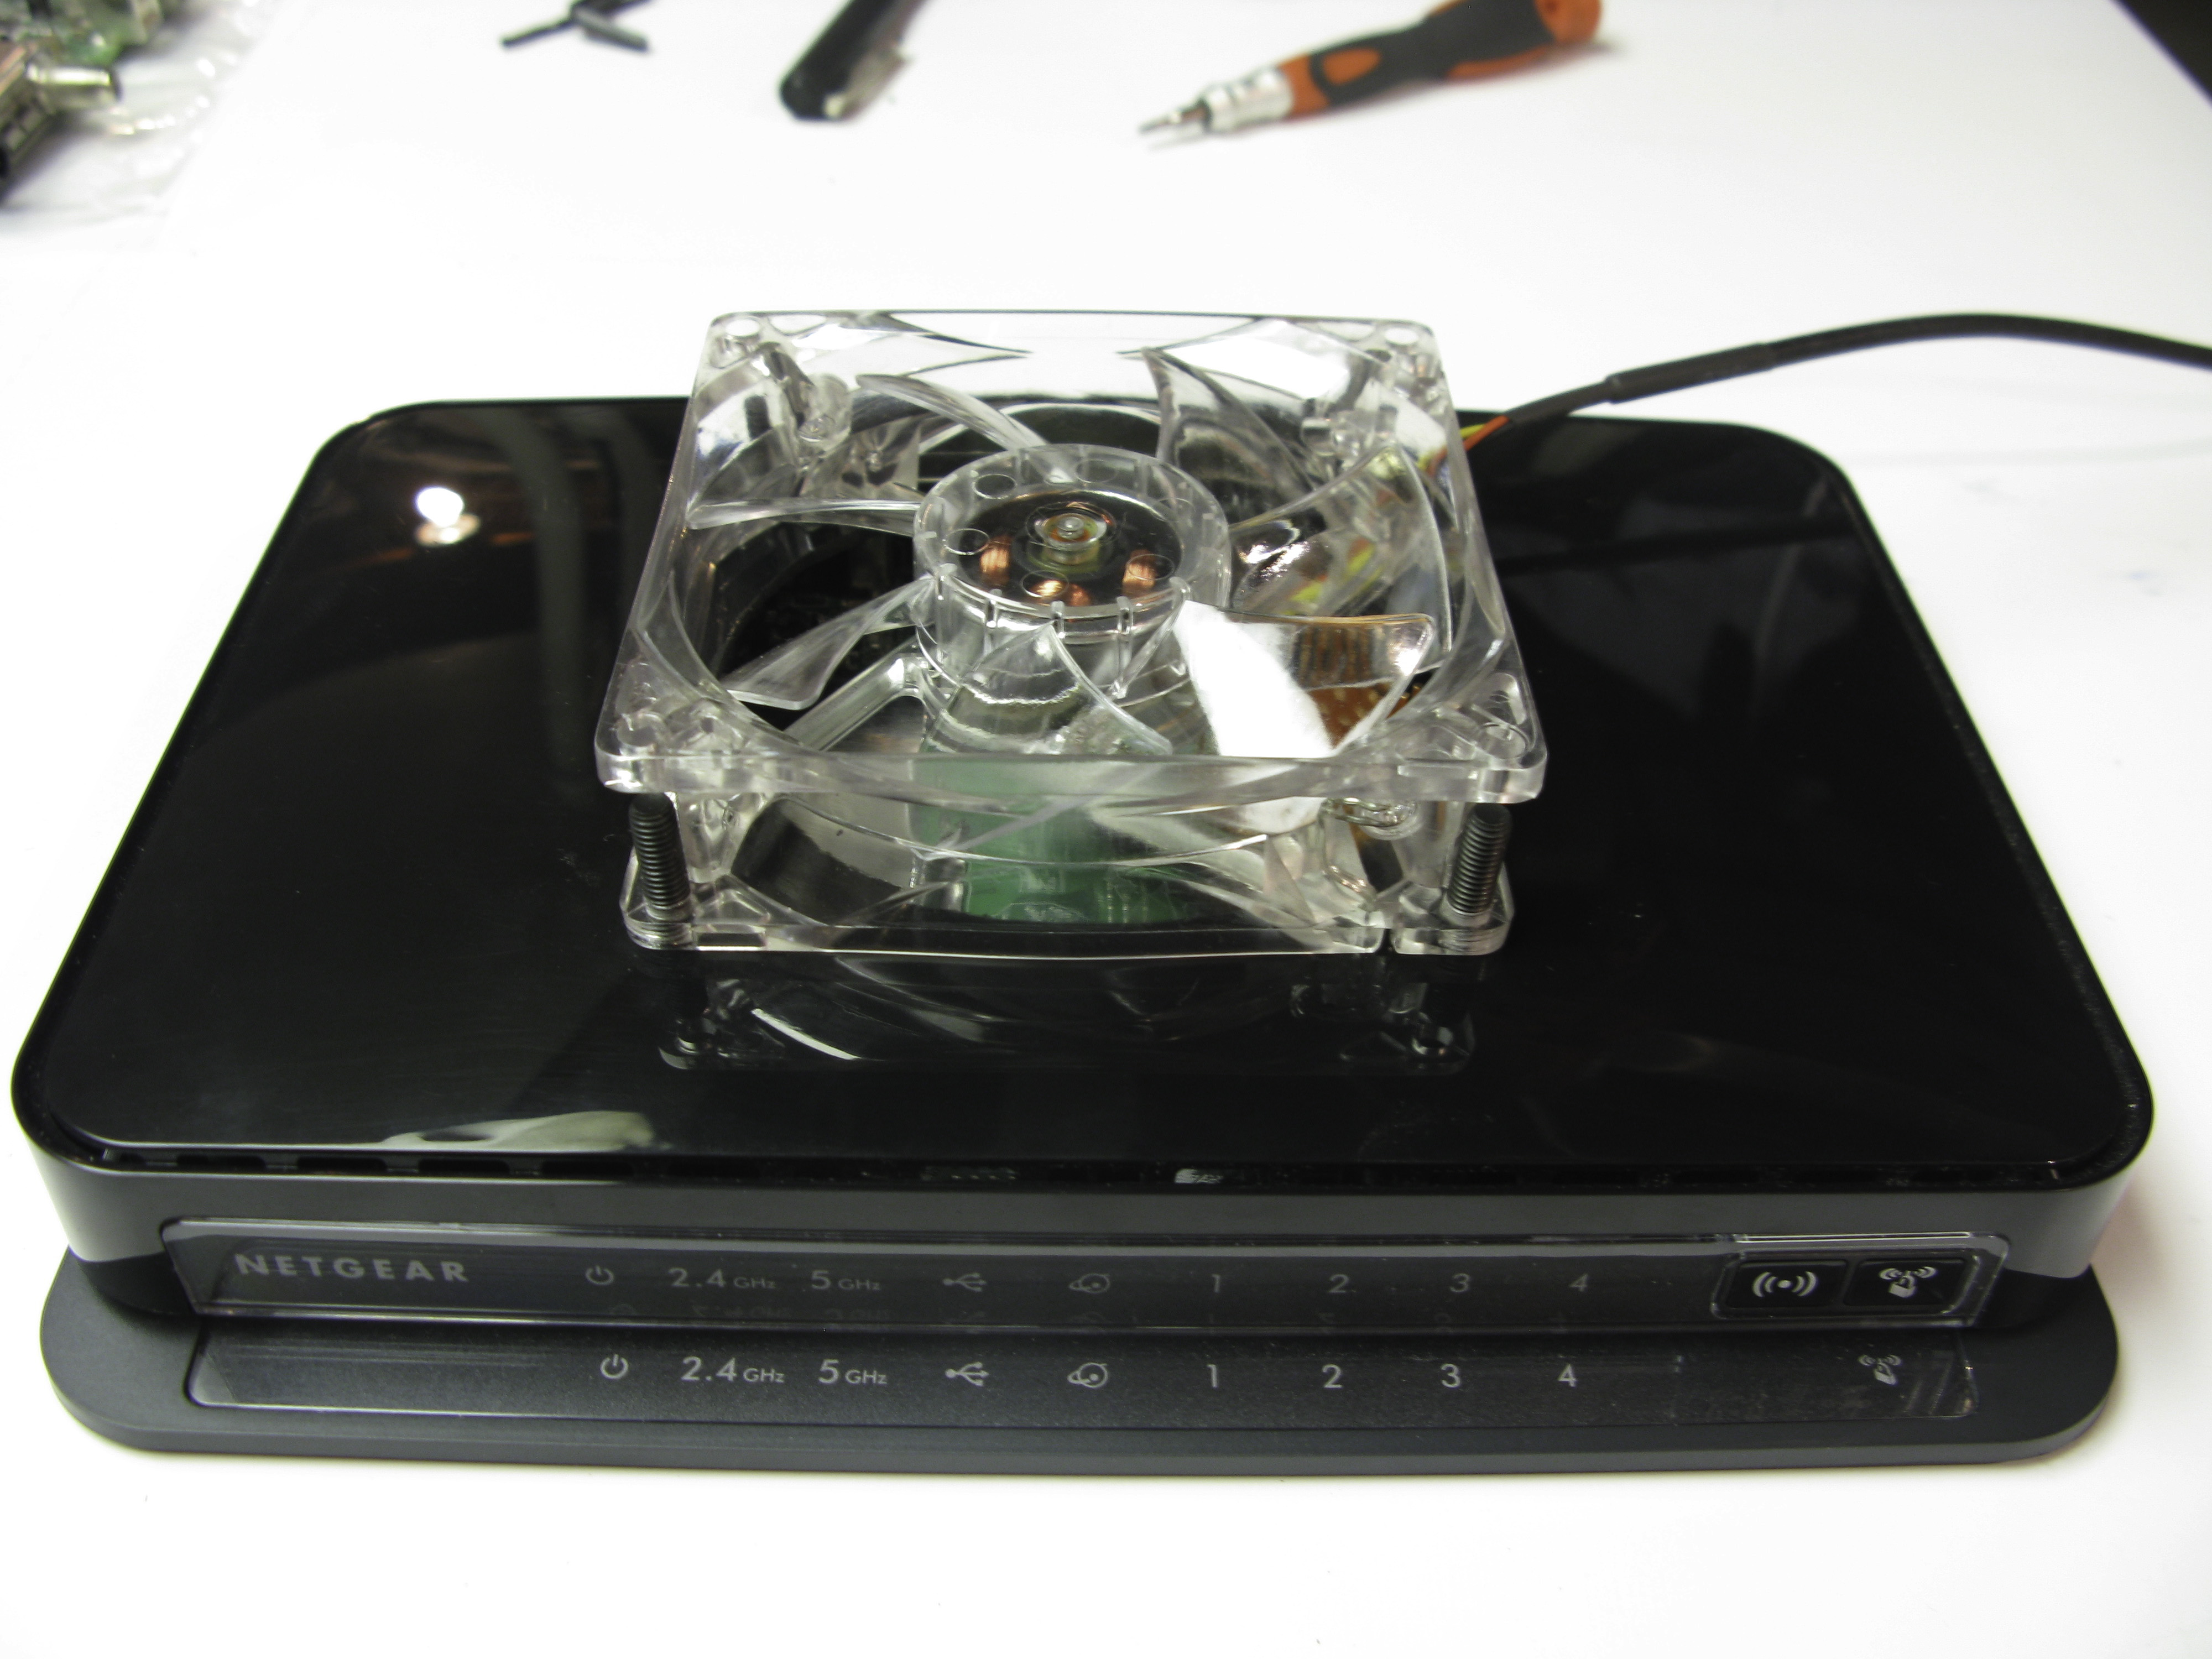
The next area I looked at was my router. I had done some research prior to buying a router as I knew that I wanted something a little more robust to be able to keep up with the demands of my heavier usage. After doing enough research I settled in on buying the NETGEAR WNDR3700 unit. After reading a lot of reviews it seemed like this was one of the best routers out there. I had fairly good luck with the router since I had starting using it. The performance was great and I noticed good transfer speeds across the network as well as minimal issues. I did have some connection issues from time to time following heavy torrent use where I had many connections going at once. Following this I would usually get some dropouts here and there. I also noticed the same issue with heat. The router is also a passively cooled device and uses a plastic case with air vent holes around its perimeter.
I decided to repeat my tests that I had done on the modem with my IR temp gun. I took the router apart and ran the same types of usage tests. I immediately noticed that the same issues arose when temps started to rise beyond a certain level. My connection would slow and become intermittent with heavy enough use. I did some research online and found a myriad of different firmware and upgrade options, but it seemed to me the performance of the unit was fine as long as it did not get too hot. I was also concerned after reading of issues that people were having with some of the latest firmware and did not want to go down that path. I ended up using another 120mm fan and trying to repeat my tests. Unsurprisingly, after adding the fan and cooling everything off my connection again was rock solid with zero stability issues.


At first I was slightly alarmed that my expensive router seemed to be suffering from issues strictly related to heat. As with most electronic components heat is usually the enemy, and stability as well as lifespan can be significantly affected by issues with overheating. The last thing I wanted was to buy another router a year or two from now because the one I had died.
I decided based on my tests and results from cooling the devices that I needed to come up with a more solid setup as far as fan mounting and configuration. Having a couple of fans loosely zip tied to these devices without any covers left on them since I had them apart would not work long term. Not only was I blowing them full of dust, it really just looked shoddy.
To improve looks and efficiency I decided to use a board that I could mount up on the wall. Something I could connect both the modem and router too. I wanted to be able to lay the cables and wiring out cleanly on the board for easy identification and changes if needed as well as make it look a little more polished. I also wanted to add fans to both devices while still keeping them as more sealed units. I wanted the fans to incorporate dust filters for easy cleaning as well as make the devices into positively pressurized cases so that dust was kept to a minimum inside of them. At the same time I would upgrade my network wiring and eliminate the hodgepodge of Cat5 Cat5E and who knows what other kind of cables. I was going to switch to all Cat6 wiring at this point.
My project started with going to a local hardware store and finding an appropriately sized piece of acrylic board suitable for mounting. I found a piece that was big enough in white that I could cut down into the right size and shape. The next step was determining the best possible layout given the wiring routing.
When I got around to the modification of the devices for the fans I hit a stumbling block. I was unsure how to go about mounting a fan to the devices without causing other issues. I deemed that the 120mm fans were too big for what I was doing. After doing some research I came across some relatively quiet 92mm CPU fans that seemed perfect.
At first I was unsure how I wanted to mount the fans. I wanted to get adequate airflow and positively pressurize the cases, but I realized quickly that it was not going to be obtainable without modifying the cases of the devices. I decided at that point to take the plunge and mount each fan directly in the middle of the device on the face of the cases. I would cut holes into the cases and screw the fans directly to them. This would allow me to retain the stock cases and keep them sealed, while allowing the fan mounting in the correct locations for adequate airflow.
I mocked everything up and laid out my fan placement on the devices. I cut the holes in the covers with a Rotozip saw. It was fairly easy to do. Using a relatively steady hand I was able to get two pretty good holes cut right where I wanted them.

I decided to take the cooling at little further than I had initially planned, I am someone who likes to overclock and tinker, so I thought it wouldn’t hurt to add a little extra cooling help. I purchased some solid copper heatsinks with 3M thermal tape on them. Based on my original tests and results I would isolate the hottest components and add these heatsinks to them to help even further.


After getting the heatsinks in position and test fitting the fan and fan mounting screws for clearance, I drilled the holes for the fans and mounted them to the cases.

Based on my initial intentions I had planned to keep the airflow through the cases to positively pressurize the cases in order to minimize dust. On the NETGEAR case this was relatively easy and required no modifications because the air would be able to flow back out the factory-cut, passive cooling holes that surrounded the outside of the case. On the modem this was more difficult because the holes for passive airflow and cooling were on the same side as the fan mount so there was nowhere for air to escape. I decided to use the mounting screws (also used to hold the main portion of the case) and PCB as a small spacer to hold the top of the case off the bottom half. This allowed me to leave a small gap (approximately a quarter inch) in the middle of the case. This ended up working extremely well and allowed air to exit at the perimeter of the case.


I mounted the devices to the acrylic board by using 10/32 screws and drilling and tapping the board. This worked out great. I have successfully drilled and tapped acrylic before and this was no different.

I encountered a small problem when it came to mounting the modem in place. While the router had a back-plate on it designed for a wall mount, the modem was not designed to be wall-mounted. I only had four corners with screws that held the case halves and PCB board together. I decided to use two opposite corners to hold the unit to the board, and the other opposite two screws to hold the unit together. The issue I encountered after I assembled the case halves together was that there would be no way to access the screws inside of the unit to tighten the device down to the board. I solved this problem by drilling out the two corner screw holes on the outside of the case just enough to get an Allen wrench through them. This allowed me to put the screws in place in the corners and put the two halves together, and then to insert the Allen wrench through the outside of the case as a pass-through to tighten the modem to the board.
After getting both units with their fans mounted and in place and then bolted down to the board I was able to then layout the wiring. My main goal was to avoid having a bird’s nest of wires; I wanted something presentable. Secondarily, I wanted the wires attached to the board so I could quickly disconnect and change wires if needed.
With this goal in mind, I purchased some small nylon wire holders and also some 8/32 Allen head screws. I laid out all the wires as I would like them and marked all the positions. Following that I drilled and tapped the holes into the board, and then I was all set.
I had to do a little wiring modification for the power wires for the fans. I purchased a power supply unit that had the correct moldex end for a computer fan and had enough power to safely juice up to 4 fans. In this case I only needed 2. I had removed the moldex ends and extended the wires on each fan in order to mount the board on the wall and use wire covers.
After fixing the wiring I tested everything with power and found that all of my connections seemed solid. I had power going to everything. At that point I was ready to mount it on the wall and run wires to it.
(Picture)
After getting the board mounted to the wall I got all the wires in place. I had purchased two 92mm fan filter housings and filters for a couple of bucks online, so I mounted these to the fans to try and limit the dust intake. At this point everything was wired, configured and ready to go. I plugged everything in and fired up the computers and server.

My first test at this point was to run the same test I had initially and look for new results. It was time to see if all the work I had done had fixed the heat-related problems with my connection.
I repeated the same test as before:
Torrent Linux Live/OS Package (12 gigabytes file, 200 connections, 800kbs down 20kbs up)
Stream Blu-Ray movie from server to PC and finally onto TV (35GB file, VC-1 format)
Run backup of 3 PCs in a row to server (10 gigabytes)
In the past when I ran this sequence the internet connection would drop and I would have to power off and reset the modem and router to get up and running again. I would also have issues with lagging spots in the movie playback.
Following this modification, I can happily say I can perform that same test without any of the prior issues. I no longer have to reset the modem or router anymore following any heavy torrent sessions. I can also watch a movie streamed from the server and go online at the same time without any lags or hang-ups.

In conclusion, it seems that essentially all of my network related issues were nothing more than heat issues. I’m not an IT expert by any means but I do have enough of an understanding of electronics to know that when they overheat that they are more likely to fail. In reality I could have got away with a less elaborate setup, and left the fans zipped tied to the modem and router. Overkill yes, but what’s the point of being a geek if you can’t enjoy playing with your gadgets?